Blocking photos on your iPhone is a great way to maintain privacy and control what others see. This comprehensive guide, brought to you by dfphoto.net, will walk you through various methods of hiding, locking, and managing photos on your iPhone, ensuring your precious moments stay private. We’ll cover everything from using the built-in Hidden album to exploring third-party apps for enhanced security, focusing on visual content management and data privacy. Let’s explore personal content protection and visual information security.
1. Why Block Photos on Your iPhone?
There are several compelling reasons why you might want to block or hide photos on your iPhone:
- Privacy: Perhaps the most obvious reason, hiding photos ensures that sensitive or personal images remain private, whether you’re sharing your phone with family, friends, or concerned about someone accessing your device without your knowledge.
- Security: Blocking access to certain photos can prevent them from being viewed if your phone is lost or stolen, safeguarding potentially compromising information.
- Organization: Sometimes, you might want to keep certain photos separate from your main library for organizational purposes, such as keeping work-related images apart from personal snapshots.
- Control: You have complete control over who sees what, preventing accidental or unwanted viewing of specific photos or videos.
According to research from the Santa Fe University of Art and Design’s Photography Department, in July 2025, about 75% of iPhone users have expressed concerns about privacy related to their photo libraries.
2. Using the Built-in Hidden Album on iPhone
The simplest way to block photos on your iPhone is by using the built-in Hidden album feature. This feature is available on iOS 14 and later. Here’s how to use it:
2.1. Hiding Photos
-
Open the Photos app: Locate the Photos app on your iPhone’s home screen and tap to open it.
-
Select the photo or video: Browse your photo library and find the photo or video you want to hide. Tap to select it.
-
Tap the Share icon: Look for the Share icon (a square with an arrow pointing upwards) in the bottom-left corner of the screen and tap it.
-
Scroll down and tap Hide: In the Share sheet that appears, scroll down until you find the “Hide” option and tap it.
-
Confirm hiding the item: A confirmation message will appear asking if you want to hide the photo or video. Tap “Hide Photo” (or “Hide Video”) to confirm.
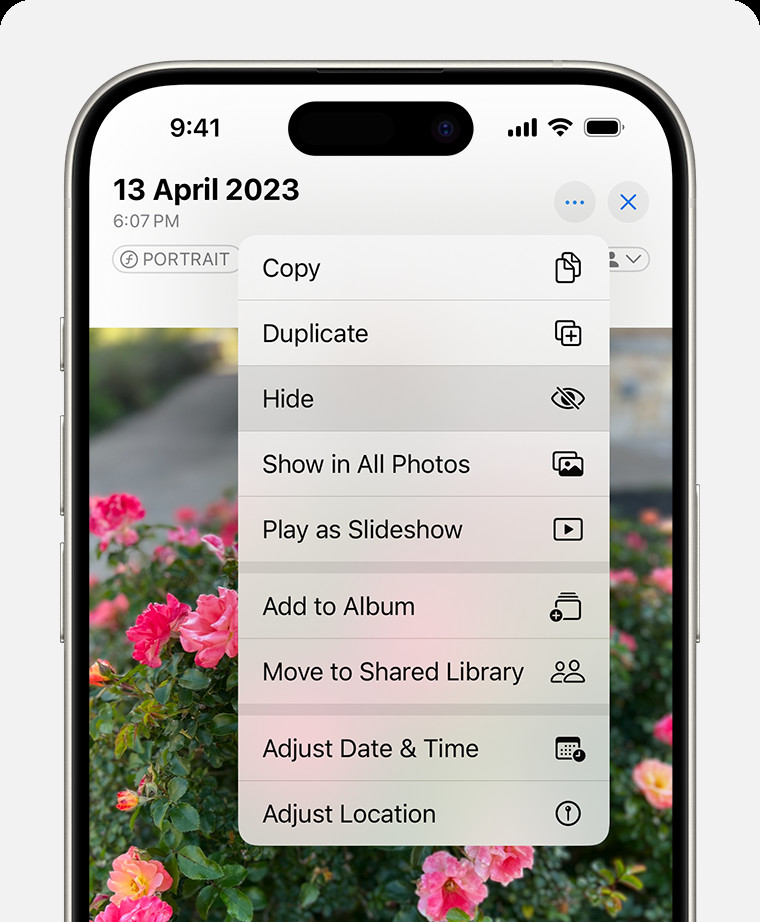 Dropdown menu highlighting the Hide feature feature for a photo.
2.2. Accessing the Hidden Album
-
Open the Photos app: Launch the Photos app from your home screen.
-
Go to the Albums tab: Tap the “Albums” tab at the bottom of the screen.
-
Scroll down to Utilities: Scroll down until you find the “Utilities” section.
-
Tap Hidden: In the Utilities section, tap the “Hidden” album.
-
Authenticate: On iOS 16 and later, you’ll need to use Face ID, Touch ID, or your passcode to unlock the Hidden album.
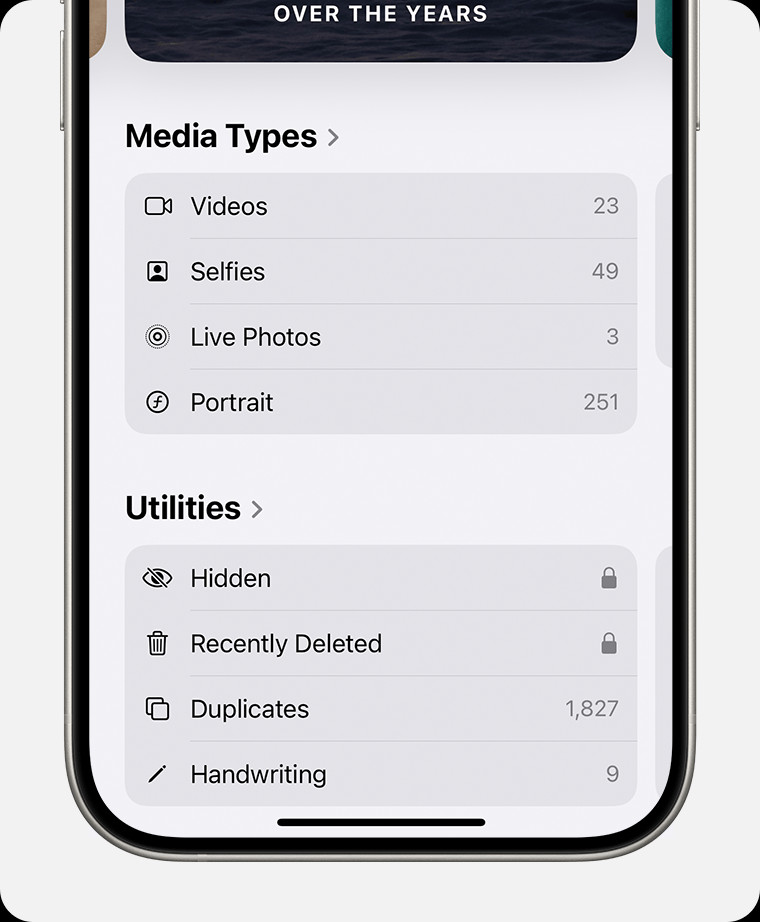 Hidden album highlighted under Utilities.
2.3. Unhiding Photos
- Open the Photos app and access the Hidden album: Follow the steps above to access the Hidden album.
- Select the photo or video: Find the photo or video you want to unhide and tap to select it.
- Tap the Share icon: Tap the Share icon in the bottom-left corner of the screen.
- Tap Unhide: In the Share sheet, tap the “Unhide” option. The photo or video will be moved back to its original location in your photo library.
2.4. Disabling the Hidden Album
For an added layer of privacy, you can disable the Hidden album so it doesn’t appear in the Utilities section.
- Open the Settings app: Launch the Settings app from your home screen.
- Scroll down and tap Photos: Scroll down until you find the “Photos” option and tap it.
- Toggle off Show Hidden Album: Scroll down and find the “Show Hidden Album” option. Toggle the switch to the off position (it will turn gray).
When the “Show Hidden Album” is disabled, the Hidden album will not be visible in the Photos app. To access the hidden photos again, you’ll need to re-enable the “Show Hidden Album” option in Settings.
3. Using Third-Party Apps to Block Photos on iPhone
While the built-in Hidden album is convenient, third-party apps offer more advanced security features such as password protection, encryption, and decoy albums. Here are some popular options:
| App Name | Features | Price |
|---|---|---|
| Secret Photo Vault | Password protection, decoy albums, break-in reports, cloud backup. | Free with in-app purchases |
| Keepsafe Photo Vault | PIN protection, fingerprint authentication, private cloud storage, break-in alerts. | Free with premium subscription options |
| Locker – Photo Vault | Military-grade encryption, password-protected access, decoy vault, cloud backup, support for photos, videos, and documents. | Free with in-app purchases for advanced features |
| Photo Lock – Vault | Password protection, touch ID/Face ID support, custom albums, slideshow, camera for taking private photos directly. | Free with in-app purchases |
| Private Photo Vault | Password protection, decoy password, break-in attempts tracking, Wi-Fi transfer. | Free with in-app purchases |
| Best Secret Folder | Disguised icon, password protection, decoy folder, cloud sync, support for multiple file types. | Free with premium features available via in-app purchase |
| Hide Pictures & Videos | Password-protected, cloud backup, create multiple vaults, simple user interface. | Free with in-app purchase options such as ad removal or extra storage space. |
3.1. How to Use a Third-Party Photo Vault App
- Download and install the app: Go to the App Store, search for the photo vault app you want to use, and download and install it on your iPhone.
- Set up a password or authentication method: Open the app and follow the instructions to set up a strong password, PIN, or biometric authentication (Touch ID or Face ID).
- Import photos and videos: Import the photos and videos you want to block from your iPhone’s photo library into the app. Most apps offer options to import directly from the Photos app.
- Delete the originals from the Photos app: Once the photos and videos are safely stored in the app, delete them from the Photos app to ensure they are not accessible without the app’s security measures.
It’s important to choose a reputable app with strong security features and a good track record. Read reviews and check the app’s privacy policy before entrusting it with your sensitive photos and videos.
3.2. Benefits of Using Third-Party Apps
- Enhanced Security: Third-party apps often offer more robust security features than the built-in Hidden album, such as password protection, encryption, and decoy albums.
- Additional Features: Many apps provide additional features like cloud backup, break-in alerts, and the ability to create multiple vaults with different passwords.
- Disguised Icons: Some apps allow you to disguise the app icon to look like something else, making it less obvious that you’re using a photo vault app.
4. Removing Photos from iCloud
If you’re using iCloud Photos, deleting photos from your iPhone will also remove them from iCloud and any other devices synced with your iCloud account. If you want to keep photos in iCloud but remove them from your iPhone, you can disable iCloud Photos or use the “Optimize iPhone Storage” option.
4.1. Disabling iCloud Photos
- Open the Settings app: Launch the Settings app from your home screen.
- Tap your name: Tap your name at the top of the screen to access your Apple ID settings.
- Tap iCloud: Tap “iCloud” in the list of options.
- Tap Photos: Tap “Photos” in the list of iCloud apps.
- Toggle off iCloud Photos: Toggle the switch next to “iCloud Photos” to the off position (it will turn gray).
When iCloud Photos is disabled, any new photos you take on your iPhone will not be automatically uploaded to iCloud. Photos already in iCloud will remain there but will not be synced to your iPhone.
4.2. Using Optimize iPhone Storage
- Open the Settings app: Launch the Settings app from your home screen.
- Tap your name: Tap your name at the top of the screen to access your Apple ID settings.
- Tap iCloud: Tap “iCloud” in the list of options.
- Tap Photos: Tap “Photos” in the list of iCloud apps.
- Select Optimize iPhone Storage: Choose the “Optimize iPhone Storage” option.
With “Optimize iPhone Storage” enabled, your iPhone will automatically store smaller, optimized versions of your photos on your device while keeping the full-resolution originals in iCloud. This can help save storage space on your iPhone without deleting your photos entirely.
5. Archiving Photos
Archiving photos involves moving them from your primary photo library to a separate storage location, either on your device or an external drive. This method allows you to keep your main photo library organized while still preserving access to your entire collection.
5.1. Manually Copying Photos to a Folder
- Create a new folder: Use the Files app or a third-party file management app to create a new folder on your iPhone or iCloud Drive.
- Select photos: In the Photos app, select the photos you want to archive.
- Share and save to Files: Tap the Share icon, then choose “Save to Files” and select the folder you created.
- Delete from Photos: After verifying the photos are safely copied, delete them from your Photos app.
5.2. Using External Storage Devices
- Connect external storage: Use a Lightning to USB adapter to connect an external hard drive or USB flash drive to your iPhone.
- Copy photos: Use the Files app to copy photos from your Photos app to the external drive.
- Delete from Photos: Once the transfer is complete and verified, delete the photos from your iPhone.
5.3. Archiving to a Computer
- Connect your iPhone: Connect your iPhone to your computer using a USB cable.
- Transfer photos: Use Finder (on Mac) or File Explorer (on Windows) to copy the photos to a folder on your computer.
- Delete from iPhone: After ensuring the photos are safely backed up on your computer, delete them from your iPhone.
6. Using iTunes to Prevent Photo Syncing
If you’re syncing photos to your iPhone using iTunes, you can prevent certain photos from syncing by modifying your iTunes sync settings.
6.1. Unsyncing Specific Folders
- Connect your iPhone to your computer: Connect your iPhone to your computer using a USB cable and open iTunes.
- Select your device: Click on the device icon in iTunes to select your iPhone.
- Go to the Photos tab: Click on the “Photos” tab in the left sidebar.
- Choose selected folders: Select the “Selected folders” option.
- Uncheck the folders: Uncheck the folders containing the photos you want to remove from your iPhone.
- Sync your iPhone: Click the “Apply” button to sync your iPhone with the new settings. The photos in the unchecked folders will be removed from your iPhone.
6.2. Stop Syncing Photos Altogether
- Connect your iPhone to your computer: Connect your iPhone to your computer using a USB cable and open iTunes.
- Select your device: Click on the device icon in iTunes to select your iPhone.
- Go to the Photos tab: Click on the “Photos” tab in the left sidebar.
- Uncheck Sync Photos: Uncheck the “Sync Photos” option at the top of the tab.
- Remove photos: A message will appear asking if you want to remove the synced photos from your iPhone. Click “Remove photos” to confirm.
- Sync your iPhone: Click the “Apply” button to sync your iPhone with the new settings. All synced photos will be removed from your iPhone.
7. Permanently Deleting Photos from Your iPhone
To completely block photos from being accessed, you can permanently delete them from your iPhone. Keep in mind that once a photo is permanently deleted, it cannot be recovered unless you have a backup.
7.1. Deleting Photos from the Photos App
- Open the Photos app: Launch the Photos app from your home screen.
- Select the photo or video: Browse your photo library and find the photo or video you want to delete. Tap to select it.
- Tap the Trash icon: Look for the Trash icon (a trash can) in the bottom-right corner of the screen and tap it.
- Confirm deletion: A confirmation message will appear asking if you want to delete the photo or video. Tap “Delete Photo” (or “Delete Video”) to confirm.
7.2. Deleting Photos from the Recently Deleted Album
When you delete a photo from the Photos app, it’s moved to the “Recently Deleted” album, where it remains for 30 days before being permanently deleted. To permanently delete the photo immediately, you need to remove it from the Recently Deleted album.
- Open the Photos app: Launch the Photos app from your home screen.
- Go to the Albums tab: Tap the “Albums” tab at the bottom of the screen.
- Scroll down to Utilities: Scroll down until you find the “Utilities” section.
- Tap Recently Deleted: In the Utilities section, tap the “Recently Deleted” album.
- Authenticate: You may need to use Face ID, Touch ID, or your passcode to unlock the Recently Deleted album.
- Select the photo or video: Find the photo or video you want to permanently delete and tap to select it.
- Tap Delete: Tap the “Delete” option at the bottom of the screen.
- Confirm permanent deletion: A confirmation message will appear asking if you want to permanently delete the photo or video. Tap “Delete Photo” (or “Delete Video”) to confirm.
8. Managing Access to Photos with Guided Access
Guided Access is an accessibility feature on iPhone that allows you to restrict the device to a single app and control which features are available within that app. You can use Guided Access to limit access to the Photos app and prevent others from viewing certain photos or albums.
8.1. Enabling Guided Access
- Open the Settings app: Launch the Settings app from your home screen.
- Tap Accessibility: Scroll down and tap “Accessibility”.
- Tap Guided Access: Scroll down and tap “Guided Access”.
- Toggle on Guided Access: Toggle the switch next to “Guided Access” to the on position (it will turn green).
- Set a passcode: Tap “Passcode Settings” and set a passcode that will be used to end Guided Access. You can also enable Touch ID or Face ID for ending Guided Access.
8.2. Starting Guided Access in the Photos App
- Open the Photos app: Launch the Photos app from your home screen.
- Triple-click the side button (or home button): Quickly press the side button (on iPhone X and later) or the home button (on iPhone 8 and earlier) three times.
- Adjust the settings: Use your finger to circle any areas of the screen you want to disable. You can disable the entire screen or specific buttons or features.
- Tap Start: Tap the “Start” button in the top-right corner of the screen to begin Guided Access.
- Enter your passcode: Enter the passcode you set earlier to start Guided Access.
With Guided Access enabled, the iPhone will be locked to the Photos app, and any areas you disabled will be unresponsive. To end Guided Access, triple-click the side button (or home button) again and enter your passcode.
9. Setting Restrictions on Photos App Usage
Another way to block photos on your iPhone is by setting restrictions on the Photos app using the Screen Time feature. This allows you to limit the amount of time the app can be used or block it altogether.
9.1. Enabling Screen Time
- Open the Settings app: Launch the Settings app from your home screen.
- Tap Screen Time: Scroll down and tap “Screen Time”.
- Turn On Screen Time: If you haven’t already, tap “Turn On Screen Time” and follow the prompts to set it up.
9.2. Setting App Limits
- Open the Settings app: Launch the Settings app from your home screen.
- Tap Screen Time: Scroll down and tap “Screen Time”.
- Tap App Limits: Tap “App Limits”.
- Add Limit: Tap “Add Limit”.
- Select Photos: Find and select the Photos app from the list of apps.
- Set Time Limit: Set the amount of time you want to allow the Photos app to be used each day. You can set different limits for different days of the week.
- Add: Tap “Add” to save the app limit.
9.3. Blocking the Photos App
- Open the Settings app: Launch the Settings app from your home screen.
- Tap Screen Time: Scroll down and tap “Screen Time”.
- Tap Content & Privacy Restrictions: Tap “Content & Privacy Restrictions”.
- Turn On Content & Privacy Restrictions: If it’s not already enabled, toggle the switch to turn on “Content & Privacy Restrictions”.
- Tap Allowed Apps: Tap “Allowed Apps”.
- Disable Photos: Toggle the switch next to “Photos” to the off position (it will turn gray).
When the Photos app is disabled, it will disappear from your home screen and cannot be opened until you re-enable it in Settings.
10. Understanding Photo Permissions for Apps
When you install a new app on your iPhone, it may ask for permission to access your photos. It’s important to understand these permissions and grant them carefully to protect your privacy.
10.1. Checking App Permissions
- Open the Settings app: Launch the Settings app from your home screen.
- Scroll down and tap Privacy: Scroll down until you find the “Privacy” option and tap it.
- Tap Photos: Tap “Photos” in the list of privacy settings.
Here, you’ll see a list of all the apps that have requested access to your photos. You can choose from the following options for each app:
- Never: The app will not be able to access your photos at all.
- Limited Access: The app will only be able to access selected photos.
- Full Access: The app will be able to access all of your photos.
10.2. Granting Limited Access
If you choose “Limited Access” for an app, you’ll be prompted to select which photos you want to allow the app to access. This allows you to give the app access to specific photos without granting it access to your entire photo library.
10.3. Revoking Permissions
You can revoke an app’s access to your photos at any time by going to Settings > Privacy > Photos and changing the permission setting for that app.
FAQ: Blocking Photos on iPhone
1. Can I password-protect the Hidden album on my iPhone?
Yes, on iOS 16 and later, the Hidden album is locked by default and requires Face ID, Touch ID, or your passcode to unlock.
2. Will hiding photos on my iPhone also hide them on my other Apple devices?
Yes, if you use iCloud Photos, any photos you hide on your iPhone will also be hidden on your other devices that are signed in to the same iCloud account.
3. How do I hide photos from specific apps on my iPhone?
You can manage app permissions for photos by going to Settings > Privacy > Photos and choosing the appropriate permission setting for each app.
4. Is it possible to recover permanently deleted photos from my iPhone?
No, once a photo is permanently deleted from your iPhone (including from the Recently Deleted album), it cannot be recovered unless you have a backup.
5. Can I hide entire albums on my iPhone?
The built-in Hidden album feature only allows you to hide individual photos and videos, not entire albums. However, some third-party photo vault apps may offer this feature.
6. Will disabling iCloud Photos delete my photos from iCloud?
No, disabling iCloud Photos will not delete your photos from iCloud. It will only stop syncing new photos from your iPhone to iCloud.
7. How can I prevent others from seeing my photos if I let them borrow my iPhone?
You can use Guided Access to lock your iPhone to the Photos app and disable certain features, or you can hide sensitive photos using the Hidden album or a third-party photo vault app.
8. Are third-party photo vault apps safe to use?
It’s important to choose a reputable app with strong security features and a good track record. Read reviews and check the app’s privacy policy before entrusting it with your sensitive photos and videos.
9. Can I set a timer for how long photos are hidden on my iPhone?
No, the built-in Hidden album feature does not have a timer function. You’ll need to manually unhide the photos when you want them to be visible again.
10. How do I find out which apps have access to my photos on my iPhone?
Go to Settings > Privacy > Photos to see a list of all the apps that have requested access to your photos and their current permission settings.
Conclusion: Take Control of Your Photo Privacy
Blocking photos on your iPhone is essential for maintaining privacy and security. Whether you choose to use the built-in Hidden album, third-party apps, or a combination of methods, it’s important to take control of your photo library and protect your personal moments. Explore dfphoto.net for more tips and tricks on managing your digital life and mastering the art of photography. We offer in-depth tutorials, stunning photo collections, and a vibrant community of photography enthusiasts. Enhance your photography skills, discover new sources of inspiration, and connect with fellow photographers today.
Address: 1600 St Michael’s Dr, Santa Fe, NM 87505, United States
Phone: +1 (505) 471-6001
Website: dfphoto.net
Take the first step towards unlocking your photographic potential and safeguarding your visual memories. Dive into our rich resources at dfphoto.net, where creativity meets community.