Sending photos via email from your iPhone is a straightforward process, perfect for sharing memories with family, submitting work documents, or simply sending visual information quickly. The iPhone Mail app makes it easy to attach photos, videos, and even documents directly to your emails. Whether you want to attach a recent photo from your library or take a new picture on the spot, this guide will walk you through each method to master How To Attach Photos In Iphone Email.
Attaching Photos, Videos, and Files Directly from Your iPhone
The most common need is to attach photos and videos already saved on your iPhone, or perhaps a document from your Files app. Here’s how to do it seamlessly within the Mail app:
- Open the Mail App: Start by launching the Mail app on your iPhone’s home screen.
- Compose a New Email or Reply: Tap the compose button to start a new email or open an existing email and tap reply.
- Position the Cursor: In the body of your email, tap where you want the attachment to be logically associated within your message. This is important for how the recipient views the email.
- Access the Attachment Toolbar: Look above the keyboard for a toolbar. If it’s collapsed, tap the Expand Toolbar button (it looks like an upward-pointing arrow in a rectangle). Once expanded, you will see several options.
- Tap the Attach File Icon: Find and tap the Attach File button (it’s typically represented by a paperclip icon). This action will present you with different sources for your attachment.
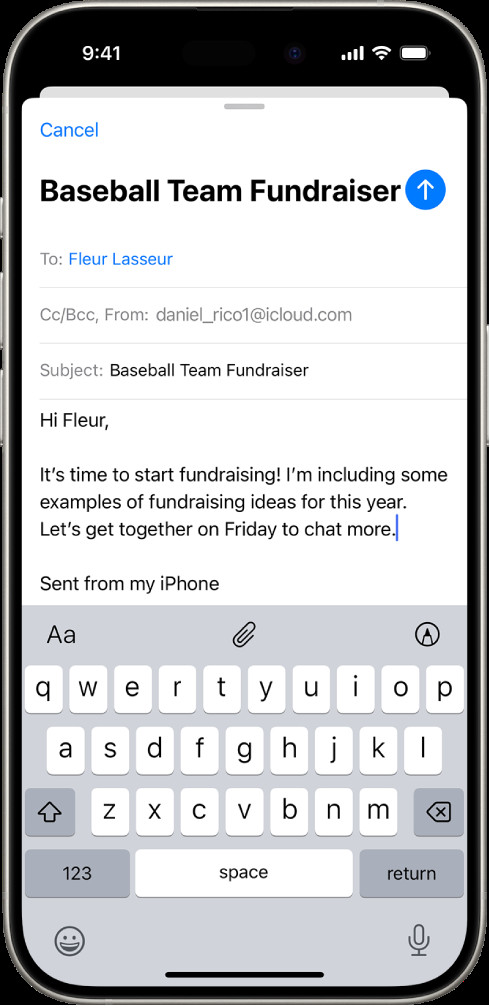 Compose email interface on iPhone with the expanded toolbar showing attachment options above the keyboard.
Attaching Existing Photos and Videos
To attach photos or videos that are already in your Photos app:
- Select the Photo/Video Option: After tapping the Expand Toolbar button, tap the Photo or Video icon (it usually looks like a landscape image).
- Choose from Your Library: Your Photos app will open, allowing you to browse your albums and select the photos or videos you wish to attach. You can tap multiple items to select more than one.
- Confirm Your Selection: Once you’ve chosen your desired photos and videos, tap Done in the top right corner to return to your email draft. The selected files will be attached to your email.
Taking a New Photo or Video to Attach
Sometimes, you need to take a photo or video right then and there to include in your email. The iPhone makes this incredibly convenient:
- Select the Take Photo/Video Option: In the expanded toolbar above the keyboard, tap the Take Photo or Video button (camera icon).
- Capture Your Photo or Video: Your iPhone’s camera will activate. Take your photo or video.
- Use or Retake: After taking the photo or video, you’ll have options:
- Tap Use Photo or Use Video to immediately attach the captured media to your email.
- Tap Retake if you are not satisfied and want to capture it again.
How to Scan and Attach Documents as PDFs
Need to send a physical document? Your iPhone can scan it and attach it as a PDF directly in your email:
- Follow Steps 1-4 Above: Begin by opening the Mail app, composing your email, positioning the cursor, and expanding the toolbar.
- Tap the Scan Document Button: In the expanded toolbar, look for and tap the Scan Document button (it looks like a document with a camera icon).
- Scan Your Document:
- Automatic Capture: Position your iPhone camera over the document. The iPhone will automatically detect the document’s edges and capture the page.
- Manual Capture (if needed): If automatic capture doesn’t work as expected, you can manually tap the shutter button or press a volume button to capture the scan.
- Flash Control: If lighting is an issue, tap the Flash Settings button to turn the flash on or off.
- Review and Save the Scan:
- Retake or Keep Scan: After scanning, tap Retake if you need to rescan the page, or tap Keep Scan if you are satisfied with the scan.
- Scan Additional Pages: If your document has multiple pages, continue scanning each page.
- Save Scans: Once you have scanned all pages, tap Save. The scanned document will be saved as a PDF and attached to your email.
Editing Your Scan
After scanning, you can refine the PDF attachment directly within the Mail app:
- Tap the Scanned Document: Tap on the attached scanned document in your email draft.
- Use Editing Tools: You’ll see a set of editing tools at the bottom:
- Crop: Tap the Crop icon to adjust the borders of the scanned document.
- Filters: Tap the Filters icon to apply different filters to improve readability.
- Rotate: Tap the Rotate icon to rotate the image if it’s oriented incorrectly.
- Delete: Tap the Delete Scan icon if you need to remove the scanned page.
Adding a Personal Touch: Attaching Drawings to Emails
For times when words aren’t enough, or you want to add a quick sketch or annotation, you can create and attach a drawing directly in your email:
- Follow Steps 1-3 Above: Open the Mail app, start your email, and position your cursor.
- Access Markup Toolbar: Tap the Expand Toolbar button above the keyboard, then tap the Markup icon (it looks like a pen tip). This will display the Markup toolbar.
- Create Your Drawing:
- Choose Tools: Select a drawing tool (pen, marker, pencil) and a color from the Markup toolbar.
- Draw: Use your finger or an Apple Pencil to draw directly in the provided drawing area.
- Insert Your Drawing: Once your drawing is complete, tap Done in the top corner, and then tap Insert Drawing. Your drawing will be attached to your email.
Editing an Existing Drawing
Need to tweak your drawing? It’s easy to reopen and edit:
- Tap the Drawing: In your email draft, tap on the drawing attachment.
- Resume Editing: Tap the Markup icon again to reopen the drawing in the Markup editor and continue working on it.
Attaching photos and various files to emails on your iPhone is a versatile feature that enhances your communication. From quickly sharing photos to sending important scanned documents or personalized drawings, the iPhone Mail app provides all the tools you need right at your fingertips. Explore these methods and make the most of your iPhone’s email capabilities.