Sending photos via email on your iPhone is a common task, whether you’re sharing vacation snapshots with family, submitting images for work, or simply wanting to visually communicate with someone. The iPhone Mail app makes it incredibly easy to attach photos, videos, and even documents to your emails. This guide will walk you through all the methods available, ensuring you can effortlessly share your visual content directly from your iPhone.
Attaching Photos and Videos Directly from Your Library
The most straightforward way to attach photos and videos is directly from your iPhone’s photo library. This method is perfect for sharing existing memories or videos you’ve already captured.
- Open the Mail App: Begin by launching the Mail application on your iPhone.
- Compose a New Email or Reply: Start a new email by tapping the compose button, or open an existing email and choose to reply or forward.
- Position the Cursor: In the body of your email, tap where you want to insert the photo or video. This will usually be at the end of your message, but you can place it anywhere within the text.
- Access the Attachment Options: Look for the toolbar above the keyboard. If it’s collapsed, tap the upward-pointing arrow to expand it. Then, tap the photo icon .
- Select Photos or Videos: Your Photos library will appear. Browse through your albums or use the “Recents” album for quick access. Tap on each photo or video you wish to attach. A checkmark will appear on selected items.
- Tap “Done”: Once you’ve chosen all the desired photos and videos, tap “Done” in the top right corner of the screen. The selected media will be attached to your email.
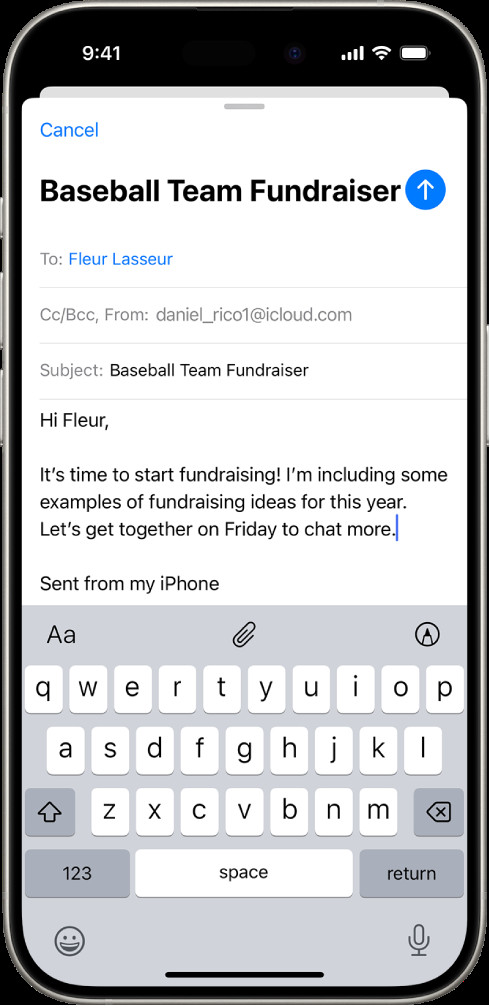 Draft email in progress with attachment options highlighted above the keyboard
Attaching Documents from the Files App
Beyond photos and videos, you can also attach various documents stored in your iPhone’s Files app. This is useful for sending PDFs, Word documents, spreadsheets, and other file types.
- Follow Steps 1-3 above: Open the Mail app, start a new email or reply, and position your cursor.
- Expand Toolbar and Tap Attach File: Tap the expand toolbar button if necessary, and then tap the “Attach File” icon .
- Navigate the Files App: The Files app interface will open. At the bottom, you’ll see options like “Recent,” “Browse,” and “Shared.”
- Recent: Access recently opened files.
- Browse: Explore different locations like iCloud Drive, On My iPhone, and any other cloud storage services connected to your Files app (e.g., Dropbox, Google Drive).
- Shared: Find files shared with you.
- Locate and Select Document: Navigate to the folder where your document is stored and tap on the file to select it. The document will be attached to your email.
Taking a New Photo or Video Directly for Email Attachment
Sometimes, you need to take a picture or video in the moment and immediately attach it to an email. The iPhone Mail app allows you to do this seamlessly.
- Follow Steps 1-3 above: Open Mail, compose or reply, and position your cursor.
- Expand Toolbar and Tap Camera Icon: Expand the toolbar if needed and tap the “Take Photo or Video” icon .
- Capture Photo or Video: Your iPhone’s camera will open. Take a new photo or record a video as needed.
- Use or Retake: After capturing, you’ll have the option to “Use Photo” or “Use Video” to attach it to your email, or “Retake” if you are not satisfied and want to try again. Tap “Use Photo” or “Use Video” to insert it into your message.
Scanning Paper Documents to Email as PDF Attachments
Need to send a physical document? Your iPhone can scan paper documents and attach them as PDFs directly within the Mail app.
- Follow Steps 1-3 above: Open Mail, compose or reply, and position your cursor.
- Expand Toolbar and Tap Scan Document: Expand the toolbar if needed and tap the “Scan Document” icon .
- Scan the Document: Position your iPhone over the document. It will automatically detect the edges and capture the page. You can also manually tap the shutter button or a volume button to capture. Use the flash icon to control the flash if needed.
- Review and Save Scan: Tap “Retake” or “Keep Scan.” For multi-page documents, continue scanning additional pages. Once finished, tap “Save.”
- Edit Scanned Document (Optional): To adjust the scan, tap on the saved scan within your email draft. You can then:
- Crop: Tap the crop icon to adjust the document boundaries.
- Apply Filters: Tap the filter icon to enhance readability.
- Rotate: Tap the rotate icon to change the orientation.
- Delete: Tap the delete icon to remove the scan.
Creating and Attaching Drawings to Emails
For times when words aren’t enough, you can create a quick drawing and attach it to your email to visually explain ideas.
- Follow Steps 1-3 above: Open Mail, compose or reply, and position your cursor.
- Expand Toolbar and Tap Markup: Expand the toolbar if necessary and tap the markup icon to access the drawing tools.
- Create Your Drawing: Choose a drawing tool (pen, marker, pencil) and a color from the Markup toolbar. Use your finger to draw directly in the message area.
- Finish and Insert: Once your drawing is complete, tap “Done,” then tap “Insert Drawing.” Your drawing will be attached to the email.
- Edit Drawing (If Needed): To modify a drawing you’ve already inserted, simply tap on the drawing and then tap the “Insert Drawing” icon to resume editing in the Markup interface.
Troubleshooting Attachment Issues
While attaching photos and files is generally smooth, you might encounter occasional issues. Here are a few things to consider:
- File Size Limits: Email providers often have limits on attachment sizes. If your file is too large, you might see a prompt to use Mail Drop (Apple’s service for sending large files) or need to compress your files. Check your email provider’s specific size limits.
- Internet Connection: A stable internet connection is essential for attaching and sending files, especially large ones. Ensure you have a strong Wi-Fi or cellular data signal.
- App Updates: Make sure your iPhone’s operating system and Mail app are up to date. Software updates often include bug fixes that can resolve attachment issues.
Attaching photos and other files to emails on your iPhone is a versatile feature that enhances your communication. By mastering these methods, you can efficiently share a wide range of content directly from your mobile device.
