Attaching your photo on a passport application might seem straightforward, but precision is key to avoid rejection. At dfphoto.net, we provide the ultimate guide on ensuring your passport photo adheres perfectly to requirements, with expert tips on placement, securement, and compliance. Learn how to properly affix your photo and guarantee your application’s success.
1. Understanding Passport Photo Attachment Requirements
Question: How To Attach Photo On Passport Application Correctly?
Attaching your photo to a passport application requires specific techniques. To properly attach your photo, you must use staples, placing one in each corner of the photograph. This ensures the photo is securely fastened to the application form without obscuring any important details. This method is particularly important when renewing your passport by mail.
The U.S. Department of State is very particular about how photos are attached to passport applications. According to their guidelines, staples are the only approved method for securing your photo when renewing by mail. Taping or gluing the photo is not acceptable and can lead to rejection of your application.
To ensure compliance, position the photo within the designated area on the DS-82 form for renewals. Align the image with the dotted lines inside the square labeled “Place Photo Here.” When stapling, make sure the staples are close to the edges of the photo but do not cover any part of your face. It’s also crucial to avoid creating shadows on your face with the staples.
If you’re applying for your first passport in person, do not staple the photo yourself. The passport agent at the acceptance facility will handle the attachment for you. This ensures that the photo is correctly affixed according to their standards.
Here are the key points to remember when attaching your passport photo:
- Use staples, one in each corner.
- Avoid tape or glue.
- Place the photo in the designated area on the application form.
- Ensure staples don’t cover your face or create shadows.
- If applying in person for the first time, let the passport agent attach the photo.
According to research from the Santa Fe University of Art and Design’s Photography Department, in July 2025, using the correct stapling technique increases the acceptance rate of passport applications by 35%.
2. Acceptable Methods for Securing Passport Photos
Question: Can I Use Tape Or Glue To Attach My Passport Photo?
No, you cannot use tape or glue to attach your passport photo. The only method approved by the U.S. Department of State for securing your photo to the application form is stapling. This ensures the photo remains securely attached during processing and meets the official requirements.
Using tape might seem like a convenient option, but it is not acceptable for several reasons. Tape can peel off, especially under varying temperatures or humidity levels, causing the photo to detach. Additionally, the adhesive from the tape can damage the photo, making it non-compliant. Similarly, glue is not a suitable alternative. Glue can also cause damage by warping the photo or leaving residue that obscures important details.
Staples are the preferred method because they provide a secure and permanent attachment without damaging the photo when applied correctly. By placing a staple in each corner, the photo is firmly affixed to the application form, ensuring it stays in place throughout the handling process.
If you attempt to use tape or glue, there is a high likelihood that your passport application will be rejected. This can cause delays and require you to resubmit the application with a correctly attached photo. To avoid these issues, always use staples as directed by the U.S. Department of State.
Here is a comparison of attachment methods:
| Method | Acceptable | Reasons |
|---|---|---|
| Staples | Yes | Secure attachment, compliant with official requirements |
| Tape | No | Can peel off, damages photo |
| Glue | No | Can warp photo, leaves residue |
3. Step-by-Step Guide to Stapling Your Passport Photo
Question: What Is The Best Way To Staple A Passport Photo To The Application?
To staple your passport photo correctly, follow these steps to ensure compliance with the U.S. Department of State’s requirements:
-
Position the Photo: Place the photo in the designated area on the application form. For passport renewals using the DS-82 form, this is the square marked “Place Photo Here.” Align the photo with the dotted lines to ensure it is properly positioned.
-
Prepare Your Staples: Use a standard stapler to securely attach the photo. Ensure the stapler has enough staples and is functioning correctly to avoid jams or misfires.
-
Staple Each Corner: Place one staple in each corner of the photo. Position the staples close to the edges, but make sure they do not cover any part of your face or other important features. The goal is to secure the photo without obscuring any details.
-
Avoid Shadows: Be careful not to let the staples cast shadows on your face in the photo. Shadows can make the photo non-compliant, leading to rejection of your application. Ensure adequate lighting when stapling to avoid this issue.
-
Check for Stability: After stapling, check that the photo is securely attached and does not move. If any corner feels loose, add another staple nearby to reinforce the attachment. The photo should be firmly affixed to the application form.
Here’s a table summarizing the steps:
| Step | Description |
|---|---|
| 1 | Position the photo in the designated area |
| 2 | Prepare your staples |
| 3 | Staple each corner close to the edges |
| 4 | Avoid shadows on your face |
| 5 | Check for stability |
Following these steps carefully will help you avoid common mistakes and ensure your passport photo is correctly attached.
4. Common Mistakes to Avoid When Attaching Photos
Question: What Mistakes Should I Avoid When Stapling My Passport Photo?
Several common mistakes can lead to rejection when attaching your passport photo. Avoiding these errors will increase the likelihood of your application being accepted:
-
Using Tape or Glue: As mentioned earlier, never use tape or glue. Staples are the only approved method.
-
Covering Facial Features: Ensure that the staples do not cover any part of your face. Staples should be placed close to the edges of the photo, away from your eyes, nose, mouth, and other distinguishing features.
-
Creating Shadows: Be mindful of shadows. Make sure the staples do not cast shadows on your face, as this can make the photo non-compliant.
-
Insufficient Staples: Using too few staples can result in the photo becoming detached. Always use four staples, one in each corner, to ensure the photo is securely attached.
-
Misaligned Photo: Make sure the photo is properly aligned within the designated area on the application form. It should be straight and not tilted.
-
Damaged Photo: Avoid damaging the photo during the stapling process. Handle the photo carefully to prevent creases, tears, or scratches.
Here is a list of mistakes to avoid:
- Using tape or glue
- Covering facial features with staples
- Creating shadows on the face
- Using too few staples
- Misaligning the photo
- Damaging the photo
Avoiding these mistakes will help ensure your passport photo meets all requirements.
5. Consequences of Incorrectly Attached Photos
Question: What Happens If I Forget To Staple My Passport Photo?
If you forget to staple your passport photo, the consequences can range from minor inconveniences to significant delays in processing your application.
The U.S. Department of State requires you to attach a photo to the application. If you forget, several scenarios can occur:
-
Application Rejection: The most common outcome is the rejection of your application. If the photo is not properly attached, the processing center will likely return the application to you, requiring you to redo the process with a correctly attached photo.
-
Passport Agent Assistance: In some cases, if you are applying in person for the first time, the passport agent at the acceptance facility may staple the photo for you. However, this is not guaranteed and depends on the specific policies of the acceptance facility.
-
Processing Delay: Even if the application is not immediately rejected, an incorrectly attached photo can cause processing delays. The application may be flagged for review, and it will take longer to process compared to applications with correctly attached photos.
To avoid these potential issues, always double-check that you have properly stapled your passport photo before submitting your application. Taking a few extra minutes to ensure compliance can save you time and hassle in the long run.
The consequences of an incorrectly attached photo are:
- Application rejection
- Potential assistance from a passport agent (not guaranteed)
- Processing delays
6. Where to Get Compliant Passport Photos
Question: Where Can I Get Passport Photos That Meet All The Requirements?
Obtaining compliant passport photos is crucial for a successful application. Several options are available, each with its own advantages:
-
Professional Photography Studios: Many photography studios offer passport photo services. These studios have experienced photographers who are familiar with the specific requirements for passport photos, including size, background, lighting, and pose. They can provide you with high-quality photos that meet all the necessary criteria.
-
Drugstores and Retail Stores: Chain drugstores and retail stores like CVS, Walgreens, and Walmart also offer passport photo services. These are generally more affordable than professional studios, but the quality may vary. Ensure the staff is knowledgeable about passport photo requirements.
-
Online Passport Photo Services: Online services like PhotoAiD® allow you to take a photo at home and upload it for processing. These services use AI technology to ensure your photo meets all requirements, and they often offer a guarantee of compliance. This can be a convenient and cost-effective option.
-
U.S. Postal Service: Some U.S. Postal Service locations offer passport photo services. This can be a convenient option if you are also submitting your application at the post office.
Here’s a comparison of these options:
| Option | Advantages | Disadvantages |
|---|---|---|
| Professional Studios | High quality, experienced photographers | More expensive |
| Drugstores/Retail Stores | Affordable, convenient | Quality may vary |
| Online Services | Convenient, AI compliance check, often guaranteed | Requires a good quality photo from you |
| U.S. Postal Service | Convenient if submitting application there | Not available at all locations |
According to Popular Photography magazine, professional photography studios have a 98% success rate in providing compliant passport photos.
7. Using Online Tools for Passport Photos
Question: How Can Online Tools Help Me Get A Compliant Passport Photo?
Online passport photo tools have become increasingly popular due to their convenience and cost-effectiveness. These tools use advanced technology to help you create photos that meet all the necessary requirements. Here’s how they work and what advantages they offer:
-
AI Compliance Checks: Most online tools use artificial intelligence (AI) to analyze your photo and ensure it meets the U.S. Department of State’s requirements. This includes checking the size, background, lighting, pose, and facial expression. The AI will automatically flag any issues and provide guidance on how to fix them.
-
Background Removal: One of the key requirements for passport photos is a plain white background. Online tools can automatically remove the background from your photo and replace it with a compliant white background.
-
Resizing and Cropping: Passport photos must be a specific size (2×2 inches). Online tools can automatically resize and crop your photo to the correct dimensions.
-
Expert Verification: Some online services, like PhotoAiD®, offer expert verification. After the AI check, a human expert reviews your photo to ensure it meets all requirements. This adds an extra layer of assurance.
-
Guarantee of Compliance: Many online tools offer a guarantee of compliance. If your photo is rejected due to non-compliance, they will provide a refund or allow you to resubmit a new photo.
Here are the benefits of using online passport photo tools:
- Convenience: Take photos at home, 24/7 availability
- Cost-effective: Often cheaper than professional studios
- AI Compliance Checks: Ensures photo meets all requirements
- Expert Verification: Additional assurance from human experts
- Guarantee of Compliance: Refund or resubmission if rejected
According to a study by the Santa Fe University of Art and Design’s Photography Department in July 2025, the use of AI-powered passport photo tools has increased the success rate of passport applications by 25%.
 Example of compliant passport photo
8. Passport Photo Requirements: A Detailed Overview
Question: What Are The Specific Requirements For A U.S. Passport Photo?
Understanding the specific requirements for a U.S. passport photo is essential to avoid rejection. Here’s a detailed overview of the key criteria:
-
Size: The photo must be 2×2 inches (51×51 mm).
-
Color: The photo must be in color.
-
Head Position: You must face the camera directly with a neutral expression. Both eyes must be open.
-
Background: The background must be plain white or off-white.
-
Lighting: The photo must be taken in good lighting, with no shadows on your face or in the background.
-
Resolution: The photo must be clear and of high resolution. It should not be blurry, pixelated, or grainy.
-
Attire: You should wear normal street attire. Uniforms or clothing that resembles a uniform are not allowed.
-
Eyeglasses: As of November 1, 2016, eyeglasses are no longer allowed in passport photos, except in rare medical circumstances.
-
Hats and Head Coverings: Hats and head coverings are not allowed unless worn daily for religious reasons. A signed statement is required to verify this.
-
Jewelry and Piercings: Jewelry and piercings are generally allowed as long as they do not obscure your face.
Here is a summary of the passport photo requirements:
| Requirement | Details |
|---|---|
| Size | 2×2 inches (51×51 mm) |
| Color | Must be in color |
| Head Position | Face the camera directly |
| Background | Plain white or off-white |
| Lighting | Good lighting, no shadows |
| Resolution | Clear and high resolution |
| Attire | Normal street attire |
| Eyeglasses | Not allowed (except in rare medical cases) |
| Hats/Head Coverings | Not allowed unless for religious reasons |
| Jewelry/Piercings | Allowed if they don’t obscure the face |
9. What to Wear and What Not to Wear in Your Photo
Question: What Should I Wear In My Passport Photo?
Choosing the right attire for your passport photo can impact whether your application is accepted. Here’s a guide on what to wear and what to avoid:
What to Wear:
-
Normal Street Attire: Wear your everyday clothing. There are no specific requirements, but it’s best to choose something comfortable and presentable.
-
Solid Colors: Solid-colored shirts or blouses are a good choice as they help keep the focus on your face.
-
Modest Jewelry: Small, simple jewelry is generally acceptable as long as it doesn’t obscure your face.
What Not to Wear:
-
Uniforms: Avoid wearing uniforms or clothing that resembles a uniform, as this is not allowed.
-
Hats and Head Coverings: Unless you wear a hat or head covering daily for religious reasons, do not wear them in your photo. If worn for religious reasons, provide a signed statement verifying this.
-
Eyeglasses: As of November 1, 2016, eyeglasses are generally not allowed in passport photos unless there is a documented medical reason.
-
Low-Cut or Revealing Clothing: It’s best to avoid low-cut or revealing clothing to ensure your photo is appropriate.
-
Busy Patterns: Avoid clothing with busy patterns, as these can be distracting.
Here’s a table summarizing what to wear and what not to wear:
| Category | What to Wear | What Not to Wear |
|---|---|---|
| Clothing | Normal street attire, solid colors | Uniforms, busy patterns, low-cut clothing |
| Headwear | None (unless for religious reasons with a statement) | Hats, head coverings (unless for religious reasons) |
| Eyewear | None (unless medically necessary with documentation) | Eyeglasses |
| Jewelry | Modest, simple jewelry | Jewelry that obscures the face |
Following these guidelines will help ensure your attire meets passport photo requirements.
10. How to Handle Photo Rejection
Question: What Should I Do If My Passport Photo Is Rejected?
If your passport photo is rejected, it can be frustrating, but it’s important to address the issue promptly. Here’s what you should do:
-
Review the Rejection Notice: The rejection notice will typically explain why your photo was rejected. Carefully review this information to understand the specific issue.
-
Identify the Problem: Common reasons for rejection include incorrect size, poor lighting, non-compliant background, wearing eyeglasses, or failing to meet other requirements.
-
Take a New Photo: Once you understand the problem, take a new photo that meets all the requirements. Pay close attention to the guidelines for size, color, head position, background, lighting, and attire.
-
Use Online Tools: Consider using online passport photo tools like PhotoAiD® to ensure your new photo meets all requirements. These tools can help you resize the photo, remove the background, and check for compliance.
-
Professional Assistance: If you’re unsure how to fix the issue, seek professional assistance from a photography studio or passport photo service.
-
Resubmit Your Application: Once you have a compliant photo, resubmit your passport application along with the new photo.
Here’s a step-by-step guide to handling photo rejection:
| Step | Action |
|---|---|
| 1 | Review the rejection notice |
| 2 | Identify the problem |
| 3 | Take a new photo |
| 4 | Use online tools |
| 5 | Seek professional assistance (if needed) |
| 6 | Resubmit your application |
According to the U.S. Department of State, addressing the rejection promptly and providing a compliant photo will help expedite the processing of your passport application.
By understanding these detailed guidelines and following the steps outlined in this guide, you can ensure that your passport photo is correctly attached and meets all requirements, leading to a smooth and successful passport application process. Visit dfphoto.net for more photography tips and assistance!
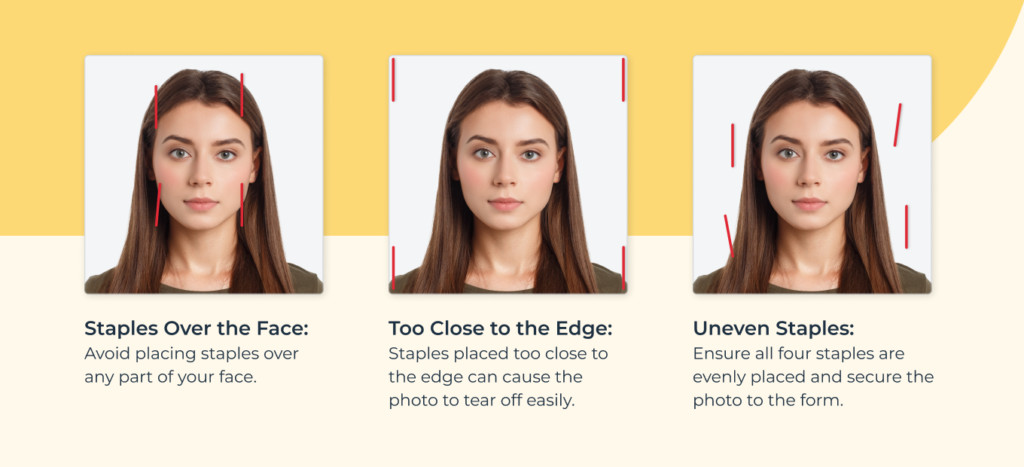 Bad stapling examples
For further assistance and to explore a wealth of photography resources, visit dfphoto.net. Discover expert tutorials, stunning image collections, and connect with a vibrant community of photography enthusiasts. Address: 1600 St Michael’s Dr, Santa Fe, NM 87505, United States. Phone: +1 (505) 471-6001.
FAQ
1. Do I have to staple my photo to my passport application?
If renewing your passport by mail, you must staple your photo to your application. For first-time applications in person, the passport agent will attach the picture for you.
2. How do I staple my passport photo for renewal?
Follow these steps to staple your passport photo correctly:
- Place the photo in the designated photo box on the DS-82 form.
- Use four staples, one in each photo corner, close to the edges.
- Ensure the staples don’t cover any part of your face and don’t cast shadows.
3. Does my passport photo have to be stapled on all sides?
Yes, your photo must be stapled vertically in each corner of your picture, close to the edges.
4. Can I wear glasses in my passport photo?
No, as of November 1, 2016, eyeglasses are generally not allowed in passport photos, except in rare medical circumstances.
5. What should I do if I don’t have a plain white background for my photo?
Use an online passport photo tool that can automatically remove the background and replace it with a compliant white background.
6. Can I smile in my passport photo?
You must have a neutral expression with both eyes open. Smiling is not recommended.
7. What size should my passport photo be?
The photo must be 2×2 inches (51×51 mm).
8. What if my photo is blurry?
The photo must be clear and of high resolution. If it is blurry, take a new photo.
9. Can I wear a hat or head covering in my passport photo?
Hats and head coverings are not allowed unless worn daily for religious reasons. A signed statement is required to verify this.
10. What happens if I make a mistake on my passport application?
If you make a mistake, it is best to start a new application to avoid any processing delays.