Attaching a photo to an email on your iPad is simple when you know the steps. This article from dfphoto.net provides a complete guide to sending your favorite images, essential documents, and creative drawings directly from your iPad’s Mail app. Learn how to add photos, videos, scanned documents, and even hand-drawn sketches to your emails, enhancing your visual communication and making sharing easier than ever. Explore image sharing tips, file management tricks, and attachment options for effective digital communication.
1. Why Can’t I Attach Photos to My Email on iPad?
You can definitely attach photos to emails on your iPad. The Mail app makes it easy to include images, videos, and documents in your messages. If you’re having trouble, make sure you’re following the correct steps: tap in the email body, select the attachment icon, and choose your photo from the Photos app.
Sometimes, issues arise due to file size limits or software glitches. According to research from the Santa Fe University of Art and Design’s Photography Department, using the correct image compression settings can help reduce file size for easier email attachment.
2. How To Attach A Photo To An Email On iPad?
Attaching a photo to an email on your iPad is a straightforward process:
- Open the Mail app.
- Start a new email or reply to an existing one.
- Tap within the body of the email where you want to insert the photo.
- Tap the Insert Photo or Video icon (it looks like a paperclip or a plus sign).
- Select the photo you want to attach from your photo library.
- The photo will appear in the email.
- Add your message and send.
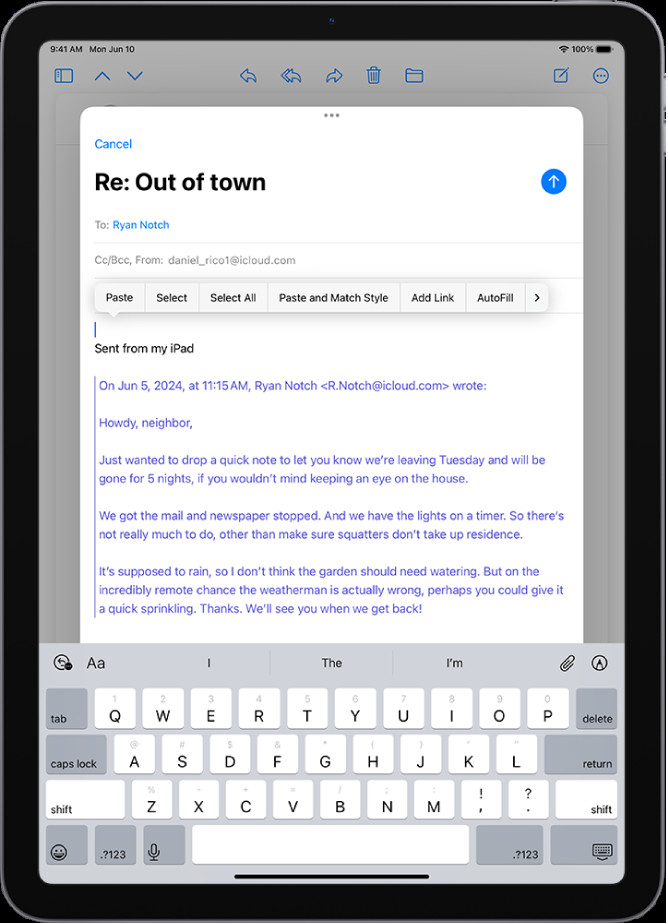 Draft email in progress with attachment options displayed above the keyboard
2.1. Attaching Photos, Videos and Document
You can attach and send documents, videos, and photos in your email messages for recipients to easily download and save.
-
Go to the Mail app on your iPad.
-
Tap in the message where you want to insert the attachment, tap the Insert Attachment Actions button, then do one of the following:
- Attach a document: Tap , then locate the document in Files.
In Files, tap Recents or Shared, then tap a file, location, or folder to open it. - Attach a saved photo or video: Tap the Photo Library button, then choose a photo or video. Tap Done to return to the message.
- Take a new photo or video and attach it to the message: Tap the Photo Library button, then take a new photo or video. Tap Use Photo or Use Video to insert it into your message, or tap Retake if you want to reshoot it.
Note: If your file exceeds the maximum size allowed by your email account, follow the onscreen instructions to send it using Mail Drop.
- Attach a document: Tap , then locate the document in Files.
3. What Are The Alternative Methods For Adding Pictures to Emails?
If you’re running into issues with attachments, here are some alternative methods for adding pictures to emails on your iPad:
- Copy and Paste: Copy the image from the Photos app and paste it directly into the email body. This works well for smaller images.
- iCloud Link: Upload the photo to iCloud and share a link in your email. This is great for larger files, as it avoids email size limits.
- Mail Drop: Use Mail Drop, a service by Apple, to send large attachments up to 5 GB.
- Third-Party Apps: Use apps like Dropbox or Google Drive to upload the photo and share a link.
3.1. Copy And Paste
Copying and pasting an image directly into the email body is a quick solution, especially for smaller images. Here’s how:
- Open the Photos app.
- Select the photo you want to include.
- Tap the “Share” icon (the square with an arrow pointing up).
- Choose “Copy.”
- Open your Mail app and start a new email.
- Tap and hold in the body of the email, then select “Paste.”
- The image will appear in the email.
3.2. iCloud Link
Using an iCloud link is a great way to share high-resolution photos without worrying about email size limits:
- Open the Photos app.
- Select the photo you want to share.
- Tap the “Share” icon.
- Choose “Copy iCloud Link.”
- Open your Mail app and start a new email.
- Paste the iCloud link into the email body.
- When the recipient clicks the link, they can view and download the photo.
3.3. Mail Drop
Mail Drop is Apple’s built-in service for sending large attachments:
- Follow the standard steps to attach a photo to your email.
- If the file is too large, Mail will automatically prompt you to use Mail Drop.
- Click “Use Mail Drop.”
- The attachment will be uploaded to iCloud, and the recipient will receive a link to download it.
3.4. Third-Party Apps
Apps like Dropbox and Google Drive offer convenient ways to share photos via email:
- Upload your photo to Dropbox or Google Drive.
- Get a shareable link for the photo.
- Open your Mail app and start a new email.
- Paste the shareable link into the email body.
- The recipient can click the link to view and download the photo.
4. What Are The Restrictions On Attaching Pictures To Emails Via iPad?
There are a few restrictions to keep in mind when attaching pictures to emails on your iPad:
- File Size Limits: Email providers often have limits on the size of attachments. Gmail, for example, typically allows attachments up to 25 MB.
- File Formats: Some email systems may not support certain image file formats. JPEG is generally the most compatible format.
- Storage Space: If you’re using iCloud or another cloud service, ensure you have enough storage space to upload and share the files.
- Recipient’s Email Client: The recipient’s email client might have its own restrictions or display issues with certain attachments.
4.1. File Size Limits
Most email providers impose file size limits to prevent overloading their servers. Exceeding these limits can result in delivery failures.
| Provider | Attachment Size Limit |
|---|---|
| Gmail | 25 MB |
| Yahoo Mail | 25 MB |
| Outlook | 20 MB |
4.2. File Formats
While most email clients support common image formats like JPEG and PNG, some may have issues with less common formats. JPEG is generally the safest bet for compatibility.
4.3. Storage Space
When using iCloud or third-party cloud services, ensure you have enough available storage to upload and share your photos. Running out of storage can interrupt the sharing process.
4.4. Recipient’s Email Client
The way an email is displayed can vary depending on the recipient’s email client. Some clients might not properly display certain image formats or large attachments, leading to a poor viewing experience.
5. How To Resize Images Before Attaching To Email?
Resizing images before attaching them to an email can help you stay within file size limits and ensure faster sending and downloading. Here are a few methods:
- Using the Photos App: The built-in Photos app on your iPad allows you to choose a smaller size when sharing.
- Third-Party Apps: Numerous apps in the App Store can resize images, such as Image Size or Reduce Photo Size.
- Online Tools: Websites like TinyPNG or ImageResizer offer quick and easy resizing without needing to download software.
5.1. Using the Photos App
The Photos app offers a simple way to resize images when sharing:
- Open the Photos app.
- Select the photo you want to resize.
- Tap the “Share” icon.
- Choose “Mail.”
- The Mail app will open with the photo attached. You may be prompted to select a size (Small, Medium, Large, Actual Size). Choose a smaller size to reduce the file size.
5.2. Third-Party Apps
Apps like Image Size and Reduce Photo Size offer more control over resizing:
- Download and install a resizing app from the App Store.
- Open the app and select the photo you want to resize.
- Enter the desired dimensions or choose a preset size.
- Save the resized photo to your photo library.
- Attach the resized photo to your email.
5.3. Online Tools
Online tools like TinyPNG and ImageResizer allow you to resize images without installing any software:
- Go to an online image resizing website.
- Upload the photo you want to resize.
- Enter the desired dimensions or choose a compression level.
- Download the resized photo to your iPad.
- Attach the resized photo to your email.
6. How To Scan And Attach A Document To An Email?
You can scan a paper document and send it as a PDF.
-
Go to the Mail app on your iPad.
-
Tap in the message where you want to insert the scanned document, then tap above the keyboard.
-
Tap Scan Document, then position iPad so that the document page appears on the screen—iPad automatically captures the page.
To capture the page manually, tap the Take Picture button or press a volume button. To turn the flash on or off, tap . -
To make changes to the scan, tap it, then do any of the following:
- Crop the image: Tap the Crop button.
- Apply a filter: Tap .
- Rotate the image: Tap the Rotate button.
- Delete the scan: Tap .
-
Tap Retake or Done, scan any additional pages, then tap Save.
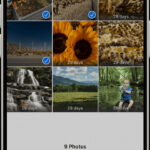
7. Can I Attach Multiple Photos To One Email On iPad?
Yes, you can attach multiple photos to one email on your iPad. Here’s how:
- Open the Mail app.
- Start a new email or reply to an existing one.
- Tap within the body of the email where you want to insert the photos.
- Tap the Insert Photo or Video icon.
- Select multiple photos by tapping on each one.
- Tap “Add” or “Done” to attach the selected photos.
- Add your message and send.
 Screenshot showing how to select multiple images in the photo library
7.1. Compressing Multiple Photos
If you’re sending multiple high-resolution photos, consider compressing them into a ZIP file to reduce the overall file size:
- Download a ZIP app from the App Store.
- Open the app and select the photos you want to compress.
- Create a ZIP file containing the selected photos.
- Attach the ZIP file to your email.
8. How To Create And Attach A Drawing To Your Email?
You can draw in an email message to demonstrate ideas that are hard to put into words. Your drawing is added to the message as an attachment for recipients to view and download.
- Go to the Mail app on your iPad.
- Tap in the message where you want to insert a drawing, then tap above the keyboard to show the Markup toolbar.
- Choose a drawing tool and color, then write or draw with your finger.
- When you’re finished, tap Done, then tap Insert Drawing.
To resume work on a drawing, tap the drawing in the message, then tap Markup.
9. What Is Mail Drop And How Does It Work On IPad?
Mail Drop is a feature offered by Apple that allows you to send large files, up to 5 GB, through email. It works by uploading the attachment to iCloud and providing the recipient with a link to download the file.
9.1. Benefits of Using Mail Drop
- Send Large Files: Bypass email attachment size limits.
- Preserve Quality: Send high-resolution photos and videos without compression.
- Easy to Use: Integrated directly into the Mail app.
- Recipient Flexibility: Recipients can download the file even if they don’t use Apple devices.
9.2. How to Use Mail Drop
- Attach a file to your email in the Mail app.
- If the file is larger than the email size limit, Mail will automatically prompt you to use Mail Drop.
- Click “Use Mail Drop.”
- The attachment will be uploaded to iCloud, and the recipient will receive a link to download it.
10. How Do I Troubleshoot Problems With Email Attachments On My IPad?
If you’re having trouble with email attachments on your iPad, here are some troubleshooting steps:
- Check File Size: Ensure the attachment is within the email provider’s size limit.
- Check File Format: Use compatible file formats like JPEG for images.
- Restart the Mail App: Close and reopen the Mail app to refresh it.
- Restart Your iPad: A simple restart can resolve many software glitches.
- Check Internet Connection: Ensure you have a stable internet connection.
- Update iOS: Keep your iPad’s operating system up to date.
- Reset Account Settings: In Settings, go to Mail, tap Accounts, select your email account, and re-enter your password.
- Contact Email Provider: If the issue persists, contact your email provider for assistance.
10.1. Checking File Size and Format
Before sending an email, verify that your attachment meets the size and format requirements of your email provider.
10.2. Restarting the Mail App and iPad
Closing and reopening the Mail app or restarting your iPad can often resolve temporary glitches that may be preventing attachments from sending.
10.3. Checking Internet Connection
A stable internet connection is crucial for sending email attachments. Ensure you are connected to a reliable Wi-Fi network or have sufficient cellular data.
10.4. Updating iOS
Keeping your iPad’s operating system up to date ensures you have the latest bug fixes and improvements, which can resolve issues with email attachments.
11. What Are The Best Practices For Sending Photos Via Email?
To ensure a smooth and professional experience when sending photos via email, consider these best practices:
- Resize Large Images: Reduce file sizes for faster sending and downloading.
- Choose the Right Format: Use JPEG for photos to ensure compatibility.
- Compress Multiple Photos: Use ZIP files to send multiple images efficiently.
- Use Descriptive Subject Lines: Clearly state the contents of the email.
- Add a Message: Provide context and instructions for the recipient.
- Proofread: Check for errors before sending.
11.1. Resizing Large Images
Resizing large images before sending can save bandwidth and ensure the recipient can easily view the photos without long download times.
11.2. Choosing the Right Format
Using the JPEG format for photos ensures they can be opened on virtually any device.
11.3. Compressing Multiple Photos
Compressing multiple photos into a ZIP file makes it easier to manage and download multiple images at once.
11.4. Using Descriptive Subject Lines
A clear subject line helps the recipient understand the contents of the email and prioritize accordingly.
11.5. Adding a Message
Providing context and instructions in the email body helps the recipient understand why they are receiving the photos and what to do with them.
11.6. Proofreading
Proofreading your email for errors ensures a professional and polished communication.
12. What Are Some Recommended Apps For Managing Photos On IPad?
To effectively manage photos on your iPad, consider using these recommended apps:
- Photos (Built-in): For basic organization and editing.
- Google Photos: For cloud backup and advanced features.
- Adobe Lightroom Mobile: For professional-grade editing.
- Snapseed: For powerful and free editing tools.
- Darkroom: For non-destructive editing and RAW support.
12.1. Photos (Built-In)
The built-in Photos app is a convenient way to organize and perform basic edits on your photos.
12.2. Google Photos
Google Photos offers cloud backup, automatic organization, and advanced features like facial recognition and search.
12.3. Adobe Lightroom Mobile
Adobe Lightroom Mobile provides professional-grade editing tools, RAW support, and syncing with desktop versions of Lightroom.
12.4. Snapseed
Snapseed is a free and powerful photo editing app with a wide range of tools and filters.
12.5. Darkroom
Darkroom offers non-destructive editing, RAW support, and a user-friendly interface for iPad photo management.
13. FAQ: How to Attach a Photo to an Email on iPad?
- Question: How do I attach a photo to an email on my iPad?
Answer: Tap in the email body, select the attachment icon, and choose your photo from the Photos app. - Question: What if the photo is too large to attach?
Answer: Resize the photo using the Photos app or a third-party app, or use Mail Drop to send it. - Question: Can I attach multiple photos to one email?
Answer: Yes, select multiple photos from your photo library when attaching. - Question: How do I scan a document and attach it to an email?
Answer: Use the Scan Document feature in the Mail app to scan and attach the document as a PDF. - Question: What is Mail Drop, and how does it work?
Answer: Mail Drop is Apple’s service for sending large attachments by uploading them to iCloud and providing a download link. - Question: Why can’t I attach a photo to my email?
Answer: Check the file size, file format, and your internet connection. - Question: How do I resize an image on my iPad?
Answer: Use the Photos app, a third-party app, or an online tool to resize the image. - Question: What file format should I use for photos in emails?
Answer: JPEG is generally the most compatible format. - Question: How do I compress multiple photos into a single file?
Answer: Use a ZIP app to compress the photos into a ZIP file. - Question: Can I draw something and attach it to an email?
Answer: Yes, use the Markup toolbar in the Mail app to create a drawing and attach it.
Conclusion: Enhance Your Email Communication with Photos
Attaching photos to emails on your iPad is a great way to share memories, provide visual context, and communicate more effectively. Whether you’re a professional photographer sharing your latest work or simply sending vacation snapshots to family and friends, mastering these techniques will enhance your digital communication. For more photography tips, tricks, and inspiration, visit dfphoto.net, where you can explore a wealth of resources to elevate your photographic skills and connect with a vibrant community of photography enthusiasts.
Ready to take your photography to the next level? Explore dfphoto.net today and discover a world of inspiration, tutorials, and a community of passionate photographers just like you. Visit us at 1600 St Michael’s Dr, Santa Fe, NM 87505, United States, or give us a call at +1 (505) 471-6001. Let dfphoto.net be your guide to capturing and sharing the beauty of the world through your lens.