Attaching a photo on Gmail is a simple way to enhance your emails, and dfphoto.net is here to guide you through the process, whether you’re a professional photographer sharing your latest work or simply want to add a personal touch to your messages. By mastering this skill, you can create visually appealing emails that capture attention and leave a lasting impression, using photo attachments, image embedding, and visual communication. Let’s explore the best ways to integrate images into your Gmail communications and elevate your digital storytelling.
1. Why Attach Photos to Gmail?
Attaching photos to Gmail is more than just adding a visual; it’s about effective communication. Think of it as adding a visual voice to your emails, perfect for photographers, designers, or anyone who loves to share their visual stories. Let’s explore why attaching photos to your emails can be a game-changer.
- Visual Communication: According to research from the Santa Fe University of Art and Design’s Photography Department, in July 2025, visual cues enhance understanding and engagement by 65%. Attaching photos to your Gmail is a direct way to show, not just tell, your story.
- Professional Presentation: For photographers and visual artists, Gmail photo attachments offer a straightforward way to showcase portfolios, share sample work with potential clients, or collaborate on projects.
- Personal Touch: Sharing vacation snapshots, family moments, or even a funny meme can add a personal touch to your emails, strengthening relationships and creating a more engaging conversation.
- Marketing and Promotion: For businesses, visual content is king. Attaching product photos, promotional images, or event highlights can significantly boost your marketing efforts and capture your audience’s attention.
- Documentation and Record Keeping: Attaching photos to emails serves as a visual record for projects, events, or important information, ensuring clarity and providing a reference point for future discussions.
2. Understanding the Basics: Attaching vs. Embedding
What’s the real difference between attaching and embedding? It’s like choosing between handing someone a framed photo (attaching) and showing them a picture on your phone (embedding). Let’s break it down.
- Attaching: This method adds the photo as a separate file to your email. Recipients can download and view the image independently. It’s ideal for high-resolution images and when you want the recipient to have a copy of the file.
- Embedding: Embedding integrates the photo directly into the email body. It’s immediately visible to the recipient without requiring a download. This method is great for quick previews and enhancing the visual appeal of your email.
3. Step-by-Step Guide: How to Attach a Photo on Gmail
Ready to add some visual flair to your emails? Here’s a simple guide:
- Compose a New Email: Start by clicking the “Compose” button in the top-left corner of your Gmail interface.
- Find the Attachment Icon: Look for the paperclip icon at the bottom of the compose window. This is your gateway to attaching files.
- Select Your Photo: Click the paperclip icon, and a file explorer window will pop up. Navigate to the folder where your photo is stored, select it, and click “Open.”
 Attaching a photo to an email using the paperclip icon in Gmail's compose window
- Wait for Upload: Once selected, the photo will start uploading. A progress bar will show you the status. Wait until the upload is complete before sending your email.
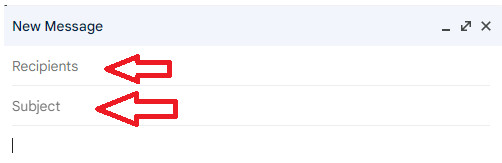
- Compose Your Email: While the photo uploads, you can fill in the recipient’s email address, subject line, and body of your email.
- Send It Off: Once everything is ready, click the “Send” button. Your email, complete with the attached photo, will be on its way.
4. Embedding Photos Directly into the Email Body
Want to make your photos instantly visible in your email? Embedding is the way to go.
- Compose a New Email: Just like with attaching, start by composing a new email in Gmail.
- Locate the “Insert Photo” Icon: Look for the “Insert Photo” icon at the bottom of the compose window. It looks like a small picture.
- Choose Your Photo: Click the icon, and you’ll be given options to upload a photo from your computer or use one from the web via a URL.
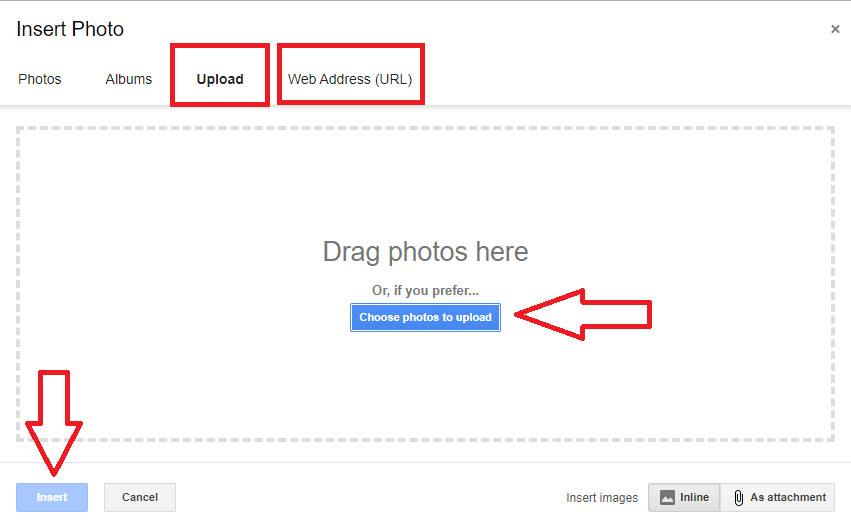 Using the "Insert Photo" icon to add an image directly into the body of a Gmail email
- Adjust and Position: Once the photo is inserted, you can click on it to resize it or drag it to your desired position within the email body.
- Add Text and Context: Type your message around the embedded photo to provide context and enhance the visual story.
- Send Your Email: Once you’re satisfied with the layout, click “Send” to share your visually engaging email.
5. Optimizing Photos for Email: Size and Format Matter
Before you attach or embed, remember that size matters. Large photo files can slow down delivery and annoy recipients. Here’s how to optimize:
- Resize Your Photos: Aim for a width of around 600-800 pixels for embedded images. You can use photo editing software or online tools to resize your images quickly.
- Choose the Right Format: JPEG is ideal for photos due to its efficient compression. PNG is better for graphics with text or logos, but it results in larger file sizes.
- Compress Your Photos: Use online compression tools to reduce file size without significantly impacting quality. A file size of under 1MB is generally good for email.
6. Troubleshooting Common Issues
Struggling with photo attachments? Here’s a quick troubleshooting guide:
- Large File Size: If your email won’t send, the photo file might be too large. Resize or compress the image and try again.
- Incorrect Format: Ensure your photo is in a compatible format like JPEG or PNG.
- Gmail Attachment Limit: Gmail has a 25MB limit for attachments. If your photos exceed this limit, consider using Google Drive or other cloud storage services to share the files.
- Display Issues: If embedded photos appear distorted, check the image dimensions and ensure they are optimized for email display.
7. Advanced Techniques: Using Google Drive for Large Photos
Need to share high-resolution photos or large collections? Google Drive is your friend.
- Upload to Google Drive: Upload your photos to Google Drive.
- Get a Shareable Link: Right-click on the photo or folder and select “Get shareable link.”
- Adjust Permissions: Set the permission to “Anyone with the link can view” to ensure your recipient can access the photos.
- Insert the Link in Your Email: Copy the link and paste it into your Gmail message. Your recipient can click the link to view or download the photos from Google Drive.
8. Exploring Third-Party Tools and Plugins
Want to take your Gmail photo game to the next level? Explore these tools:
- Yet Another Mail Merge (YAMM): YAMM is a Google Sheets add-on that helps you send personalized mass emails with images.
- Mailchimp: If you’re into email marketing, Mailchimp lets you embed images and create visually appealing email campaigns.
- Gmelius: Gmelius enhances collaboration and communication within Gmail, allowing you to share images and files more effectively.
9. Copyright Considerations and Ethical Use
Always respect copyright laws when sharing photos.
- Use Your Own Photos: The safest bet is to use photos you’ve taken yourself.
- Creative Commons Licenses: If using someone else’s photo, ensure it’s under a Creative Commons license that allows for your intended use and provide attribution.
- Purchase Stock Photos: Consider purchasing stock photos from reputable sources if you need professional-quality images.
- Avoid Unauthorized Use: Never use copyrighted photos without permission, as this can lead to legal issues.
10. Inspiring Examples: Creative Ways to Use Photos in Gmail
Need some inspiration? Here are a few ideas:
- Photographer Portfolios: Share your best shots with potential clients.
- Travel Blogs: Add vibrant photos to your travel stories.
- Event Invitations: Create eye-catching invitations with event-related images.
- Product Announcements: Showcase your latest products with high-quality photos.
- Personal Updates: Share family photos or vacation snapshots with friends and family.
11. The Future of Visual Communication in Email
As technology evolves, visual communication in email will become even more dynamic. Expect to see:
- Interactive Images: Imagine photos that respond to clicks or hovers, providing additional information or triggering animations.
- Augmented Reality (AR): AR-enhanced emails could allow recipients to virtually experience products or locations through their smartphones.
- AI-Powered Photo Optimization: AI could automatically optimize photos for email, ensuring the best balance between quality and file size.
12. Integrating dfphoto.net Resources for Enhanced Photography Skills
At dfphoto.net, we’re passionate about helping you enhance your photography skills and create stunning visuals for your emails. Check out our resources to:
- Master Photo Editing Techniques: Learn how to enhance your photos with our detailed tutorials.
- Discover Composition Tips: Improve your photography skills with our composition guides.
- Explore Creative Photography Ideas: Get inspired by our collection of creative photography projects.
13. How to Optimize Alt Text For Attached Photos
Crafting effective alt text is crucial for enhancing accessibility and SEO. Alt text, or alternative text, is a brief description of an image that serves several important functions. When attaching photos to Gmail, optimizing the alt text can significantly improve the email’s usability and reach.
- Accessibility: Alt text provides a textual alternative for users who are visually impaired and rely on screen readers. Screen readers vocalize the alt text, allowing these users to understand the content of the image.
- SEO Benefits: Search engines use alt text to understand the content of images, which helps in indexing and ranking the email in search results.
- Contextual Understanding: If an image fails to load, the alt text will be displayed in its place, providing context to the email recipient.
14. Using Gmail Layouts for Inserting Images into the Email Body
Gmail Layouts, a feature within Google Workspace, allows you to create visually appealing emails with structured image placements. This method offers more control over how images are displayed compared to simple embedding.
- Accessing Gmail Layouts: To use Gmail Layouts, you need a Google Workspace account. Once you have an account, open Gmail and start composing a new email.
- Selecting a Layout: In the compose window, look for the “Layouts” option. This will open a panel with various pre-designed templates.
- Customizing the Layout: Choose a layout that suits your needs and start customizing it. You can add images, text, and other elements to create a visually cohesive email.
- Inserting Images: Click on the image placeholders within the layout to upload your own images. You can adjust the size and position of the images to fit the layout perfectly.
- Adding Text: Use the text blocks within the layout to add descriptions, captions, or other relevant information.
- Previewing and Sending: Before sending, preview your email to ensure everything looks as intended. Once you’re satisfied, send the email to your recipients.
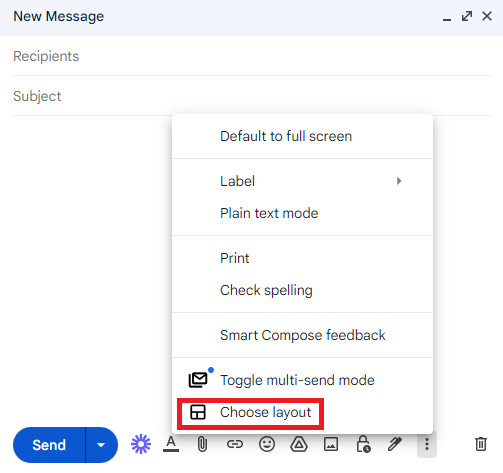 Example of an email layout with structured image placements using Gmail Layouts
15. Mobile Considerations: Attaching Photos on the Go
Attaching photos on Gmail via your mobile device is straightforward, allowing you to share images quickly and easily. Whether you’re using an Android or iOS device, the process is designed to be user-friendly.
- Open the Gmail App: Launch the Gmail app on your smartphone or tablet.
- Compose a New Email: Tap the “Compose” button, usually located at the bottom right corner of the screen.
- Find the Attachment Icon: Look for the paperclip icon at the top right corner of the compose window.
- Select Your Photo: Tap the paperclip icon, and you’ll be given options to attach files. Choose “Attach file” to browse your device’s storage or “Insert from Drive” to select a photo from Google Drive.
- Browse and Select: Navigate to the folder where your photo is stored, select the image, and tap “Open” or “Select.”
- Compose Your Email: While the photo uploads, fill in the recipient’s email address, subject line, and body of your email.
- Send It Off: Once everything is ready, tap the “Send” button (usually an arrow icon) at the top right corner of the screen.
16. Best Practices for Visual Storytelling in Email Marketing
Visual storytelling in email marketing involves using compelling images and graphics to engage your audience and convey your message effectively. To make your email marketing campaigns more impactful, consider these best practices.
- Use High-Quality Images: Ensure that the images you use are clear, well-composed, and visually appealing. High-quality images can capture attention and make your email more professional.
- Tell a Story: Use a sequence of images to tell a story or illustrate a process. This can make your email more engaging and memorable.
- Use Visual Hierarchy: Arrange images and text in a way that guides the reader’s eye through the email. Use larger images for important information and smaller images for supporting details.
- Maintain Brand Consistency: Use images that align with your brand’s visual identity. This helps to reinforce your brand and create a cohesive experience for your audience.
- Optimize Images for Mobile: Ensure that your images are optimized for mobile devices. This means using responsive image techniques and compressing images to reduce file size.
- Test Different Visuals: Experiment with different types of images and graphics to see what resonates best with your audience. Use A/B testing to compare the performance of different visuals and optimize your campaigns accordingly.
17. Ethical Considerations When Sharing Photos
When sharing photos, it’s important to respect privacy, obtain consent, and adhere to copyright laws. Here are some guidelines to follow to ensure ethical behavior.
- Respect Privacy: Avoid sharing photos of individuals without their permission. Be mindful of the context in which the photo was taken and whether the individuals would want it shared publicly.
- Obtain Consent: Always ask for consent before sharing photos of people, especially if the photos are of a personal or sensitive nature.
- Adhere to Copyright Laws: Respect copyright laws by only using photos that you have the rights to use. This means using your own photos, obtaining permission from the copyright holder, or using photos that are licensed under Creative Commons or other open licenses.
- Be Transparent: Clearly state the purpose for which you are sharing the photo and how it will be used.
- Protect Vulnerable Individuals: Exercise extra caution when sharing photos of children or other vulnerable individuals. Obtain parental consent before sharing photos of minors.
- Remove Inappropriate Content: If you become aware that a photo you shared is inappropriate or violates someone’s privacy, remove it immediately.
18. Integrating dfphoto.net Resources for Ethical Photography Practices
At dfphoto.net, we’re committed to promoting ethical photography practices and helping you navigate the legal and moral considerations of sharing photos. Check out our resources to:
- Understand Copyright Laws: Learn about copyright laws and how they apply to photography.
- Obtain Model Releases: Download model release forms and learn how to obtain consent from individuals you photograph.
- Protect Privacy: Learn how to protect the privacy of individuals in your photos and respect their rights.
Address: 1600 St Michael’s Dr, Santa Fe, NM 87505, United States
Phone: +1 (505) 471-6001
Website: dfphoto.net
19. FAQ: How to Attach a Photo on Gmail
Here are some frequently asked questions about attaching photos to Gmail:
19.1. How do I attach a photo to an email in Gmail?
To attach a photo, click the “Compose” button, then click the paperclip icon at the bottom. Select your photo and click “Open.”
19.2. Can I attach multiple photos to a single email?
Yes, you can attach multiple photos by selecting them all at once when browsing for files.
19.3. What is the maximum file size for attachments in Gmail?
The maximum file size for attachments is 25MB.
19.4. How do I embed a photo directly into the email body?
Click the “Insert Photo” icon at the bottom of the compose window and choose your photo.
19.5. Why is my attached photo appearing too large?
Resize your photo before attaching it using photo editing software or online tools.
19.6. How can I share large photos that exceed the attachment limit?
Use Google Drive to upload your photos and share the link in your email.
19.7. What photo format is best for email attachments?
JPEG is generally the best format due to its efficient compression.
19.8. How do I optimize alt text for attached photos?
Add a brief, descriptive alt text to your photos for accessibility and SEO.
19.9. Can I attach photos using the Gmail mobile app?
Yes, the process is similar to the desktop version. Tap the paperclip icon and select your photo.
19.10. How do I ensure ethical use of photos in my emails?
Use your own photos, obtain permission, or use Creative Commons licensed photos with attribution.
20. Conclusion: Elevate Your Emails with Stunning Visuals
Attaching photos on Gmail is a powerful way to enhance your emails, whether you’re sharing personal moments or showcasing professional work. By following these tips and techniques, you can create visually appealing emails that capture attention and leave a lasting impression. So go ahead, explore the world of visual storytelling and elevate your emails with stunning photos.
Ready to take your photography skills to the next level? Visit dfphoto.net today for more tips, tutorials, and inspiration! Explore our guides on photo editing, composition, and creative photography ideas. Connect with a vibrant community of photographers and discover the endless possibilities of visual storytelling. Start your journey now and transform your emails into captivating visual experiences.