Attaching a photo in iPhone email is a common task, but mastering it enhances your communication. At dfphoto.net, we’re dedicated to providing clear, concise guides to elevate your iPhone photography and sharing skills. Let’s dive into the simple steps and uncover some pro tips for seamless photo sharing, ensuring your visual stories are delivered perfectly every time with image attachments, photo sharing, and email composition best practices.
1. Why Can’t I Attach Photos to My iPhone Email?
You can absolutely attach photos to your iPhone email. Here are several methods to do so directly from the Mail app or through other applications:
1.1 Attaching a Photo, Video, or Document to Email
This is your go-to method for directly embedding files into your email:
-
Open the Mail app on your iPhone.
-
Begin composing a new email or reply to an existing one.
-
Tap within the body of the email where you want to insert the photo.
-
Look for the Expand Toolbar button above the keyboard (it usually appears as an arrow or a line). Tap it.
-
Select the Attach File icon. This may look like a paperclip or a similar symbol.
-
A file selection window will appear. From here you can:
-
Attach a document: Tap the Attach File button, then find the document in the Files app. If needed, tap Browse at the bottom to navigate to different locations.
-
Attach a saved photo or video: Tap the Photo/Video icon, then select your desired media. Tap Done to return to your email.
-
Take a new photo or video: Tap the Take Photo or Video button (camera icon). After taking your shot, tap Use Photo or Use Video to insert it, or Retake if you’re not satisfied.
-
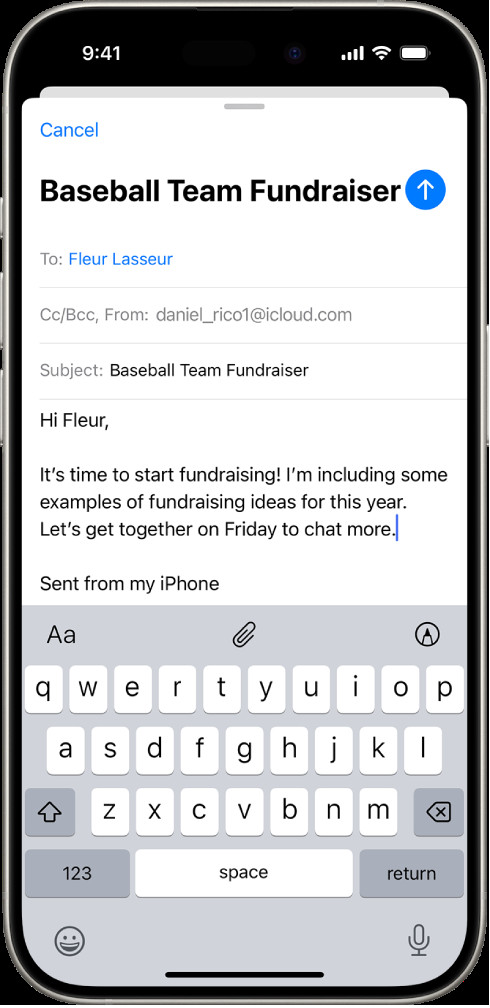 Compose new iPhone email draft with attachment options.
1.2 Scanning and Attaching Documents
Need to send a physical document as a PDF? Here’s how:
- In your email draft, tap where you want to insert the scan.
- Tap the Expand Toolbar button.
- Tap the Scan Document button.
- Position your iPhone over the document. It should automatically capture the page. If not, tap the shutter button manually or press a volume button.
- Tap Retake or Keep Scan. Scan any additional pages needed.
- Tap Save when finished.
- You can edit the saved scan by tapping it and using the crop, filter, rotate, or delete options.
1.3 Creating and Attaching a Drawing
Want to add a personal touch with a sketch?
- In your email draft, tap where you want to insert the drawing.
- Tap the Expand Toolbar button.
- Tap the Markup icon to bring up drawing tools.
- Choose your tool and color, and then draw with your finger.
- Tap Done, then Insert Drawing. You can later edit the drawing by tapping it and selecting the edit option.
1.4 Using the Photos App
Another straightforward method:
- Open the Photos app on your iPhone.
- Select the photo you wish to send.
- Tap the Share icon (the square with an arrow pointing upwards).
- Choose Mail from the share options. This will open a new email with the photo already attached.
- Address the email and add any text, then send.
2. What If My Photo Attachment Is Too Large?
Sometimes, your email provider will have size limits for attachments. If your photo is too large, here are a few solutions:
-
Mail Drop: If you’re using iCloud Mail, Mail Drop is a fantastic feature. It automatically appears when you try to send a large file. Mail Drop uploads your attachment to iCloud, and the recipient receives a link to download it.
-
Compress the Photo: Before attaching, compress the photo to reduce its file size. You can do this using various apps available in the App Store or online tools. Simply search for “image compressor” in the App Store.
-
Send a Lower Resolution Version: Most iPhones let you choose the size of the image when sharing. When you tap the Share icon, look for options like “Small,” “Medium,” or “Large.” Choosing a smaller size will reduce the file size.
-
Use Cloud Storage: Upload the photo to a cloud service like Google Drive, Dropbox, or iCloud Drive, then share a link to the file in your email. This is a great way to send large files without clogging up email servers.
-
Third-Party Transfer Services: Services like WeTransfer allow you to send large files easily. Just upload your photo to the site, and it will generate a link to share via email.
3. What Are the Best Photo Formats to Send via Email from My iPhone?
Choosing the right photo format can impact the quality and size of your attachments:
- JPEG (or JPG): This is the most common format for photos. JPEGs offer a good balance between image quality and file size, making them ideal for most email uses.
- HEIC: This is Apple’s default format, which offers better compression than JPEG. However, not all email clients or devices support HEIC. If you’re sending to someone who might have compatibility issues, it’s best to convert HEIC to JPEG. You can do this in your iPhone’s settings under Camera > Formats > Most Compatible.
- PNG: PNGs are great for images with text, graphics, or when you need transparency. However, they are generally larger files than JPEGs, so they may not be the best choice for sending many photos or high-resolution images.
4. What Are the iPhone Email Photo Attachment Size Limits?
Email providers set limits to prevent server overload and ensure smooth delivery. Here are some common limits:
| Email Provider | Size Limit | Notes |
|---|---|---|
| iCloud Mail | 20 MB | Using Mail Drop can increase this limit for larger files. |
| Gmail | 25 MB | This includes the total size of the email and all attachments. |
| Yahoo Mail | 25 MB | Similar to Gmail, this is the total limit for the email. |
| Outlook.com | 20 MB | Again, this limit includes the entire email. |
| Corporate Email Servers | Varies | Corporate email servers often have stricter limits set by the IT department. Check with your IT support for specific limits. |
5. How Do I Resize Photos on My iPhone Before Attaching Them to an Email?
Resizing photos can help you stay within email attachment size limits and make it easier for recipients to download the images. Here’s how to do it:
5.1 Using the Mail App
When you attach a photo directly in the Mail app, your iPhone might give you options to choose the image size:
- Follow the steps in section 1.1 Attaching a Photo, Video, or Document to Email.
- After selecting the photo(s), the Mail app may present you with options like “Small,” “Medium,” “Large,” or “Actual Size.”
- Choose the size that best fits your needs. Smaller sizes will significantly reduce the file size.
5.2 Using Third-Party Apps
Several apps in the App Store can resize photos. Here are a few popular choices:
- Image Size: This app allows you to specify the exact dimensions or percentage by which you want to resize your photo. It’s simple and effective.
- Resize Me!: A batch resizing app that can handle multiple photos at once. Ideal if you have many images to resize.
- Adobe Photoshop Express: A more comprehensive photo editing app that includes resizing features.
To use these apps:
- Download and install the app from the App Store.
- Open the app and select the photo(s) you want to resize.
- Follow the app’s instructions to resize the photo. You’ll typically have options to enter specific dimensions or choose a percentage reduction.
- Save the resized photo to your Camera Roll.
- Attach the resized photo to your email.
5.3 Using Shortcuts App
The Shortcuts app, pre-installed on iPhones, can also be used to resize photos. Here’s how:
- Open the Shortcuts app.
- Tap the + icon to create a new shortcut.
- Tap Add Action.
- Search for “Resize Image” and select it.
- Tap Add Action again.
- Search for “Save to Photo Album” and select it.
- Tap the arrow next to “Resize Image” to customize the size. You can choose from “Small,” “Medium,” “Large,” or “Custom.”
- Tap the Settings icon (top right) and give your shortcut a name (e.g., “Resize for Email”).
- To use the shortcut, open the Photos app, select the photo, tap the Share icon, and choose your shortcut from the list.
6. Can I Send Live Photos via Email from My iPhone?
Yes, you can send Live Photos via email, but they will typically be sent as still images (JPEG). The recipient won’t see the motion unless they have a compatible device and email client:
- Open the Photos app on your iPhone.
- Select the Live Photo you want to send.
- Tap the Share icon.
- Choose Mail.
The Live Photo will be attached to the email as a JPEG. If you want to ensure the recipient sees the motion, consider sharing the Live Photo via iCloud Photo Sharing or another service that supports Live Photos.
7. How Can I Compress a Photo on My iPhone Before Emailing?
Compressing a photo reduces its file size, making it easier to send via email and quicker for the recipient to download. Here are a few ways to compress photos on your iPhone:
7.1 Using Online Compression Tools
Several websites offer free online image compression:
- TinyPNG: While designed for PNG files, TinyPNG also works well for JPEGs. It uses smart lossy compression techniques to reduce file size.
- Compress JPEG: A straightforward tool specifically for compressing JPEG files.
- iLoveIMG: Offers various image editing tools, including compression.
To use these tools:
- Open the website in Safari or your preferred browser on your iPhone.
- Upload the photo you want to compress.
- Wait for the website to process the image.
- Download the compressed photo to your Camera Roll.
- Attach the compressed photo to your email.
7.2 Changing Camera Settings
You can also reduce the file size of future photos by adjusting your camera settings:
- Open the Settings app on your iPhone.
- Scroll down and tap Camera.
- Tap Formats.
- Choose High Efficiency to use HEIF/HEVC format, which offers better compression. Note that some older devices may not fully support this format. For maximum compatibility, choose Most Compatible, which uses JPEG.
7.3 Using the Files App
The Files app can also be used to compress images:
- Open the Photos app and select the photo you want to compress.
- Tap the Share icon and choose Save to Files.
- Select a location in the Files app to save the photo.
- Open the Files app and navigate to the saved photo.
- Long-press on the photo and choose Compress. This will create a ZIP file.
- Attach the ZIP file to your email. The recipient will need to unzip the file to access the photo.
8. How Do I Send Multiple Photos in One Email from My iPhone?
Sending multiple photos in one email is simple:
- Open the Photos app.
- Tap Select in the top right corner.
- Tap to select all the photos you want to send.
- Tap the Share icon.
- Choose Mail. A new email will open with all the photos attached.
Keep in mind the total size limit of your email provider. If the total size of the photos exceeds the limit, consider sending multiple emails or using a cloud storage service.
9. Why Are My Photos Blurry When I Email Them from My iPhone?
Blurry photos can be frustrating, but here are some common causes and solutions:
- Compression: Email providers often compress photos to reduce file size, which can result in a loss of quality. To minimize this, try sending smaller sizes or using a format like JPEG with moderate compression.
- Original Quality: Make sure the original photo is clear. If the photo was blurry to begin with, emailing it won’t magically fix it.
- Recipient’s Device: The way the recipient’s device or email client displays the photo can also affect its perceived quality.
10. How to Save Photos from Email to iPhone?
Saving photos from an email on your iPhone is straightforward:
- Open the Mail app and find the email with the photo attachment.
- Tap the photo to preview it.
- Tap the Share icon (the square with an arrow pointing upwards).
- Choose Save Image. The photo will be saved to your Camera Roll.
Alternatively, you can long-press on the photo in the email and choose Save.
11. Why Does My iPhone Convert Photos to HEIC When Emailing?
HEIC is Apple’s high-efficiency image format, offering better compression and image quality compared to JPEG. However, not all devices and email clients support HEIC.
If your iPhone is converting photos to HEIC when emailing, it’s likely because you have “High Efficiency” selected in your camera settings. To change this:
- Open the Settings app.
- Scroll down and tap Camera.
- Tap Formats.
- Choose Most Compatible. This will use JPEG for photos, which is widely supported.
12. How Do I Stop My iPhone from Compressing Photos When Emailing?
While you can’t entirely prevent email providers from compressing photos, you can minimize it by:
- Choosing the “Actual Size” option when attaching the photo in the Mail app.
- Using a cloud storage service like Google Drive or Dropbox to share the photo, as these services typically don’t compress files.
- Compressing the photo yourself before attaching it, so you have more control over the compression level.
13. What Is the Best Way to Email High-Resolution Photos from My iPhone?
To email high-resolution photos without significant quality loss, follow these steps:
- Check the Original Photo: Ensure the original photo is high resolution and clear.
- Use Cloud Storage: Upload the photo to a cloud service like Google Drive, Dropbox, or iCloud Drive. Share a link to the photo in your email.
- Use Mail Drop: If you’re using iCloud Mail, Mail Drop automatically appears when you attach a large file. It uploads your attachment to iCloud, and the recipient receives a link to download it.
14. Troubleshooting: Photos Not Sending in Email
If you’re having trouble sending photos via email, try these troubleshooting steps:
- Check Your Internet Connection: Make sure you have a stable Wi-Fi or cellular connection.
- Check Attachment Size: Ensure the total size of the email and attachments is within your email provider’s limit.
- Restart the Mail App: Close the Mail app completely and reopen it.
- Restart Your iPhone: Sometimes, a simple restart can fix underlying issues.
- Update iOS: Make sure your iPhone is running the latest version of iOS.
- Check Email Settings: Verify that your email account settings are correct.
- Try a Different Email Account: If possible, try sending the photo from a different email account to see if the issue is with your primary account.
- Contact Your Email Provider: If none of the above steps work, contact your email provider for assistance.
15. Best Practices for Emailing Photos on iPhone
Here are some best practices to keep in mind when emailing photos from your iPhone:
- Consider Your Recipient: Think about the recipient’s device and email client. If they might have compatibility issues, use JPEG format and avoid sending Live Photos.
- Respect Attachment Limits: Be mindful of attachment size limits. If you need to send large files, use cloud storage or Mail Drop.
- Compress When Necessary: If you’re sending multiple photos or high-resolution images, compress them to reduce file size.
- Label Clearly: Add a descriptive subject line to your email and label your photos clearly if you’re sending multiple images.
- Preview Before Sending: Always preview your email before sending it to make sure everything looks correct.
- Secure Sensitive Photos: If you’re sending sensitive photos, consider encrypting them or using a secure file transfer service.
- Update Software: Keep your iPhone and apps updated to ensure compatibility and security.
FAQ: How to Attach a Photo in iPhone Email
1. How do I attach a photo to an email on my iPhone?
Open the Mail app, start a new email or reply to one, tap in the email body, select the photo icon, choose your photo, and tap Send.
2. What if my photo is too large to attach?
Use Mail Drop (if available), compress the photo, send a lower resolution version, or use cloud storage to share a link.
3. What is the best photo format for emailing from an iPhone?
JPEG is generally the best due to its balance of quality and file size.
4. What is the attachment size limit for iPhone email?
It varies by provider, but generally, it’s around 20-25 MB.
5. How do I resize a photo on my iPhone before emailing?
Use the Mail app’s built-in resizing options, third-party apps, or the Shortcuts app.
6. Can I send Live Photos via email?
Yes, but they’ll be sent as still images (JPEG).
7. How do I compress a photo on my iPhone?
Use online compression tools, change camera settings, or use the Files app.
8. How do I send multiple photos in one email from my iPhone?
In the Photos app, select multiple photos and choose Mail from the Share menu.
9. Why are my emailed photos blurry?
Compression, original photo quality, or the recipient’s device can cause blurriness.
10. How do I save photos from email to my iPhone?
Tap the photo, tap the Share icon, and choose Save Image.
Mastering these tips ensures your photos always make a great impression, no matter how you send them.
We at dfphoto.net are dedicated to helping you master every aspect of photography, from capturing the perfect shot to sharing it seamlessly. Explore our website for more tips, tutorials, and inspiration to elevate your photography journey.