Attaching a photo in Gmail is a straightforward way to enhance your emails, whether for professional correspondence or personal updates. At dfphoto.net, we understand the power of visual communication, and this guide will provide you with clear, step-by-step instructions on how to insert photos into your Gmail messages, ensuring they look perfect. Learn the best practices for photo integration, image optimization, and alternative methods to make your emails visually appealing and engaging.
1. Understanding The Basics Of Attaching Photos In Gmail
Attaching photos in Gmail is a simple yet powerful way to make your emails more engaging and informative. But what are the different ways to do it?
You can attach a photo directly from your computer, insert an inline image within the body of your email, or even link to an image hosted online. Each method has its own advantages, depending on your needs. Let’s explore the methods.
1.1. What Are The Different Methods For Adding Photos To Gmail?
There are three main methods to insert a photo in Gmail: attachments, inline images, and links. Attachments are separate files included with your email. Inline images appear directly within the email body. Links direct recipients to an image hosted elsewhere.
- Attachments: This method is ideal for sending high-resolution images that recipients might want to download and save. The photo is sent as a separate file.
- Inline Images: These images are embedded directly into the body of your email, making them immediately visible. This is great for illustrations or visuals you want the recipient to see right away.
- Links: Instead of sending the image itself, you can include a link to where the image is hosted online. This is useful for very large images or when you want to ensure recipients always see the latest version of an image.
Understanding these methods will help you choose the best option for your specific needs and ensure your emails are both visually appealing and functional.
1.2. Why Is Knowing How To Attach A Photo Important For Gmail Users?
Knowing how to attach a photo is important because it enhances communication, adds visual context, and improves engagement. Photos clarify messages, capture attention, and create a more personal connection, making emails more effective and memorable.
Visuals are processed 60,000 times faster in the brain than text, according to research by the Massachusetts Institute of Technology (MIT). This means that including a relevant photo can instantly convey information that would take much longer to explain in words. For example, a photographer might attach a portfolio sample to showcase their skills or a business might include a product image in a promotional email.
Furthermore, attaching photos can personalize your emails, making them more relatable and engaging. Whether it’s a family photo shared with loved ones or a team picture in a company announcement, images help build connections and create a sense of community.
1.3. What Are Common Mistakes To Avoid When Attaching Pictures?
Common mistakes when attaching pictures include sending large files, ignoring image optimization, forgetting alt text, and embedding incorrectly. These errors can lead to slow loading times, poor accessibility, and a less professional appearance.
- Sending Large Files: Large image files can clog up inboxes and take a long time to download. Always compress images before sending to reduce file size.
- Ignoring Image Optimization: Unoptimized images may appear blurry or pixelated. Ensure your images are properly sized and optimized for web viewing.
- Forgetting Alt Text: Alt text provides a description of the image for screen readers and is crucial for accessibility. Always include alt text to ensure your emails are inclusive.
- Embedding Incorrectly: Incorrectly embedded images may not display properly across all email clients. Test your emails to ensure images are displayed correctly.
Avoiding these common mistakes will help ensure your emails are professional, accessible, and visually appealing.
2. Step-By-Step Guide: How To Attach A Photo In Gmail
The simplest method is the direct attachment, allowing you to add image files directly from your computer. Here’s how you do it:
2.1. How To Attach A Photo As An Attachment?
To attach a photo as an attachment, compose a new email in Gmail, click the “Attach files” icon (paperclip), select the photo from your computer, and click “Open”. The photo will then be added as an attachment to your email.
Here’s a detailed breakdown:
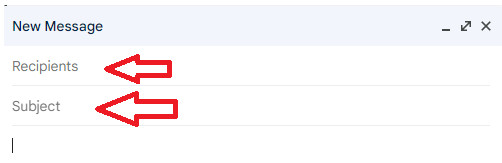
- Compose a New Email: Click the “Compose” button in the top-left corner of your Gmail interface to start a new email.
- Find the “Attach Files” Icon: Look for the paperclip icon at the bottom of the compose window. This is the “Attach files” button.
 Attach Files Icon in Gmail
- Select the Photo: A file selection window will appear. Navigate to the folder where your photo is stored, select it, and click “Open”.
- Wait for the Upload: Gmail will upload the photo. You’ll see a progress bar next to the file name as it uploads.
- Complete Your Email: Once the upload is complete, you can finish writing your email and add other attachments if needed.
- Send Your Email: Click the “Send” button to send your email with the attached photo.
2.2. What Are The Steps To Insert A Photo Inline In Gmail?
To insert a photo inline, open a new email in Gmail, click the “Insert photo” icon, choose “Upload” or “Web Address (URL)”, select or paste the image, and click “Insert”. The photo will appear directly in the email body.
Here’s a more detailed explanation:
- Open a New Email: Start by clicking the “Compose” button in Gmail to create a new email.
- Locate the “Insert photo” Icon: This icon is usually found at the bottom of the compose window, often represented by a picture icon.
- Choose Your Source:
- Upload: Click “Upload” to select a photo from your computer.
- Web Address (URL): Choose this option to insert a photo directly from a URL. Paste the URL into the provided field.
- Select or Paste the Image:
- Upload: Navigate to the folder where your photo is saved, select the image, and click “Open”.
- Web Address (URL): Paste the image URL into the field and wait for the image to load.
- Insert the Photo: Once the image is loaded, click the “Insert” button. The photo will now appear directly in the body of your email.
 Insert Photos to email body
2.3. How Do You Add A Photo From Google Drive Into A Gmail Email?
To add a photo from Google Drive, compose a new email, click the Google Drive icon, select the photo, choose “Insert as inline” or “Insert as attachment”, and click “Insert”. This directly adds the photo to your email.
Here’s a step-by-step guide:
- Compose a New Email: Start by opening a new email in Gmail by clicking on the “Compose” button.
- Click the Google Drive Icon: Look for the Google Drive icon at the bottom of the compose window. It looks like a triangle.
- Select the Photo: A Google Drive window will appear. Navigate to the folder where your photo is located and select the image.
- Choose How to Insert: You will be prompted to choose whether to insert the photo as an inline image or as an attachment.
- Insert as inline: The photo will appear directly in the body of your email.
- Insert as attachment: The photo will be added as a separate file attached to your email.
- Click “Insert”: Once you have chosen how to insert the photo, click the “Insert” button. The photo will now be added to your email in the selected format.
Adding photos from Google Drive is particularly useful when you’re collaborating on projects or sharing images that are already stored in your Drive.
3. Optimizing Photos For Gmail
Optimizing photos for Gmail ensures they look great and don’t cause issues with email delivery or display. This involves resizing, compressing, and choosing the right file format.
3.1. What Is The Ideal Image Size For Gmail Attachments?
The ideal image size for Gmail attachments is under 25MB to avoid delivery issues. For inline images, aim for under 1MB to ensure fast loading times and optimal viewing on various devices.
Gmail has a limit of 25MB for total email size, including all attachments. If your image is larger than this, it may not be delivered. To avoid this, you can compress the image or use a file-sharing service like Google Drive and send a link instead.
For inline images, smaller file sizes are crucial for a good user experience. Large images can slow down the loading time of your email, especially on mobile devices. Aim for images that are visually clear but don’t exceed 1MB. This ensures that your emails load quickly and display properly across different devices and email clients.
3.2. How Can You Compress Photos Before Attaching Them?
You can compress photos using online tools, image editing software, or built-in operating system features. Online tools like TinyPNG and ImageOptim are easy to use. Image editing software such as Adobe Photoshop or GIMP offer more control. Windows and macOS have built-in compression options as well.
- Online Tools:
- TinyPNG: This tool uses smart lossy compression techniques to reduce the file size of your PNG files.
- ImageOptim: A free, open-source tool that optimizes images by removing unnecessary data.
- Image Editing Software:
- Adobe Photoshop: Open your image, go to “File” > “Export” > “Save for Web (Legacy)”, and adjust the settings to reduce the file size.
- GIMP: Open your image, go to “File” > “Export As”, and adjust the quality settings to compress the image.
- Built-In Operating System Features:
- Windows: Right-click on the image file, select “Send to” > “Compressed (zipped) folder”.
- macOS: Open the image in “Preview”, go to “File” > “Export”, and adjust the quality settings to reduce the file size.
By compressing your photos before attaching them, you can ensure they meet Gmail’s size requirements and load quickly for recipients.
3.3. What Image Formats Work Best With Gmail?
JPEG, PNG, and GIF formats work best with Gmail. JPEG is ideal for photographs due to its efficient compression. PNG is better for images with text or graphics, preserving clarity. GIF supports animations, adding dynamic elements to your emails.
- JPEG (or JPG): This format is widely used for photographs because it offers good compression while maintaining reasonable image quality. It’s a great choice for images with lots of colors and gradients.
- PNG: PNG is best for images with text, logos, or graphics. It supports lossless compression, meaning it preserves image quality without losing data. This format is ideal for images where clarity is crucial.
- GIF: GIF is suitable for simple animations and images with limited colors. It supports transparency and is often used for creating animated email signatures or small, looping videos.
Choosing the right image format ensures that your photos display correctly and look their best in Gmail.
4. Troubleshooting Common Issues
Even with the best preparation, you might encounter issues when attaching photos. Here are some common problems and how to solve them.
4.1. What To Do If The Photo Is Too Large To Attach?
If the photo is too large to attach, compress it using online tools or image editing software, use Google Drive to share the image via a link, or reduce the image dimensions. These methods help reduce file size while maintaining acceptable quality.
- Compress the Image: Use online tools like TinyPNG or ImageOptim to reduce the file size without significant quality loss.
- Use Google Drive: Upload the photo to Google Drive and share a link in your email. This allows recipients to view or download the photo without exceeding Gmail’s attachment limit.
- Reduce Image Dimensions: Use image editing software like Adobe Photoshop or GIMP to reduce the width and height of the image, which can significantly decrease the file size.
4.2. Why Is The Photo Not Displaying Correctly In The Email Body?
If the photo is not displaying correctly, ensure it is properly embedded as an inline image, check the image format, and test the email on different devices and email clients. Incorrect embedding, unsupported formats, and compatibility issues can cause display problems.
- Ensure Proper Embedding: Make sure you’ve inserted the photo as an inline image rather than just attaching it. Use the “Insert photo” icon in Gmail to embed the image correctly.
- Check the Image Format: Verify that the image is in a supported format like JPEG, PNG, or GIF. Other formats may not display correctly in Gmail.
- Test on Different Devices and Email Clients: Send a test email to yourself and open it on different devices (desktop, mobile) and in various email clients (Gmail, Outlook, Yahoo Mail) to check for compatibility issues.
 Adding alt text
4.3. How To Fix Blurry Or Pixelated Photos In Gmail?
To fix blurry or pixelated photos, use high-resolution images, optimize the image size for web viewing, and avoid excessive compression. These steps ensure your photos appear sharp and clear in Gmail.
- Use High-Resolution Images: Start with an image that has a high resolution. A higher resolution image contains more detail and will appear sharper.
- Optimize Image Size for Web Viewing: Resize the image to the appropriate dimensions for web viewing. Images that are too large can be scaled down by Gmail, which can result in blurriness.
- Avoid Excessive Compression: When compressing the image, use settings that balance file size and image quality. Excessive compression can lead to pixelation and loss of detail.
5. Advanced Tips And Tricks
Take your Gmail photo game to the next level with these advanced techniques.
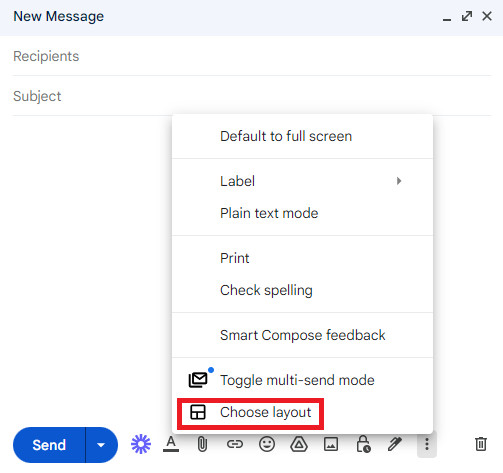
5.1. Using Gmail Layouts For More Sophisticated Image Insertion
Gmail Layouts, available in Google Workspace, allow you to insert images with pre-designed templates for sophisticated layouts. This feature enables you to create visually appealing emails with aligned images and formatted text, enhancing the overall presentation.
- Access Gmail Layouts:
- Compose a New Email: Open a new email in Gmail.
- Find the Layouts Icon: Look for the layouts icon (usually represented by a grid or template icon) in the compose window.
- Select a Template: Choose a pre-designed template that suits your needs.
- Customize the Layout:
- Add Images: Replace the placeholder images with your own by clicking on the image areas and uploading your photos.
- Format Text: Customize the text areas with your message, adjusting fonts, colors, and sizes as needed.
- Adjust Alignment: Use the layout tools to align images and text, creating a visually balanced and appealing email.
Gmail Layouts provide a more professional and polished look for your emails, making them stand out and capture the recipient’s attention.
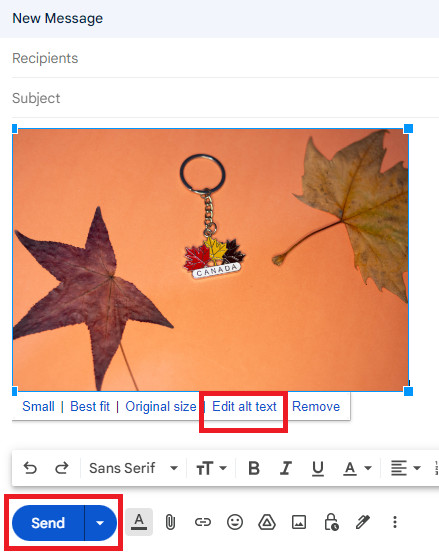
5.2. How To Add Alt Text To Photos For Accessibility?
To add alt text to photos in Gmail, insert the image inline, click on the image, select “Edit alt text”, enter a descriptive text, and click “Apply”. This makes your emails accessible to users with visual impairments and improves SEO.
Here’s a detailed guide:
- Insert the Image Inline: First, insert the photo into the body of your email using the “Insert photo” icon.
- Click on the Image: Once the image is inserted, click on it to select it.
- Select “Edit alt text”: A menu will appear. Look for the option to “Edit alt text” or “Add description”.
- Enter Descriptive Text: In the alt text field, enter a brief but descriptive text that explains what the image is about. For example, “Photo of Santa Fe University of Art and Design’s Photography Department”.
- Click “Apply”: Save your changes by clicking the “Apply” or “OK” button.
Adding alt text ensures that your emails are accessible to everyone, including those who use screen readers.
According to the Web Accessibility Initiative (WAI), providing alt text for images is a key principle of web accessibility. By including alt text, you make your content more inclusive and user-friendly.
5.3. Best Practices For Sending Photo-Heavy Emails
Best practices for sending photo-heavy emails include compressing images, using inline images sparingly, providing alt text, testing email display, and considering a link to an online album. These practices ensure emails are visually appealing, accessible, and load quickly.
- Compress Images: Reduce the file size of your images to ensure fast loading times and avoid exceeding Gmail’s attachment limit.
- Use Inline Images Sparingly: Too many inline images can slow down the email and make it look cluttered. Use them strategically to enhance your message.
- Provide Alt Text: Add alt text to all images for accessibility and SEO purposes.
- Test Email Display: Send a test email to yourself and view it on different devices and email clients to ensure the images display correctly.
- Consider a Link to an Online Album: For a large number of photos, consider uploading them to an online album (e.g., Google Photos, Flickr) and sharing a link in your email.
6. Integrating dfphoto.net Resources
Leverage dfphoto.net to enhance your photography skills and create even better visual content for your emails.
6.1. How To Use dfphoto.net To Improve Your Photography Skills?
Use dfphoto.net to improve your photography skills by exploring tutorials, joining workshops, viewing photo galleries, and engaging with the community. These resources offer valuable insights, inspiration, and feedback to enhance your photographic abilities.
- Explore Tutorials: dfphoto.net offers a wide range of tutorials covering various photography techniques, from basic composition to advanced editing.
- Join Workshops: Participate in online and in-person workshops to learn from experienced photographers and gain hands-on experience.
- View Photo Galleries: Browse the site’s photo galleries to get inspiration from other photographers and see examples of high-quality work.
- Engage with the Community: Join the dfphoto.net community forum to ask questions, share your work, and receive feedback from fellow photographers.
6.2. Finding High-Quality Images For Your Emails On dfphoto.net
Find high-quality images for your emails on dfphoto.net by browsing the curated galleries, using the search function, and ensuring proper attribution. This helps you select visually appealing and legally compliant images for your email content.
- Browse Curated Galleries: Explore the site’s curated galleries, which feature top-quality images selected by dfphoto.net’s editors.
- Use the Search Function: Use the search function to find images related to specific topics or themes.
- Ensure Proper Attribution: Always check the licensing terms of the images and provide proper attribution to the photographer when required.
6.3. Showcasing Your Photos From dfphoto.net In Gmail
Showcase your photos from dfphoto.net in Gmail by attaching them directly, inserting them inline with alt text, or linking to your dfphoto.net portfolio. This allows you to share your best work with contacts and promote your photography skills.
- Attach Photos Directly: Attach your favorite photos from dfphoto.net directly to your email.
- Insert Inline with Alt Text: Insert photos inline and add alt text to describe the images and provide context.
- Link to Your dfphoto.net Portfolio: Include a link to your dfphoto.net portfolio in your email signature or body to showcase your full range of work.
7. Staying Updated With Gmail’s Features
Keeping up with Gmail’s latest features ensures you can take full advantage of its capabilities for attaching and displaying photos.
7.1. How To Keep Up With New Gmail Features Related To Images?
Keep up with new Gmail features related to images by following the Google Workspace Updates blog, subscribing to photography newsletters, and participating in online forums. These resources provide timely information on new features, updates, and best practices.
- Follow the Google Workspace Updates Blog: This blog provides official announcements about new features and updates in Google Workspace, including Gmail.
- Subscribe to Photography Newsletters: Stay informed about the latest trends and techniques in photography by subscribing to newsletters from reputable sources like Popular Photography.
- Participate in Online Forums: Engage with online photography communities on platforms like dfphoto.net to discuss new Gmail features and share tips with other users.
7.2. Exploring Future Possibilities For Image Handling In Gmail
Future possibilities for image handling in Gmail include enhanced AI-powered optimization, improved integration with Google Photos, and more interactive display options. These advancements could streamline the process of attaching and showcasing photos in emails.
- Enhanced AI-Powered Optimization: Future Gmail updates may include AI-powered tools that automatically optimize images for file size, resolution, and display quality.
- Improved Integration with Google Photos: Gmail could offer tighter integration with Google Photos, allowing users to easily access and share images directly from their Google Photos library.
- More Interactive Display Options: Future versions of Gmail might introduce more interactive display options, such as the ability to create photo slideshows or galleries directly within emails.
8. FAQ: Common Questions About Attaching Photos In Gmail
8.1. Can I Attach Multiple Photos At Once In Gmail?
Yes, you can attach multiple photos at once in Gmail. When you click the “Attach files” icon, you can select multiple files from your computer by holding down the Ctrl (or Command on Mac) key while clicking on each photo. Then, click “Open” to attach all the selected photos to your email.
8.2. Is There A Limit To The Number Of Photos I Can Attach?
While there isn’t a specific limit to the number of photos you can attach, the total size of all attachments must not exceed 25MB. If your photos exceed this limit, you’ll need to compress them or use Google Drive to share them.
8.3. How Do I Resize An Image Directly In Gmail?
Gmail does not offer a built-in tool to resize images directly. You need to resize the image before attaching it, using image editing software or online tools. Once the image is inserted inline, you can click on it and drag the corners to adjust its size within the email body, but this does not reduce the file size.
8.4. Can I Add A Caption To An Attached Photo In Gmail?
You cannot directly add a caption to an attached photo in Gmail. However, you can add a caption to an inline image by inserting the image into the email body and typing the caption below it. For attachments, you can mention the photo and its description in the body of your email.
8.5. How Do I Ensure My Photos Are Secure When Sending Them Via Gmail?
To ensure your photos are secure, use Gmail’s confidential mode, which allows you to set an expiration date for the email and require recipients to verify their identity with a passcode. Additionally, be cautious about who you send your photos to and avoid sending sensitive images over email.
8.6. What Does “Insert Inline” Mean When Adding Photos To Gmail?
“Insert inline” means that the photo is embedded directly into the body of your email, so it appears within the text rather than as a separate attachment. This allows recipients to see the image immediately without having to download it.
8.7. Why Are My Attached Photos Appearing As Small Icons?
Attached photos may appear as small icons if the email client is not displaying them inline or if the recipient’s settings prevent images from being displayed automatically. Ensure that you are attaching the photos correctly and advise recipients to check their email settings.
8.8. How Can I Prevent My Photos From Being Compressed By Gmail?
To prevent your photos from being compressed by Gmail, avoid sending very large files and ensure that your images are already optimized for web viewing. Compressing the images yourself before attaching them gives you more control over the final quality.
8.9. Can I Use Animated GIFs In Gmail Emails?
Yes, you can use animated GIFs in Gmail emails. Simply insert the GIF as an inline image, and it will play automatically in the email body. Ensure that the GIF file size is reasonable to avoid slowing down the email.
8.10. What Is The Difference Between Attaching A Photo And Embedding It In Gmail?
Attaching a photo means the photo is sent as a separate file along with the email. Embedding a photo (inserting it inline) means the photo is displayed directly within the body of the email, so it is immediately visible to the recipient.
9. Conclusion: Elevate Your Emails With Stunning Photos
Mastering How To Attach A Photo In Gmail opens up a world of possibilities for enhancing your email communication. Whether you’re a professional photographer sharing your latest work or simply adding a personal touch to your messages, incorporating visuals can significantly boost engagement and convey your message more effectively. With the tips and tricks outlined in this guide, you’re well-equipped to create visually stunning emails that stand out.
Remember to explore the resources available at dfphoto.net to further refine your photography skills and discover inspiration for your next visual project. From tutorials and workshops to curated galleries and a vibrant community, dfphoto.net offers everything you need to elevate your photographic journey.
Ready to take your photography to the next level? Visit dfphoto.net today to explore our comprehensive resources, connect with fellow photographers, and unlock your creative potential. Discover inspiring galleries, in-depth tutorials, and a supportive community that will help you master the art of photography. Don’t miss out on the opportunity to enhance your skills and showcase your work. Join dfphoto.net now and start your journey towards photographic excellence.
Address: 1600 St Michael’s Dr, Santa Fe, NM 87505, United States
Phone: +1 (505) 471-6001
Website: dfphoto.net