Sharing photos between iPhones has never been easier thanks to AirDrop, Apple’s seamless file transfer feature. Whether you’re swapping vacation snapshots with a friend or sending a quick picture to your own iPad, AirDrop provides a fast and private way to wirelessly share photos and other files between nearby Apple devices. This guide will walk you through everything you need to know about How To Airdrop Photos From Iphone To Iphone, ensuring a smooth and successful sharing experience every time.
Before you start using AirDrop to send your precious photos, there are a few essential checks to ensure a smooth transfer. Let’s quickly run through these prerequisites to avoid any hiccups.
Getting Ready to AirDrop: Essential Prerequisites
For AirDrop to work effectively between iPhones, both devices need to be within close proximity, typically within Bluetooth and Wi-Fi range (around 30 feet or 9 meters). Here’s a checklist to ensure you’re both set up correctly:
- Proximity: Make sure the sending and receiving iPhones are physically near each other.
- Wi-Fi and Bluetooth: Both iPhones must have Wi-Fi and Bluetooth enabled. You don’t need to be connected to a specific Wi-Fi network, but Wi-Fi needs to be turned on for AirDrop to function. Similarly, Bluetooth needs to be active for device discovery.
- Personal Hotspot: If either iPhone has Personal Hotspot turned on, it’s crucial to disable it temporarily. Personal Hotspot can interfere with AirDrop connectivity.
- AirDrop Receiving Settings: This is a key setting. The receiving iPhone determines who can send files via AirDrop. There are two main settings to consider:
- Contacts Only: If the receiving iPhone is set to “Contacts Only,” only people in their Contacts app can AirDrop to them. If you are sending to someone with this setting, and you are in their contacts, they need to have either your Apple ID email address or phone number associated with your contact card for AirDrop to work.
- Everyone: To receive files from anyone nearby, regardless of whether they are in contacts, the receiving iPhone needs to have its AirDrop setting set to “Everyone.” For enhanced security, in iOS 16.2 and later, setting it to “Everyone” defaults back to “Contacts Only” after 10 minutes.
You can easily adjust your AirDrop receiving settings at any time for privacy and control over who can discover your device and send you content. Now that we’ve covered the preliminary steps, let’s dive into the process of actually AirDropping those photos.
Step-by-Step Guide: How to AirDrop Photos
Sending photos via AirDrop is a straightforward process. Follow these simple steps to quickly share your images:
-
Open the Photos App and Select Photos: Launch the Photos app on your iPhone and navigate to the photos you wish to share. You can select single or multiple photos. To select multiple photos, tap “Select” in the top right corner and then tap on each photo you want to include.
-
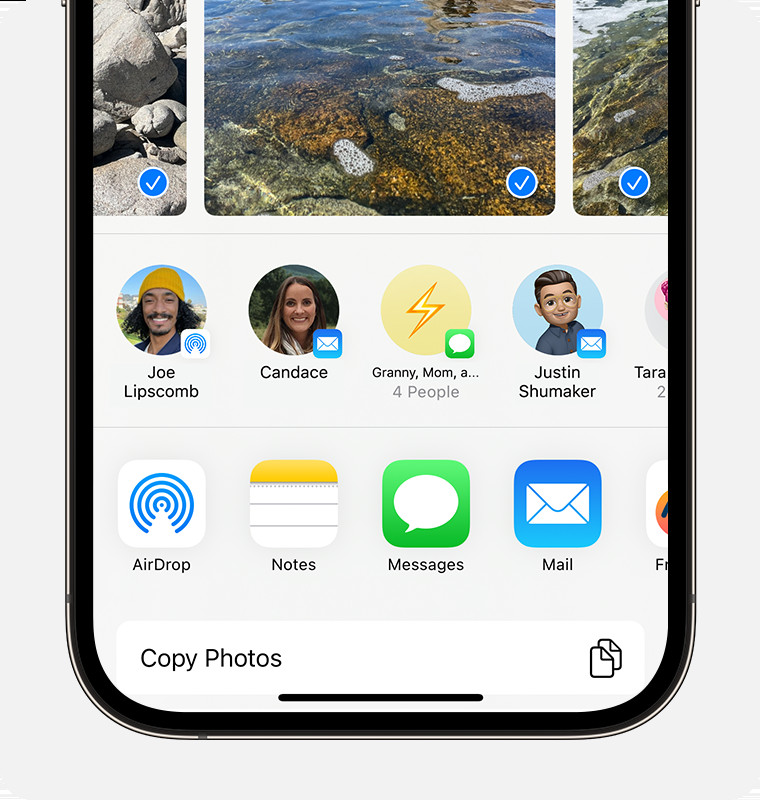
Tap the Share Button: Once you’ve selected your photos, look for the Share button, which is typically located in the bottom left corner of the screen. It’s represented by an upward-pointing arrow in a box. Tap this button to bring up the share sheet.
-
Choose AirDrop: On the share sheet, you’ll see various sharing options. Look for the AirDrop icon, which is a circle with radiating lines. Tap the “AirDrop” button.
 An iPhone displaying the share sheet with multiple photos selected and the AirDrop option highlighted.
 -
Select the Recipient iPhone: After tapping AirDrop, your iPhone will start searching for nearby AirDrop-enabled devices. You will see a list of available users.
- If the person you are sending photos to is in your Contacts, their name will appear with their contact photo (if they have one set).
- If they are not in your contacts, you will see just their name without a photo.
- Tap on the name of the person you want to AirDrop the photos to.
Alternatively, for users with iOS 17 and later, there’s an even quicker method: if both you and the recipient have iPhones with iOS 17, you can simply bring your iPhones close together after selecting the content to share. This initiates the AirDrop transfer automatically if the recipient is in your contacts.
Accepting AirDrop Photos: What the Recipient Needs to Do
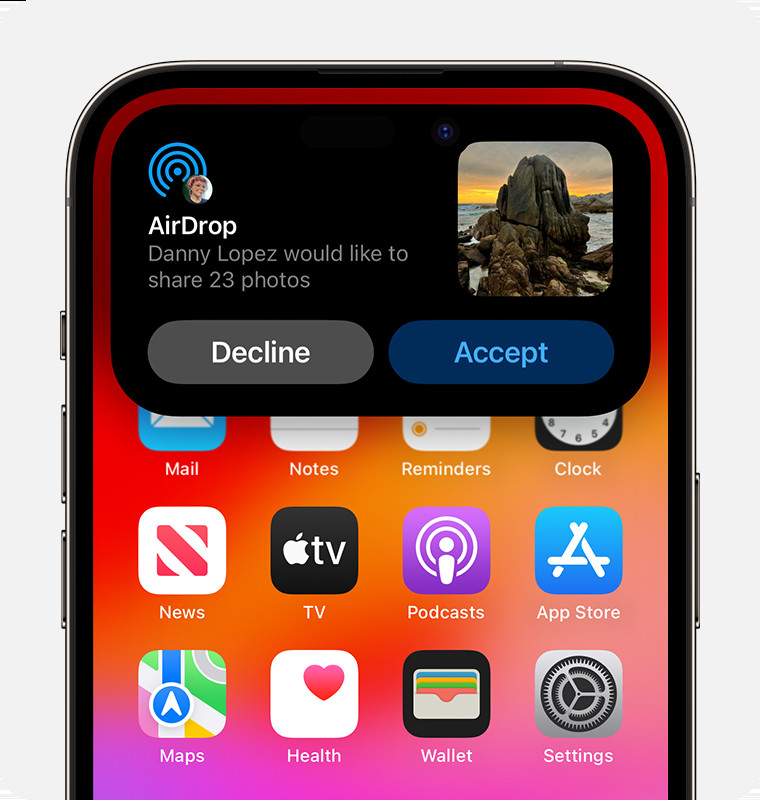
When someone AirDrops photos (or any file) to your iPhone, you’ll receive a notification alert on your screen.
 An iPhone displaying an AirDrop alert with options to accept or decline the incoming file transfer.
- Accept or Decline: You’ll see two options: “Accept” and “Decline.” Tap “Accept” to receive the photos. If you don’t want to receive the photos, tap “Decline.”
- Automatic Acceptance (for your own devices): If you AirDrop photos to another of your own Apple devices (for example, from your iPhone to your iPad) and both devices are logged in with the same Apple ID, the transfer will happen automatically. You won’t see an “Accept” or “Decline” prompt. The photos will simply appear on your other device.
Once you tap “Accept,” the photos will be transferred and saved to your Photos app. The transfer speed is typically very quick, especially for smaller files like photos.
Customizing Your AirDrop Settings for Privacy and Control
You have granular control over who can see your device and send you content via AirDrop. Adjusting these settings is easy and can be done in two ways: through the Settings app or via Control Center.
Method 1: Via Settings App
-
Open Settings: Go to the “Settings” app on your iPhone’s home screen.
-
Tap General: Scroll down and tap on “General.”
-
Tap AirDrop: Look for and tap the “AirDrop” option.
-
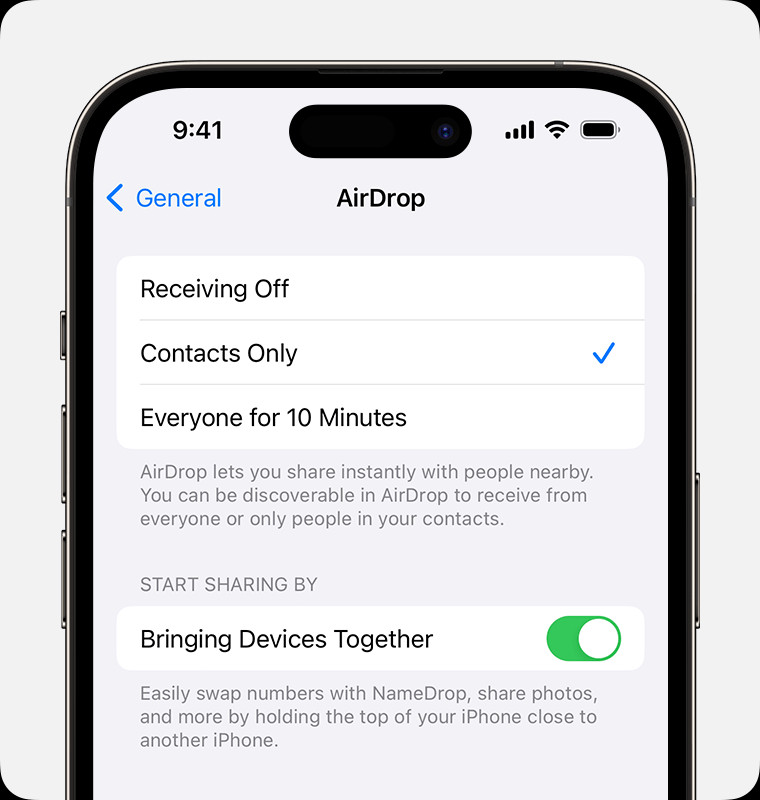
Choose Your Preference: Here, you can select from the following options:
- Receiving Off: You will not receive any AirDrop requests.
- Contacts Only: Only people in your contacts can see your device and AirDrop to you.
- Everyone: Anyone nearby using AirDrop can see your device. As mentioned earlier, in iOS 16.2 and later, this setting will revert to “Contacts Only” after 10 minutes for security if you choose “Everyone for 10 Minutes.”
 An iPhone showing AirDrop settings with "Contacts Only" option selected for receiving files.
Method 2: Via Control Center
Control Center provides quick access to AirDrop settings:
- Open Control Center:
- iPhone X and later: Swipe down from the top-right corner of your screen.
- iPhone 8 and earlier: Swipe up from the bottom of the screen.
- Force Touch or Long Press Network Settings Card: In the upper-left corner of Control Center, you’ll see a card with network settings (Airplane Mode, Wi-Fi, Bluetooth, Cellular). Force touch (press firmly) or touch and hold this card to expand it.
- Touch and Hold AirDrop Button: In the expanded network settings, you’ll see the AirDrop button. Touch and hold the AirDrop button.
- Select Your Option: Choose between “Receiving Off,” “Contacts Only,” or “Everyone,” just as you would in the Settings app.
If you find that the AirDrop option is set to “Receiving Off” and you can’t change it, it might be restricted by Screen Time settings. To resolve this:
- Go to Settings > Screen Time.
- Tap Content & Privacy Restrictions.
- Tap Allowed Apps and ensure that AirDrop is toggled on.
AirDrop: Your Go-To for iPhone Photo Sharing
AirDrop is an incredibly convenient and efficient way to share photos and files between iPhones. By understanding the simple steps and settings involved, you can seamlessly transfer your cherished memories with friends and family, or between your own Apple devices, making the most of your iPhone’s capabilities. Whether it’s a quick snapshot or a whole album of adventures, AirDrop makes sharing photos a breeze.

