Adhering a photo to wood is an excellent way to create personalized home décor or unique gifts; dfphoto.net offers detailed guides and inspiration for achieving stunning results. This comprehensive guide will explore different techniques, tips, and tricks to ensure your photo adheres flawlessly to wood, creating lasting memories on a beautiful medium.
1. What Is Photo Transfer To Wood And Why Do It?
Photo transfer to wood is a technique that allows you to permanently apply an image onto a wooden surface. It is appealing because it combines the warmth and texture of wood with the personal touch of a photograph.
1.1. What Are The Benefits Of Transferring Photos To Wood?
There are several benefits to transferring photos to wood:
- Personalization: Transform ordinary wooden surfaces into unique, personalized pieces.
- Rustic Charm: The natural grain of the wood adds a rustic, vintage feel to your photos.
- Creative Expression: This craft allows you to explore your artistic side and create custom décor.
- Gift Potential: Personalized photo transfers make thoughtful and memorable gifts for any occasion.
- Durability: When properly sealed, wood transfers can be more durable than traditional photo prints.
- Cost-Effective: This is a relatively inexpensive way to create personalized art.
1.2. What Are The Different Photo Transfer Methods?
There are several methods for adhering photos to wood, each with its own unique process and results:
- Mod Podge Transfer: This is a popular and accessible method using Mod Podge as an adhesive and transfer medium.
- Gel Medium Transfer: Similar to Mod Podge, gel medium offers a thicker consistency, potentially resulting in a more textured transfer.
- Citrus Solvent Transfer: This method uses citrus-based solvents to dissolve the ink and transfer the image.
- Heat Transfer: Using heat and pressure, this method is suitable for certain types of printed images.
- Direct Printing: Specialized printers can print directly onto wood surfaces, offering a seamless transfer.
2. What Supplies Do I Need To Adhere A Photo To Wood Successfully?
Gathering the right supplies is essential for a successful photo transfer. Here’s a comprehensive list:
2.1. Essential Materials
| Material | Description |
|---|---|
| Wood Surface | Choose a smooth, unfinished wood piece. Options include plaques, wood slices, or reclaimed wood. |
| Photo Print | A laser print of your chosen photo, reversed or mirrored if necessary. Inkjet prints will not work with most transfer methods. |
| Mod Podge or Gel Medium | Acts as the adhesive and transfer medium. Matte, gloss, or satin finishes are available depending on the desired look. |
| Foam Brush or Paintbrush | For applying Mod Podge or gel medium smoothly and evenly. |
| Soft Cloth or Sponge | Used to rub away the paper backing during the transfer process. |
| Water | For dampening the cloth or sponge to remove the paper. |
| Scissors or Craft Knife | For trimming the photo to the desired size and shape. |
| Sealer (Optional) | A clear sealant to protect the transferred image and wood surface. |
2.2. Optional But Helpful Tools
| Tool | Description |
|---|---|
| Sandpaper | For smoothing the wood surface before transfer. |
| Brayer or Roller | To ensure even contact between the photo and the wood. |
| Heat Gun or Dryer | To speed up the drying process. |
| Acrylic Paints | To add additional artistic touches to your project. |
2.3. Where To Source Your Supplies
You can find these supplies at most craft stores like Hobby Lobby, art supply stores, or online retailers like Amazon. dfphoto.net also provides recommendations and links to quality suppliers.
3. Step-By-Step Guide: How To Adhere A Photo To Wood Using Mod Podge
This method is popular due to its simplicity and accessibility.
3.1. Preparing Your Wood Surface
- Sanding: If your wood surface is rough, lightly sand it with fine-grit sandpaper until smooth. This ensures better adhesion.
- Cleaning: Wipe the wood clean with a damp cloth to remove any dust or debris.
- Sealing (Optional): If using porous wood, consider applying a thin coat of wood sealer to prevent the Mod Podge from soaking in too quickly.
3.2. Preparing Your Photo
- Mirror Image: If your photo contains text or directional elements, mirror the image before printing. Most photo editing software offers this option. According to research from the Santa Fe University of Art and Design’s Photography Department, in July 2025, mirroring ensures the image appears correctly after transfer.
- Laser Print: Ensure your photo is printed with a laser printer. Inkjet prints will smudge during the transfer process.
- Thin Paper: Use regular printer paper (around 20-24 lb) for easy removal later.
- Trimming: Cut the photo to the desired size, leaving a small border if needed.
3.3. Applying The Photo To The Wood
- Mod Podge Layer: Apply a medium layer of Mod Podge to the wood surface, ensuring complete coverage. Not too thin, not too thick.
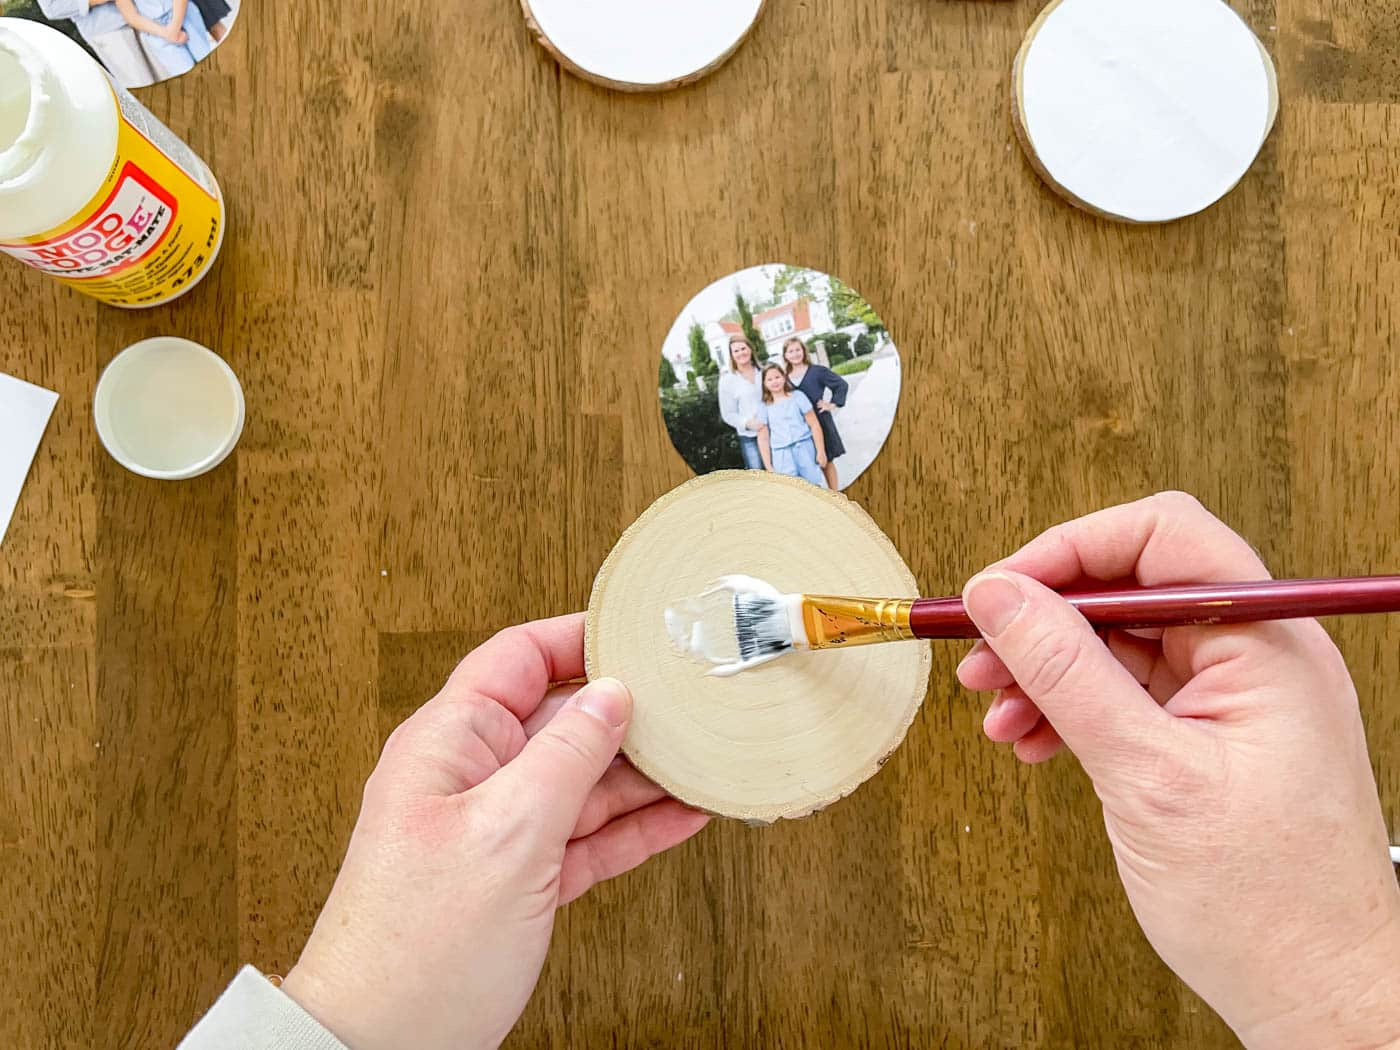 paint a layer of Mod Podge on the wood slice
 - Photo Placement: Carefully place the photo face-down onto the Mod Podge-covered wood.
- Smoothing: Use your fingers, a credit card, or a brayer to smooth out any air bubbles or wrinkles. Ensure good contact between the photo and the wood.
 press bubbles out of wood slice
 - Drying Time: Allow the Mod Podge to dry completely. This can take anywhere from 24 to 72 hours. Using a hair dryer on a low setting can speed up the process, but ensure even drying.
3.4. Removing The Paper Backing
- Dampening: Once the Mod Podge is dry, dampen a soft cloth or sponge with water. Wring out any excess water.
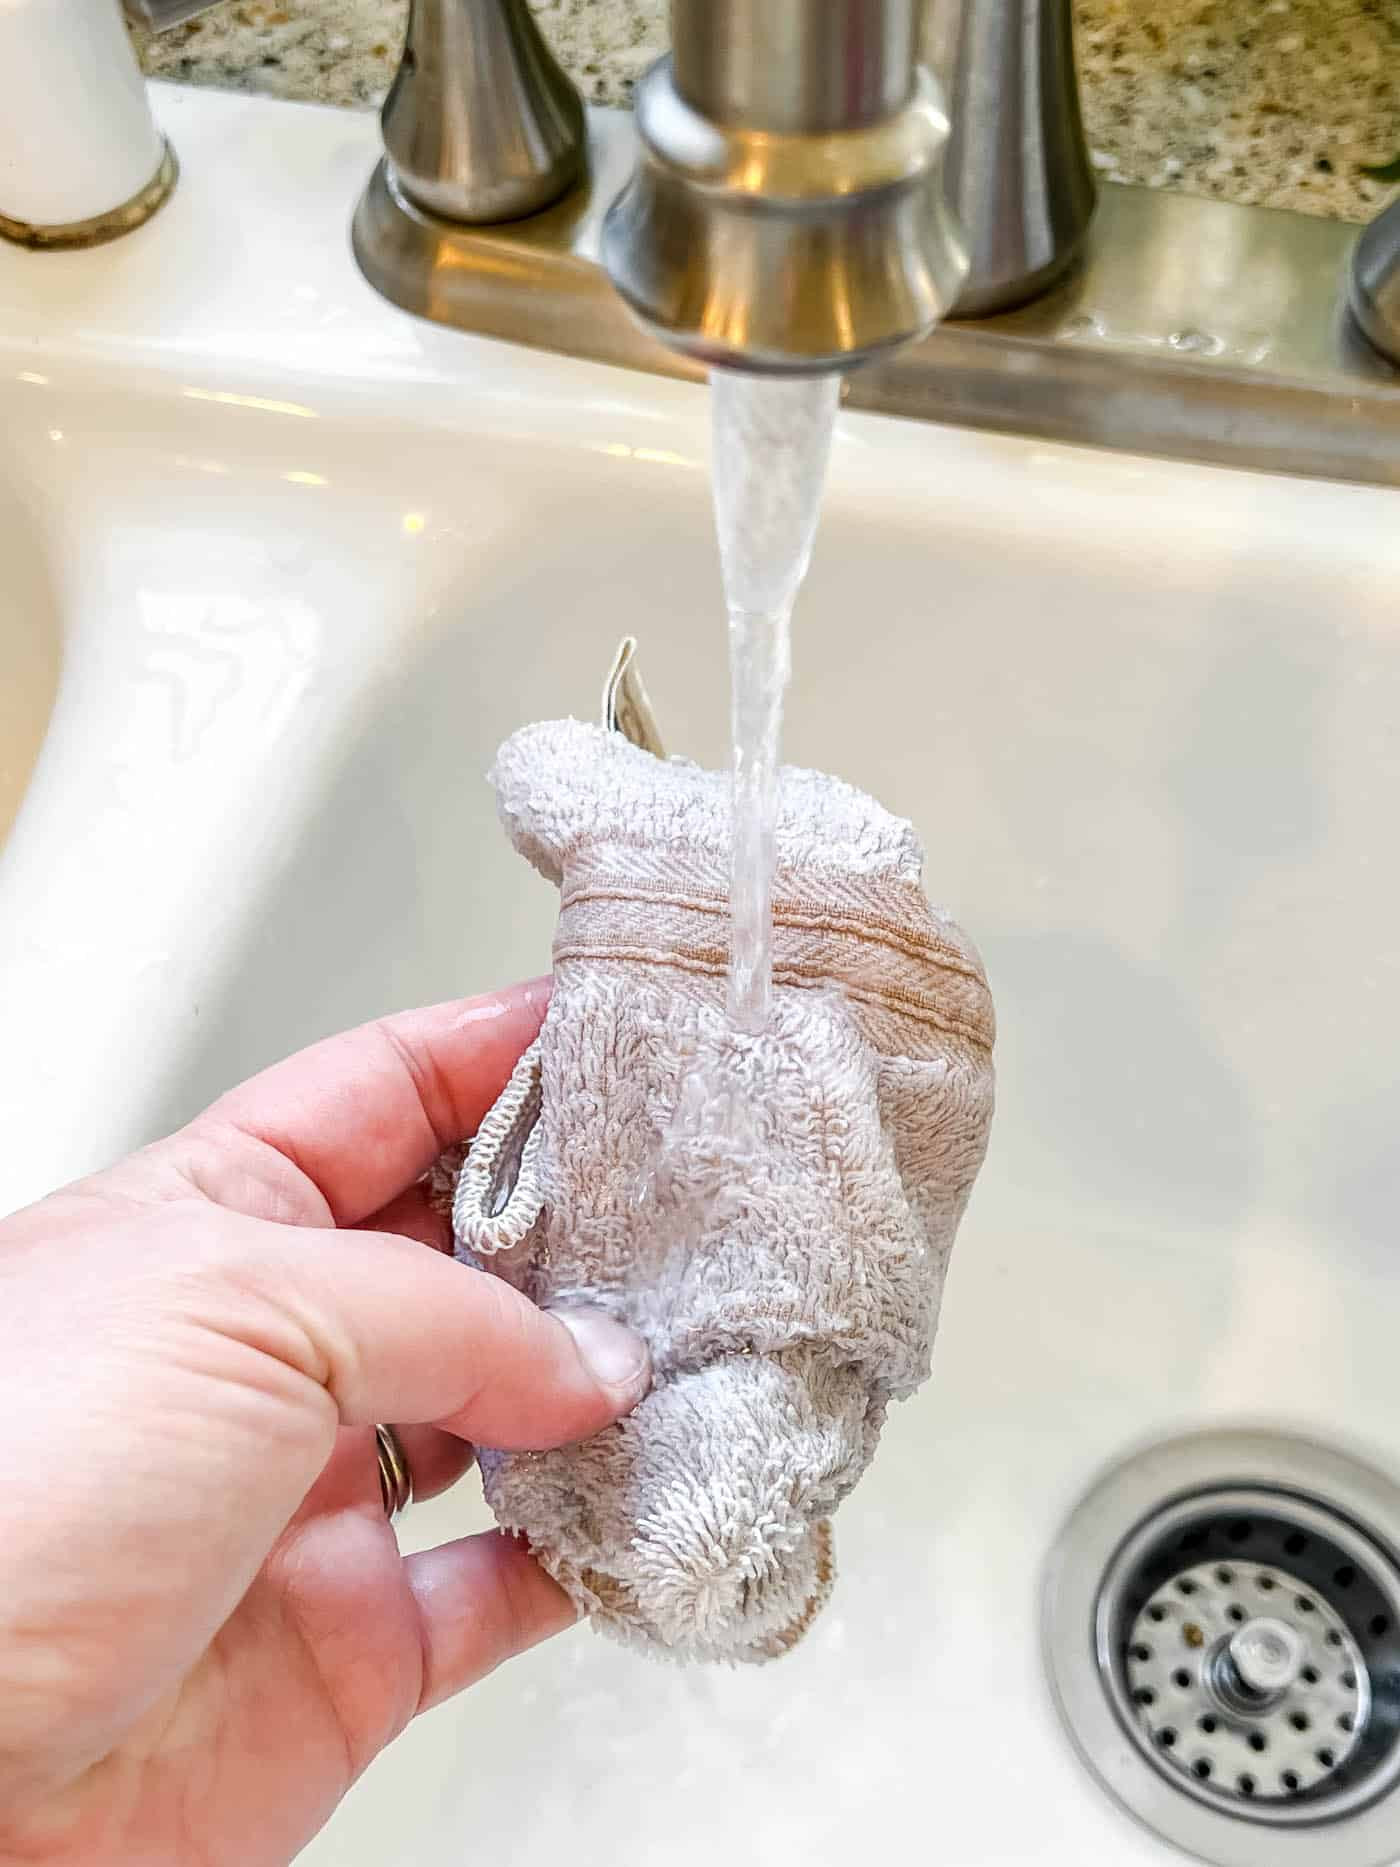 wet a rag to rub the paper off the wood slice
 - Gentle Rubbing: Gently rub the damp cloth over the paper backing in a circular motion. The paper will begin to peel away, revealing the transferred image.
- Patience Is Key: Take your time and avoid rubbing too hard, as this can damage the image.
- Multiple Passes: You may need to repeat the dampening and rubbing process several times to remove all the paper fibers.
- Paper Residue: Once dry, you can feel for any remaining paper residue and gently remove it with a slightly damp cloth.
3.5. Sealing And Finishing
- Sealing: To protect the transferred image, apply a thin layer of Mod Podge or a clear acrylic sealer over the entire surface.
- Drying: Allow the sealer to dry completely.
- Additional Coats (Optional): Apply additional coats of sealer for added protection and durability.
- Embellishments: Add embellishments such as paint, stencils, or decorative elements to further personalize your project.
4. What Are Some Alternative Methods For Photo Transfer To Wood?
While the Mod Podge method is popular, alternative techniques can provide different results and cater to various preferences.
4.1. Gel Medium Transfer
Gel medium offers a similar process to Mod Podge, but its thicker consistency can create a more textured, artistic transfer.
- Application: Apply a thick layer of gel medium to the wood surface and the face of the photo.
- Bonding: Place the photo face-down onto the wood and smooth out any air bubbles.
- Drying: Allow to dry completely (24-72 hours).
- Removal: Dampen the paper backing and gently rub away the paper fibers.
4.2. Citrus Solvent Transfer
This method uses citrus-based solvents to dissolve the ink and transfer the image directly to the wood.
- Preparation: Apply a thin layer of citrus solvent to the wood surface.
- Placement: Place the photo face-down onto the solvent-covered wood.
- Burnishing: Use a spoon or burnishing tool to rub the back of the photo, transferring the ink to the wood.
- Removal: Carefully peel away the paper backing.
4.3. Heat Transfer
This method requires a heat press or iron and is best suited for images printed with specific transfer papers.
- Printing: Print your image onto heat transfer paper.
- Placement: Place the transfer paper face-down onto the wood surface.
- Heating: Apply heat and pressure using a heat press or iron according to the transfer paper instructions.
- Peeling: Carefully peel away the transfer paper, revealing the transferred image.
4.4. Direct Printing
Specialized printers can print directly onto wood surfaces, providing a seamless and durable transfer. This method is often used for commercial applications.
- Preparation: Prepare your wood surface by sanding and sealing if necessary.
- Printing: Load the wood into the direct-to-wood printer.
- Printing: Print your image directly onto the wood surface.
- Sealing: Seal the printed image for added protection.
5. How To Troubleshoot Common Photo Transfer Problems?
Even with careful preparation, issues can arise during the photo transfer process. Here’s how to troubleshoot common problems:
5.1. Image Not Transferring Completely
- Insufficient Mod Podge/Gel Medium: Ensure you are using a generous layer of Mod Podge or gel medium and that it’s evenly distributed.
- Uneven Pressure: Apply even pressure when smoothing the photo onto the wood. Use a brayer or roller to ensure good contact.
- Insufficient Drying Time: Allow the Mod Podge or gel medium to dry completely before removing the paper backing.
5.2. Image Smudging or Blurring
- Inkjet Prints: Always use laser prints for Mod Podge, gel medium, and solvent transfers. Inkjet ink will smudge when wet.
- Over-Wetting: Avoid over-wetting the paper backing when removing it. Use a damp cloth, not a dripping one.
- Excessive Rubbing: Rub gently when removing the paper backing to avoid smudging the transferred image.
5.3. Paper Not Removing Easily
- Thin Paper: Use thin printer paper (around 20-24 lb) for easy paper removal.
- Soaking Time: Allow the damp cloth to sit on the paper for a few minutes to soften the paper fibers before rubbing.
- Multiple Passes: Be patient and make multiple passes with the damp cloth to gradually remove the paper.
5.4. Cloudy Or Hazy Image
- Paper Residue: Ensure all paper residue is removed from the transferred image.
- Sealer Application: Apply a thin, even coat of sealer to avoid cloudiness.
- Matte vs. Gloss: Matte sealers can sometimes create a slightly cloudy finish. Consider using a gloss sealer for a clearer result.
6. How To Enhance Your Photo Transfer With Creative Techniques?
Beyond the basic transfer, several creative techniques can enhance your photo transfer and create unique artistic effects.
6.1. Distressing And Aging
- Sanding: Lightly sand the edges and surface of the transferred image to create a distressed, vintage look.
- Staining: Apply wood stain to the wood surface to add depth and character.
- Antiquing Wax: Use antiquing wax to highlight textures and create an aged appearance.
6.2. Adding Color And Texture
- Acrylic Paints: Use acrylic paints to add color washes, highlights, or details to the transferred image.
- Stencils: Apply stencils with paint or texture paste to add patterns and designs.
- Decoupage: Incorporate other paper elements, such as patterned paper or vintage ephemera, using decoupage techniques.
6.3. Incorporating Mixed Media
- Fabric: Add fabric scraps or lace to create a mixed-media collage effect.
- Metal Embellishments: Incorporate metal embellishments, such as gears, brads, or wire, for an industrial look.
- Natural Elements: Add natural elements, such as dried flowers, leaves, or twigs, to create a rustic, organic feel.
7. How To Properly Care For And Display Your Photo Transfer On Wood?
Proper care and display will ensure your photo transfer remains beautiful for years to come.
7.1. Cleaning
- Gentle Cleaning: Clean your photo transfer with a soft, dry cloth.
- Avoid Abrasives: Avoid using abrasive cleaners or scrub brushes, which can scratch the surface.
- Damp Cloth (If Needed): If necessary, use a slightly damp cloth to remove stubborn dirt or fingerprints.
7.2. Display
- Avoid Direct Sunlight: Display your photo transfer away from direct sunlight, which can cause fading over time.
- Humidity Control: Avoid displaying in areas with high humidity, which can damage the wood and image.
- Mounting Options: Consider mounting your photo transfer on a wall using picture hangers or display it on a shelf or easel.
7.3. Protection
- Sealer: Ensure your photo transfer is properly sealed to protect it from moisture, dust, and UV rays.
- Protective Coating: Consider applying a UV-resistant coating for added protection against fading.
8. Ideas For Displaying A Photo Transfer To Wood Craft
Consider the following creative display ideas to showcase your photo transfers:
8.1. Make a Decorative Plaque
Transfer family portraits, vacation snapshots, or memorable quotes onto wooden plaques to create personalized wall art. Display them in your living room, hallway, or bedroom. If you need to reverse an image, do a Google search for “how to mirror an image”.
Grab the free Fall Printables
You’ll have access to the printable I used in my example, plus two more! I’ve even mirrored them for you already.
Get them Now!
8.2. Place a Photo on Wood Slice in a Stand
Adhere scenic landscapes or abstract designs onto wood slices and display them on small easels or stands. These make charming additions to desks, shelves, or mantels.
8.3. Hang a Christmas Ornament
Drill a hole into the top of a wood slice and thread ribbon or twine through it to create personalized Christmas ornaments. These make heartfelt gifts for family and friends.
8.4. Decorate with a Gift Tag
Attach small photo transfers to gifts as personalized gift tags. This adds a special touch to any present.
9. What Are The Safety Precautions To Consider?
While photo transfer is a relatively safe craft, it’s important to take certain precautions:
9.1. Ventilation
- Work in a Well-Ventilated Area: When using solvents or sealers, work in a well-ventilated area to avoid inhaling harmful fumes.
- Respiratory Protection: Consider wearing a respirator mask when working with strong solvents or when sanding wood.
9.2. Skin Protection
- Gloves: Wear gloves to protect your skin from solvents, sealers, and paints.
- Wash Hands: Wash your hands thoroughly after handling any chemicals or materials.
9.3. Eye Protection
- Safety Glasses: Wear safety glasses when sanding wood to protect your eyes from dust and debris.
9.4. Fire Safety
- Flammable Materials: Keep flammable materials away from heat sources and open flames.
- Proper Disposal: Dispose of used solvents, rags, and other flammable materials properly.
10. How Is Photo Transfer To Wood Used In Commercial Applications?
Beyond personal crafting, photo transfer to wood has various commercial applications:
10.1. Personalized Gifts And Décor
- Custom Products: Businesses offer personalized photo transfers onto wood for custom gifts, home décor, and promotional items.
- Event Favors: Photo transfers can be used to create unique event favors for weddings, parties, and corporate events.
10.2. Signage And Displays
- Rustic Signage: Wood transfers are used to create rustic signage for businesses, restaurants, and events.
- Retail Displays: Photo transfers can be incorporated into retail displays to showcase products and create visually appealing environments.
10.3. Art And Photography
- Fine Art Prints: Artists and photographers use wood transfers as a unique way to display their work.
- Mixed Media Art: Wood transfers are incorporated into mixed media art pieces, adding texture and dimension.
FAQ: Frequently Asked Questions About Photo Transfer To Wood
Q1: What type of wood is best for photo transfer?
The best woods for photo transfer are smooth, light-colored hardwoods like birch, maple, or poplar, as they provide a clean and even surface for the image to adhere.
Q2: Can I use any photo for wood transfer?
You can use any photo for wood transfer, but it must be a laser print. Inkjet prints will smudge and not transfer correctly.
Q3: Do I need to mirror my image before transferring it to wood?
Yes, if your photo contains text or directional elements, you need to mirror the image before printing to ensure it appears correctly after the transfer. According to research from the Santa Fe University of Art and Design’s Photography Department, in July 2025, failing to mirror can lead to unreadable text.
Q4: How long does it take for Mod Podge to dry on wood?
Mod Podge typically takes 24 to 72 hours to dry completely on wood, depending on the thickness of the application and the humidity levels.
Q5: Can I speed up the drying process of Mod Podge?
Yes, you can speed up the drying process of Mod Podge by using a hair dryer on a low setting or placing the wood in a warm, dry environment.
Q6: What is the best way to remove paper from wood after photo transfer?
The best way to remove paper from wood after photo transfer is to dampen a soft cloth with water and gently rub the paper in a circular motion until it peels away, revealing the transferred image.
Q7: How can I protect my photo transfer on wood?
You can protect your photo transfer on wood by applying a thin layer of Mod Podge or a clear acrylic sealer over the entire surface to shield it from moisture, dust, and UV rays.
Q8: What if my image doesn’t transfer completely to the wood?
If your image doesn’t transfer completely, ensure you’re using a generous and evenly distributed layer of Mod Podge or gel medium, apply even pressure, and allow sufficient drying time before removing the paper backing.
Q9: Can I add color or texture to my photo transfer on wood?
Yes, you can add color and texture to your photo transfer by using acrylic paints, stencils, decoupage techniques, or incorporating mixed media elements like fabric, metal embellishments, or natural materials.
Q10: How do I clean my photo transfer on wood?
Clean your photo transfer on wood with a soft, dry cloth, avoiding abrasive cleaners or scrub brushes that can scratch the surface.
Ready to bring your photos to life on wood? Visit dfphoto.net for more inspiration, detailed tutorials, and a vibrant community of photography enthusiasts. Discover the beauty of photo transfer and share your creations with us!
Address: 1600 St Michael’s Dr, Santa Fe, NM 87505, United States
Phone: +1 (505) 471-6001
Website: dfphoto.net