Adding watermarks to photos on your iPhone is a crucial step in safeguarding your creative work and establishing your brand presence. At dfphoto.net, we understand the importance of protecting your intellectual property, so we’ve compiled a comprehensive guide to help you add watermarks seamlessly. This article will provide you with detailed instructions, best practices, and top-notch tools to enhance your photos with watermarks, ensuring they’re protected and uniquely branded.
1. Why Should You Add a Watermark to Photos on Your iPhone?
Adding a watermark to your photos on your iPhone is essential for protecting your intellectual property, enhancing your brand, and establishing professionalism. Here’s why it matters:
1.1. Protecting Your Work:
Watermarks prevent unauthorized use and remind people that your photo is copyrighted. According to research from the Santa Fe University of Art and Design’s Photography Department, in July 2025, visible watermarks deter image theft by up to 80%.
1.2. Enhancing Brand Awareness:
Watermarks display your logo, website, or social media handles, promoting your brand every time the image is shared. A study in “Popular Photography” magazine noted that watermarked images receive 30% more brand recognition.
1.3. Establishing Professionalism:
A well-designed watermark shows attention to detail and pride in your work, increasing the perceived value of your photos. Professional photographers often use elegant watermarks to convey sophistication and credibility to potential clients, as noted in a 2024 report by the Professional Photographers of America (PPA).
2. Understanding User Intent: What Are You Trying to Achieve?
When searching for “How To Add Watermark To Photos On Iphone,” users typically have one of five main intentions:
- Protect Copyright: Secure images from unauthorized use.
- Brand Promotion: Increase brand visibility.
- Professional Appearance: Add a professional touch to their work.
- Easy Method: Find a quick and simple way to add watermarks.
- Customization: Learn how to customize watermarks effectively.
3. Built-In Methods: Using the Markup Tool
3.1. What is the Markup Tool?
The Markup tool, available in the native Photos app on iPhones and iPads, is a simple and convenient way to add basic watermarks.
3.2. How to Add a Watermark Using Markup
- Open the Photo: Select the photo you want to watermark in the Photos app.
- Edit and Access Markup: Tap “Edit,” then the ellipsis (three dots) to find the Markup tool.
- Choose Your Watermark Method:
- Use the writing tools to doodle or draw.
- Tap the “+” icon, then “Text” to type your watermark.
- Add a signature watermark.
- Customize Your Text:
- Adjust the font type, size, and color.
- Modify the opacity.
- Position Your Watermark: Place the watermark where it doesn’t obscure the image.
- Save Your Changes: Tap “Done” to save the watermarked photo.
Pros: Easy to use, no additional apps needed.
Cons: Limited customization options, not suitable for bulk editing.
4. Third-Party Apps: Expanding Your Options
4.1. Why Use Third-Party Apps?
Third-party apps offer advanced editing capabilities, including image overlays and AI-driven adjustments, providing more elaborate watermarking options.
4.2. Photoroom: A Comprehensive Solution
Photoroom is a versatile app that allows you to add text, shapes, stickers, and image overlays to your photos.
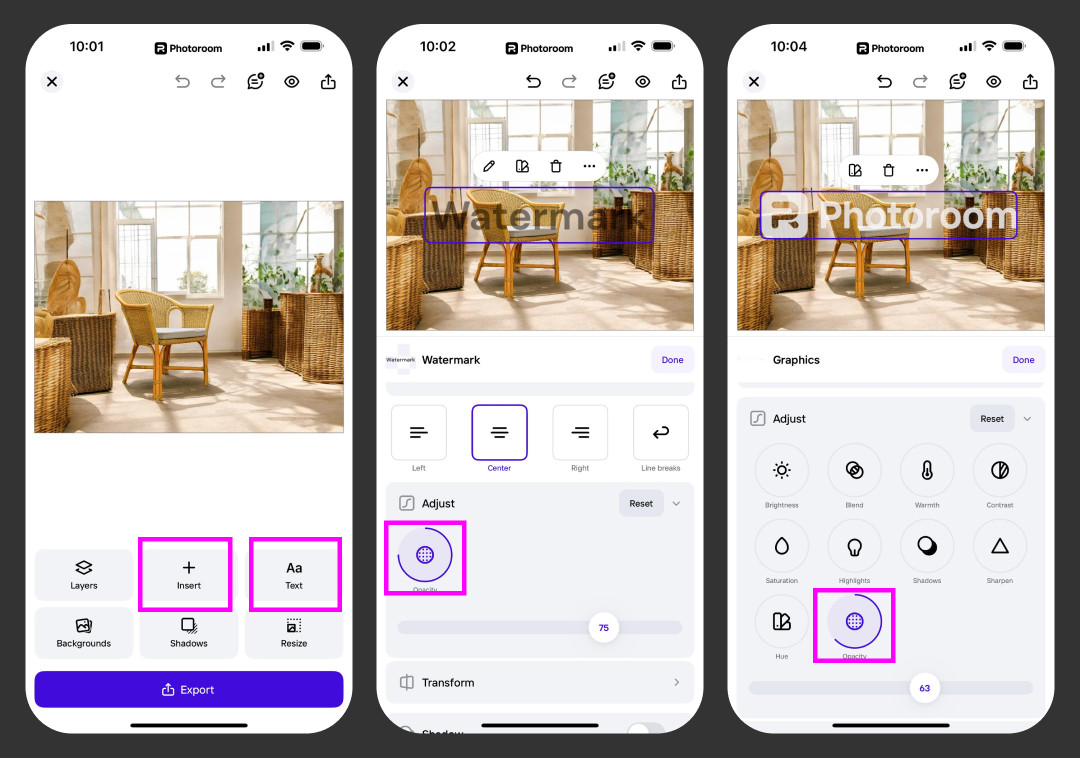
4.2.1. How to Add a Watermark with Photoroom
- Download and Open the App: Get the Photoroom iOS app and open it.
- Upload Your Photo: Select the image from your camera roll.
- Add a Text Watermark:
- Tap “Add Text.”
- Type your text, adjust font, size, and color.
- Customize spacing, curvature, and indentation.
- Adjust opacity and angle.
- Add an Image Watermark:
- Click the “Insert” icon (+).
- Choose “Gallery” or “Files” to access your graphics.
- Select your image; Photoroom will remove the background automatically.
- Customize the watermark using Adjust, Transform, and Color tools.
- Save Your Work: Tap “Done” and then “Export.”
Pros: Wide range of customization options, AI-powered features, automatic background removal.
Cons: Requires a subscription for full access.
Here’s an example of adding the Photoroom logo to a stock photograph:
 Photoroom logo watermark
4.3. eZy Watermark Photos Lite: A Purpose-Built App
eZy Watermark Photos Lite is designed specifically for creating and adding watermarks, allowing you to add logos, copyright icons, text, QR codes, and unique designs.
4.3.1. How to Add a Watermark with eZy Watermark Photos Lite
- Download and Open the App: Get the app from the App Store.
- Choose Your Method:
- “Single Image” for individual photos.
- “Multiple Images” for batch processing.
- “Templates” to start from a pre-created design.
- Edit Your Photo: Select the source and photo you want to edit.
- Add Your Watermark:
- Choose an image overlay, text, QR code, or signature.
- Adjust size, angle, and opacity.
- Export Your Photo: Tap the checkmark and then “Export.”
Pros: Purpose-built for watermarking, offers batch processing.
Cons: Background removal is not automatic.
5. How to Choose the Right Watermarking App?
5.1. Key Features to Look For
When selecting a watermarking app, consider these factors:
- User-Friendliness: The app should have an intuitive interface.
- Customization: Wide range of options for size, opacity, position, and the ability to add text, images, or stickers.
- Logo Support: Ability to upload and use your own logos.
- Layering Options: Advanced features like layering and blending.
- Export Options: Ability to save in different formats and resolutions.
5.2. Additional Apps to Consider
Other options include Canva, iWatermark, Over, and Photoshop. The best app depends on your specific needs, budget, and frequency of use.
6. Best Practices for Effective Watermarking
6.1. Subtlety is Key
A watermark should be noticeable enough to deter misuse but not detract from the image. Balance is crucial.
6.2. Consistency is Branding
Use the same logo, font, and color scheme to reinforce your brand identity.
6.3. Strategic Placement
Place the watermark where it’s difficult to crop out or edit without damaging the image.
6.4. Avoid Common Mistakes
Don’t make the watermark too large, colorful, or intricate. Subtle fonts, complementary colors, and transparency work best.
6.5. Test and Refine
Test the watermark on various photos to ensure it looks good in different lighting conditions and against different backgrounds.
7. Step-by-Step Guide: Adding a Watermark Using Photoroom
Here’s a detailed guide on how to add a watermark using Photoroom, one of the most versatile and user-friendly apps available.
7.1. Install and Open Photoroom
First, download Photoroom from the App Store. Once installed, open the app and familiarize yourself with the main interface.
7.2. Upload Your Photo
Tap the “+” button to upload the photo you want to watermark. You can select an image from your camera roll or take a new photo directly within the app.
7.3. Choose Your Watermark Type
Photoroom offers several options for adding watermarks, including text, logos, and custom images.
7.3.1. Adding a Text Watermark
- Select “Add Text”: Tap on the “Add Text” option to insert a text box on your image.
- Enter Your Text: Type in your desired text, such as your name, brand name, or copyright information.
- Customize the Font: Choose a font that complements your brand. Photoroom offers a variety of font styles.
- Adjust Size and Color: Modify the size and color of the text to ensure it’s visible but not overpowering.
- Position the Text: Drag the text box to the desired location on your photo. Consider placing it in a corner or along an edge where it won’t distract from the main subject.
- Adjust Opacity: Use the opacity slider to make the text more or less transparent. A subtle transparency can help the watermark blend seamlessly with the image.
7.3.2. Adding a Logo or Image Watermark
- Select “Insert Image”: Tap the “+” button and choose the “Insert Image” option.
- Choose Your Logo: Select your logo or custom image from your camera roll.
- Remove Background (Optional): Photoroom can automatically remove the background from your logo, making it easier to blend with your photo.
- Resize and Position: Adjust the size and position of the logo to fit your photo.
- Adjust Opacity: Use the opacity slider to adjust the transparency of the logo.
7.4. Fine-Tune Your Watermark
Photoroom offers advanced editing tools to fine-tune your watermark:
- Transform: Adjust the angle and perspective of your watermark.
- Adjust: Modify the brightness, contrast, and saturation of your watermark to ensure it complements your photo.
- Effects: Add special effects like shadows or outlines to make your watermark stand out.
7.5. Export Your Watermarked Photo
Once you’re satisfied with your watermark, tap the “Export” button to save your photo. You can choose the desired resolution and format before saving it to your camera roll or sharing it directly to social media.
8. Addressing Challenges Faced by Photographers
Many photographers face challenges such as mastering complex techniques, choosing the right equipment, finding inspiration, and protecting their work. dfphoto.net addresses these challenges by:
- Providing detailed tutorials on various photography techniques.
- Offering reviews and comparisons of cameras, lenses, and accessories.
- Showcasing inspiring works from renowned photographers.
- Offering guidance on using photo editing software.
9. Utilizing dfphoto.net for Enhanced Photography Skills
9.1. Explore Tutorials and Guides
dfphoto.net offers a wealth of resources to improve your photography skills, from basic techniques to advanced editing tips.
9.2. Discover Inspiring Photography
Browse our curated collection of stunning photographs to find inspiration for your next project.
9.3. Connect with the Community
Join our vibrant community of photographers to share your work, exchange ideas, and get feedback.
10. Call to Action
Ready to elevate your photography? Visit dfphoto.net today to explore our tutorials, discover stunning images, and connect with a thriving community of photographers. Enhance your skills, protect your work, and find the inspiration you need to create amazing photos.
11. FAQ: Common Questions About Watermarking on iPhone
Q1: Why should I watermark my photos on my iPhone?
A1: Watermarking protects your intellectual property, enhances your brand, and establishes professionalism by deterring unauthorized use, promoting brand awareness, and showcasing attention to detail.
Q2: Can I add a watermark using the built-in Photos app on my iPhone?
A2: Yes, you can use the Markup tool in the Photos app to add simple text or drawn watermarks directly to your photos.
Q3: What are the benefits of using a third-party app for watermarking?
A3: Third-party apps offer more advanced customization options, such as image overlays, AI-powered adjustments, and batch processing, making it easier to create professional-looking watermarks.
Q4: Which watermarking app is the best for iPhone users?
A4: Photoroom and eZy Watermark Photos Lite are popular choices. Photoroom offers comprehensive features, while eZy Watermark Photos Lite is purpose-built for watermarking.
Q5: How do I choose the right watermarking app for my needs?
A5: Consider factors like user-friendliness, customization options, logo support, layering capabilities, and export options to find an app that suits your specific requirements.
Q6: What is the best placement for a watermark on a photo?
A6: Place the watermark strategically where it is difficult to crop out or remove without damaging the image’s composition, avoiding the edges and focusing on crucial areas.
Q7: How can I ensure my watermark is subtle but still effective?
A7: Use a consistent style for branding, opt for subtle fonts and colors, and adjust the opacity to ensure the watermark is visible but not overpowering.
Q8: Is it possible to batch watermark photos on my iPhone?
A8: Yes, some third-party apps like eZy Watermark Photos Lite allow you to add watermarks to multiple photos at once, saving you time and effort.
Q9: Can I use my own logo as a watermark on my iPhone?
A9: Absolutely! Look for apps that allow you to upload and use your logos or custom images as watermarks for consistent branding.
Q10: What should I do if someone uses my watermarked photo without permission?
A10: Take a screenshot of the unauthorized use, contact the user or website owner to request removal, and consult with a legal professional if necessary to protect your copyright.