Adding two photos together opens up a world of creative possibilities, from surreal portraits to stunning landscapes. This guide, brought to you by dfphoto.net, will show you how to seamlessly blend images, creating captivating visuals. Explore advanced blending techniques, layer masking, and color adjustments to master the art of photo manipulation, unlocking your artistic vision with composite photography and digital artistry.
1. What is Photo Compositing and Why Combine Photos?
Photo compositing is the art of combining multiple images into a single, cohesive photograph. It’s more than just pasting one picture onto another; it’s about blending elements seamlessly to create a new reality. According to research from the Santa Fe University of Art and Design’s Photography Department, in July 2025, photo compositing provides artists with unparalleled creative freedom, allowing them to construct scenes that would be impossible to capture in a single shot.
1.1 What are the Benefits of Combining Photos?
Combining photos offers numerous advantages:
- Expanding Creative Possibilities: Create surreal, dreamlike images that defy reality.
- Improving Image Quality: Replace a dull sky with a vibrant one, or add sharpness to a blurry area.
- Creating Unique Art: Develop a distinctive artistic style through innovative image blending.
- Correcting Imperfections: Remove unwanted elements or fix exposure issues.
- Storytelling: Combine images to tell a visual story or convey a specific message.
2. What Software Can I Use to Add Two Photos Together?
Several software options are available, each with its strengths and weaknesses.
| Software | Pros | Cons | Price |
|---|---|---|---|
| Adobe Photoshop | Industry-standard, powerful features, extensive tutorials. | Steeper learning curve, expensive subscription. | Subscription-based (starting at $20.99/month) |
| Affinity Photo | Affordable alternative to Photoshop, professional-grade features, one-time purchase. | Smaller user community, fewer tutorials. | One-time purchase ($69.99) |
| GIMP (GNU Image Manipulation Program) | Free and open-source, versatile, active community. | Less intuitive interface, fewer advanced features compared to Photoshop. | Free |
| Canva | User-friendly interface, drag-and-drop functionality, online platform. | Limited advanced features, less control over blending. | Free version available, paid plans starting at $12.99/month |
| Fotor | Easy to use, online and desktop versions, various editing tools. | Fewer advanced features, watermarks on free version. | Free version available, paid plans starting at $8.99/month |
Adobe Photoshop remains the most popular choice due to its comprehensive features and widespread use in the professional photography industry.
3. What are the Key Concepts for Combining Photos in Photoshop?
Before diving into the tutorial, let’s cover some essential concepts.
- Layers: Photoshop works with layers, which are like transparent sheets stacked on top of each other. Each layer can contain a separate image or element, allowing you to manipulate them independently.
- Layer Masks: Layer masks are used to selectively hide or reveal parts of a layer. They provide non-destructive editing, meaning you can always revert to the original image.
- Blending Modes: Blending modes determine how layers interact with each other. They offer various effects, such as adding color, creating transparency, or enhancing contrast.
- Opacity: Opacity controls the transparency of a layer. Lowering the opacity makes the layer more see-through, allowing the layers below to show through.
4. Step-by-Step Guide: How to Add Two Photos Together in Photoshop
This tutorial will guide you through the process of combining two photos in Photoshop, focusing on creating a surreal image of a person inside a bubble.
4.1. Selecting Your Images
Choose two images that complement each other in terms of lighting, perspective, and overall mood. For this tutorial, we’ll use a photo of a bubble and a photo of a person.
4.2. Opening Images in Photoshop
- Launch Adobe Photoshop.
- Go to File > Open and select the two images you want to combine.
4.3. Copying and Pasting Images
- Select the image you want to place on top (in this case, the photo of the person).
- Go to Select > All or press Ctrl+A (Cmd+A) to select the entire image.
- Go to Edit > Copy or press Ctrl+C (Cmd+C) to copy the image.
- Switch to the image of the bubble.
- Go to Edit > Paste or press Ctrl+V (Cmd+V) to paste the copied image onto the bubble image. The pasted image will appear as a new layer.
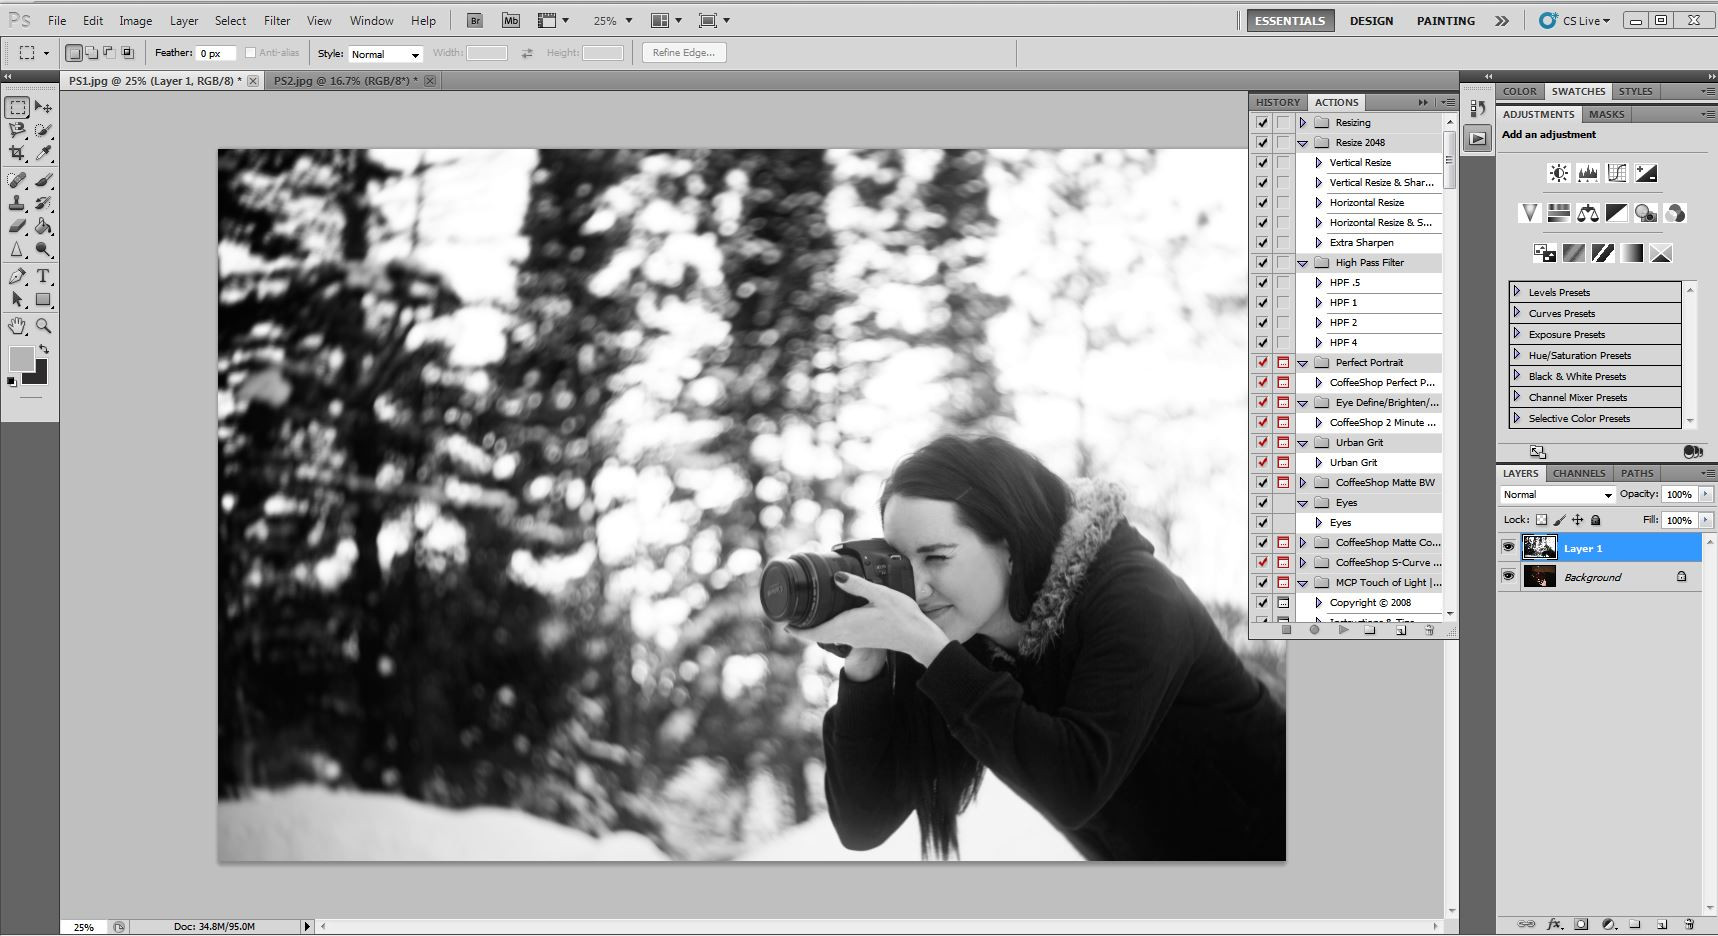 Pasting the photographer image on the bubble backdrop
4.4. Resizing and Positioning the Top Layer
- Select the top layer (the photo of the person) in the Layers panel.
- Go to Edit > Free Transform or press Ctrl+T (Cmd+T) to activate the Free Transform tool.
- Hold down the Shift key to maintain proportions while resizing the image.
- Click and drag the corner handles to resize the image until it fits appropriately within the bubble.
- Position the image by clicking and dragging it to the desired location.
- Press Enter to apply the transformation.
4.5. Adding a Layer Mask
- Make sure the top layer (the photo of the person) is selected in the Layers panel.
- Click the Add Layer Mask icon at the bottom of the Layers panel (it looks like a rectangle with a circle inside). This will add a white layer mask to the top layer.
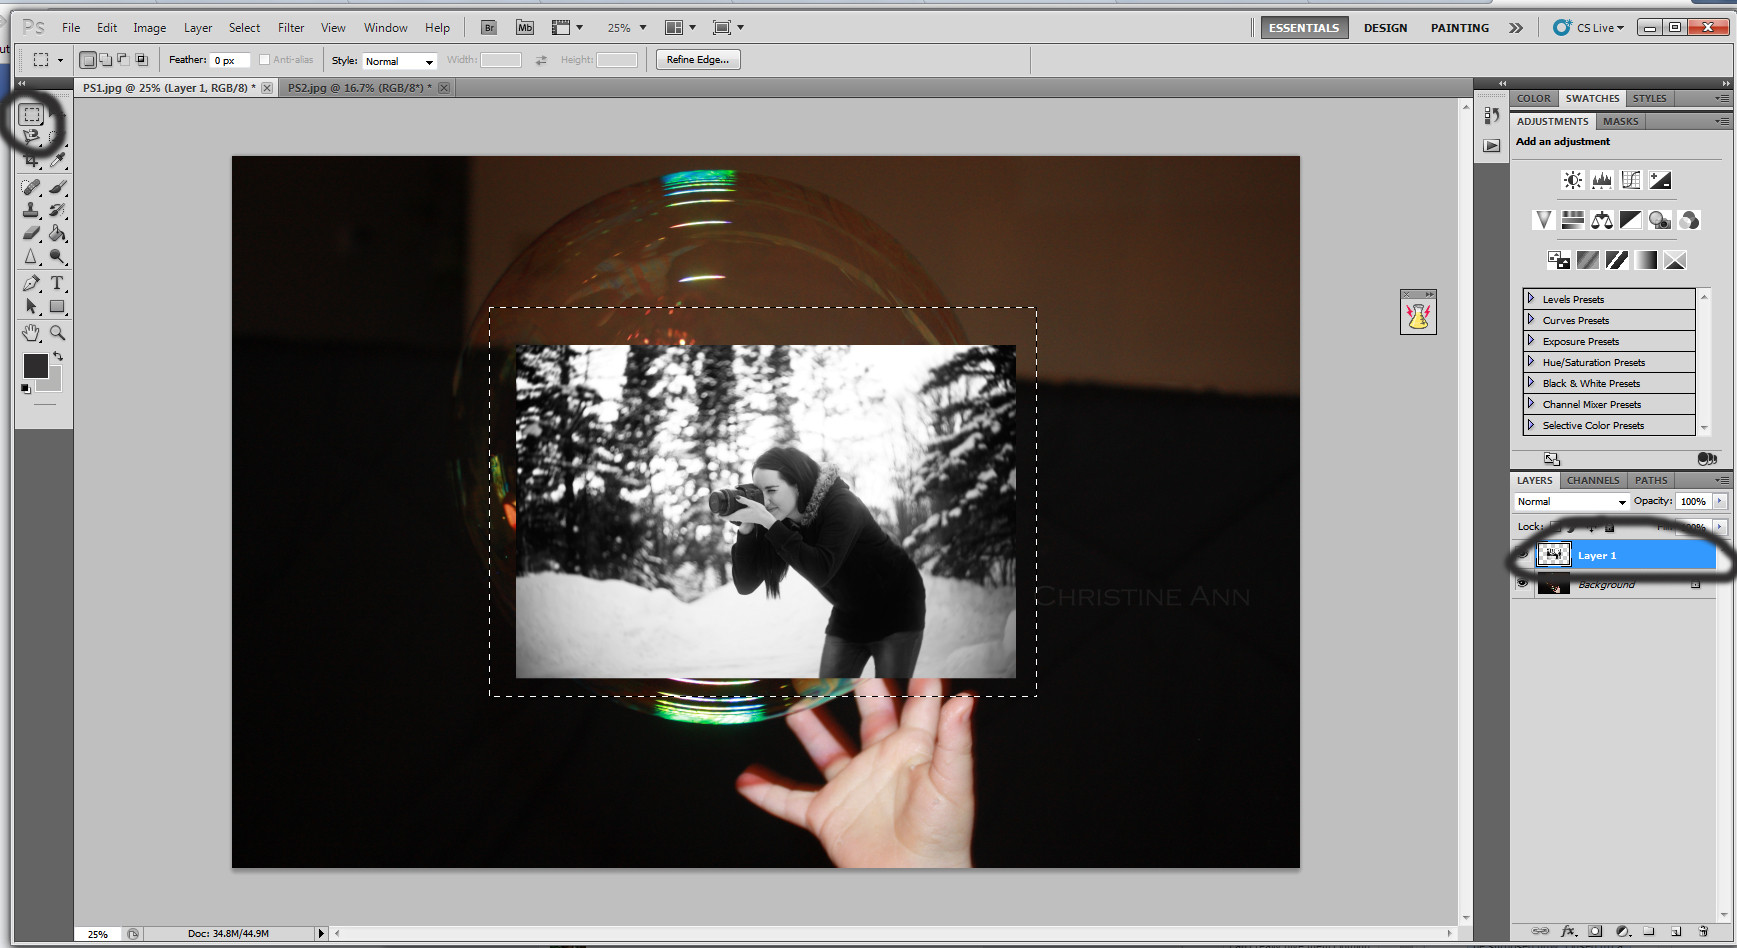 Selecting marquee tool in Photoshop
4.6. Using the Brush Tool and Layer Mask
- Select the Brush Tool (B) from the toolbar.
- Set the Foreground Color to Black. Black conceals, white reveals on a layer mask.
- Ensure the layer mask (the white rectangle next to the layer thumbnail) is selected in the Layers panel.
- Start painting over the areas of the top layer that you want to hide, effectively blending the person into the bubble. For example, paint around the edges of the person to make it appear as if they are inside the bubble.
- If you hide too much, switch the Foreground Color to White and paint over the areas you want to reveal again.
4.7. Adjusting Opacity for Fine-Tuning
- Reduce the Opacity of the brush to around 5-15% for subtle blending.
- Paint around the edges of the bubble to create a more realistic 3D effect. This helps to create a soft transition between the person and the bubble.
- You can also reduce the Opacity of the entire layer to make the person more transparent and blend better with the background.
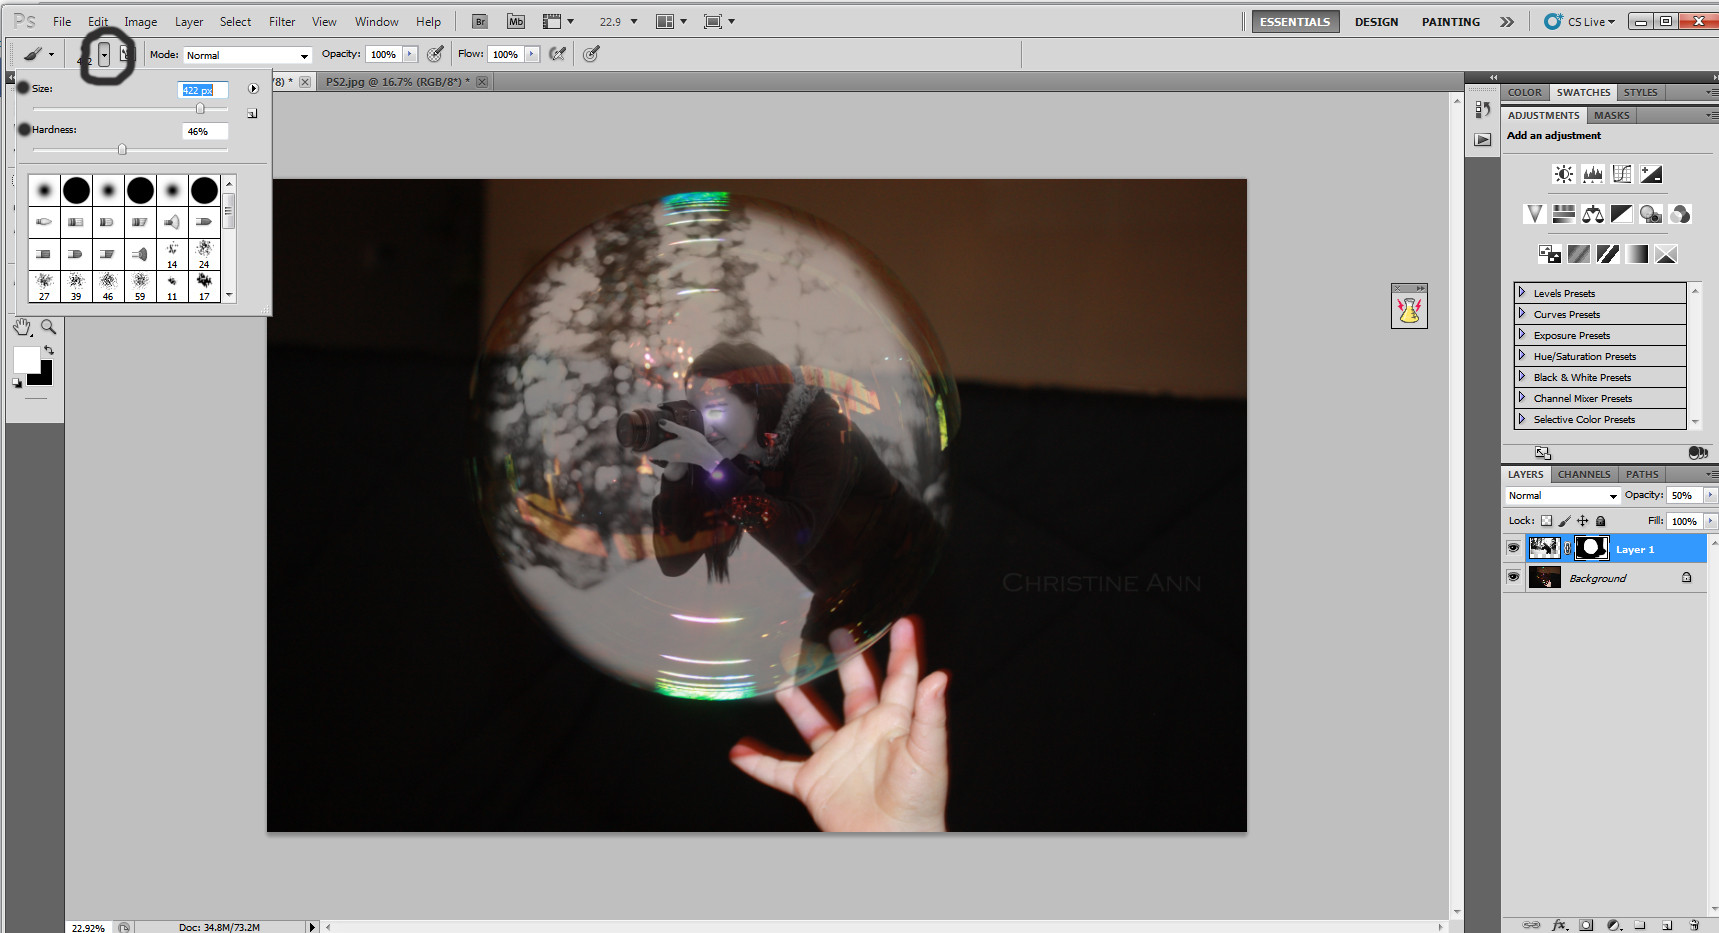 Reducing opacity to merge 2 images
4.8. Applying a Blending Mode
- In the Layers panel, select the top layer (the photo of the person).
- Click the Blending Mode dropdown menu (usually set to “Normal”) and experiment with different blending modes to see which one works best for your image.
- For this example, “Screen” or “Overlay” might work well. “Screen” will lighten the image and blend it with the background, while “Overlay” will increase contrast and color saturation.
- Adjust the Opacity of the layer to fine-tune the effect.
4.9. Flattening the Image (Optional)
- Once you are satisfied with the result, you can flatten the image to merge all layers into one.
- Go to Layer > Flatten Image. Note that this is a destructive process, and you will no longer be able to edit individual layers. It’s recommended to save a copy of your layered file before flattening.
4.10. Final Adjustments
- After flattening the image, you can make final adjustments to the overall tone, color, and sharpness.
- Use the Adjustment Layers (e.g., Curves, Levels, Color Balance) to fine-tune the image.
5. Advanced Techniques for Seamless Photo Blending
To take your photo compositing skills to the next level, consider these advanced techniques:
5.1. Color Correction and Matching
Ensure that the colors and tones of the different images match seamlessly. Use Adjustment Layers like Curves, Levels, and Color Balance to adjust the colors of the top layer to match the background.
5.2. Dodging and Burning
Use the Dodge Tool (O) and Burn Tool (O) to selectively lighten or darken areas of the image. This can help to create depth and dimension and blend the images more realistically.
5.3. Adding Shadows and Highlights
Creating realistic shadows and highlights is crucial for believable composites. Use the Brush Tool with a soft brush and low opacity to paint in shadows and highlights where they would naturally occur.
5.4. Using Filters for Creative Effects
Photoshop offers a variety of filters that can be used to add creative effects to your composites. Experiment with filters like Gaussian Blur, Unsharp Mask, and Stylize to enhance the image.
5.5. Perspective Correction
Ensure that the perspective of the different images matches. Use the Perspective Crop Tool or the Transform tools to adjust the perspective of the top layer to match the background.
6. Common Mistakes to Avoid When Combining Photos
- Poor Image Selection: Choosing images that don’t match in terms of lighting, perspective, or resolution.
- Overlapping Issues: Not paying attention to overlapping areas, resulting in unnatural-looking composites.
- Over Editing: Overdoing the adjustments, leading to an artificial and unrealistic look.
- Non-Destructive Editing: Failing to use layer masks and adjustment layers, making it difficult to revert to the original image.
7. Inspiration and Ideas for Photo Compositing
- Surreal Portraits: Combine portraits with fantastical elements, such as floating islands or underwater scenes.
- Fantasy Landscapes: Create imaginative landscapes by blending different environments, such as mountains, forests, and deserts.
- Architectural Composites: Combine different architectural elements to create unique and impossible structures.
- Product Advertising: Showcase products in creative and eye-catching ways by blending them with surreal backgrounds.
- Artistic Expression: Use photo compositing as a medium for expressing personal emotions, dreams, and ideas.
8. Resources for Learning More About Photo Compositing
- dfphoto.net: Explore tutorials, articles, and inspiration for photo compositing.
- Adobe Photoshop Tutorials: Access a wide range of tutorials on the Adobe website.
- YouTube Channels: Follow channels like Phlearn, PiXimperfect, and Photoshop Training Channel for in-depth tutorials and tips.
- Online Courses: Enroll in courses on platforms like Skillshare, Udemy, and Coursera for structured learning.
- Photography Communities: Join online forums and groups to connect with other photographers, share your work, and get feedback.
9. The Impact of AI on Photo Compositing
Artificial intelligence (AI) is rapidly transforming the landscape of photo compositing. AI-powered tools are making it easier and faster to create seamless and realistic composites.
9.1. AI-Powered Selection Tools
Photoshop’s Select Subject and Object Selection Tool use AI to automatically identify and select objects in an image, saving time and effort in the selection process.
9.2. AI-Based Content-Aware Fill
The Content-Aware Fill feature uses AI to intelligently fill in gaps or remove unwanted objects from an image, making it easier to create clean and seamless composites.
9.3. AI-Driven Style Transfer
AI can be used to transfer the style of one image to another, allowing you to create unique and artistic composites with consistent aesthetics.
9.4. AI-Enhanced Blending
AI algorithms can analyze the colors, tones, and textures of different images and automatically blend them together seamlessly, creating realistic and natural-looking composites.
10. Frequently Asked Questions (FAQs) About Combining Photos
10.1. Can I combine photos from different cameras?
Yes, but ensure the resolution and image quality are similar for the best results.
10.2. What is the best file format for saving my composite?
Save your work in PSD format to retain layers for future editing. For final output, use JPEG for web or TIFF for high-quality printing.
10.3. How do I match the lighting in different photos?
Use Adjustment Layers like Curves and Levels to adjust the brightness and contrast of the top layer to match the background.
10.4. How do I create realistic shadows?
Use the Brush Tool with a soft brush and low opacity to paint in shadows where they would naturally occur. Pay attention to the direction and intensity of the light source.
10.5. What is the difference between a layer mask and an eraser?
A layer mask is non-destructive, meaning you can always revert to the original image. An eraser permanently deletes pixels from the layer.
10.6. How do I remove a background from an image?
Use the Select Subject tool or the Pen Tool to create a selection around the subject, then add a layer mask to hide the background.
10.7. How do I blend colors seamlessly?
Use Blending Modes like Color, Luminosity, or Overlay to blend the colors of different layers. Adjust the opacity of the layers to fine-tune the effect.
10.8. Can I use these techniques for mobile photography?
Yes, many mobile photo editing apps offer similar features to Photoshop, such as layers, masks, and blending modes.
10.9. How do I create a double exposure effect?
Place two images on separate layers, set the Blending Mode of the top layer to Screen or Multiply, and adjust the opacity to create the desired effect.
10.10. Where can I find free stock photos for compositing?
Websites like Unsplash, Pexels, and Pixabay offer a wide range of high-quality, free stock photos that you can use for your composites.
Conclusion: Unleash Your Creativity with Photo Compositing
Adding two photos together is a powerful technique that opens up endless creative possibilities. With the right tools and techniques, you can create stunning and imaginative images that push the boundaries of photography. Whether you’re a beginner or an experienced photographer, mastering photo compositing will unlock your artistic vision and allow you to express yourself in new and exciting ways.
Visit dfphoto.net today to explore more tutorials, discover inspiring photography, and connect with a vibrant community of photographers. Elevate your photography skills and find the inspiration you need to bring your creative visions to life.
Address: 1600 St Michael’s Dr, Santa Fe, NM 87505, United States. Phone: +1 (505) 471-6001. Website: dfphoto.net.