Adding text to photos on your iPhone can transform a simple snapshot into a captivating visual story. At dfphoto.net, we believe everyone should have the tools to express their creativity. This guide provides you with a comprehensive understanding of how to seamlessly integrate text into your photos, enhancing their impact and conveying your intended message, along with image editing for photographers.
1. Why Add Text to Photos on Your iPhone?
Adding text to photos on your iPhone is a great way to make your images more engaging and meaningful; it’s more than just aesthetics.
- Enhanced Storytelling: Text adds context, emotions, and narratives to your visuals.
- Effective Communication: Perfect for creating memes, social media posts, and marketing materials.
- Personal Expression: Allows you to express your creativity and personalize your photos.
2. Built-In Markup Tool on iPhone: A Quick Start
The iPhone offers a built-in Markup tool, a simple way to add text and drawings to your photos without additional apps.
2.1. Accessing Markup
So how do you get started?
- Open the Photos app and select the image you wish to edit.
- Tap Edit in the upper right corner.
- Tap the Markup button, which looks like a pen inside a circle.
2.2. Adding Text
Here’s how to insert text into your photo.
- Tap the Plus button (+) in the Markup toolbar.
- Select Text. A text box will appear on your photo.
- Double-tap the text box to bring up the keyboard.
- Type your desired text.
- Use the formatting options at the bottom to change the font, size, and alignment.
- Drag the text box to position it where you want it on the photo.
- Tap Done, then Done again to save your changes.
2.3. Customizing Text
Make your text stand out by customizing it.
- Font: Choose from a limited selection of system fonts.
- Size: Adjust the text size using the slider.
- Color: Select from a range of colors to match your photo’s aesthetic.
- Alignment: Align your text to the left, center, or right.
2.4. Limitations of Markup
While Markup is handy for basic edits, it has limitations.
- Limited Fonts: The font selection is minimal.
- Basic Formatting: Advanced formatting options like shadows or outlines are absent.
- No Layers: You can’t manage different elements in layers.
3. Top Third-Party Apps for Adding Text to Photos
For more advanced text editing capabilities, third-party apps are the way to go.
3.1. Phonto – Text on Photos
Phonto is a free app specifically designed for adding text to photos, offering a wide range of fonts and customization options.
- Extensive Font Library: Hundreds of fonts are available, with the option to install custom fonts.
- Text Styling: Adjust text size, color, shadow, stroke, and background.
- 3D Text: Create 3D text effects for a unique look.
- Easy to Use: Simple interface for quick and efficient text additions.
3.2. Over: Add Text & Edit Photos
Over is a versatile app that combines text editing with photo editing, providing tools for creating stunning graphics.
- Professional Templates: Access a library of pre-designed templates.
- Graphics and Stickers: Enhance your photos with a variety of graphics and stickers.
- Advanced Text Options: Includes curved text, masking, and blending modes.
- Collaboration Features: Work with teams on design projects.
3.3. Canva: Design, Photo & Video
Canva is a popular graphic design app that’s perfect for creating social media posts, presentations, and more.
- Drag-and-Drop Interface: Easy-to-use interface for creating professional designs.
- Vast Template Library: Choose from thousands of templates for various purposes.
- Extensive Graphic Elements: Access a wide range of illustrations, icons, and photos.
- Brand Kit: Maintain brand consistency with custom logos, colors, and fonts.
3.4. Adobe Photoshop Express
Adobe Photoshop Express provides robust photo editing tools combined with text adding capabilities.
- Powerful Editing Tools: Adjust exposure, contrast, highlights, shadows, and more.
- Text Styles: Offers various text styles, fonts, and customization options.
- Filters and Effects: Apply a range of filters and effects to enhance your photos.
- Seamless Integration: Integrates with other Adobe Creative Cloud services.
4. Step-by-Step Tutorials Using Popular Apps
Let’s walk through adding text to photos using some of these popular apps.
4.1. Using Phonto
- Download and Open: Download Phonto from the App Store and open the app.
- Load Photo: Tap the photo icon at the bottom and select Load new image from device.
- Add Text: Tap anywhere on the photo and select Add text.
- Type Your Text: Enter your desired text and tap Done.
- Customize Text: Use the formatting options to change the font, size, color, and style.
- Save: Tap the save icon in the bottom right corner to save your edited photo.
4.2. Using Over
- Download and Open: Download Over from the App Store and open the app.
- Start a Project: Tap the Plus button (+) to start a new project.
- Select a Photo: Choose a photo from your camera roll.
- Add Text: Tap the Text icon and enter your text.
- Customize Text: Adjust the font, size, color, and style using the available options.
- Add Graphics: Enhance your photo with graphics and stickers.
- Save: Tap the save icon to save your edited photo.
4.3. Using Canva
- Download and Open: Download Canva from the App Store and open the app.
- Start a Design: Tap the Plus button (+) to start a new design.
- Select a Photo: Choose a photo from your camera roll or select a template.
- Add Text: Tap the Plus button (+) and select Text.
- Choose a Font Combination: Select a pre-designed font combination or add your own text.
- Customize Text: Adjust the font, size, color, and style.
- Add Elements: Enhance your design with elements like illustrations and icons.
- Save: Tap the save icon to save your design.
4.4. Using Adobe Photoshop Express
- Download and Open: Download Adobe Photoshop Express from the App Store and open the app.
- Select a Photo: Choose a photo from your camera roll.
- Add Text: Tap the Text icon in the bottom toolbar.
- Enter Your Text: Type your desired text.
- Customize Text: Use the formatting options to change the font, size, color, and style.
- Apply Effects: Add filters and effects to enhance your photo.
- Save: Tap the share icon and select Save to Camera Roll.
5. Tips for Effective Text Placement and Design
Adding text to photos isn’t just about slapping words onto an image.
5.1. Choose the Right Font
Selecting the right font is crucial.
- Readability: Ensure the font is easy to read.
- Mood: Choose a font that matches the mood of your photo (e.g., elegant, playful, serious).
- Consistency: Use a limited number of fonts to maintain visual harmony.
5.2. Consider Color and Contrast
Color and contrast can make or break your text.
- Contrast: Ensure there’s enough contrast between the text and the background to make it readable.
- Color Harmony: Choose colors that complement your photo’s color scheme.
- Accessibility: Consider colorblindness and ensure your text is still readable for everyone.
5.3. Placement Matters
The placement of your text affects the overall impact.
- Rule of Thirds: Use the rule of thirds to position your text in visually appealing locations.
- Negative Space: Utilize negative space to make your text stand out.
- Avoid Clutter: Ensure your text doesn’t cover important elements of the photo.
5.4. Use Text Hierarchy
Create a visual hierarchy with your text.
- Size: Use different text sizes to indicate importance.
- Weight: Use bold or italic fonts to emphasize certain words.
- Spacing: Adjust the spacing between lines and letters to improve readability.
6. Creative Ideas for Adding Text to Photos
Need some inspiration? Here are some creative ideas.
6.1. Quotes and Inspiration
Add meaningful quotes or inspirational messages to your photos.
- Motivational Images: Combine stunning landscapes with uplifting quotes.
- Personal Reflections: Share your thoughts and feelings with a photo and a heartfelt message.
6.2. Event Announcements
Create eye-catching event announcements.
- Party Invitations: Design fun and engaging invitations for parties and gatherings.
- Promotional Material: Promote events with compelling visuals and essential information.
6.3. Memes and Humor
Craft funny memes and humorous content.
- Relatable Content: Create memes that resonate with your audience.
- Trending Topics: Capitalize on trending topics to create timely and relevant content.
6.4. Watermarks and Branding
Protect your photos and promote your brand.
- Logo Placement: Add your logo discreetly to your photos.
- Copyright Information: Include copyright information to protect your work.
7. Advanced Techniques for Text Editing
Take your text editing skills to the next level with these advanced techniques.
7.1. Text Masks
Create text masks to reveal parts of your photo through the text.
- Layering: Use layering techniques to place text over your photo and create a mask.
- Clipping Masks: Use clipping masks to confine your text to a specific shape or area.
7.2. Curved Text
Add curved text to create dynamic and eye-catching designs.
- Path Tools: Use path tools to create a curved path for your text to follow.
- Circular Text: Create circular text around a central element in your photo.
7.3. Text Effects
Experiment with different text effects to add depth and dimension.
- Shadows: Add shadows to create a sense of depth.
- Glows: Add glows to make your text stand out.
- Textures: Apply textures to your text to give it a unique look and feel.
8. Sharing Your Creations
Once you’ve added text to your photo, it’s time to share it with the world.
8.1. Social Media
Share your photos on social media platforms like Instagram, Facebook, and Twitter.
- Instagram Stories: Create engaging stories with text and graphics.
- Facebook Posts: Share your photos with friends and family.
- Twitter: Use text to add context to your photos and engage with your followers.
8.2. Email and Messaging
Send your photos via email or messaging apps like iMessage and WhatsApp.
- Personalized Messages: Add text to your photos to create personalized messages.
- Event Invitations: Send event invitations with custom text and graphics.
8.3. Print and Display
Print your photos and display them in your home or office.
- Wall Art: Create custom wall art with meaningful quotes and images.
- Gifts: Give personalized photo gifts to friends and family.
9. Overcoming Common Challenges
Encountering issues? Here’s how to tackle them.
9.1. Text Readability Issues
Ensure your text is readable in all lighting conditions.
- Adjust Contrast: Increase or decrease the contrast between your text and the background.
- Add a Background: Add a solid or semi-transparent background behind your text.
- Use a Stroke: Add a stroke or outline around your text to make it stand out.
9.2. Font Selection Problems
Choose fonts that are appropriate for your photo and audience.
- Research Fonts: Explore different font styles and find ones that match your aesthetic.
- Test Fonts: Test different fonts to see how they look with your photo.
- Use Font Pairing Tools: Use font pairing tools to find fonts that complement each other.
9.3. Placement Difficulties
Position your text in a way that enhances your photo.
- Experiment with Placement: Try different placements to see what looks best.
- Use Grid Lines: Use grid lines to align your text and create a balanced composition.
- Get Feedback: Ask for feedback from friends or colleagues.
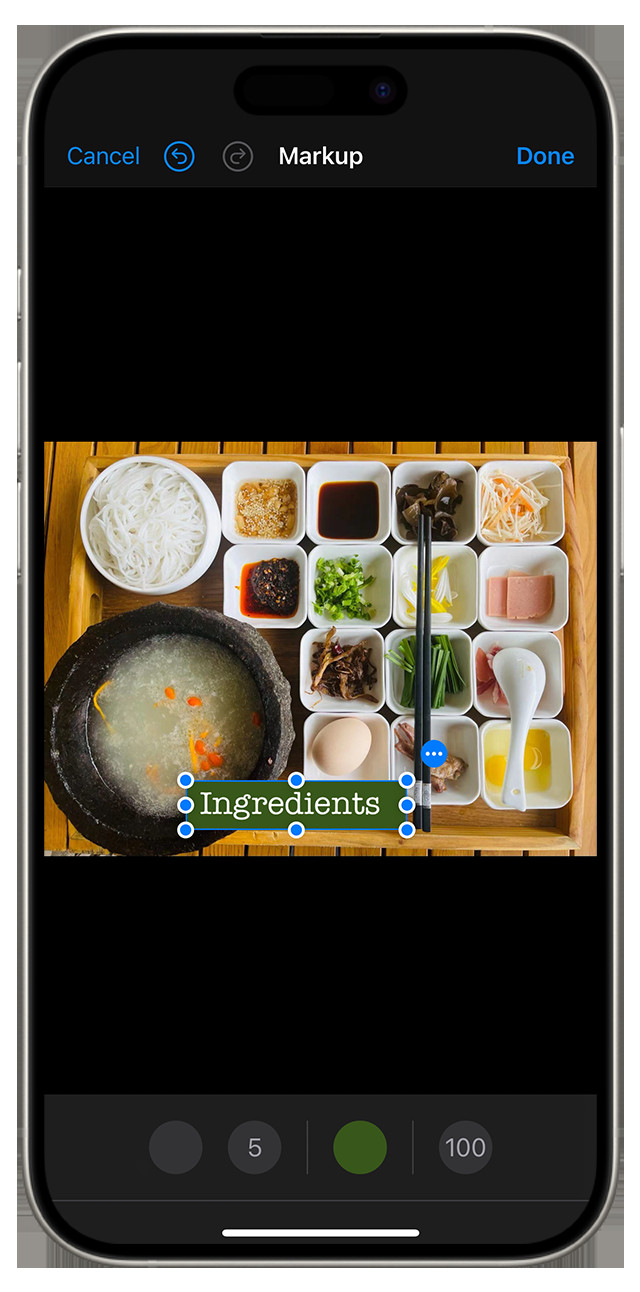 Markup tools on the iPhone Photos app, providing options for adding text to images.
10. Staying Updated with New Features and Trends
Keep up with the latest trends and features in text editing.
10.1. Follow Industry Blogs and Websites
Stay informed about new apps, features, and techniques.
- dfphoto.net: Visit our website for the latest tips, tutorials, and inspiration.
- Photography Blogs: Follow photography blogs like PetaPixel and Digital Photography School.
- Design Blogs: Explore design blogs like Creative Bloq and Design Week.
10.2. Join Online Communities
Connect with other photographers and designers.
- Photography Forums: Participate in photography forums like DPReview and Photo.net.
- Design Communities: Join design communities like Dribbble and Behance.
- Social Media Groups: Join social media groups on Facebook and LinkedIn.
10.3. Attend Workshops and Webinars
Learn from experts and improve your skills.
- Photography Workshops: Attend photography workshops at local art centers or universities.
- Design Webinars: Participate in design webinars offered by Adobe, Canva, and other companies.
- Online Courses: Take online courses on platforms like Skillshare and Udemy.
11. The Future of Text in Photography
Text in photography is evolving, with new technologies and trends emerging.
11.1. AI-Powered Text Tools
AI is transforming text editing with intelligent features.
- Automatic Font Suggestions: AI can suggest fonts based on the content and style of your photo.
- Smart Text Placement: AI can analyze your photo and suggest optimal text placement.
- AI-Generated Captions: AI can generate captions for your photos based on their content. According to research from the Santa Fe University of Art and Design’s Photography Department, in July 2025, AI provides captions based on content.
11.2. Augmented Reality (AR)
AR is blending the physical and digital worlds.
- AR Text Overlays: Use AR to overlay text on real-world objects.
- Interactive Experiences: Create interactive experiences with AR text and graphics.
11.3. Personalized Content
Content is becoming more personalized.
- Customized Text Messages: Tailor your text messages to individual recipients.
- Dynamic Content: Create dynamic content that changes based on user preferences.
12. Conclusion: Unleash Your Creativity
Adding text to photos on your iPhone opens up a world of creative possibilities. Whether you’re using the built-in Markup tool or a third-party app like Phonto, Over, Canva, or Adobe Photoshop Express, the key is to experiment and find what works best for you. Remember the tips for effective text placement and design, and don’t be afraid to try new things. At dfphoto.net, we encourage you to explore your creativity and share your vision with the world and image overlays for photographers.
FAQ Section
1. How do I add text to a photo on my iPhone using the built-in Markup tool?
To add text to a photo on your iPhone using the built-in Markup tool, open the Photos app, select the photo, tap Edit, tap the Markup button, tap the Plus button, select Text, type your text, customize the font, size, and color, and tap Done.
2. What are some good apps for adding text to photos on iPhone?
Some excellent apps for adding text to photos on iPhone include Phonto, Over, Canva, and Adobe Photoshop Express. These apps offer a wide range of fonts, customization options, and advanced features.
3. How can I change the font of the text I add to a photo on my iPhone?
To change the font of the text you add to a photo on your iPhone, use an app like Phonto, Over, Canva, or Adobe Photoshop Express. These apps allow you to select from a variety of fonts and customize the text to your liking.
4. How do I make the text stand out on a photo with a busy background?
To make text stand out on a photo with a busy background, add a background color to the text, use a contrasting color for the text, add a stroke or outline to the text, or place the text in an area of the photo with less detail.
5. Can I add curved text to a photo on my iPhone?
Yes, you can add curved text to a photo on your iPhone using apps like Over and Canva, which offer tools for creating curved text paths.
6. How do I create a watermark with text on my iPhone?
To create a watermark with text on your iPhone, use an app like Phonto or Canva to add your logo or copyright information to the photo, then adjust the opacity to make it semi-transparent.
7. How can I add text to multiple photos quickly on my iPhone?
To add text to multiple photos quickly on your iPhone, use a batch editing feature in apps like Adobe Lightroom Mobile or VSCO, which allows you to apply the same text and settings to multiple images at once.
8. What are some tips for choosing the right font for my photo?
When choosing a font for your photo, consider readability, the mood of the photo, and consistency. Ensure the font is easy to read, matches the mood of the photo, and complements the overall design.
9. How do I save a photo with text on my iPhone without losing quality?
To save a photo with text on your iPhone without losing quality, save the photo in its original resolution and format. Avoid compressing the image or saving it in a lower quality format.
10. How do I share a photo with text on social media directly from my iPhone?
To share a photo with text on social media directly from your iPhone, save the edited photo to your camera roll, then open the social media app, select the photo, and share it with your followers.
Ready to enhance your photos with captivating text? Visit dfphoto.net for more tutorials, inspiration, and a vibrant community of photographers! Connect with us at 1600 St Michael’s Dr, Santa Fe, NM 87505, United States or call +1 (505) 471-6001.