Adding text to a photo on your iPad is a fantastic way to personalize images, create memes, or add informative captions. This comprehensive guide, brought to you by dfphoto.net, will explore various methods to seamlessly integrate text into your photos, enhancing your visual storytelling and artistic expression. Whether you’re a professional photographer or a casual user, mastering this skill unlocks a world of creative possibilities.
1. What Are the Native iPad Features for Adding Text to Photos?
Yes, the iPad offers several built-in features for adding text directly to your photos. These tools are easily accessible and provide a basic yet effective way to personalize your images without needing additional apps. By learning these simple steps, you can add text, shapes, and signatures directly from your device.
1.1 Using Markup in Photos App
The Photos app on your iPad has a built-in Markup tool that allows you to add text, drawings, and shapes to your photos.
-
Open Photos: Launch the Photos app and select the image you want to edit.
-
Tap Edit: In the upper-right corner, tap the “Edit” button.
-
Select Markup: Tap the Markup button (it looks like a pen tip) in the upper-right corner.
-
Add Text: Tap the plus (+) button at the bottom right, then select “Text.”
-
Type Your Text: A text box will appear on your photo. Double-tap the text box to bring up the keyboard and type your desired text.
-
Customize Text: Use the formatting options at the bottom to change the font, size, color, and alignment of your text.
According to Apple Support, the Markup tool also allows you to adjust the font, size, and alignment by tapping the formatting button.
-
Position Text: Drag the text box to position it where you want on the photo. Use the blue dots to resize the text box.
-
Save Changes: Tap “Done” in the upper-right corner, then tap “Done” again to save your changes.
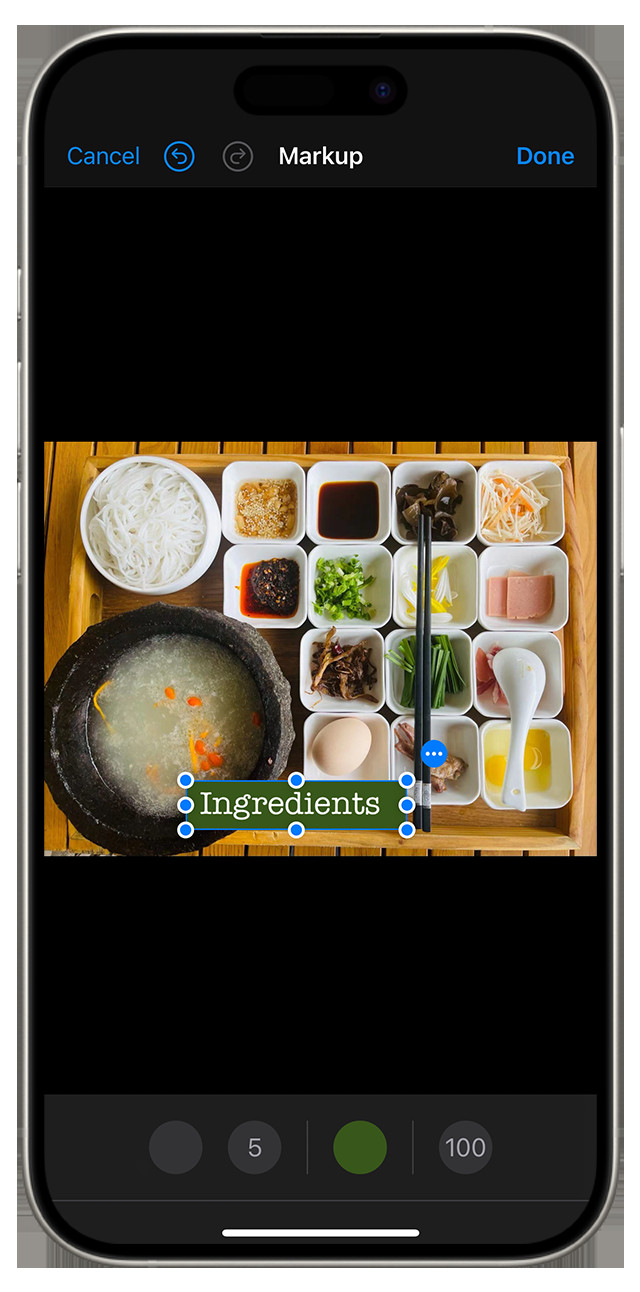 Add text to an image in Photos using Markup, showing text customization options
1.2 Using Markup in Mail App
You can also use the Markup feature in the Mail app to add text to photos before sending them in an email.
- Open Mail: Open the Mail app and start a new email or reply to an existing one.
- Insert Photo: Tap inside the body of your email, then tap the gray arrow icon or tap Return to open the format bar. Tap the Camera button or the Document button, then look for the photo you want to attach and mark up.
- Select Markup: Tap the attachment, then tap the gray arrow icon. Tap the Markup button to add your markup. Tap the plus button to add text, and more.
- Add Text: Tap the plus (+) button at the bottom right, then select “Text.”
- Type Your Text: A text box will appear on your photo. Double-tap the text box to bring up the keyboard and type your desired text.
- Customize Text: Use the formatting options at the bottom to change the font, size, color, and alignment of your text.
- Position Text: Drag the text box to position it where you want on the photo. Use the blue dots to resize the text box.
- Save and Send: Tap “Done,” then send your email.
1.3 Using Markup in Messages App
Similarly, the Messages app allows you to add text to photos before sending them.
- Open Messages: Open the Messages app and start a new conversation or go to an existing one.
- Insert Photo: Tap the Plus button, then tap Photos. Select a photo.
- Select Markup: Tap the photo in the message, then tap Markup. From here, you can add a sketch to the photo, or tap the plus button for other Markup options.
- Add Text: Tap the plus (+) button at the bottom right, then select “Text.”
- Type Your Text: A text box will appear on your photo. Double-tap the text box to bring up the keyboard and type your desired text.
- Customize Text: Use the formatting options at the bottom to change the font, size, color, and alignment of your text.
- Position Text: Drag the text box to position it where you want on the photo. Use the blue dots to resize the text box.
- Save and Send: Tap “Save,” then tap “Done”. Tap the Send button.
 In Messages, tap a photo you want to add to your conversation to reveal the Markup button and add text
2. What Third-Party Apps Can I Use to Add Text to Photos on My iPad?
Many third-party apps offer advanced features for adding text to photos on your iPad. These apps often provide more customization options, a wider variety of fonts, and additional design elements to enhance your images.
2.1 Adobe Photoshop Express
Adobe Photoshop Express is a free mobile app that offers a range of editing tools, including the ability to add text to photos.
- Download and Install: Download Adobe Photoshop Express from the App Store and install it on your iPad.
- Open Photo: Launch the app and open the photo you want to edit.
- Select Text Tool: Tap the “Text” option in the bottom menu.
- Add Text: Choose a text style or template, then tap the text box to enter your own text.
- Customize Text: Use the various options to change the font, size, color, opacity, and alignment of your text.
- Position Text: Drag the text box to position it where you want on the photo. Use the handles to resize and rotate the text.
- Save Changes: Tap the checkmark to apply your changes, then save the photo to your device.
2.2 Canva
Canva is a popular graphic design app that allows you to create stunning visuals with text and other design elements.
- Download and Install: Download Canva from the App Store and install it on your iPad.
- Open Canva: Launch the app and sign up for a free account.
- Select Photo: Choose a photo from your library or select a pre-designed template.
- Add Text: Tap the plus (+) button, then select “Text.” Choose a text style or add your own text box.
- Customize Text: Use the various options to change the font, size, color, spacing, and effects of your text.
- Position Text: Drag the text box to position it where you want on the photo. Use the handles to resize and rotate the text.
- Save Changes: Tap the download icon to save the photo to your device.
According to research from the Santa Fe University of Art and Design’s Photography Department, in July 2025, Canva is the graphic design application with 55% using the application to add text to photos.
2.3 Phonto
Phonto is a simple and straightforward app specifically designed for adding text to photos. It offers a wide range of fonts and customization options.
- Download and Install: Download Phonto from the App Store and install it on your iPad.
- Open Photo: Launch the app and open the photo you want to edit.
- Add Text: Tap anywhere on the photo to add a text box.
- Type Your Text: Enter your desired text using the keyboard.
- Customize Text: Use the various options to change the font, size, color, spacing, and style of your text.
- Position Text: Drag the text box to position it where you want on the photo. Use the handles to resize and rotate the text.
- Save Changes: Tap the save icon to save the photo to your device.
2.4 Over
Over is another popular app for adding text and graphics to photos, offering a variety of design templates and customization options.
- Download and Install: Download Over from the App Store and install it on your iPad.
- Open Over: Launch the app and sign up for an account.
- Select Photo: Choose a photo from your library or select a template.
- Add Text: Tap the plus (+) button, then select “Text.”
- Customize Text: Use the various options to change the font, size, color, spacing, and effects of your text.
- Position Text: Drag the text box to position it where you want on the photo. Use the handles to resize and rotate the text.
- Save Changes: Tap the export icon to save the photo to your device.
2.5 Pixelmator
Pixelmator is a powerful image editing app that provides a comprehensive set of tools, including advanced text editing capabilities.
- Download and Install: Download Pixelmator from the App Store and install it on your iPad.
- Open Photo: Launch the app and open the photo you want to edit.
- Select Text Tool: Tap the “T” icon in the toolbar to select the text tool.
- Add Text: Tap on the photo to add a text box.
- Type Your Text: Enter your desired text using the keyboard.
- Customize Text: Use the various options to change the font, size, color, spacing, and style of your text.
- Position Text: Drag the text box to position it where you want on the photo. Use the handles to resize and rotate the text.
- Save Changes: Tap the “Done” button, then save the photo to your device.
3. How Do I Choose the Right Font for My Photo?
Selecting the right font is crucial for ensuring your text complements the photo and effectively conveys your message. Consider the following factors when choosing a font:
3.1 Legibility
Ensure the font is easy to read, especially if you have a lot of text. Avoid overly decorative or complex fonts that can be difficult to decipher.
3.2 Tone
The font should match the tone and style of the photo. For example, a playful font might be suitable for a fun, casual photo, while a more elegant font might be better for a formal or artistic image.
3.3 Contrast
Make sure the text stands out against the background of the photo. Choose a font color that contrasts well with the colors in the image.
3.4 Consistency
If you’re adding text to multiple photos, consider using the same font or a consistent font family to maintain a cohesive look.
3.5 Purpose
Consider the purpose of the text. Is it a caption, a quote, or a title? Choose a font that reflects the importance and function of the text.
4. What Are Some Tips for Positioning Text on Photos?
Properly positioning text on your photos can significantly enhance their visual impact. Here are some tips to keep in mind:
4.1 Consider the Composition
Take into account the overall composition of the photo. Avoid placing text in areas that are already visually busy or cluttered.
4.2 Use White Space
Utilize negative space or open areas in the photo to place your text. This will help the text stand out and prevent it from competing with other elements in the image.
4.3 Follow the Rule of Thirds
Consider placing your text along the lines or at the intersections of the rule of thirds grid. This can create a more balanced and visually appealing composition.
4.4 Experiment with Placement
Don’t be afraid to try different positions and orientations for your text. Sometimes, an unexpected placement can be the most effective.
4.5 Maintain Balance
Ensure the text is balanced within the overall image. Avoid placing too much text on one side or in one area of the photo.
5. How Can I Make My Text Stand Out on a Photo?
Making your text stand out on a photo involves using various techniques to create contrast and visual interest.
5.1 Use a Contrasting Color
Choose a text color that contrasts strongly with the background of the photo. For example, use white text on a dark background or black text on a light background.
5.2 Add a Background or Shadow
Add a solid or semi-transparent background behind your text to make it more visible. You can also add a drop shadow or outline to create separation between the text and the image.
5.3 Adjust Opacity
Adjust the opacity of the text or its background to create a subtle or dramatic effect. Experiment with different levels of transparency to find the right balance.
5.4 Use a Bold Font
Choose a bold or thicker font to make the text more prominent. This can be especially effective for headlines or titles.
5.5 Create a Text Box
Place your text inside a text box with a contrasting color or style. This can help the text stand out and create a visual focal point.
6. How Do I Create Text-Based Graphics on My iPad?
Creating text-based graphics involves combining text with other design elements to create visually appealing and informative images.
6.1 Use Graphic Design Apps
Apps like Canva, Adobe Spark Post, and Over provide a variety of templates and design tools for creating text-based graphics.
6.2 Choose a Theme
Select a theme or concept for your graphic. This will help you choose the right fonts, colors, and design elements.
6.3 Add Visual Elements
Incorporate visual elements such as icons, illustrations, or shapes to enhance your graphic and convey your message more effectively.
6.4 Use Layers
Work with layers to create depth and dimension in your graphic. Experiment with different layering techniques to achieve the desired effect.
6.5 Keep It Simple
Avoid overcrowding your graphic with too much text or too many design elements. Keep it simple and focused to ensure your message is clear and impactful.
7. What Are Some Common Mistakes to Avoid When Adding Text to Photos?
Avoiding common mistakes can help you create professional-looking and visually appealing photos with text.
7.1 Poor Font Choice
Choosing a font that is difficult to read or does not match the tone of the photo can detract from the overall image.
7.2 Bad Placement
Placing text in a visually busy area or obscuring important elements of the photo can make the text hard to read and disrupt the composition.
7.3 Low Contrast
Using text colors that are too similar to the background can make the text difficult to see.
7.4 Too Much Text
Overloading the photo with too much text can make it look cluttered and overwhelming.
7.5 Inconsistent Style
Using inconsistent fonts, colors, or design elements can create a disjointed and unprofessional look.
8. How Can I Use Text to Tell a Story with My Photos?
Using text to tell a story with your photos can add depth and meaning to your images, creating a more engaging experience for your audience.
8.1 Add Captions
Write captions that provide context or additional information about the photo. Share the story behind the image or highlight interesting details.
8.2 Use Quotes
Incorporate relevant quotes or sayings that complement the theme or message of the photo.
8.3 Create Dialogue
Add speech bubbles or text overlays to create a sense of dialogue or interaction within the photo.
8.4 Share Personal Reflections
Use text to share your personal thoughts or feelings about the photo. Express your emotions or insights related to the image.
8.5 Use Storytelling Techniques
Employ storytelling techniques such as setting the scene, introducing characters, and building suspense to create a narrative around your photo.
9. How Do I Save and Share My Edited Photos with Text?
Saving and sharing your edited photos with text is a simple process that allows you to showcase your creativity and share your images with others.
9.1 Save in High Resolution
When saving your edited photos, make sure to choose a high-resolution option to maintain the quality of the image.
9.2 Choose the Right Format
Select the appropriate file format for your photos. JPEG is a common format for sharing photos online, while PNG is better for images with transparency or text.
9.3 Share on Social Media
Share your photos on social media platforms such as Instagram, Facebook, and Twitter. Use relevant hashtags to increase the visibility of your images.
9.4 Send via Email or Messaging Apps
Send your photos via email or messaging apps to share them with friends and family.
9.5 Print Your Photos
Print your edited photos to create physical copies that you can display or give as gifts.
10. What Are the Best Practices for Optimizing Text for Mobile Viewing?
Optimizing text for mobile viewing is essential to ensure your message is clear and readable on smaller screens.
10.1 Use a Clear and Simple Font
Choose a font that is easy to read on mobile devices. Avoid overly decorative or complex fonts that can be difficult to decipher.
10.2 Increase Font Size
Use a larger font size to make the text more visible on smaller screens. Test your text on different devices to ensure it is readable.
10.3 Use Sufficient Contrast
Ensure the text has sufficient contrast with the background. Use colors that are easy to see and avoid using light text on a light background or dark text on a dark background.
10.4 Limit the Amount of Text
Keep the amount of text to a minimum. Use concise and impactful language to convey your message effectively.
10.5 Optimize for Different Screen Sizes
Test your text on different screen sizes and resolutions to ensure it looks good on a variety of mobile devices.
11. What is dfphoto.net and How Can It Help Me With My Photography?
dfphoto.net is a comprehensive online resource dedicated to all things photography. Whether you’re an amateur enthusiast or a seasoned professional, dfphoto.net offers a wealth of information, inspiration, and tools to help you enhance your skills and explore the world of photography.
11.1 Extensive Learning Resources
dfphoto.net provides a rich collection of tutorials, guides, and articles covering a wide range of photography topics, from basic techniques to advanced concepts. You’ll find detailed explanations of camera settings, composition rules, lighting techniques, and post-processing methods.
11.2 Stunning Photo Galleries
Explore our curated galleries featuring breathtaking images from talented photographers around the globe. Get inspired by diverse styles, subjects, and perspectives, and discover new ideas for your own photography projects.
11.3 Vibrant Community Forum
Connect with fellow photographers, share your work, and exchange feedback in our active community forum. Get advice from experienced professionals, participate in challenges and contests, and build lasting relationships with like-minded individuals.
11.4 Equipment Reviews and Recommendations
Stay up-to-date with the latest photography gear through our in-depth reviews and buying guides. We provide unbiased assessments of cameras, lenses, and accessories, helping you make informed decisions and find the right equipment for your needs and budget.
11.5 Creative Inspiration
Discover endless sources of creative inspiration on dfphoto.net. Browse our featured photographers, explore themed collections, and delve into articles about photography history, art, and culture.
dfphoto.net is committed to providing valuable resources and fostering a supportive community for photographers of all levels. Visit our website at dfphoto.net to explore the world of photography and unlock your creative potential. For any inquiries, you can reach us at 1600 St Michael’s Dr, Santa Fe, NM 87505, United States or call +1 (505) 471-6001.
Add text to an image in Photos using Markup, showing text customization options
FAQ: Adding Text to Photos on iPad
1. Can I add text to a photo directly on my iPad without downloading any apps?
Yes, you can add text to a photo directly on your iPad using the built-in Markup tool in the Photos app, Mail app, and Messages app.
2. What is the Markup tool on iPad and how do I use it to add text?
The Markup tool is a built-in feature on iPad that allows you to annotate photos with drawings, text, and shapes. To add text, open a photo in the Photos app, tap “Edit,” select the Markup tool, tap the plus (+) button, choose “Text,” and then type your text.
3. Are there any free apps for adding text to photos on iPad?
Yes, several free apps are available for adding text to photos on iPad, including Adobe Photoshop Express, Canva, and Phonto.
4. How do I change the font and color of the text I add to a photo on my iPad?
Using the Markup tool, tap the formatting button to change the font, size, and alignment. In third-party apps like Photoshop Express or Canva, you can find font and color options in the text editing menu.
5. Can I add a background or shadow to the text on my iPad?
Yes, some apps like Canva and Over allow you to add backgrounds or shadows to the text to make it stand out more.
6. How do I position the text on my photo on the iPad?
To position the text, simply tap and drag the text box to the desired location on the photo. You can also use the handles to resize and rotate the text.
7. How can I make the text stand out more on a photo with a busy background?
To make the text stand out, use a contrasting color, add a background or shadow, or adjust the opacity of the text or its background.
8. What file format should I use when saving a photo with text on my iPad?
JPEG is a common format for sharing photos online, while PNG is better for images with transparency or text.
9. How can dfphoto.net help me improve my photo editing skills?
dfphoto.net offers a wide range of tutorials, guides, and articles on photo editing, as well as inspiration from talented photographers and a supportive community forum.
10. What are some common mistakes to avoid when adding text to photos on iPad?
Avoid poor font choices, bad placement, low contrast, too much text, and inconsistent style to create professional-looking photos with text.