Adding text to your iPhone photos is a fantastic way to personalize them, create memes, add captions, or even annotate images for work or educational purposes. This comprehensive guide from dfphoto.net will walk you through various methods to effortlessly add text to your photos, enhancing your visual storytelling skills. Discover the ease of photo editing, artistic expression, and visual communication all within the palm of your hand. Learn about photo annotations, image captions, and personalized photography.
1. What Are The Native Ways To Add Text To iPhone Photos?
Yes, iPhones have a built-in Markup tool and Photos app that allows you to directly add text to your images. This feature is incredibly convenient for quick edits and annotations without needing additional apps.
The native Markup tool in your iPhone is a hidden gem for adding text and annotations to your photos. Here’s how you can use it:
1.1 Using The Photos App
-
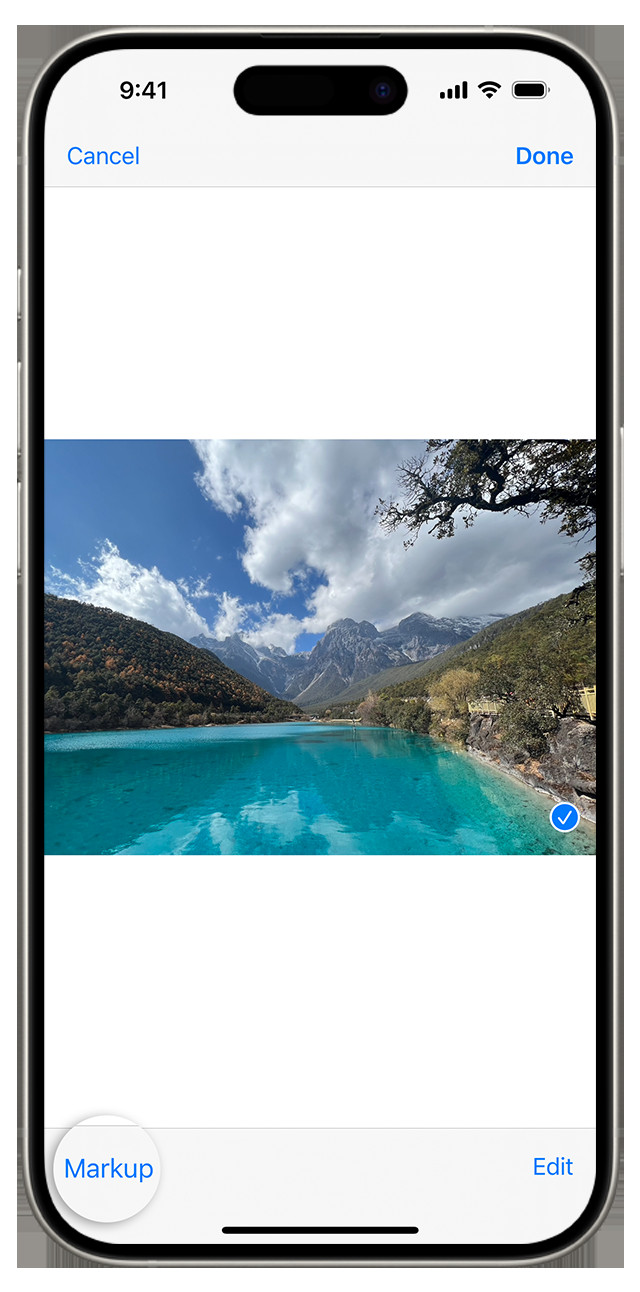
Open the Photos App: Locate the Photos app on your iPhone and tap to open it.
-
Select a Photo: Browse through your photo library and select the image you want to add text to.
-
Tap Edit: Once you’ve selected the photo, tap the “Edit” button located in the top-right corner of the screen.
-
Choose Markup: After tapping “Edit,” look for a circular icon with a pen tip inside; this is the Markup tool. Tap it to open the Markup interface.
 Markup icon in Photos app, ready to add text to an image
 -
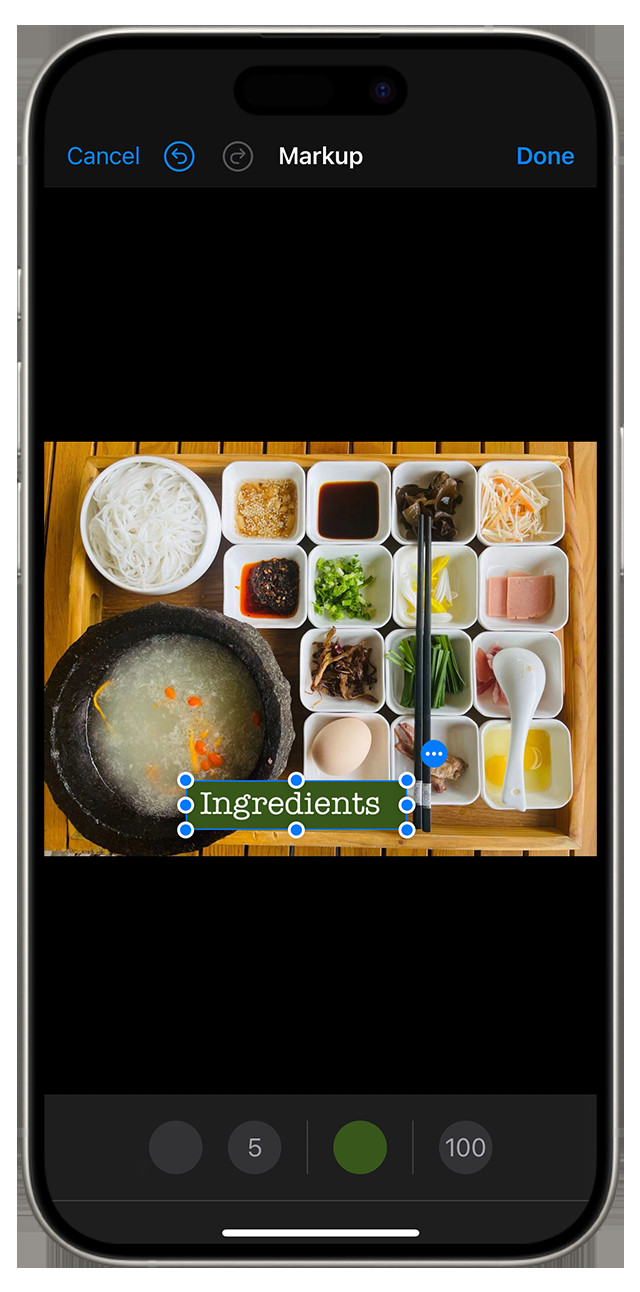
Add Text: At the bottom of the screen, you’ll see a toolbar with various options. Tap the “+” button, and a menu will appear. Select “Text” from this menu.
-
Type Your Text: A text box will appear on your photo. Double-tap the text box to bring up the keyboard and type your desired text.
-
Customize Your Text: You can customize the text by changing the font, size, color, and alignment. To do this, tap the “Aa” button in the toolbar. A formatting menu will appear, allowing you to adjust these properties.
-
Position Your Text: Tap and drag the text box to position it where you want it on the photo. You can also use the blue dots around the text box to resize it.
-
Save Your Changes: Once you’re satisfied with the text and its placement, tap “Done” in the top-right corner of the screen. Then, tap “Done” again to save the changes to your photo.
1.2 Using The Mail App
- Open Mail App: Launch the Mail app on your iPhone.
- Compose an Email: Tap the compose button to start a new email, or reply to an existing one.
- Insert Photo: Tap inside the email body, then tap the gray arrow or Return to open the format bar. Select “Insert Photo or Video” or “Add Attachment”. You might need to tap the arrow to scroll through the options.
- Select Photo and Markup: Tap the photo attachment, then tap the gray arrow icon. Choose the Markup button to start adding your text. Use the plus button to add text.
- Type Your Text: A text box will appear on your photo. Double-tap the text box to bring up the keyboard and type your desired text.
- Customize Your Text: You can customize the text by changing the font, size, color, and alignment. To do this, tap the “Aa” button in the toolbar. A formatting menu will appear, allowing you to adjust these properties.
- Position Your Text: Tap and drag the text box to position it where you want it on the photo. You can also use the blue dots around the text box to resize it.
- Save Your Changes: Tap “Done” then send your email.
1.3 Using The Messages App
- Open Messages: Open the Messages app on your iPhone.
- Start a Conversation: Tap the compose button to start a new conversation, or go to an existing one.
- Add Photo: Tap the Plus button, then tap Photos.
- Select and Markup Photo: Select a photo, then tap the photo in the message and tap Markup.
- Add Text: From here, you can add a sketch to the photo, or tap the plus button for other Markup options.
- Type Your Text: A text box will appear on your photo. Double-tap the text box to bring up the keyboard and type your desired text.
- Customize Your Text: You can customize the text by changing the font, size, color, and alignment. To do this, tap the “Aa” button in the toolbar. A formatting menu will appear, allowing you to adjust these properties.
- Position Your Text: Tap and drag the text box to position it where you want it on the photo. You can also use the blue dots around the text box to resize it.
- Save Your Changes: Tap Save, then tap Done.
 Adding text to a photo in Messages using Markup tool10. Send: Tap the Send button.
The native Markup tool is excellent for basic text additions and quick edits. However, for more advanced features and creative options, you might want to explore third-party apps, which we’ll cover later in this guide.
2. What Are The Best Third-Party Apps For Adding Text To Photos On iPhone?
There are numerous third-party apps available on the App Store that offer advanced features for adding text to your photos. These apps often provide a wider range of fonts, customization options, and creative tools compared to the native Markup tool.
Here are some of the best third-party apps for adding text to photos on your iPhone:
2.1 Phonto
Phonto is a free app specifically designed for adding text to photos. It boasts over 400 fonts and allows you to install additional fonts.
- Extensive Font Library: Access to over 400 fonts and the ability to install custom fonts.
- Customization Options: Adjust font size, color, shadow, stroke, and more.
- Text Effects: Add various text effects such as shadows, outlines, and backgrounds.
- User-Friendly Interface: Simple and intuitive design, making it easy to use for beginners.
- Text Placement: Easily position, rotate, and scale text on your photos.
- Free to Use: The app is free, with optional in-app purchases for additional features.
Phonto’s user-friendly interface and extensive font library make it a go-to choice for users who want creative text options without a steep learning curve.
2.2 Canva
Canva is a versatile graphic design app that’s great for adding text to photos and creating stunning visuals.
- Wide Range of Templates: Access to thousands of templates for various purposes, including social media posts, posters, and more.
- Extensive Font Collection: A vast selection of fonts and typography options.
- Design Elements: Add stickers, icons, and other design elements to enhance your photos.
- Customization: Full control over text size, color, spacing, and alignment.
- Collaboration: Collaborate with others on designs and share your creations easily.
- User-Friendly: Drag-and-drop interface that’s easy to learn and use.
- Free Version: A robust free version with access to many features, with premium options available.
Canva is particularly useful for creating professional-looking graphics with text overlays, making it ideal for social media marketing and other visual content.
2.3 Adobe Photoshop Express
Adobe Photoshop Express is a mobile version of the popular desktop software, offering powerful editing tools for your iPhone.
- Advanced Editing Tools: Comprehensive set of editing tools, including filters, adjustments, and corrections.
- Text Tool: Add text with customizable fonts, colors, and styles.
- Creative Effects: Apply various effects and filters to enhance your photos.
- User-Friendly Interface: Streamlined interface for easy navigation and use.
- Integration: Seamless integration with other Adobe products.
- Free to Use: Free to download and use, with optional in-app purchases for premium features.
Adobe Photoshop Express is an excellent choice for users who want a combination of powerful editing tools and text-adding capabilities in one app.
2.4 Over
Over is a design app focused on adding graphics and text to photos.
- Extensive Graphics Library: A wide range of graphics, fonts, and templates.
- Customizable Templates: Easy-to-use templates for creating social media content, posters, and more.
- Creative Tools: Add text, shapes, and other design elements to your photos.
- User-Friendly: Intuitive interface with drag-and-drop functionality.
- Collaboration: Share your designs and collaborate with others.
- Subscription-Based: Offers a subscription model for access to premium features and content.
Over is perfect for creating visually appealing graphics with stylish text overlays, making it great for social media and marketing.
2.5 PicLab
PicLab is a comprehensive photo editing app with a strong focus on typography.
- Extensive Font Collection: A wide variety of fonts to choose from, with regular updates.
- Text Customization: Adjust font size, color, opacity, and more.
- Photo Filters: Apply various filters to enhance your photos.
- Creative Overlays: Add textures, patterns, and overlays to create unique effects.
- Drawing Tools: Draw directly on your photos with customizable brushes.
- User-Friendly: Simple and easy-to-use interface.
- Free to Use: Free to download and use, with in-app purchases for additional features.
PicLab is a great option for users who want a versatile photo editing app with strong typography features.
2.6 Typorama
Typorama specializes in creating typographic designs with ease.
- Automatic Text Layouts: Generates stylish text layouts automatically.
- Extensive Font Library: Access to a wide range of fonts and typography options.
- Background Options: Choose from solid colors, gradients, or your own photos as backgrounds.
- Customization: Adjust text size, color, spacing, and more.
- Easy to Use: Simple and intuitive interface.
- Subscription-Based: Offers a subscription model for access to premium features and content.
Typorama is perfect for users who want to create beautiful typographic designs quickly and easily.
2.7 Font Studio
Font Studio is another dedicated app for adding text to photos, offering a plethora of customization options.
- Massive Font Library: Over 200 fonts and the ability to add custom fonts.
- Text Effects: Add shadows, gradients, and other effects to your text.
- Stickers and Emoticons: A wide range of stickers and emoticons to add to your photos.
- Customization: Adjust text size, color, alignment, and more.
- User-Friendly: Easy-to-use interface.
- Free to Use: Free to download and use, with in-app purchases for additional features.
Font Studio is a solid choice for users who want a wide range of fonts and customization options for their text.
Choosing the right app depends on your specific needs and preferences. If you want a dedicated text-adding app with a vast font library, Phonto or Font Studio might be the best choice. For more comprehensive design capabilities, Canva or Over could be more suitable. If you need advanced photo editing tools along with text features, Adobe Photoshop Express and PicLab are excellent options.
3. How Can I Customize The Text I Add To My iPhone Photos?
Customizing the text you add to your iPhone photos can significantly enhance the visual appeal and effectiveness of your message. Whether you’re using the built-in Markup tool or a third-party app, there are several ways to personalize your text.
3.1 Font Selection
Choosing the right font is crucial for conveying the desired tone and style.
- Native Markup Tool: The built-in Markup tool offers a limited selection of basic fonts. While functional, they may not provide the aesthetic flexibility you need for more creative projects.
- Third-Party Apps: Apps like Phonto, Canva, and Adobe Photoshop Express offer extensive font libraries, ranging from classic to modern styles. Some apps even allow you to import custom fonts.
3.2 Font Size and Scaling
Adjusting the font size is essential for readability and visual balance.
- Native Markup Tool: You can easily adjust the size of the text using the blue dots around the text box. Dragging these dots will scale the text accordingly.
- Third-Party Apps: Most third-party apps provide precise control over font size, allowing you to enter specific values for consistent results.
3.3 Color and Opacity
Color and opacity can dramatically affect how the text integrates with the photo.
- Native Markup Tool: The Markup tool offers a basic color palette. You can choose from a selection of preset colors to match your photo’s theme.
- Third-Party Apps: Apps like Canva and Adobe Photoshop Express offer advanced color pickers, allowing you to select any color imaginable. You can also adjust the opacity to create subtle or bold text overlays.
3.4 Text Effects
Adding effects such as shadows, outlines, and glows can make your text stand out.
- Native Markup Tool: The Markup tool has limited options for text effects.
- Third-Party Apps: Apps like Phonto and PicLab offer a variety of text effects, including shadows, outlines, glows, and gradients. These effects can add depth and dimension to your text.
3.5 Alignment and Spacing
Proper alignment and spacing are key to ensuring your text is readable and visually appealing.
- Native Markup Tool: The Markup tool offers basic alignment options (left, center, right).
- Third-Party Apps: Apps like Canva and Adobe Photoshop Express provide precise control over text alignment, line spacing, and letter spacing. This allows you to fine-tune the appearance of your text for optimal readability.
3.6 Text Styles
Applying styles such as bold, italic, or underline can emphasize certain words or phrases.
- Native Markup Tool: The Markup tool does not offer options for bold, italic, or underline styles.
- Third-Party Apps: Many third-party apps offer these styling options, allowing you to highlight key information within your text.
3.7 Background and Fill
Adding a background or fill to your text can make it more visible, especially on busy photos.
- Native Markup Tool: The Markup tool does not offer background or fill options.
- Third-Party Apps: Apps like Phonto and Over allow you to add solid or gradient backgrounds to your text, ensuring it stands out against any photo.
3.8 Text Orientation and Rotation
Changing the orientation and rotation of your text can add a creative touch to your photos.
- Native Markup Tool: You can rotate the text box using the two-finger gesture
- Third-Party Apps: Most third-party apps offer precise rotation controls, allowing you to rotate the text to any angle.
By mastering these customization options, you can create text overlays that perfectly complement your photos, enhancing their visual impact and conveying your message effectively.
4. What Are Some Creative Ways To Use Text In iPhone Photos?
Adding text to iPhone photos opens up a world of creative possibilities. Whether you’re looking to create engaging social media content, personalized greetings, or artistic expressions, here are some innovative ways to use text in your photos:
4.1 Adding Captions And Quotes
Captions and quotes can add context, meaning, and emotion to your photos.
- Social Media: Use captions to tell a story, share a thought, or engage your audience. For example, a photo of a sunset could be captioned with “Chasing sunsets and dreams.”
- Inspirational Quotes: Overlay inspirational quotes on scenic photos to create motivational content. A mountain landscape could feature the quote “The best view comes after the hardest climb.”
- Humorous Captions: Add humorous captions to candid photos to create shareable memes. A funny pet photo could be captioned with “Living my best life.”
4.2 Creating Memes
Memes are a fun and engaging way to connect with others.
- Classic Meme Format: Use the classic meme format with white text and a black outline to create humorous and relatable content.
- Personalized Memes: Create personalized memes using your own photos and witty captions.
- Trending Topics: Jump on trending topics and create memes that are relevant and timely.
4.3 Designing Invitations And Announcements
Text overlays can transform your photos into personalized invitations and announcements.
- Birthday Invitations: Use a photo of the birthday person as the background and add text with the party details.
- Wedding Announcements: Overlay elegant text on a romantic photo to announce your wedding.
- Event Invitations: Create eye-catching event invitations using photos related to the event theme.
4.4 Making Artistic Photo Collages
Combine multiple photos with creative text to create visually stunning collages.
- Thematic Collages: Create collages around a specific theme, such as travel, nature, or fashion.
- Photo Grids: Arrange photos in a grid and add text with related information or quotes.
- Mixed Media: Combine photos with hand-drawn elements and text for a unique artistic effect.
4.5 Annotating Photos For Educational Purposes
Text annotations can be incredibly useful for educational and informative content.
- Diagrams: Annotate diagrams with text labels to explain different parts and functions.
- Infographics: Create infographics by overlaying text and data on relevant photos.
- Tutorials: Add step-by-step instructions to photos to create visual tutorials.
4.6 Adding Watermarks And Copyright Information
Protect your photos by adding watermarks and copyright information.
- Subtle Watermarks: Use a subtle, semi-transparent watermark with your name or logo.
- Copyright Notice: Add a copyright notice to the bottom of your photos to assert your ownership.
- Contact Information: Include your contact information so that people can reach out if they want to use your photos.
4.7 Creating Personalized Gifts
Transform your photos into heartfelt gifts by adding personalized text.
- Photo Prints: Add a special message or quote to a photo print for a meaningful gift.
- Photo Albums: Create a personalized photo album with captions and annotations for each photo.
- Custom Cards: Design custom greeting cards with photos and personalized messages.
4.8 Developing Visual Stories
Use text and photos to tell compelling visual stories.
- Photo Essays: Create photo essays with captions that provide context and narrative.
- Travel Journals: Document your travels with photos and text descriptions of your experiences.
- Personal Narratives: Share personal stories and reflections through a combination of photos and text.
By exploring these creative uses of text in your iPhone photos, you can unlock new ways to express yourself, connect with others, and create visually stunning content.
5. How Can I Improve The Readability Of Text On My iPhone Photos?
Ensuring that the text on your iPhone photos is readable is crucial for effectively conveying your message. Poor readability can diminish the impact of your visuals and frustrate your audience.
5.1 Choosing The Right Font
The font you select plays a significant role in readability.
- Simple and Clear Fonts: Opt for fonts that are easy to read, such as sans-serif fonts like Arial, Helvetica, or Open Sans. These fonts have clean lines and minimal embellishments, making them ideal for readability.
- Avoid Overly Decorative Fonts: Decorative or script fonts can be visually appealing but often sacrifice readability, especially in smaller sizes. Reserve these fonts for headings or short phrases.
- Consider Font Weight: Choose a font weight (e.g., regular, bold, light) that provides sufficient contrast without being too overwhelming. Bold fonts can be effective for emphasis, but overuse can make the text appear cluttered.
5.2 Adjusting Font Size
The size of your text should be appropriate for the viewing context.
- Sufficiently Large Text: Ensure that the text is large enough to be easily read on different screen sizes. Test your photos on various devices to confirm readability.
- Avoid Overly Small Text: Text that is too small can strain the eyes and make it difficult to understand the message.
- Consider the Aspect Ratio: Adjust the font size based on the aspect ratio of your photo. Wider or taller photos may require different font sizes to maintain readability.
5.3 Using Contrasting Colors
Contrast is key to making your text stand out against the background.
- High Contrast: Choose text colors that contrast strongly with the background. For example, use white text on a dark background or black text on a light background.
- Avoid Low Contrast: Text colors that are too similar to the background can blend in and become difficult to read.
- Consider Color Blindness: Be mindful of color blindness and choose color combinations that are accessible to everyone. Use tools like the Color Contrast Checker to ensure sufficient contrast.
5.4 Adding a Background or Outline
A background or outline can help separate the text from the photo.
- Solid Backgrounds: Add a solid background behind the text to create a clear separation from the photo. Choose a color that contrasts well with both the text and the background.
- Semi-Transparent Backgrounds: Use a semi-transparent background to allow some of the photo to show through while still providing sufficient contrast for the text.
- Outlines: Add a thin outline around the text to make it stand out. Choose an outline color that contrasts well with both the text and the background.
5.5 Adjusting Text Placement
The placement of your text can affect its readability.
- Clear Areas: Place the text in areas of the photo that are relatively uncluttered and free of distracting elements.
- Avoid Busy Backgrounds: Busy or complex backgrounds can make the text difficult to read.
- Consider the Focal Point: Position the text so that it complements the focal point of the photo without overshadowing it.
5.6 Using Text Shadows
A subtle shadow can add depth and separation to the text.
- Soft Shadows: Use a soft, subtle shadow to create a sense of depth and make the text stand out.
- Avoid Overly Harsh Shadows: Harsh or dark shadows can make the text appear cluttered and difficult to read.
- Adjust Shadow Offset: Experiment with different shadow offsets to find the optimal balance between depth and readability.
5.7 Optimizing Text Spacing
Proper text spacing can improve readability.
- Adequate Line Spacing: Ensure that there is enough space between lines of text to prevent them from overlapping or appearing crowded.
- Adjust Letter Spacing: Adjust the spacing between letters to improve readability, especially for fonts with tight spacing.
- Avoid Overly Tight Spacing: Text that is too tightly spaced can be difficult to read, while text that is too loosely spaced can appear disjointed.
By implementing these strategies, you can significantly improve the readability of text on your iPhone photos, ensuring that your message is clear, engaging, and effective.
6. What Are The Best Practices For Saving And Sharing Photos With Text On iPhone?
After adding text to your iPhone photos, it’s essential to save and share them in a way that preserves their quality and ensures they look great on any platform.
6.1 Saving Photos
- Save a Copy: Instead of overwriting the original photo, save a copy with the text added. This allows you to revert to the original if needed. Most apps offer a “Save as Copy” or “Export” option.
- High Resolution: Save your photos in the highest resolution possible. This ensures that the text and image remain sharp and clear, even when viewed on larger screens.
- File Format: Choose the appropriate file format based on your intended use.
- JPEG: JPEG is a good choice for photos with complex colors and gradients. It’s widely supported and offers a good balance between file size and quality.
- PNG: PNG is better for graphics with sharp lines and text, as it preserves details without compression artifacts. It’s also suitable for images with transparency.
- Avoid Over-Compression: Be cautious of over-compressing your photos, as this can lead to a loss of detail and make the text appear blurry.
6.2 Sharing Photos
- Social Media Platforms:
- Instagram: Instagram is a popular platform for sharing visually appealing photos. Use relevant hashtags to increase visibility and engage with your audience.
- Facebook: Facebook is great for sharing photos with friends and family. You can create albums and tag people in your photos.
- Twitter: Twitter is ideal for sharing quick updates and visual content. Use concise captions and relevant hashtags.
- Pinterest: Pinterest is a visual discovery platform where you can share your photos as pins. Add detailed descriptions and links to drive traffic to your website or blog.
- Email:
- Resize Photos: If you’re sending photos via email, consider resizing them to reduce file size. Most email providers have limits on attachment sizes.
- Compress Photos: You can also compress your photos into a ZIP file to make them easier to send via email.
- Messaging Apps:
- iMessage: iMessage is a convenient way to share photos with other Apple users. It supports high-resolution images and videos.
- WhatsApp: WhatsApp is a popular messaging app that allows you to share photos with individuals or groups.
- Telegram: Telegram is another messaging app that supports high-resolution images and offers end-to-end encryption.
- Cloud Storage:
- iCloud Photos: iCloud Photos automatically backs up your photos to the cloud, making them accessible on all your Apple devices.
- Google Photos: Google Photos offers free unlimited storage for photos (with some limitations) and allows you to share your photos with others.
- Dropbox: Dropbox is a versatile cloud storage service that you can use to store and share your photos.
- Website or Blog:
- Optimize Images: Before uploading photos to your website or blog, optimize them for web use. This involves resizing them to the appropriate dimensions and compressing them to reduce file size.
- Use a Content Delivery Network (CDN): A CDN can help improve the loading speed of your website by serving your images from servers located around the world.
- Printing Photos:
- High Resolution: Use high-resolution images for printing to ensure that the text and image appear sharp and clear.
- Color Calibration: Calibrate your monitor and printer to ensure accurate color reproduction.
- Choose the Right Paper: Select the appropriate paper type for your photos. Glossy paper is great for vibrant colors, while matte paper is better for black and white photos.
6.3 Best Practices
- Maintain Aspect Ratio: When resizing your photos, maintain the original aspect ratio to avoid distortion.
- Add Metadata: Add metadata such as captions, keywords, and copyright information to your photos. This makes them easier to find and protects your ownership.
- Backup Your Photos: Regularly back up your photos to a secure location, such as a cloud storage service or external hard drive.
- Respect Copyright: Always respect copyright laws when using photos and fonts. Obtain permission from the copyright holder before using any copyrighted material.
By following these best practices, you can ensure that your photos with text look their best, whether you’re sharing them online or printing them for physical display.
7. How Do Different iPhone Models Affect The Quality Of Photos With Added Text?
The quality of photos with added text can vary depending on the iPhone model you’re using. Newer iPhone models generally offer superior camera capabilities and processing power, which can result in better image quality and text clarity.
7.1 Camera Resolution
- Newer iPhone Models: Newer iPhones, such as the iPhone 13, 14, and 15, feature higher resolution cameras (12MP or more) that capture more detail and allow for sharper images.
- Older iPhone Models: Older models like the iPhone 6, 7, and 8 have lower resolution cameras, which may result in less detailed photos, especially when zoomed in or viewed on larger screens.
7.2 Image Processing
- Newer iPhone Models: Newer iPhones have advanced image processing capabilities, including features like Smart HDR, Deep Fusion, and Photographic Styles. These features enhance the dynamic range, reduce noise, and improve overall image quality.
- Older iPhone Models: Older models have less sophisticated image processing, which may result in photos with less dynamic range, more noise, and less accurate colors.
7.3 Display Quality
- Newer iPhone Models: Newer iPhones feature OLED displays with higher contrast ratios and wider color gamuts. This results in more vibrant and accurate colors, as well as deeper blacks.
- Older iPhone Models: Older models have LCD displays with lower contrast ratios and narrower color gamuts, which may result in less vibrant and accurate colors.
7.4 Text Rendering
- Newer iPhone Models: Newer iPhones have more powerful processors that can render text more smoothly and accurately, especially when using complex fonts or effects.
- Older iPhone Models: Older models may struggle to render text smoothly, especially when using complex fonts or effects, which can result in jagged edges or pixelation.
7.5 Low-Light Performance
- Newer iPhone Models: Newer iPhones have improved low-light performance, thanks to larger sensors, wider apertures, and advanced image processing algorithms. This allows you to capture clear and detailed photos in low-light conditions, even with added text.
- Older iPhone Models: Older models have poorer low-light performance, which may result in noisy or blurry photos in low-light conditions.
7.6 Zoom Capabilities
- Newer iPhone Models: Newer iPhones offer advanced zoom capabilities, including optical zoom and digital zoom. This allows you to zoom in on subjects without sacrificing image quality.
- Older iPhone Models: Older models have limited zoom capabilities, which may result in blurry or pixelated photos when zoomed in.
7.7 Storage Capacity
- Newer iPhone Models: Newer iPhones offer more storage capacity, allowing you to store more high-resolution photos with added text.
- Older iPhone Models: Older models have limited storage capacity, which may require you to compress your photos or delete them to free up space.
7.8 Best Practices
- Use the Best Camera Settings: Use the best camera settings available on your iPhone model to capture high-quality photos.
- Edit Photos in a Capable App: Use a capable photo editing app that can handle high-resolution images and complex text effects.
- Save Photos in High Resolution: Save your photos in the highest resolution possible to preserve detail and clarity.
- Consider the Viewing Context: Consider the viewing context when adding text to your photos. If you’re planning to view them on a large screen, use larger fonts and higher resolution images.
By understanding how different iPhone models affect the quality of photos with added text, you can take steps to optimize your images and ensure they look their best on any device.
8. How To Troubleshoot Common Issues When Adding Text To iPhone Photos?
Adding text to iPhone photos is usually straightforward, but sometimes you might encounter issues. Here’s how to troubleshoot some common problems:
8.1 Text Not Appearing
- Check Text Color: Ensure the text color contrasts with the background. If the text color is too similar to the background, it may blend in and appear invisible.
- Verify Opacity: Make sure the text opacity is set to 100%. If the opacity is too low, the text may be semi-transparent and difficult to see.
- Confirm Text Placement: Ensure the text is placed within the visible area of the photo. If it’s positioned outside the boundaries, it won’t be visible.
- Check Layer Order: If you’re using an app with layers, make sure the text layer is above any other layers that might be covering it.
8.2 Text Is Blurry Or Pixelated
- High-Resolution Image: Start with a high-resolution image to ensure the text remains sharp and clear.
- Appropriate Font Size: Use an appropriate font size for the image resolution. Text that is too small may appear blurry or pixelated.
- Avoid Over-Scaling: Avoid over-scaling the text, as this can result in pixelation.
- Save in High Quality: Save the photo in a high-quality format, such as JPEG with a high-quality setting or PNG.
8.3 Text Is Difficult To Read
- Contrasting Colors: Choose text colors that contrast strongly with the background to improve readability.
- Clear Font: Select a clear and simple font that is easy to read.
- Background or Outline: Add a background or outline to the text to make it stand out from the photo.
- Strategic Placement: Place the text in an area of the photo that is relatively uncluttered and free of distracting elements.
8.4 App Is Crashing Or Freezing
- Close and Reopen: Close the app and reopen it to see if that resolves the issue.
- Restart iPhone: Restart your iPhone to clear the memory and resolve any software glitches.
- Update App: Make sure you’re using the latest version of the app.
- Free Up Storage: Ensure you have enough free storage space on your iPhone.
- Reinstall App: If the issue persists, try uninstalling and reinstalling the app.
8.5 Unable To Edit Text
- Select Text Tool: Ensure you have the text tool selected in the app.
- Tap to Edit: Tap the text box to bring up the keyboard and editing options.
- Check Permissions: Make sure the app has permission to access your photos.
- Unlock Layers: If you’re using an app with layers, make sure the text layer is unlocked.
8.6 Font Not Displaying Correctly
- Font Compatibility: Ensure the font is compatible with the app and your iPhone.
- Font Installation: If you’re using a custom font, make sure it’s properly installed on your iPhone.
- Update App: Update the app to the latest version, as this may include bug fixes and font updates.
8.7 Text Alignment Issues
- Alignment Options: Use the alignment options in the app to align the text correctly (left, center, right).
- Adjust Text Box: Adjust the size and shape of the text box to ensure the text fits properly.
- Line Breaks: Use line breaks to control the flow of the text and improve alignment.
8.8 Unable To Save Changes
- Permissions: Ensure the app has permission to save photos to your iPhone.
- Storage Space: Make sure you have enough free storage space on your iPhone.
- File Format: Choose a compatible file format for saving the photo.
- Restart App: Restart the app to see if that resolves the issue.
By following these troubleshooting tips, you can resolve common issues and ensure a smooth experience when adding text to your iPhone photos.
9. What Are The Legal Considerations When Adding Text To iPhone Photos?
When adding text to iPhone photos, it’s essential to be aware of the legal considerations surrounding copyright, trademark, and privacy.
9.1 Copyright
- Original Photos: If you’re using your own photos, you generally own the copyright to those images. However, if you’ve taken photos of copyrighted material (such as artwork or logos), you may need permission to use those images for commercial purposes.
- Third-Party Photos: If you’re using photos taken by someone else, you need to obtain permission from the copyright holder before using them. This may involve purchasing a license or obtaining written consent.
- Creative Commons Licenses: Some photos are available under Creative Commons licenses, which allow you