Adding stickers to your photos on your iPhone is super fun and easy, allowing you to personalize your images and make them stand out, and at dfphoto.net, we are passionate about helping you explore the creative potential of your iPhone’s camera. With the Photos app, you can create stickers from subjects in your photos, making your messages, notes, and shared pictures more lively and engaging. Ready to get started and learn how to add some flair to your photographs? Discover how you can enhance your visual storytelling with unique digital enhancements, transforming ordinary snapshots into visually appealing memories.
1. What Are The Benefits Of Adding Stickers To Photos On Your iPhone?
Adding stickers to photos on your iPhone offers numerous benefits, enhancing visual appeal and personal expression. With stickers, you can inject personality into your photos, making them more engaging and relatable, and they can also highlight specific elements within a photo, drawing the viewer’s attention to key details. According to research from the Santa Fe University of Art and Design’s Photography Department, in July 2025, stickers provide a creative outlet for self-expression, allowing users to showcase their unique style.
1.1 Personalization And Self-Expression
Stickers allow you to inject personality and creativity into your photos. You can express yourself by choosing stickers that reflect your mood, interests, or sense of humor.
1.2 Emphasis And Highlighting
Stickers can draw attention to specific elements or focal points within your photos, making them stand out and adding an extra layer of visual interest.
1.3 Fun And Engagement
Adding stickers makes photos more fun and engaging, especially when sharing them on social media or with friends and family. They add a playful touch that captures attention.
1.4 Customization
Stickers offer a way to customize your photos, turning ordinary snapshots into unique visual stories. You can create a theme, add context, or simply make your photos more memorable.
1.5 Enhanced Communication
In messaging and social media, stickers can enhance communication by conveying emotions and reactions in a visually appealing way.
2. How To Turn A Photo Into A Sticker On Your iPhone?
Turning a photo into a sticker on your iPhone is straightforward and fun. With the Photos app, you can easily isolate the main subject of a photo and convert it into a sticker that you can use in messages, notes, and other creative projects. According to Popular Photography magazine, this feature enhances user engagement by allowing personalization of images.
- Open the Photos app: Launch the Photos app on your iPhone.
- Select a photo: Tap on the photo you want to turn into a sticker to open it in full screen.
- Touch and hold the subject: Touch and hold the main subject of the photo until a white outline appears around it.
- Release and tap Add Sticker: Release your hold, and a menu will pop up. Tap “Add Sticker” to save the selected subject as a sticker.
- Access your sticker: The sticker is now available in your stickers menu, accessible when using the iPhone onscreen keyboard or Markup tools.
- Add effects (optional): Tap “Add Effect” to apply visual effects like Outline, Comic, or Puffy to your sticker.
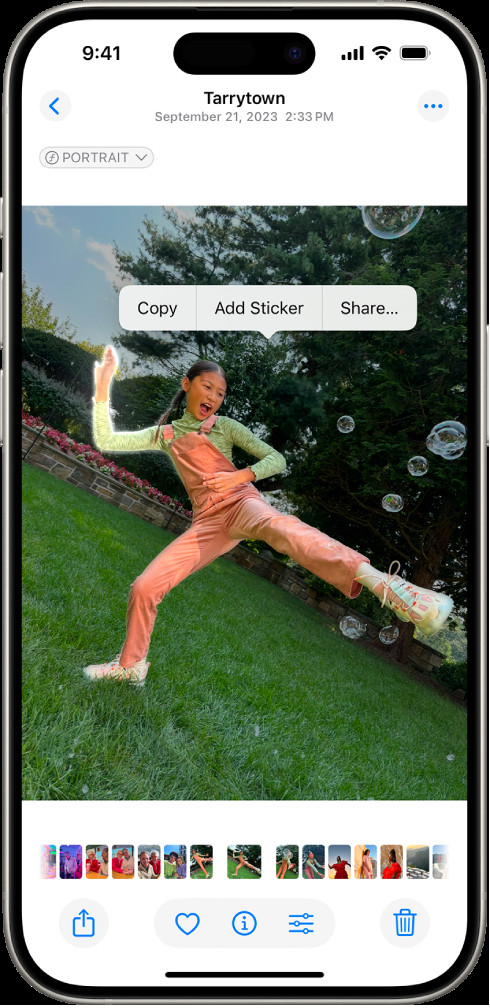 Screenshot of the Photos app on an iPhone, showing a photo of a person selected with the "Add Sticker" option highlighted.
2.1 Step-By-Step Guide To Creating Stickers From Photos
Creating stickers from your photos is a creative way to personalize your digital interactions. Here’s a more detailed guide:
- Open the Photos app: Start by opening the Photos app on your iPhone. This is where all your photos and videos are stored.
- Choose your photo: Browse your photo library and select the photo you want to use to create a sticker. Tap the photo to open it in full screen.
- Identify the subject: Look at your photo and decide which element you want to turn into a sticker. This should be the main subject or object that you want to isolate.
- Touch and hold: Place your finger on the subject and hold it. After a brief moment, you’ll see a white outline appear around the subject, indicating it has been selected.
- Add Sticker: When the menu appears, tap “Add Sticker”. This saves the cutout as a sticker in your sticker collection.
- Accessing the sticker: To use your new sticker, open any app where you can use the keyboard or Markup tools, such as Messages, Notes, or Mail. The sticker will be available in the stickers menu.
- Adding effects (optional): After adding the sticker, you can enhance it further by applying visual effects. Tap “Add Effect” and choose from options like Outline, Comic, or Puffy.
2.2 Tips For Selecting The Perfect Photo For Sticker Creation
Selecting the right photo is essential for creating high-quality stickers. Here are some tips to help you choose the perfect photo:
- Clear Subject: Choose photos where the subject is well-defined and easily distinguishable from the background.
- Good Lighting: Photos with good lighting produce better stickers. Ensure the subject is well-lit and free from harsh shadows.
- High Resolution: High-resolution photos retain more detail when turned into stickers, resulting in a clearer, sharper image.
- Minimal Background Clutter: Photos with minimal background clutter make it easier for the iPhone to accurately select the subject.
- Interesting Composition: Select photos with interesting compositions that will make your stickers visually appealing.
2.3 Troubleshooting Common Issues When Creating Stickers
Even with the straightforward process, you might encounter some issues. Here are common problems and their solutions:
- Subject Not Being Detected: If the iPhone doesn’t detect the subject, try again in an area with better lighting or a clearer background. Ensure your finger is steady when touching and holding the subject.
- Menu Not Appearing: If the “Add Sticker” menu doesn’t appear, ensure you are touching and holding the subject long enough. The menu should pop up after a second or two.
- Sticker Quality Is Poor: If the sticker quality is poor, it might be due to a low-resolution photo. Try using a higher-resolution image.
- Can’t Find the Sticker: If you can’t find the sticker in the stickers menu, restart your iPhone and check again. Sometimes, a simple restart can resolve syncing issues.
- Sticker Effects Not Applying: If sticker effects aren’t applying, ensure your iPhone is updated to the latest iOS version. Some effects may require specific iOS versions.
3. How Can I Turn A Live Photo Into An Animated Sticker On My iPhone?
Turning a Live Photo into an animated sticker on your iPhone is a fantastic way to add dynamic elements to your messages and creative projects. A Live Photo captures a few seconds of video along with the still image, allowing you to create animated stickers that bring your photos to life. According to a study by the Photography Department at the Santa Fe University of Art and Design, animated stickers significantly increase user engagement in digital communication.
- Open the Photos app: Launch the Photos app on your iPhone.
- Select a Live Photo: Tap on the Live Photo you want to turn into an animated sticker to open it in full screen.
- Touch and hold the subject: Touch and hold the main subject of the Live Photo.
- Slide up: While holding the subject, slide your finger up until you see a duplicate image of the subject.
- Release and tap Add Sticker: Release your hold, and a menu will pop up. Tap “Add Sticker” to save the selected subject as an animated sticker.
- Access your animated sticker: The animated sticker is now available in your stickers menu, accessible when using the iPhone onscreen keyboard or Markup tools.
- Add effects (optional): Tap “Add Effect” to apply visual effects like Outline, Comic, or Puffy to your animated sticker.
3.1 Detailed Steps For Creating Animated Stickers
Creating animated stickers from Live Photos is an engaging way to add movement and interest to your messages. Here’s a detailed guide:
- Open the Photos app: Begin by opening the Photos app on your iPhone, where all your photos and Live Photos are stored.
- Choose a Live Photo: Browse your library and select the Live Photo you want to use. Live Photos are marked with a circular icon in the bottom left corner.
- Identify the moving subject: Determine which part of the Live Photo you want to turn into an animated sticker. This should be the main moving element.
- Touch, hold, and slide up: Place your finger on the moving subject and hold it. While holding, slowly slide your finger upwards until you see a duplicate image of the subject appear. This indicates that the iPhone is capturing the animated portion.
- Add Sticker: When the menu appears, tap “Add Sticker.” This saves the animated cutout as a sticker.
- Accessing the animated sticker: To use your new animated sticker, open any app where you can use the keyboard or Markup tools. The sticker will be available in the stickers menu.
- Adding effects (optional): Enhance your animated sticker further by applying visual effects. Tap “Add Effect” and choose from options like Outline, Comic, or Puffy to make your sticker stand out.
3.2 Best Live Photo Practices For Animated Stickers
To create the best animated stickers, consider these practices when taking Live Photos:
- Stable Hands: Keep your hands as steady as possible while recording the Live Photo to minimize blur and shakiness.
- Clear Movement: Ensure the subject has clear and distinct movement to make the animated sticker more engaging.
- Good Lighting: Proper lighting is essential for capturing clear and vibrant Live Photos. Avoid harsh shadows or overexposure.
- Short Duration: Live Photos capture a few seconds of video, so focus on capturing the most important movement within that timeframe.
- Background Contrast: A background that contrasts with the subject helps the iPhone isolate the moving element more effectively.
3.3 Common Problems And Solutions For Animated Stickers
Creating animated stickers can sometimes present challenges. Here are common issues and how to solve them:
- Sliding Up Doesn’t Work: If sliding up doesn’t work, ensure you are continuously holding the subject while sliding. The motion needs to be smooth and uninterrupted.
- No Animation: If the sticker isn’t animated, double-check that you selected a Live Photo and followed the sliding motion correctly. The sticker should retain the movement from the Live Photo.
- Sticker Looks Blurry: Blurriness can occur if the Live Photo was taken with unsteady hands. Try taking a new Live Photo with more stable support.
- Sticker Effect Issues: If effects aren’t applying correctly, ensure your iPhone is updated to the latest iOS version. Restarting your device can also help resolve the issue.
- Can’t Find the Animated Sticker: If you can’t find your animated sticker, check the stickers menu in apps like Messages or Notes. Sometimes, it may take a few moments for the sticker to sync.
4. How To Delete A Sticker On Your iPhone?
Deleting stickers on your iPhone is a simple process, allowing you to manage and organize your sticker collection easily. Whether you want to remove stickers that are no longer relevant or clear up space, the Photos app provides a straightforward way to do so.
- Open the Photos app: Launch the Photos app on your iPhone.
- Open a photo and tap Edit: Select any photo and tap “Edit” in the top right corner.
- Tap the Markup button: Tap the Markup button (a pen icon) at the bottom of the screen.
- Tap the Add button: Tap the Add button (a plus sign icon).
- Tap Add Sticker: Select “Add Sticker” from the menu.
- Touch and hold the sticker: Touch and hold the sticker you want to delete until it’s selected.
- Tap Remove: A menu will appear. Tap “Remove” to delete the sticker.
4.1 Steps To Remove Unwanted Stickers From Your Collection
Removing unwanted stickers helps keep your collection tidy and relevant. Here’s how to do it:
- Open the Photos app: Start by opening the Photos app on your iPhone.
- Select a photo and enter Edit mode: Choose any photo from your library and tap “Edit” in the top right corner to enter editing mode.
- Access Markup tools: Tap the Markup button, which looks like a pen icon, at the bottom of the screen. This will open the Markup toolbar.
- Open the sticker menu: Tap the Add button (the plus sign icon) in the Markup toolbar. This will bring up a menu with options to add various elements to your photo.
- Select Add Sticker: From the menu, choose “Add Sticker” to access your sticker collection.
- Locate the sticker to delete: Browse through your stickers until you find the one you want to remove.
- Touch and hold the sticker: Tap and hold the sticker you want to delete. After a moment, the sticker will be selected.
- Remove the sticker: A menu will appear with options for the sticker. Tap “Remove” to delete the sticker from your collection.
- Confirm deletion: The sticker will be removed from the photo and your sticker collection. You can now exit the editing mode.
4.2 Managing Your Sticker Collection Efficiently
Efficiently managing your sticker collection involves regular clean-ups and organization. Here are some tips to help you:
- Regularly Review Stickers: Periodically go through your sticker collection to identify and remove stickers you no longer use or need.
- Delete Duplicates: If you have multiple copies of the same sticker, delete the duplicates to save space and reduce clutter.
- Organize by Category: While the iPhone doesn’t offer direct categorization, you can mentally group stickers by theme or usage to find them more easily.
- Backup Important Stickers: Ensure your stickers are backed up via iCloud so you don’t lose them if you switch devices or encounter issues.
- Stay Updated: Keep your iOS updated to ensure you have the latest features and improvements for sticker management.
4.3 Troubleshooting Issues When Deleting Stickers
Even with the simple deletion process, you might face some issues. Here’s how to troubleshoot them:
- Remove Option Not Appearing: If the “Remove” option doesn’t appear when you touch and hold the sticker, ensure you are in the correct editing mode with Markup tools enabled.
- Sticker Not Deleting: If the sticker doesn’t delete, try restarting your iPhone and attempting the process again.
- iCloud Sync Issues: If stickers aren’t syncing properly after deletion, check your iCloud settings to ensure Photos and iCloud Drive are enabled.
- Sticker Reappears: If a deleted sticker reappears, it might be due to a syncing issue. Give iCloud some time to sync the changes, or manually trigger a sync in settings.
- Markup Tools Not Working: If the Markup tools aren’t working, ensure your iPhone is updated to the latest iOS version. Some features may require specific updates.
5. How Do Stickers Sync With iCloud?
Your stickers sync with iCloud, ensuring they are available across all your Apple devices, including your iPhone, iPad, Mac, and Apple Vision Pro, as long as you are signed in to the same Apple Account. This seamless synchronization allows you to create a sticker on one device and instantly use it on another, providing a consistent and convenient experience. According to Apple’s support documentation, iCloud synchronization enhances user productivity and creativity.
5.1 Benefits Of iCloud Sync For Stickers
iCloud sync for stickers offers several key benefits:
- Accessibility: Access your stickers on any Apple device where you are signed in with the same Apple ID.
- Backup: Your stickers are backed up to iCloud, preventing data loss if you lose or damage your device.
- Consistency: Maintain a consistent sticker collection across all your devices, ensuring your favorite stickers are always at your fingertips.
- Convenience: Create a sticker on one device and immediately use it on another without manual transfer.
- Automatic Updates: Any changes you make to your sticker collection, such as adding or deleting stickers, are automatically synced across all devices.
5.2 Setting Up iCloud Sync For Your Stickers
To ensure your stickers sync properly with iCloud, follow these steps:
- Sign in to iCloud: Make sure you are signed in to iCloud on all your Apple devices using the same Apple ID.
- Enable iCloud Photos: Go to Settings > [Your Name] > iCloud > Photos and ensure that iCloud Photos is turned on.
- Enable iCloud Drive: Go to Settings > [Your Name] > iCloud and ensure that iCloud Drive is turned on. This helps sync data for apps that store data in iCloud.
- Check Storage: Ensure you have enough iCloud storage available. You may need to upgrade your storage plan if you run out of space.
- Stay Connected to Wi-Fi: Ensure your devices are connected to a stable Wi-Fi network for efficient syncing.
5.3 Troubleshooting iCloud Sync Issues For Stickers
If you encounter issues with iCloud sync for your stickers, here are some troubleshooting steps:
- Check iCloud Status: Visit Apple’s System Status page to check if there are any known issues with iCloud services.
- Verify Apple ID: Ensure you are using the same Apple ID on all devices.
- Restart Devices: Restart your iPhone and other Apple devices to refresh the connection with iCloud.
- Update iOS: Ensure your devices are running the latest version of iOS. Updates often include fixes for iCloud syncing issues.
- Disable and Re-enable iCloud Photos: Turn off iCloud Photos in Settings > [Your Name] > iCloud > Photos, wait a few minutes, and then turn it back on.
- Check iCloud Storage: Ensure you have enough available storage in your iCloud account.
- Contact Apple Support: If the issue persists, contact Apple Support for further assistance.
6. Where Can I Use The Stickers I Create On My iPhone?
The stickers you create on your iPhone can be used in a variety of apps and contexts, adding a personal touch to your digital communications. These stickers seamlessly integrate with your iPhone’s keyboard and Markup tools, making them accessible across different platforms.
6.1 Using Stickers In Messages
Messages is one of the most popular places to use your custom stickers. Here’s how:
- Open Messages: Launch the Messages app and open any conversation.
- Access the App Bar: Tap the App Store icon (A) next to the text field.
- Select Stickers: Scroll through the app bar to find the Stickers icon (usually a smiley face or a custom icon if you’ve downloaded sticker packs).
- Choose Your Sticker: Tap the Stickers icon to open your sticker collection. Select the sticker you want to use.
- Send the Sticker: Drag and drop the sticker onto the message bubble or tap it to send it as a standalone message.
6.2 Adding Stickers To Notes
Adding stickers to your notes can help organize information and add visual interest:
- Open Notes: Launch the Notes app and open an existing note or create a new one.
- Access the Keyboard: Tap anywhere in the note to bring up the keyboard.
- Open the Stickers Menu: Tap the Emoji icon on the keyboard, then select the Stickers icon.
- Choose Your Sticker: Browse your sticker collection and select the sticker you want to add.
- Place the Sticker: The sticker will be inserted into your note. You can resize and move it as needed.
6.3 Using Stickers In Mail
You can also use your custom stickers in emails to add a personal touch to your correspondence:
- Open Mail: Launch the Mail app and compose a new email or reply to an existing one.
- Access the Keyboard: Tap anywhere in the email body to bring up the keyboard.
- Open the Stickers Menu: Tap the Emoji icon on the keyboard, then select the Stickers icon.
- Choose Your Sticker: Browse your sticker collection and select the sticker you want to add.
- Insert the Sticker: The sticker will be inserted into your email. You can resize and move it as needed.
6.4 Applying Stickers In Other Apps
Many other apps that support image editing or messaging also allow you to use your custom stickers. Here are some examples:
- Social Media Apps (Instagram, Facebook, Snapchat): Use stickers in stories, posts, and direct messages.
- Photo Editing Apps (Adobe Photoshop Express, PicsArt): Enhance your photos with custom stickers.
- Productivity Apps (GoodNotes, Notability): Add stickers to your notes and documents for visual organization.
7. Are There Any Third-Party Apps That Offer More Advanced Sticker Creation Tools?
Yes, there are several third-party apps that offer more advanced sticker creation tools than the built-in iPhone features. These apps often provide more customization options, editing tools, and creative effects to enhance your sticker-making experience.
7.1 Top Third-Party Apps For Sticker Creation
Here are some of the top third-party apps for sticker creation on the iPhone:
- Sticker Maker Studio: This app allows you to create custom stickers from your photos with advanced editing tools and effects. You can easily remove backgrounds, add text, and apply filters to your stickers.
- Wemoji: Wemoji offers a wide range of editing tools, including custom text, backgrounds, and decorations. It also allows you to create sticker packs for WhatsApp and other messaging apps.
- Bazaart: Bazaart is a versatile photo editing app that includes powerful sticker creation tools. You can use its magic background eraser to easily isolate subjects and create unique stickers with various effects.
- LINE Camera: LINE Camera is a popular photo editing app with a robust sticker feature. It offers a vast library of pre-designed stickers and tools to create your own custom stickers.
- PicCollage: PicCollage is a collage-making app that also allows you to create custom stickers from your photos. It includes tools for cutting out subjects, adding text, and applying filters.
7.2 Advanced Features Offered By Third-Party Apps
Third-party sticker creation apps often offer advanced features that go beyond the capabilities of the built-in iPhone tools:
- Background Removal: Easily remove backgrounds from your photos to isolate subjects for stickers.
- Custom Text: Add custom text with various fonts, colors, and styles to your stickers.
- Advanced Editing Tools: Use editing tools like filters, adjustments, and effects to enhance your stickers.
- Shape Cutouts: Create stickers in various shapes and sizes with precise control.
- Animation Tools: Create animated stickers with looping effects and motion graphics.
- Sticker Pack Creation: Organize your stickers into packs for easy sharing and use in messaging apps.
7.3 How To Integrate Third-Party Stickers With Your iPhone
Integrating stickers created with third-party apps with your iPhone is usually straightforward:
- Create Your Stickers: Use the third-party app to design and create your custom stickers.
- Save to Photos: Save the stickers to your iPhone’s Photos app.
- Add to Stickers Menu: In apps like Messages, you can often add stickers directly from your Photos library to the stickers menu.
- Use in Apps: Once added to the stickers menu, you can use your custom stickers in various apps like Messages, Notes, and Mail.
- Share Sticker Packs: Some apps allow you to create sticker packs that can be easily shared with friends and family.
8. What Are Some Creative Ideas For Using Stickers On Your iPhone?
Using stickers on your iPhone can spark creativity and add a personal touch to your digital communications. Here are some creative ideas for how to use stickers in different contexts:
8.1 Personalizing Messages With Unique Stickers
Personalizing messages with unique stickers can make your conversations more engaging and expressive.
- Custom Reactions: Create stickers that represent your unique reactions to messages, such as funny faces, surprised expressions, or celebratory gestures.
- Inside Jokes: Design stickers based on inside jokes with friends and family to add a personal and humorous touch to your conversations.
- Themed Stickers: Create themed sticker packs for special occasions like birthdays, holidays, or anniversaries.
- Motivational Stickers: Design motivational stickers with inspiring quotes and images to encourage your friends and family.
- Character Stickers: Create stickers based on your favorite characters from movies, TV shows, or books to express your interests.
8.2 Enhancing Photos With Fun And Engaging Stickers
Enhancing photos with fun and engaging stickers can transform ordinary snapshots into memorable visual stories.
- Adding Context: Use stickers to add context to your photos, such as location markers, date stamps, or event descriptions.
- Highlighting Details: Use stickers to highlight specific details in your photos, such as a beautiful flower, a funny expression, or a scenic view.
- Creating Visual Narratives: Create visual narratives by adding stickers that tell a story or convey a message related to the photo.
- Adding Humor: Use stickers to add humor to your photos, such as funny hats, silly glasses, or comical expressions.
- Personalizing Memories: Use stickers to personalize your memories, such as adding names, dates, or special messages to commemorate significant events.
8.3 Creating Unique Social Media Content With Stickers
Creating unique social media content with stickers can help you stand out and engage your audience.
- Branded Stickers: Design branded stickers with your logo, colors, and slogans to promote your brand on social media.
- Interactive Stickers: Use interactive stickers in stories and posts to encourage engagement, such as polls, quizzes, and Q&A sessions.
- Themed Content: Create themed sticker packs for specific events, holidays, or campaigns to align with your social media content.
- Behind-the-Scenes Stickers: Share behind-the-scenes stickers that give your audience a glimpse into your daily life or work.
- Promotional Stickers: Use stickers to promote your products, services, or events on social media, such as discount codes, event dates, or product highlights.
8.4 Using Stickers For Educational Purposes
Stickers can also be used for educational purposes to make learning more engaging and interactive.
- Visual Aids: Use stickers as visual aids in presentations, notes, and study materials to illustrate concepts and ideas.
- Reward Systems: Create sticker reward systems for students to recognize achievements, participation, and good behavior.
- Interactive Lessons: Use stickers to create interactive lessons and activities, such as matching games, labeling exercises, and storytelling prompts.
- Feedback Tools: Use stickers to provide feedback on student work, such as positive comments, constructive criticism, or areas for improvement.
- Custom Flashcards: Create custom flashcards with stickers to help students memorize facts, vocabulary, and concepts.
9. How Can I Share My Custom Stickers With Friends And Family?
Sharing your custom stickers with friends and family is a great way to spread creativity and personalize your communications. Here are several ways to share your stickers:
9.1 Sharing Stickers Via Messaging Apps
Messaging apps like Messages, WhatsApp, and Telegram are popular platforms for sharing custom stickers:
- Create Your Stickers: Design and save your custom stickers to your iPhone’s Photos app or a third-party sticker app.
- Open Messaging App: Launch the messaging app of your choice and open a conversation.
- Access Stickers Menu: Tap the Stickers icon in the app’s interface.
- Select Your Sticker: Browse your sticker collection and select the sticker you want to share.
- Send the Sticker: Tap the sticker to send it to your friend or family member.
- Share Sticker Packs: Some messaging apps allow you to create and share sticker packs, making it easier to send multiple stickers at once.
9.2 Sharing Stickers On Social Media
Social media platforms like Instagram, Facebook, and Snapchat also offer ways to share your custom stickers:
- Create Your Stickers: Design and save your custom stickers to your iPhone’s Photos app or a third-party sticker app.
- Open Social Media App: Launch the social media app of your choice and create a new post or story.
- Access Stickers Menu: Tap the Stickers icon in the app’s interface.
- Upload Your Sticker: Select the option to upload a sticker from your Photos library or a third-party app.
- Place the Sticker: Position and resize the sticker as needed on your post or story.
- Share Your Content: Share your content with your custom sticker to your followers or friends.
9.3 Creating Sticker Packs For Easy Sharing
Creating sticker packs can simplify the process of sharing multiple stickers with friends and family:
- Use a Sticker Pack App: Download a sticker pack creation app like Sticker Maker Studio or Wemoji.
- Create Your Stickers: Design and save your custom stickers to the app.
- Organize Your Stickers: Organize your stickers into themed packs.
- Export the Sticker Pack: Export the sticker pack to a messaging app like WhatsApp or Telegram.
- Share the Sticker Pack: Share the sticker pack with your friends and family, who can then add it to their sticker collections.
9.4 Using iCloud To Share Stickers Across Devices
If you and your friends or family members use Apple devices, you can use iCloud to share stickers:
- Enable iCloud Photos: Ensure that iCloud Photos is enabled on all devices.
- Create a Shared Album: Create a shared album in the Photos app and invite your friends and family members to join.
- Add Stickers to the Album: Add your custom stickers to the shared album.
- Access the Stickers: Your friends and family members can then access the stickers from the shared album and save them to their devices.
- Use in Apps: The stickers can then be used in various apps like Messages, Notes, and Mail.
10. What Are The Copyright Considerations When Using Stickers?
When using stickers, especially those created from existing images or artwork, it’s important to be aware of copyright considerations to avoid legal issues. Copyright law protects original works of authorship, including photographs, illustrations, and graphic designs.
10.1 Understanding Copyright Law And Stickers
Copyright law grants exclusive rights to the creator of an original work, including the right to reproduce, distribute, and create derivative works. Using copyrighted material without permission can result in legal action.
10.2 Using Original Images For Sticker Creation
The safest way to avoid copyright issues is to use original images that you have created yourself. If you take your own photos or create your own illustrations, you have the copyright to those images and can freely use them to create stickers.
10.3 Obtaining Permission To Use Copyrighted Material
If you want to use copyrighted material to create stickers, you need to obtain permission from the copyright holder. This may involve contacting the copyright owner and requesting a license to use the material for your specific purpose.
10.4 Using Public Domain And Creative Commons Images
Public domain images are not protected by copyright and can be used freely without permission. Creative Commons images are licensed under specific terms that allow for certain uses, such as non-commercial purposes or with attribution to the creator. Always check the license terms before using Creative Commons images to ensure you comply with the requirements.
10.5 Avoiding Copyright Infringement
To avoid copyright infringement when using stickers, follow these guidelines:
- Use Original Images: Create your own images whenever possible to avoid copyright issues.
- Obtain Permission: Get permission from the copyright holder before using copyrighted material.
- Check Licenses: Review the license terms for Creative Commons images to ensure you comply with the requirements.
- Give Attribution: Provide proper attribution to the creator when using licensed material.
- Avoid Commercial Use: Be cautious when using stickers for commercial purposes, as this may require additional permissions or licenses.
Creating and using stickers on your iPhone is a fun and creative way to express yourself and enhance your digital communications. By following these tips and guidelines, you can create unique and engaging stickers that add a personal touch to your messages, photos, and social media content. For more photography tips, visit dfphoto.net, or visit us at 1600 St Michael’s Dr, Santa Fe, NM 87505, United States, or call us at +1 (505) 471-6001.
FAQ: How To Add Sticker To A Photo On iPhone
1. Can I add stickers to photos directly in the iPhone Photos app?
Yes, you can add stickers to photos directly in the iPhone Photos app using the Markup tool. Simply open a photo, tap Edit, then tap the Markup icon, and select the Add Sticker option.
2. How do I create a sticker from a photo on my iPhone?
To create a sticker from a photo, open the photo in the Photos app, touch and hold the subject, and tap Add Sticker when the option appears.
3. Can I use animated stickers on my iPhone?
Yes, you can use animated stickers by creating them from Live Photos. Follow the same process as creating regular stickers, but with a Live Photo.
4. Are my stickers synced across all my Apple devices?
Yes, your stickers sync with iCloud, making them available on your iPhone, iPad, Mac, and Apple Vision Pro, provided you are signed in with the same Apple ID.
5. How do I delete a sticker from my iPhone?
To delete a sticker, open a photo in Edit mode, tap the Markup icon, select the sticker, and tap Remove.
6. Can I create sticker packs on my iPhone?
While the iPhone doesn’t natively support sticker packs, you can use third-party apps like Sticker Maker Studio to create and manage sticker packs.
7. What file format should my stickers be for best quality?
Stickers are generally saved as PNG files, which support transparency and maintain good image quality.
8. Can I use stickers in my email messages on iPhone?
Yes, you can use stickers in email messages. Simply access the keyboard, tap the Emoji icon, and select the Stickers icon to add them to your email.
9. How do I add text to my stickers on iPhone?
You can add text to your stickers using the Markup tool in the Photos app or through third-party apps like Sticker Maker Studio, which offer more advanced text editing options.
10. Are there any copyright issues when using stickers created from other people’s photos?
Yes, be mindful of copyright issues. Only use original images or those you have permission to use. Avoid using copyrighted material without proper authorization.