Adding photos to PowerPoint presentations can significantly enhance their visual appeal and engagement, and dfphoto.net is here to guide you through the process. This guide explains, step-by-step, how to insert images, optimize them for impact, and create visually compelling slideshows.
1. Why Should I Add Photos to My PowerPoint Presentations?
Adding visuals is one of the best ways to enhance the overall quality of the PowerPoint presentation. A picture is worth a thousand words, and using photographs in your PowerPoint presentations can transform your message from plain to powerfully engaging. Photos are more than just decoration; they’re tools for communication.
- Enhance Engagement: Visuals grab attention faster than text.
- Improve Understanding: Photos can illustrate complex ideas simply.
- Increase Retention: People remember visual content more easily.
- Evoke Emotion: Images can create a connection with your audience.
- Make It Memorable: A well-placed photo can make your presentation stand out.
2. What Are the Different Ways to Insert Photos into PowerPoint?
There are several ways to insert photos into PowerPoint, depending on where your images are stored and how you want to incorporate them. Here’s a breakdown:
2.1. Inserting Photos from Your Computer
This is the most common method, allowing you to use images stored locally on your device.
How do I add photos from my computer to PowerPoint?
Adding photos from your computer to PowerPoint is straightforward. First, open your PowerPoint presentation and navigate to the slide where you want to insert the photo. Click on the “Insert” tab in the ribbon at the top of the screen. In the “Images” group, click “Pictures” and then select “This Device”. A file explorer window will open, allowing you to browse your computer’s folders. Locate the image file you want to insert and click “Insert.” The photo will appear on your slide, and you can then resize, reposition, and format it as needed. This method works with various image formats, including JPEG, PNG, GIF, and TIFF.
2.2. Inserting Photos from Online Sources
PowerPoint allows you to directly insert images from online sources like stock photo websites or your OneDrive account.
How do I insert photos into PowerPoint directly from the internet?
Inserting photos into PowerPoint directly from the internet is a convenient way to add visuals without leaving the application. In the “Images” group on the “Insert” tab, click “Pictures” and select “Online Pictures.” A dialog box will appear, offering options to search for images using Bing or access your OneDrive account. When using Bing, type keywords related to the image you need in the search bar. Browse the search results, and when you find an image you like, click on it and then click “Insert.” The image will be added to your slide, and you can adjust its size and position. Keep in mind that when using online images, it’s essential to respect copyright laws and licensing agreements.
2.3. Using Drag and Drop
A quick and easy method for adding photos directly from your desktop or a folder.
Can I drag and drop photos directly into PowerPoint?
Yes, you can drag and drop photos directly into PowerPoint, making the process even simpler. Open the folder containing the image you want to insert and position it next to your PowerPoint window. Click on the image file and drag it directly onto the slide where you want it to appear. Release the mouse button, and the image will be inserted. This method is especially useful for quickly adding multiple images to your presentation. You can then resize and reposition the image as necessary. This method works seamlessly with images stored on your desktop, in folders, or even from certain web browsers.
2.4. Copying and Pasting Photos
Another simple method for transferring images from other applications or websites.
How effective is copying and pasting photos into PowerPoint?
Copying and pasting photos into PowerPoint is a straightforward and effective way to insert images from other applications or websites. To copy an image, right-click on it in its original location (e.g., a web browser, image editor, or document) and select “Copy.” Then, in PowerPoint, navigate to the slide where you want to insert the image, right-click, and select “Paste.” The image will appear on your slide, and you can resize and reposition it as needed. While this method is convenient, be aware that the image quality may sometimes be reduced during the copy-paste process, especially with high-resolution images. If quality is a concern, consider using one of the other insertion methods instead.
2.5. Inserting Screenshots
Capture and insert a screenshot directly into your presentation for quick demonstrations or explanations.
How do I insert a screenshot into PowerPoint for quick demonstrations?
To insert a screenshot into PowerPoint, go to the “Insert” tab and click on the “Screenshot” button in the “Images” group. A dropdown menu will appear, showing available windows that you can capture. You can either select one of the windows to take a full screenshot of it, or you can click on “Screen Clipping” to select a specific area of your screen to capture. Once you select the area, PowerPoint will automatically insert the screenshot into your slide. This feature is especially useful for creating tutorials or demonstrating software features during your presentation. You can then resize and reposition the screenshot as needed.
3. How to Optimize Photos in PowerPoint for Visual Appeal?
Once you’ve inserted your photos, optimizing them is essential for creating a visually appealing presentation.
3.1. Resizing and Cropping
Adjust the size and dimensions of your photos to fit your slide layout.
What is the best way to resize photos in PowerPoint without losing quality?
To resize photos in PowerPoint without losing quality, click on the image to select it. Drag one of the corner handles to resize the image proportionally. Avoid using the side handles, as this can distort the image. For more precise control, right-click on the image and select “Size and Position.” In the Format Picture pane, you can enter specific height and width values. Make sure the “Lock aspect ratio” box is checked to maintain the image’s proportions. If you need to enlarge an image, be aware that it may become pixelated if you increase its size too much. It’s generally better to start with a high-resolution image to avoid quality loss when resizing.
How do I crop photos in PowerPoint to highlight specific areas?
Cropping photos in PowerPoint allows you to highlight specific areas and remove unwanted parts of the image. Select the photo and click on the “Picture Format” tab. In the “Size” group, click the “Crop” button. Black handles will appear around the edges of the image. Drag these handles to define the area you want to keep. You can also move the image within the crop area to position it precisely. Once you’re satisfied with the cropping, click the “Crop” button again or press Enter. Cropping is useful for focusing on the most important elements of your photo and improving its composition within the slide.
3.2. Adjusting Brightness and Contrast
Enhance the visual quality of your photos by adjusting their brightness and contrast.
How can I adjust the brightness and contrast of a photo directly in PowerPoint?
Adjusting the brightness and contrast of a photo directly in PowerPoint can improve its overall appearance and make it more visually appealing. Select the photo and go to the “Picture Format” tab. In the “Adjust” group, click on the “Corrections” button. A dropdown menu will appear, offering various preset options for brightness and contrast adjustments. You can hover over these options to see a live preview on your slide. For more precise control, click on “Picture Corrections Options” at the bottom of the menu. This will open the Format Picture pane, where you can manually adjust the brightness, contrast, and sharpness sliders to achieve the desired effect.
3.3. Applying Artistic Effects
Add creative flair to your photos with PowerPoint’s built-in artistic effects.
What artistic effects can I apply to photos in PowerPoint?
PowerPoint offers a range of artistic effects that can transform your photos into stylized visuals. Select the photo and go to the “Picture Format” tab. In the “Adjust” group, click on the “Artistic Effects” button. A dropdown menu will appear, offering various effects such as “Pencil Sketch,” “Watercolor Sponge,” “Pastels Smooth,” and more. Hover over these options to see a live preview on your slide. These effects can add a unique and creative touch to your presentation, making your photos stand out and capturing your audience’s attention. Experiment with different effects to find the ones that best suit your presentation’s theme and style.
3.4. Removing Backgrounds
Isolate the main subject of your photo by removing the background.
How do I remove the background from a photo in PowerPoint?
Removing the background from a photo in PowerPoint can help to isolate the main subject and create a cleaner, more professional look. Select the photo and go to the “Picture Format” tab. In the “Adjust” group, click on the “Remove Background” button. PowerPoint will automatically attempt to identify the background and mark it for removal. You can refine the selection by using the “Mark Areas to Keep” and “Mark Areas to Remove” tools. Draw lines on the areas you want to keep or remove, and PowerPoint will update the selection accordingly. Once you’re satisfied with the result, click “Keep Changes.” This feature is useful for creating silhouettes, highlighting specific elements, and integrating photos seamlessly into your slide design.
3.5. Using Picture Styles and Effects
Enhance your photos with borders, shadows, reflections, and other visual effects.
What picture styles and effects can I use to enhance photos in PowerPoint?
PowerPoint offers a variety of picture styles and effects that can significantly enhance the visual appeal of your photos. Select the photo and go to the “Picture Format” tab. In the “Picture Styles” group, you’ll find a gallery of preset styles that add borders, frames, and other visual enhancements to your photo. Click on the “Picture Effects” button to access options such as shadows, reflections, glow, soft edges, bevel, and 3D rotation. Experiment with these effects to add depth, dimension, and visual interest to your photos. Using picture styles and effects can help to integrate your photos seamlessly into your slide design and create a more polished and professional presentation.
4. How Can I Use Photos to Tell a Story in PowerPoint?
Photos can be powerful storytelling tools when used effectively in PowerPoint.
4.1. Creating a Photo Narrative
Use a sequence of photos to illustrate a story or process.
How do I create a photo narrative in PowerPoint using a sequence of photos?
Creating a photo narrative in PowerPoint involves using a sequence of photos to tell a story or illustrate a process. Start by selecting the photos that best represent the key moments or steps in your narrative. Arrange the photos in chronological order across multiple slides. Add captions or short descriptions to each photo to provide context and guide your audience through the story. Use transitions and animations to create a smooth and engaging flow between the slides. This technique is effective for showcasing projects, documenting events, or explaining complex processes in a visually compelling way.
4.2. Using Photo Albums
PowerPoint’s Photo Album feature can create dynamic presentations from a collection of images.
How do I create a dynamic presentation from a collection of images using PowerPoint’s Photo Album feature?
PowerPoint’s Photo Album feature allows you to create a dynamic presentation from a collection of images quickly and easily. Go to the “Insert” tab and click on the dropdown arrow below “Photo Album.” Select “New Photo Album.” In the Photo Album dialog box, click “File/Disk” to select the images you want to include. You can adjust the order of the photos, add captions, and choose a layout style. PowerPoint offers various layout options, such as fitting multiple photos on a single slide or using a full-screen image with captions. Once you’ve customized your photo album, click “Create” to generate the presentation. The Photo Album feature is useful for showcasing portfolios, presenting event photos, or creating visually engaging slideshows.
4.3. Adding Captions and Descriptions
Provide context and enhance understanding by adding captions to your photos.
How can adding captions and descriptions to photos enhance understanding in PowerPoint?
Adding captions and descriptions to photos can significantly enhance understanding in PowerPoint by providing context and guiding your audience’s interpretation of the images. Use captions to explain what the photo is about, who is in it, where it was taken, and why it’s relevant to your presentation. Keep captions concise and focused on the key information. Descriptions can provide additional details or insights that go beyond the basic caption. By adding captions and descriptions, you ensure that your audience fully understands the message conveyed by your photos and how they relate to your overall presentation.
4.4. Incorporating Text Overlays
Overlay text on your photos to highlight key points or add visual interest.
How do I incorporate text overlays on photos to highlight key points in PowerPoint?
Incorporating text overlays on your photos is a great way to highlight key points and add visual interest to your PowerPoint presentations. Insert the photo onto your slide. Add a text box over the photo and type in your message. Format the text to make it readable and visually appealing. Choose a font, size, and color that contrast well with the background image. You can also add a background color or a shadow to the text box to make it stand out. Text overlays are effective for emphasizing key messages, providing context, and creating visually engaging slides that capture your audience’s attention.
4.5. Using Transitions and Animations
Create a dynamic and engaging presentation by using transitions and animations effectively.
How do transitions and animations contribute to an engaging photo presentation in PowerPoint?
Transitions and animations can significantly contribute to an engaging photo presentation in PowerPoint by adding movement, visual interest, and a sense of flow between slides. Use transitions to create smooth and visually appealing changes between photos. PowerPoint offers a variety of transitions, such as fade, wipe, push, and zoom. Animations can be used to bring individual elements on a slide to life, such as zooming in on a photo, highlighting a specific area, or revealing text gradually. By using transitions and animations effectively, you can create a dynamic and engaging presentation that keeps your audience interested and enhances the overall impact of your photos.
5. What Are Some Common Mistakes to Avoid When Using Photos in PowerPoint?
Avoiding common mistakes can help you create a more professional and impactful presentation.
5.1. Using Low-Resolution Images
Ensure your photos are high-resolution to avoid pixelation and maintain visual quality.
Why should I avoid using low-resolution images in PowerPoint presentations?
Using low-resolution images in PowerPoint presentations can significantly detract from the visual quality and overall impact of your presentation. Low-resolution images often appear pixelated, blurry, and unprofessional, which can distract your audience and undermine your credibility. It’s always best to use high-resolution images that are sharp, clear, and visually appealing. High-resolution images ensure that your photos look their best, even when projected on a large screen.
5.2. Overcrowding Slides with Too Many Photos
Balance the number of photos on each slide to avoid overwhelming your audience.
How can I prevent overcrowding my PowerPoint slides with too many photos?
To prevent overcrowding your PowerPoint slides with too many photos, it’s important to strike a balance between visual interest and clarity. Avoid cramming too many images onto a single slide, as this can overwhelm your audience and make it difficult for them to focus on the key message. Instead, focus on using only the most relevant and impactful photos. Consider spreading your photos across multiple slides to give each image the attention it deserves. Use a clean and simple layout to showcase your photos without cluttering the slide.
5.3. Stretching or Distorting Images
Maintain the original proportions of your photos to avoid distortion.
What is the best way to maintain the original proportions of photos in PowerPoint?
To maintain the original proportions of your photos in PowerPoint and avoid distortion, always resize images proportionally. When you select an image, drag one of the corner handles to resize it. This will ensure that the height and width of the image are adjusted proportionally, preventing it from becoming stretched or compressed. Avoid using the side handles, as this can distort the image and make it look unprofessional. For more precise control, use the “Size and Position” options in the Format Picture pane to enter specific height and width values while keeping the “Lock aspect ratio” box checked.
5.4. Ignoring Copyright Issues
Always respect copyright laws and licensing agreements when using photos in your presentations.
How can I ensure I’m not violating copyright laws when using photos in PowerPoint?
To ensure you’re not violating copyright laws when using photos in PowerPoint, always respect copyright laws and licensing agreements. Only use photos that you have the right to use, either because you took them yourself, you have permission from the copyright holder, or the photos are licensed under a Creative Commons or similar license. Avoid using images found on the internet without verifying their copyright status. When using photos with a Creative Commons license, be sure to give proper attribution to the photographer or source. By respecting copyright laws, you can avoid legal issues and ensure that you’re using photos ethically and responsibly.
5.5. Using Irrelevant or Distracting Photos
Choose photos that are relevant to your topic and enhance your message.
Why is it important to choose relevant photos for my PowerPoint presentations?
Choosing relevant photos for your PowerPoint presentations is crucial because it helps to enhance your message, engage your audience, and create a more impactful presentation. Irrelevant or distracting photos can confuse your audience, detract from your credibility, and undermine the overall effectiveness of your presentation. Focus on selecting photos that are directly related to your topic and that illustrate your key points in a clear and visually compelling way. Relevant photos can help to reinforce your message, evoke emotion, and make your presentation more memorable.
6. How Can dfphoto.net Help You Find the Perfect Photos for Your Presentations?
dfphoto.net offers a wide range of resources to help you find and use the perfect photos for your presentations.
6.1. Access to High-Quality Stock Photos
dfphoto.net provides access to a vast library of high-quality stock photos for various topics and themes.
How does dfphoto.net ensure the quality of its stock photos?
dfphoto.net ensures the quality of its stock photos by carefully curating its collection and working with talented photographers who adhere to high standards. All photos on dfphoto.net are reviewed for resolution, clarity, composition, and relevance. dfphoto.net also provides detailed information about each photo, including its resolution, file size, and licensing terms. By maintaining high standards, dfphoto.net ensures that you have access to the best possible images for your presentations.
6.2. Tips and Tutorials on Photo Selection
dfphoto.net offers expert advice and tutorials on choosing the right photos for your presentations.
What kind of advice and tutorials does dfphoto.net offer on photo selection?
dfphoto.net offers a wealth of advice and tutorials on photo selection to help you choose the right images for your presentations. dfphoto.net provides guidance on how to identify your presentation’s goals, understand your audience, and select photos that are relevant, visually appealing, and emotionally engaging. dfphoto.net also offers tutorials on photo editing, composition, and design to help you optimize your photos for maximum impact. Whether you’re a beginner or an experienced presenter, dfphoto.net can help you master the art of photo selection and create visually stunning presentations.
6.3. Inspiration and Ideas for Visual Storytelling
dfphoto.net provides inspiration and ideas for using photos to tell compelling stories in your presentations.
Where can I find inspiration and ideas for visual storytelling on dfphoto.net?
You can find inspiration and ideas for visual storytelling on dfphoto.net through its diverse collection of articles, case studies, and examples. dfphoto.net showcases how photos can be used to create compelling narratives, evoke emotion, and engage audiences in presentations. dfphoto.net also provides tips on using photo sequences, captions, and text overlays to enhance your storytelling. By exploring dfphoto.net, you can discover new and creative ways to use photos to bring your presentations to life.
6.4. Community Forum for Sharing and Learning
dfphoto.net hosts a community forum where you can share your presentations, get feedback, and learn from other users.
How can I participate in the dfphoto.net community forum?
You can participate in the dfphoto.net community forum by creating an account on the dfphoto.net website and joining the forum. Once you’re a member, you can share your presentations, ask questions, provide feedback, and connect with other users. The dfphoto.net community forum is a valuable resource for learning from others, getting inspired, and improving your presentation skills. Whether you’re a beginner or an experienced presenter, the dfphoto.net community forum offers a supportive and collaborative environment for sharing your knowledge and expertise.
6.5. Resources for Understanding Copyright and Licensing
dfphoto.net offers resources to help you understand copyright laws and licensing agreements related to photo usage.
What resources does dfphoto.net offer for understanding copyright and licensing?
dfphoto.net offers a variety of resources to help you understand copyright laws and licensing agreements related to photo usage. dfphoto.net provides clear and concise explanations of copyright principles, fair use guidelines, and different types of photo licenses, such as Creative Commons. dfphoto.net also offers tips on how to properly attribute photos and avoid copyright infringement. By providing these resources, dfphoto.net helps you use photos ethically and legally in your presentations.
7. Step-by-Step Guide: Adding Photos to PowerPoint
Here’s a step-by-step guide to help you add photos to your PowerPoint presentations effectively:
- Open Your Presentation: Launch PowerPoint and open the presentation you want to edit.
- Select Your Slide: Choose the slide where you want to insert the photo.
- Insert Tab: Go to the “Insert” tab on the ribbon.
- Pictures Option: Click on “Pictures” in the “Images” group.
- Choose Source: Select “This Device” for photos from your computer, “Online Pictures” for online sources, or “Screenshot” to capture a screenshot.
- Browse and Select: Find the photo you want to insert and click “Insert.”
- Adjust Size and Position: Resize and reposition the photo as needed.
- Format Picture: Use the “Picture Format” tab to adjust brightness, contrast, apply effects, or remove the background.
- Add Captions: Insert a text box to add captions or descriptions to your photo.
- Animate: Add transitions and animations to create a dynamic presentation.
- Review: Preview your presentation to ensure your photos look great and enhance your message.
8. Expert Tips for Making Your Photos Stand Out
Here are some expert tips to help your photos stand out in your PowerPoint presentations:
- Use High-Quality Images: Always use high-resolution images to avoid pixelation.
- Crop Strategically: Crop your photos to focus on the most important elements.
- Adjust Brightness and Contrast: Optimize the visual quality of your photos by adjusting brightness and contrast.
- Apply Artistic Effects: Add creative flair with PowerPoint’s built-in artistic effects.
- Remove Backgrounds: Isolate the main subject of your photo by removing the background.
- Incorporate Text Overlays: Highlight key points or add visual interest with text overlays.
- Use Consistent Styling: Apply consistent picture styles and effects to create a cohesive look.
- Tell a Story: Use a sequence of photos to illustrate a narrative or process.
- Add Captions: Provide context and enhance understanding with captions and descriptions.
- Animate: Use transitions and animations to create a dynamic and engaging presentation.
- Respect Copyright: Always respect copyright laws and licensing agreements.
- Get Inspired: Explore dfphoto.net for inspiration and ideas for visual storytelling.
9. How to Troubleshoot Common Photo Insertion Issues
Sometimes, you might encounter issues when inserting photos into PowerPoint. Here’s how to troubleshoot some common problems:
- Image Not Appearing: Ensure the image file is not corrupted and is in a supported format.
- Poor Image Quality: Use high-resolution images to avoid pixelation.
- Photos Not Loading from Online Sources: Check your internet connection and ensure the online source is accessible.
- Compatibility Issues: Save your presentation in a compatible format (.pptx) to avoid issues on different devices.
- PowerPoint Freezing: Close unnecessary applications to free up system resources.
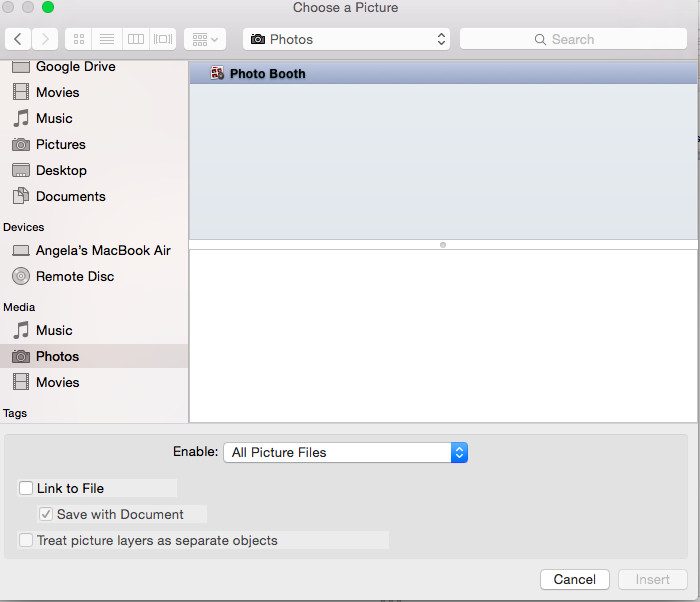
- “Photos” option greyed out: Make sure you have Office 2011 or later installed in order to see the Photos library and its photos from Word, etc.
If you’re still facing issues, consider restarting PowerPoint or your computer. If the problem persists, consult the PowerPoint help documentation or seek assistance from a technical support professional.
10. Frequently Asked Questions (FAQ) About Adding Photos to PowerPoint
Here are some frequently asked questions about adding photos to PowerPoint:
10.1. What Image Formats Are Compatible with PowerPoint?
PowerPoint supports a wide range of image formats, including JPEG, PNG, GIF, TIFF, BMP, and EMF. JPEG is the most common format for photographs due to its good compression and quality. PNG is suitable for images with transparent backgrounds. GIF is often used for animated images.
10.2. How Do I Compress Images in PowerPoint to Reduce File Size?
To compress images in PowerPoint, go to the “File” tab and click on “Info.” Under “Inspect Presentation,” click on “Compress Pictures.” Choose a compression option, such as “Email (96 ppi)” or “Web (150 ppi),” and click “OK.” This will reduce the file size of your images without significantly impacting their visual quality.
10.3. Can I Link to Images Instead of Embedding Them in PowerPoint?
Yes, you can link to images instead of embedding them in PowerPoint. When you insert a picture, select the “Link to File” option. This will create a link to the image file instead of embedding it in your presentation. Linking to images can reduce the file size of your presentation, but it also means that the images will not be displayed if the linked files are moved or deleted.
10.4. How Do I Add a Watermark to My Photos in PowerPoint?
To add a watermark to your photos in PowerPoint, insert the photo onto your slide. Insert a text box over the photo and type in your watermark text. Format the text to make it transparent or semi-transparent. You can also insert a logo or image as a watermark. Group the photo and the watermark together to ensure that they stay aligned.
10.5. How Can I Animate Photos to Create a Dynamic Slideshow in PowerPoint?
You can animate photos to create a dynamic slideshow in PowerPoint by using the “Animations” tab. Select the photo and choose an animation effect, such as “Fade,” “Fly In,” or “Zoom.” Customize the animation options, such as duration, timing, and direction. You can also use the “Motion Paths” feature to create custom animation paths for your photos.
10.6. How Do I Add a Photo Album to My PowerPoint Presentation?
To add a photo album to your PowerPoint presentation, go to the “Insert” tab and click on the dropdown arrow below “Photo Album.” Select “New Photo Album.” In the Photo Album dialog box, click “File/Disk” to select the images you want to include. You can adjust the order of the photos, add captions, and choose a layout style.
10.7. How Do I Change the Order of Photos in a PowerPoint Photo Album?
To change the order of photos in a PowerPoint photo album, open the photo album and go to the “Edit Photo Album” option. In the dialog box, you can select a photo and use the “Move Up” or “Move Down” buttons to change its position in the album.
10.8. Can I Add Music to My PowerPoint Presentation with Photos?
Yes, you can add music to your PowerPoint presentation with photos by going to the “Insert” tab and clicking on “Audio.” Select “Audio from File” to insert an audio file from your computer. You can also record audio directly in PowerPoint. Adjust the audio playback options, such as “Play in Background” and “Loop until Stopped,” to create a seamless audio experience.
10.9. How Do I Loop a PowerPoint Presentation with Photos?
To loop a PowerPoint presentation with photos, go to the “Slide Show” tab and click on “Set Up Slide Show.” In the Set Up Show dialog box, check the “Loop continuously until ‘Esc'” box. This will cause your presentation to loop continuously until you press the Esc key.
10.10. How Do I Present a PowerPoint Presentation with Photos Online?
You can present a PowerPoint presentation with photos online by using various screen-sharing and video conferencing tools. Upload your presentation to a cloud storage service, such as OneDrive or Google Drive. Share your screen with your audience and run the presentation in Slide Show mode. You can also use PowerPoint’s built-in “Present Online” feature to present your presentation remotely.
Adding photos to PowerPoint presentations can transform them into visually compelling and engaging experiences. By following these tips and techniques, you can create presentations that capture your audience’s attention, enhance your message, and leave a lasting impression. Visit dfphoto.net for more resources, inspiration, and expert advice on using photos effectively in your presentations.
Ready to elevate your presentations with stunning visuals? Explore dfphoto.net today for a wealth of resources, including expert tutorials, a vast collection of high-quality stock photos, and a vibrant community of photography enthusiasts. Whether you’re looking to master photo editing techniques, discover new sources of inspiration, or connect with fellow photographers, dfphoto.net has everything you need to transform your presentations into unforgettable experiences. Don’t wait, start your visual storytelling journey with dfphoto.net now!
Address: 1600 St Michael’s Dr, Santa Fe, NM 87505, United States. Phone: +1 (505) 471-6001. Website: dfphoto.net.
 A person's hands working on a MacBook laptop show a screen of the PowerPoint application