Controlling the visibility of your photos and videos is a crucial aspect of privacy on your iPhone. The Photos app offers a built-in feature to hide sensitive or personal media within a Hidden album. This ensures they don’t appear in your main photo library, other albums, or even the Photos widget on your Home Screen. For enhanced security, especially in iOS 16 and later, this Hidden album is locked by default, requiring Face ID, Touch ID, or your passcode for access. If you’re using iCloud Photos, hiding a photo on your iPhone will also hide it across all your Apple devices.
This guide from dfphoto.net will walk you through the process of How To Add Photos To Hidden Album Iphone, ensuring your private moments remain just that.
Step-by-Step Guide: Hiding Photos on Your iPhone
The process to add photos to the hidden album on your iPhone is straightforward and can be done in just a few taps. Here’s how:
- Open the Photos App: Launch the Photos app on your iPhone to begin managing your media.
- Select the Photo or Video: Navigate through your library and tap to select the photo or video you wish to hide. For multiple selections, tap “Select” in the top right corner and choose all the items you want to hide.
- Access the Share Sheet: Once you’ve selected your photo(s) or video(s), tap the Share button located in the bottom left corner of the screen (it looks like a square with an arrow pointing upwards).
- Choose the “Hide” Option: Scroll through the options in the Share Sheet until you find “Hide”. Tap on “Hide”.
- Confirm Hiding: A prompt will appear at the bottom of your screen asking you to confirm that you want to hide the selected photo(s) or video(s). Tap “Hide Photo” (or “Hide [Number] Photos/Videos”) to finalize the process.
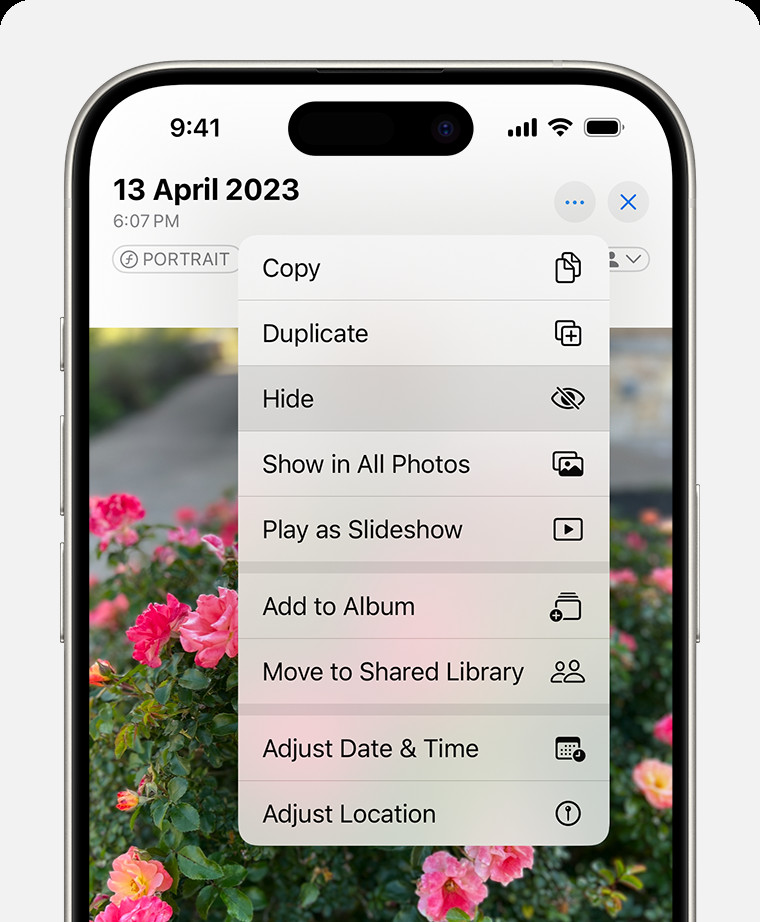 Dropdown menu highlighting the Hide feature feature for a photo.
The selected media will now be moved to the Hidden album, removing them from your main library view.
Accessing and Unhiding Photos in the Hidden Album
After you add photos to the hidden album iphone, you might need to access them later to view, unhide, or manage them. Here’s how to find and unhide your hidden photos:
- Open Photos and Navigate to Albums: Open the Photos app again. At the bottom of the screen, tap on the “Albums” tab.
- Scroll Down to Utilities: Scroll down the Albums screen until you reach the “Utilities” section.
- Tap on “Hidden”: You will see the “Hidden” album option within Utilities. Tap on it.
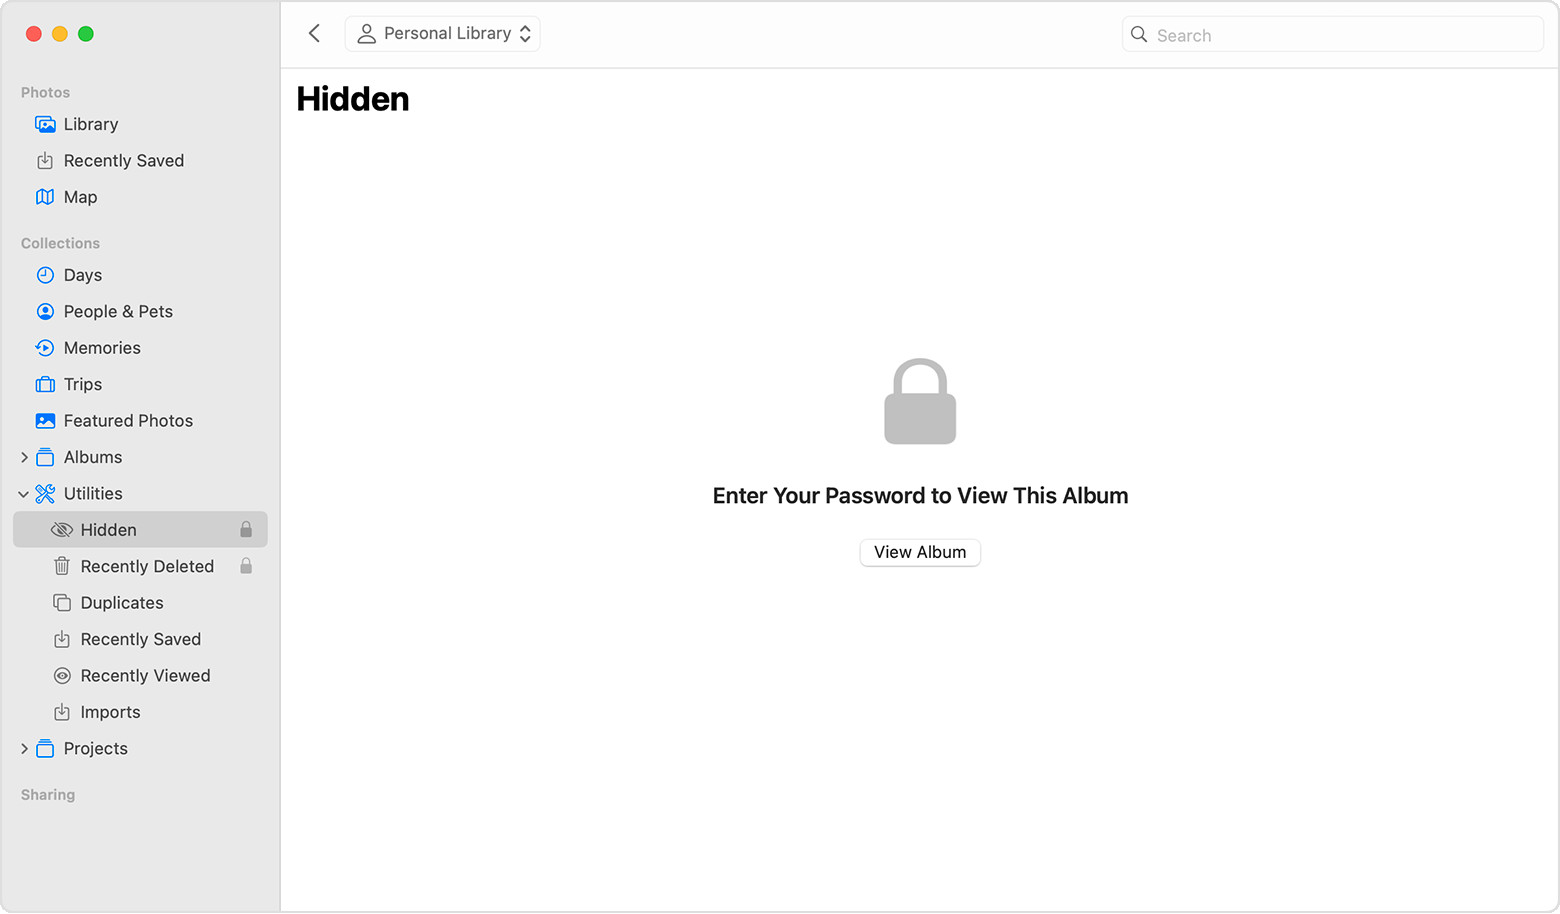
- Unlock the Hidden Album: Due to enhanced privacy, especially in recent iOS versions, the Hidden album is locked. You’ll be prompted to use Face ID, Touch ID, or your passcode to unlock and view the contents of the album.
- Unhide Photos or Videos (Optional): If you wish to unhide a photo or video, tap to select it. Then, tap the Share button in the bottom left corner. In the Share Sheet, select “Unhide”. This will move the selected media back to your main library and remove it from the Hidden album.
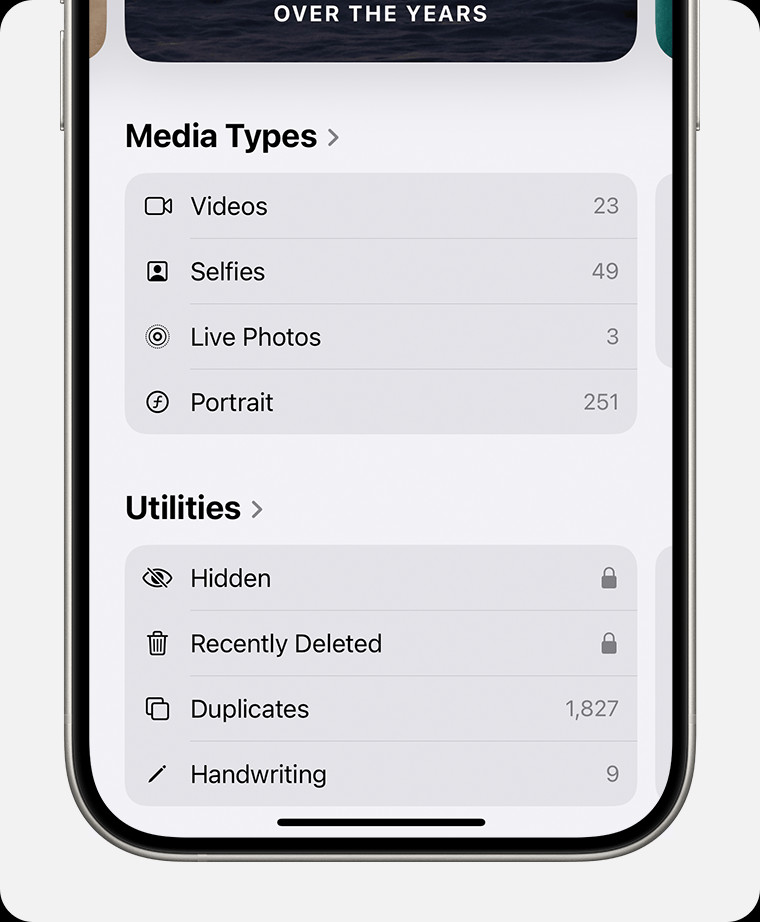 Hidden album highlighted under Utilities.
Customizing Hidden Album Visibility
For an extra layer of privacy, you can even choose to hide the Hidden album itself from the Utilities section in the Albums view. Here’s how to toggle the visibility of the Hidden album:
- Open Settings App: Go to the Settings app on your iPhone Home Screen.
- Scroll to Photos: Scroll down and find “Photos” in the list of apps and tap on it.
- Toggle “Show Hidden Album”: Under the “Albums” section, you will see a toggle switch next to “Show Hidden Album”. By default, this toggle is turned on, making the Hidden album visible in the Utilities section of the Photos app. To hide the Hidden album itself, toggle this switch off.
When “Show Hidden Album” is turned off, the Hidden album will not appear in the Utilities section of your Photos app, providing an even greater level of discretion. To access your hidden photos when this setting is off, you will need to re-enable “Show Hidden Album” in Settings.
Hiding Photos on Mac and Apple Vision Pro
The process of how to add photos to hidden album is consistent across Apple’s ecosystem. While the steps might slightly vary based on the device interface, the core functionality remains the same.
On Mac:
- Open the Photos app on your Mac.
- Control-click on the photo or video you want to hide.
- Select “Hide Photo” (or use the menu bar: Image > Hide Photo, or press Command-L).
- Confirm to hide.
- To view the Hidden album on Mac, in the menu bar, go to View > Show Hidden Photo Album. You’ll find it in the sidebar under Photos.
 Hidden album highlighted in MacOS Photos app.
On Apple Vision Pro:
- Open the Photos app on your Apple Vision Pro.
- Select and hold the photo or video.
- Tap “Hide”.
- Confirm to hide.
- To find the Hidden album on Apple Vision Pro, tap “Collections” in the sidebar, then scroll down to Utilities and tap “Hidden”.
Conclusion: Enhancing Your Photo Privacy
Knowing how to add photos to hidden album iphone and other Apple devices is a simple yet powerful way to manage your photo privacy. Whether you’re looking to keep personal photos away from prying eyes or simply declutter your main photo library, the Hidden album offers a convenient solution. Explore more photography tips and iPhone photo management guides at dfphoto.net to further enhance your digital photo experience.

