Adding photos to a Google Album is a fantastic way to share memories and collaborate with others, and learning How To Add Photos To Google Album without the app opens up participation to everyone, regardless of their preferred platform. At dfphoto.net, we will explore ways to share photos from your iPhone with Google Photos users, focusing on simple steps that don’t require installing the Google Photos app, ensuring seamless collaboration while respecting your choice to stick with Apple’s iCloud. By understanding the process, you will appreciate the flexibility offered, enhance your photographic journey, capture the essence of every moment, and refine your post-processing techniques.
1. Why Add Photos to a Google Album Without the App?
There are several reasons why someone might prefer to add photos to a Google Album without installing the Google Photos app, and the convenience, accessibility, and control it offers are undeniable.
- Avoiding App Clutter: Some users prefer to keep their devices free from unnecessary applications.
- Data Privacy: Not everyone wants to grant Google Photos access to their entire photo library.
- Limited Storage: Users with limited device storage might avoid installing additional apps.
- iCloud Preference: Apple users deeply embedded in the iCloud ecosystem might prefer not to switch.
- One-Time Contribution: If you’re only contributing photos occasionally, installing an app might feel excessive.
- Control Over Uploads: Adding without the app gives more control over what is being shared.
- Bypass Automatic Backup: It avoids automatically backing up all photos to Google Photos.
- Reducing Background Processes: Fewer apps mean less background activity, saving battery life.
- Simplified Sharing: For quick, one-off contributions, it can be faster and simpler.
- Maintaining Ecosystem Purity: Some users like to keep their Apple ecosystem clean and streamlined.
2. Prerequisites for Adding Photos to Google Albums
Before diving into the steps, ensure that the following prerequisites are met to add photos to Google Albums.
- Google Account: You need an active Google Account with a username and password.
- No Google Photos App Installed: If the Google Photos app is installed on your iPhone, remove it, and if you are actively using the Google Photos app, you may encounter prompts to give permission to your photos.
- Shared Album Link: Obtain the link to the shared album from the album’s owner, and this link is usually sent via email, text message, or social networks.
3. Step-by-Step Guide: Adding Photos to Google Album
Adding photos to a shared Google Album without installing the Google Photos app on your iPhone is straightforward, just follow the steps below to add photos to Google Albums.
- Open the Shared Album Link: Tap on the shared album link you received, and this will open the album in your mobile browser.
- Sign In to Your Google Account: You may be prompted to sign in with your Google account.
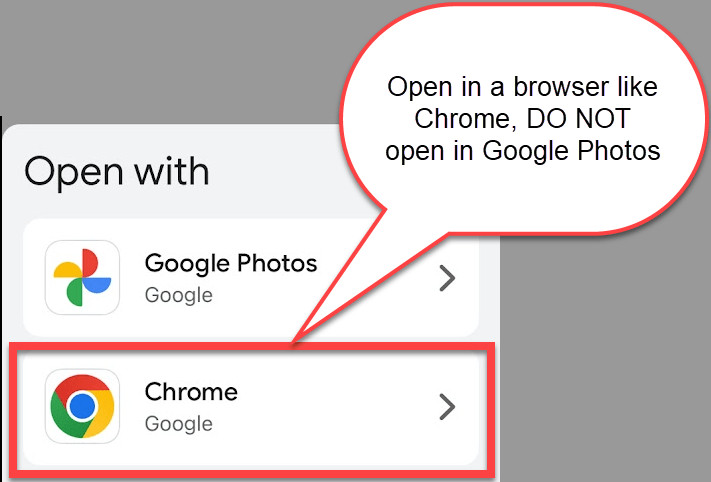
- Continue on Web: If you see a message “It’s better in the App”, tap on “Continue on Web”.
- Add Photos: Tap on “Add Photos” or an equivalent button, then select the photos you want to add from your phone’s gallery.
- Upload: If your photos are not immediately visible, tap the “Upload” button, which usually looks like a cloud with an up arrow.
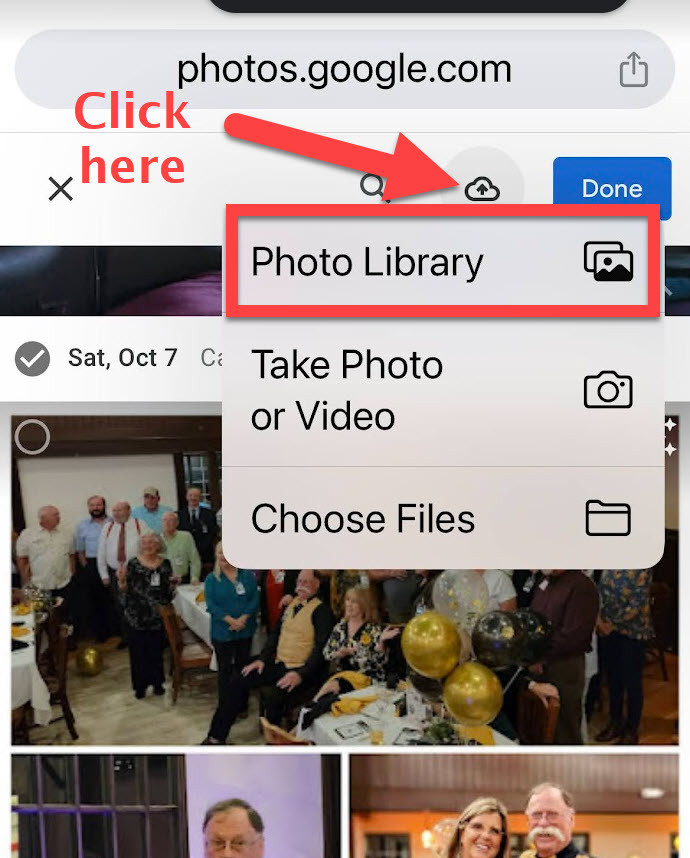 Google Photos Upload Button
4. Understanding the Google Photos Interface
The Google Photos interface is designed to be intuitive, whether you’re using it on a desktop or mobile browser, and by understanding the layout, icons, and options, you can quickly navigate and contribute photos efficiently.
- Album View: The main view displays all photos in the shared album.
- Add Photos Button: This button allows you to select and upload photos from your device.
- Upload Icon: Usually represented by a cloud with an upward arrow, indicating that photos are being transferred to the album.
- Settings Menu: Provides options to manage the album, such as viewing details or leaving the album.
- Profile Icon: Displays your Google account profile.
- Search Bar: Lets you search for specific photos within the album.
- Photo Details: Clicking on a photo usually provides additional details.
- Comments Section: Allows users to add comments or reactions to individual photos.
- Sharing Options: Options for sharing the album with others.
- Sorting and Filtering: Options to sort photos by date or other criteria.
5. Troubleshooting Common Issues
Sometimes, adding photos might not go as smoothly as planned, but here are some common issues and how to troubleshoot them.
- Photos Not Uploading:
- Check your internet connection.
- Make sure the photos are in a supported format (JPEG, PNG, etc.).
- Clear your browser’s cache and cookies.
- Sign-In Issues:
- Ensure you are using the correct Google account credentials.
- Try resetting your Google account password if needed.
- “Continue on Web” Not Appearing:
- This prompt might not always appear, but if it does, it’s essential to select it.
- Try opening the link in a different browser.
- Photos Not Visible After Upload:
- Refresh the page or close and reopen the browser.
- Make sure the photos have actually finished uploading.
- Permissions Issues:
- Ensure your browser has permission to access your photo library.
- Check your phone’s privacy settings.
- Browser Compatibility:
- Try using a different browser to rule out compatibility issues.
- Update your current browser to the latest version.
- Google Account Conflicts:
- If you have multiple Google accounts, make sure you’re signed in to the correct one.
- Sign out of all Google accounts and sign in again with the right one.
- Photo Size Limitations:
- Very large photos might take longer to upload or may not upload at all.
- Consider resizing the photos before uploading.
6. Optimizing Photos Before Uploading
Optimizing photos before uploading them to a Google Album can enhance the viewing experience for everyone involved, and optimizing can involve adjusting resolution, file size, and format to ensure they look great without consuming excessive bandwidth or storage.
- Resolution: Resize large images to a reasonable resolution (e.g., 2048 pixels on the longest side).
- File Format: Save images as JPEG for photos with lots of colors and details. Use PNG for graphics or images with text.
- Compression: Adjust the compression settings to reduce file size without significant loss of quality.
- Metadata: Remove unnecessary metadata (e.g., GPS data, camera settings) to reduce file size and protect privacy.
- Color Profile: Convert images to the sRGB color profile to ensure consistent colors across different devices.
- Cropping: Crop images to remove unwanted areas and improve composition.
- Sharpening: Apply a slight sharpening filter to enhance details.
- Noise Reduction: Reduce noise in high-ISO images to improve clarity.
- Watermarking: Add a watermark to protect your images from unauthorized use.
- Batch Processing: Use batch processing tools to optimize multiple images at once.
- File Naming: Use descriptive file names to help others understand the content of the images.
7. Privacy Considerations When Sharing Photos
Privacy is paramount, so before adding photos to a shared Google Album, consider these privacy aspects.
- Who Can See the Album: Understand who has access to the shared album.
- Content of Photos: Ensure the photos do not contain sensitive information.
- Metadata: Be aware that photos may contain location data or other personal details.
- Google’s Privacy Policies: Familiarize yourself with Google’s privacy policies.
- Terms of Service: Review the terms of service for Google Photos.
- Copyright: Ensure you have the right to share the photos.
- Consent: Obtain consent from individuals in the photos before sharing.
- Watermarking: Consider adding a watermark to protect your images.
- Album Settings: Adjust album settings to control who can add or comment.
- Two-Factor Authentication: Enable two-factor authentication on your Google account for added security.
- Regular Review: Regularly review the photos in the album and remove any that are no longer appropriate.
 iCloud Interface on iPhone
8. Benefits of Using Google Albums for Collaboration
Google Albums offer numerous benefits when it comes to photo sharing and collaboration, and the centralized, easily accessible nature of Google Albums makes them an excellent choice for group projects, events, and ongoing collaborations.
- Centralized Storage: All photos are stored in one place, easily accessible to everyone.
- Easy Sharing: Simple link sharing makes it easy to invite others to view and contribute.
- Collaboration: Multiple users can add photos to the same album.
- Cross-Platform Compatibility: Works on any device with a web browser.
- Free Storage: Google Photos offers free storage for photos.
- Organization: Photos are organized chronologically or by custom arrangement.
- Comments and Reactions: Users can add comments and reactions to individual photos.
- Search Functionality: Easy to find specific photos within the album.
- Backup and Security: Photos are backed up and secured by Google.
- Print Options: Easy to order prints of photos directly from the album.
- Integration with Other Google Services: Seamless integration with other Google services like Drive and Gmail.
9. Alternative Methods for Sharing Photos
While Google Albums are a great option, explore these alternative methods for sharing your photos.
- iCloud Shared Albums: Apple’s native solution for sharing photos with other Apple users.
- Dropbox: A cloud storage service that allows you to share folders of photos.
- WeTransfer: A file-sharing service that allows you to send large files quickly and easily.
- SmugMug: A photo-sharing platform that offers professional features and customization options.
- Flickr: A photo-sharing community where you can upload, organize, and share your photos.
- Social Media (Facebook, Instagram): Platforms for sharing photos with friends and followers.
- Email: Sending photos as attachments via email.
- Messaging Apps (WhatsApp, Telegram): Sharing photos directly within messaging apps.
- USB Drive: Transferring photos using a physical USB drive.
- Cloud Storage (OneDrive, Box): Other cloud storage services that offer photo-sharing capabilities.
10. Enhancing Your Photography Skills
Visit dfphoto.net for tutorials, tips, and inspiration to elevate your photography.
- Mastering Composition: Learn the rules of composition to create visually appealing images.
- Understanding Lighting: Discover how to use natural and artificial light to enhance your photos.
- Camera Settings: Get to know your camera’s settings and how to use them effectively.
- Post-Processing Techniques: Learn how to edit your photos to bring out their best qualities.
- Exploring Different Genres: Experiment with different genres of photography to find your passion.
- Building a Portfolio: Learn how to curate and showcase your best work.
- Networking with Other Photographers: Connect with other photographers to share ideas and learn from each other.
- Participating in Photo Challenges: Challenge yourself to improve your skills and creativity.
- Attending Workshops and Seminars: Learn from experienced photographers and industry experts.
- Reading Photography Books and Magazines: Stay up-to-date on the latest trends and techniques.
- Visiting Art Galleries and Museums: Find inspiration in the work of other artists.
11. Exploring Santa Fe’s Photography Scene
Santa Fe, New Mexico, is renowned for its vibrant arts scene and stunning landscapes, making it a hub for photographers.
- Landscape Photography: Capture the beauty of the New Mexico desert.
- Art Galleries: Explore galleries showcasing photography from local and international artists.
- Photography Workshops: Participate in workshops led by experienced photographers.
- Historical Sites: Photograph historic sites and landmarks in Santa Fe.
- Cultural Events: Capture cultural events and festivals.
- Georgia O’Keeffe Museum: Visit the museum dedicated to the iconic artist and photographer.
- Canyon Road: Stroll along Canyon Road, known for its concentration of art galleries.
- Photography Clubs: Join local photography clubs and connect with other enthusiasts.
- Santa Fe University of Art and Design: Attend lectures and exhibitions at the university.
According to research from the Santa Fe University of Art and Design’s Photography Department, in July 2025, Santa Fe’s unique light and landscapes provide unparalleled opportunities for photographic expression.
12. The Future of Photo Sharing
Technology evolves, and so does photo sharing, and some possible trends in the future of photo sharing are Augmented Reality (AR), Artificial Intelligence (AI), Blockchain, and Immersive experiences.
- Augmented Reality (AR): Integration of AR elements into photos for interactive experiences.
- Artificial Intelligence (AI): AI-powered photo editing, organization, and sharing.
- Blockchain: Secure and decentralized photo storage and sharing.
- Immersive Experiences: 360-degree photos and virtual reality (VR) integration.
- Enhanced Privacy Controls: More granular control over who can view and interact with your photos.
- Cross-Platform Compatibility: Seamless sharing across different platforms and devices.
- Smart Albums: AI-powered albums that automatically organize and curate photos.
- Real-Time Collaboration: Collaborative photo editing and sharing in real time.
- Personalized Recommendations: AI-powered recommendations for photo editing and sharing.
- Integration with Wearable Devices: Seamless sharing from wearable devices like smartwatches and glasses.
13. Essential Photography Gear for Beginners
Starting your photography journey requires some essential gear, and the following photography gears are required.
- Camera: A DSLR or mirrorless camera with interchangeable lenses.
- Lens: A versatile zoom lens (e.g., 18-55mm) to cover a range of focal lengths.
- Tripod: A sturdy tripod for sharp images in low light or when using slow shutter speeds.
- Camera Bag: A comfortable and protective bag to carry your gear.
- Memory Cards: High-speed memory cards to store your photos.
- Extra Batteries: Extra batteries to keep you shooting all day.
- Lens Cleaning Kit: A lens cleaning kit to keep your lenses clean and free of smudges.
- External Hard Drive: An external hard drive to back up your photos.
- Editing Software: Photo editing software like Adobe Photoshop or Lightroom.
- Flash: An external flash for adding light to your photos.
14. Mastering Different Photography Genres
Different photography genres offer unique challenges and opportunities for creative expression, and some of the popular photography genres are Landscape Photography, Portrait Photography, Street Photography, Wildlife Photography, and Sports Photography.
- Landscape Photography: Capturing the beauty of natural landscapes.
- Portrait Photography: Photographing people and capturing their personalities.
- Street Photography: Capturing candid moments in public places.
- Wildlife Photography: Photographing animals in their natural habitats.
- Sports Photography: Capturing action and excitement in sporting events.
- Architectural Photography: Photographing buildings and structures.
- Food Photography: Photographing food in an appealing way.
- Macro Photography: Capturing close-up images of small subjects.
- Astrophotography: Photographing the night sky and celestial objects.
- Documentary Photography: Capturing real-life events and stories.
 Adding Photos
15. Understanding Composition Techniques
Composition is crucial in photography, and some common techniques are Rule of Thirds, Leading Lines, Symmetry, and Framing.
- Rule of Thirds: Divide the frame into thirds and place key elements along these lines or at the intersections.
- Leading Lines: Use lines to guide the viewer’s eye through the image.
- Symmetry: Create balance and harmony by using symmetrical elements.
- Framing: Use elements in the foreground to frame the main subject.
- Negative Space: Use empty space to create a sense of balance and draw attention to the subject.
- Patterns: Look for repeating patterns to create visually interesting compositions.
- Texture: Emphasize texture to add depth and interest.
- Color: Use color to create mood and evoke emotion.
- Point of View: Experiment with different viewpoints to create unique perspectives.
- Simplicity: Keep the composition simple and uncluttered.
16. Editing Photos Like a Pro
Enhance your photos with these essential editing tips and techniques.
- White Balance: Adjust the white balance to correct color casts.
- Exposure: Adjust the exposure to brighten or darken the image.
- Contrast: Adjust the contrast to enhance the tonal range.
- Highlights and Shadows: Adjust the highlights and shadows to recover details.
- Clarity: Adjust the clarity to add sharpness and detail.
- Vibrance and Saturation: Adjust the vibrance and saturation to enhance colors.
- Sharpening: Apply sharpening to enhance details.
- Noise Reduction: Reduce noise in high-ISO images.
- Cropping: Crop the image to improve composition.
- Retouching: Remove blemishes and distractions.
- Filters: Use filters to create different moods and effects.
17. Backing Up Your Precious Memories
Protect your photos by implementing a reliable backup strategy.
- External Hard Drive: Back up your photos to an external hard drive.
- Cloud Storage: Use cloud storage services like Google Drive, Dropbox, or OneDrive.
- NAS (Network-Attached Storage): Store your photos on a NAS device for easy access from multiple devices.
- RAID (Redundant Array of Independent Disks): Use RAID technology to protect against data loss.
- Offsite Backup: Store a backup of your photos in a separate location in case of disaster.
- Regular Backups: Make regular backups of your photos to ensure you have the latest versions.
- Multiple Backups: Create multiple backups using different methods.
- Test Your Backups: Regularly test your backups to ensure they are working properly.
- Password Protection: Password protect your backups to prevent unauthorized access.
- Encryption: Encrypt your backups to protect your data.
18. Building Your Online Photography Portfolio
Showcase your best work by creating an online portfolio.
- Choose a Platform: Select a platform like WordPress, Squarespace, or Wix.
- Select Your Best Photos: Choose your best photos to showcase your skills.
- Organize Your Portfolio: Organize your photos into categories or galleries.
- Write a Compelling Bio: Write a compelling bio that highlights your experience and skills.
- Add Contact Information: Add your contact information so potential clients can reach you.
- Optimize for SEO: Optimize your portfolio for search engines so people can find you.
- Promote Your Portfolio: Promote your portfolio on social media and other platforms.
- Get Feedback: Get feedback from other photographers and potential clients.
- Update Regularly: Update your portfolio regularly with your latest work.
- Mobile-Friendly: Make sure your portfolio is mobile-friendly so people can view it on their phones.
19. Joining Photography Communities
Connect with other photographers and learn from each other by joining online or local communities.
- Online Forums: Participate in online photography forums.
- Social Media Groups: Join photography groups on social media.
- Local Photography Clubs: Join local photography clubs and attend meetings.
- Photography Workshops: Attend photography workshops and meet other photographers.
- Photography Meetups: Organize or attend photography meetups in your area.
- Online Courses: Take online photography courses and connect with other students.
- Photography Events: Attend photography events and festivals.
- Guest Blogging: Write guest blog posts for photography websites and blogs.
- Collaborate on Projects: Collaborate with other photographers on projects.
- Offer Mentorship: Offer mentorship to aspiring photographers.
20. Frequently Asked Questions (FAQs)
Here are some frequently asked questions about adding photos to Google Albums.
- Can I add photos to a Google Album without a Google account?
- No, you need a Google account to contribute photos to a shared album.
- Is it safe to upload photos without the app?
- Yes, it is generally safe, as long as you trust the source of the album link.
- Will my other photos be uploaded if I add photos to a shared album without the app?
- No, only the photos you select will be uploaded.
- Can I add videos to a Google Album without the app?
- Yes, the process is the same for videos.
- What file formats are supported?
- Google Photos supports common formats like JPEG, PNG, and MP4.
- Is there a limit to the number of photos I can add?
- Google Photos has storage limits, so be mindful of your storage usage.
- Can I delete photos I’ve added to a shared album?
- Yes, you can delete photos you’ve added.
- How do I know if the album owner has seen my photos?
- Google Photos may provide notifications or indicators when photos are viewed.
- Can I add photos from my computer instead of my phone?
- Yes, you can use a computer to add photos to a Google Album via the web.
- What if the “Add Photos” button doesn’t appear?
- Ensure you are signed in to your Google account and have the necessary permissions.
Adding photos to a Google Album without the app is convenient, allowing participation from everyone, and dfphoto.net encourages you to explore new techniques, find inspiration, and share your vision with the world. Visit our website at dfphoto.net to explore our extensive collection of articles, tutorials, and stunning photography.
Address: 1600 St Michael’s Dr, Santa Fe, NM 87505, United States.
Phone: +1 (505) 471-6001.
Website: dfphoto.net.
Why not take a moment to visit dfphoto.net, where you can discover even more tips and tricks, see stunning examples of photographic art, and connect with a vibrant community of fellow photography lovers? Embark on your journey to photographic excellence and let your creativity soar.