Adding photos to Facebook is a great way to share memories, but what if you want to upload pictures without them appearing on your timeline? You can easily add photos to Facebook without posting them publicly by adjusting your privacy settings. At dfphoto.net, we’ll guide you through the simple steps to maintain your privacy while enjoying Facebook’s photo storage features. Explore advanced photography techniques and visual storytelling with us, and learn how to manage your social media presence effectively. This article will cover how to upload private photos, create hidden albums, and use privacy settings effectively, improving your digital photo management skills.
1. Understanding Facebook’s Privacy Settings
Facebook’s privacy settings are designed to give you control over who sees your content. Knowing how these settings work is crucial for managing your online presence. It’s important to understand the different audience options Facebook offers and how they impact the visibility of your photos.
1.1. Different Audience Options
Facebook offers several audience options when posting content:
- Public: Anyone on or off Facebook can see your post.
- Friends: Only your Facebook friends can see your post.
- Friends except…: Lets you exclude specific friends from seeing your post.
- Specific Friends: Only the friends you choose can see the post.
- Only me: Only you can see the post. This is the option you’ll use to add photos without posting them publicly.
- Custom: Allows you to create a custom list of people who can see your post.
1.2. How Privacy Settings Impact Visibility
The audience you choose determines who can see your photos. When you select “Only me,” the photos are uploaded to your profile but aren’t visible to your friends or the public. They won’t appear in news feeds or search results for others. According to Facebook’s help center, “When you share something on Facebook, you choose who can see it.” This highlights the importance of understanding and utilizing these settings effectively.
2. Adding Photos Without Posting: Step-by-Step Guide
Here’s How To Add Photos To Facebook Without Posting Them, whether you’re using a mobile device or a desktop computer.
2.1. Using the Mobile App
- Open the Facebook App: Launch the Facebook mobile app on your smartphone or tablet.
- Navigate to Photo Upload: Tap the “Photo” icon, usually located near the “What’s on your mind?” status bar.
- Select Photos: Choose the photo(s) you want to upload from your device’s gallery.
- Adjust Audience Settings:
- Tap the “Audience” dropdown (often represented by a globe icon).
- Select “Only me” from the options. Make sure this setting is saved.
- Add to Album (Optional): Use the “Album” dropdown to choose an existing album or create a new one.
- Post: Tap “Post” in the upper right corner.
2.2. Using a Desktop Computer
- Open Facebook in a Browser: Go to Facebook.com in any web browser and log into your account.
- Click Photo/Video: Find the “Photo/Video” button under the “What’s on your mind?” status bar and click it.
- Select Photos: Choose the photo(s) you want to upload from your computer.
- Adjust Audience Settings:
- Click the “Audience” dropdown (the globe icon) under your name.
- Change the setting to “Only me.”
- Post: Click the “Post” button.
2.3. Adding Photos to Stories Privately
While Facebook Stories are typically public, you can share photos in your story with only specific friends.
- Open the Facebook App: Launch the Facebook mobile app.
- Create a Story: Tap on “Add to Story” at the top of your news feed.
- Select Photo/Video: Choose the photo or video you want to add.
- Adjust Privacy Settings:
- Tap the “Share to Story” button.
- Select “Friends and Connections” then tap the gear icon to customize who can view your story.
- Choose “Hide Story From” and select the individuals you don’t want to see your story.
- Share: Tap “Save” and then “Share to Story”.
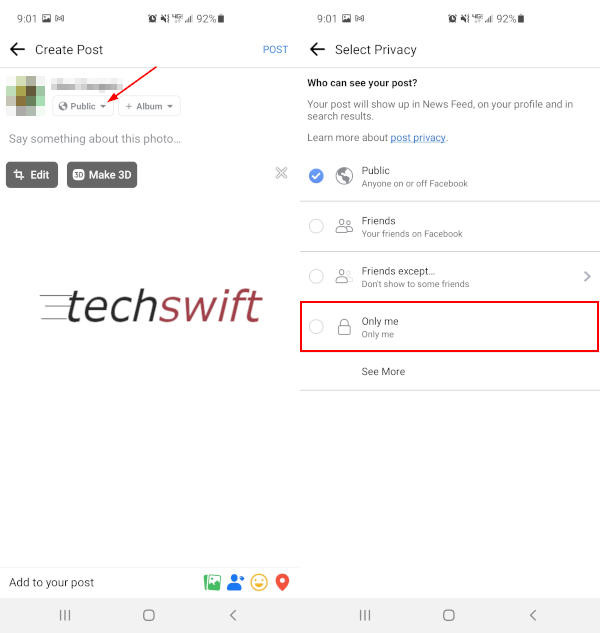 Facebook Mobile App Audience Button in New Post and Only me Option in Menu
Alt text: Facebook mobile app displaying audience options in a new post, highlighting the “Only me” setting.
3. Creating Private Photo Albums
For photos you frequently want to keep private, creating a private album is an efficient solution.
3.1. Mobile Instructions
- Open the Facebook App: Launch the Facebook mobile app and log in.
- Go to Your Profile: Navigate to your profile page.
- Access Photos: Tap “Photos” under the status bar, then tap the “Albums” tab.
- Create Album: Tap the “Create Album” button.
- Set Privacy: Tap the “Audience” button (globe icon) below “Album name” and select “Only me.”
- Name Album: Give your album a name.
- Create: Tap “Create” in the upper right corner.
3.2. Desktop Instructions
- Open Facebook in a Browser: Go to Facebook.com and log in.
- Navigate to Your Profile: Go to your Facebook profile.
- Access Photos: Click the “Photos” tab, then click “Albums.”
- Create Album: Click the “Create Album” button.
- Set Privacy: Click the “Audience” button (globe icon) and change it to “Only me.”
- Name Album: Name your album.
- Post: Click the “Post” button at the bottom.
3.3. Benefits of Private Albums
Creating private albums is useful for several reasons:
- Organization: Keeps your private photos separate from public ones.
- Efficiency: Simplifies the process of adding photos without adjusting privacy settings each time.
- Peace of Mind: Ensures that your personal photos remain private.
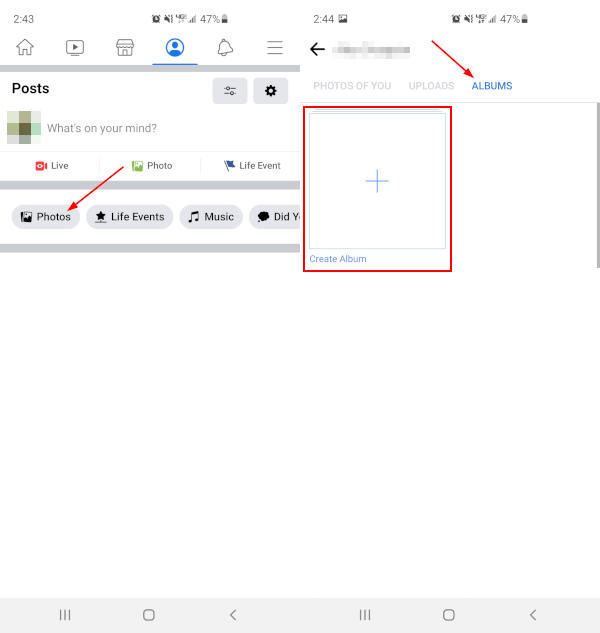 Facebook Mobile App Create Album Button in Albums Profile Page
Alt text: Facebook mobile app displaying the “Create Album” button within the Albums section of a user’s profile.
4. Managing Existing Photos
What if you want to change the privacy settings of photos you’ve already posted? Facebook makes it easy to adjust the visibility of individual photos or entire albums.
4.1. Changing the Privacy of Individual Photos
- Find the Photo: Navigate to the photo you want to edit on your timeline or in an album.
- Edit Post: Click the three dots in the upper right corner of the post.
- Edit Audience: Select “Edit Post” and click the audience selector (globe icon).
- Choose New Audience: Change the audience to “Only me” or any other desired setting.
- Save Changes: Click “Done Editing” to save your changes.
4.2. Changing the Privacy of Albums
- Go to Albums: Navigate to the “Albums” section of your profile.
- Edit Album: Click the album you want to edit.
- Edit Privacy: Click the three dots in the upper right corner and select “Edit Album.”
- Adjust Audience: Change the audience setting to “Only me” or your preferred option.
- Save: Click “Save” to apply the changes.
4.3. Batch Editing Privacy Settings
Unfortunately, Facebook doesn’t offer a direct way to batch edit the privacy settings of multiple photos at once. You must change the settings for each photo or album individually.
5. Why Keep Photos Private?
There are several reasons why you might want to keep photos private on Facebook.
5.1. Personal Privacy
Some photos are simply too personal to share with a wide audience. Whether it’s pictures of family, private moments, or experimental photography, keeping them private ensures that only you can view them. According to a study by the Pew Research Center, concerns about privacy are a major reason why many users adjust their social media settings.
5.2. Security Concerns
Sharing too much personal information online can pose security risks. Keeping certain photos private can help protect you from identity theft and other online threats. It’s essential to be mindful of the information you share and who can access it.
5.3. Professional Image
If you use Facebook for professional networking, you might want to keep certain personal photos private to maintain a professional image. Potential employers or clients might view your profile, so it’s wise to curate what they see.
6. Facebook and Photography: A Balancing Act
Facebook can be a powerful tool for photographers to showcase their work, but it’s important to strike a balance between sharing and privacy.
6.1. Using Facebook to Showcase Your Work
For photographers, Facebook can be a great platform to display your best shots and engage with other photographers. Creating a professional page allows you to share your work while keeping your personal profile separate.
6.2. Balancing Sharing and Privacy
Decide what you want to share publicly and what you want to keep private. Use Facebook’s privacy settings to control who sees your photos and albums. Consider creating separate albums for professional and personal photos.
6.3. Watermarking Your Photos
To protect your work from unauthorized use, consider watermarking your photos before uploading them to Facebook. This adds a visible overlay to your images, indicating that they are your property.
7. Exploring dfphoto.net for More Photography Tips
For more tips on photography techniques, editing, and showcasing your work, visit dfphoto.net. We offer a wealth of resources to help photographers of all levels improve their skills and connect with the photography community.
7.1. Tutorials and Guides
dfphoto.net provides detailed tutorials and guides on various photography topics, including composition, lighting, and post-processing. Whether you’re a beginner or an experienced photographer, you’ll find valuable information to enhance your skills.
7.2. Community and Inspiration
Connect with other photographers, share your work, and find inspiration at dfphoto.net. Our community forums and galleries are a great place to get feedback and discover new ideas.
7.3. Gear Reviews and Recommendations
Stay up-to-date on the latest photography gear with our reviews and recommendations. We cover everything from cameras and lenses to lighting equipment and accessories.
8. Advanced Privacy Techniques
For those looking to take their privacy management to the next level, here are some advanced techniques.
8.1. Using Facebook Lists
Facebook Lists allow you to group your friends into categories, making it easier to share content with specific groups. For example, you can create a list for family members and share personal photos with them while keeping them hidden from other friends.
8.2. Reviewing Your Activity Log
Regularly reviewing your activity log can help you identify any privacy issues and ensure that your settings are configured correctly. The activity log shows all your posts, comments, and other activities on Facebook.
8.3. Adjusting App Permissions
Many apps request access to your Facebook account. Reviewing and adjusting app permissions can help protect your privacy by limiting the amount of information these apps can access.
9. Common Mistakes to Avoid
Even with a good understanding of Facebook’s privacy settings, it’s easy to make mistakes. Here are some common pitfalls to avoid.
9.1. Forgetting to Set Audience
One of the most common mistakes is forgetting to set the audience when posting photos. Always double-check the audience setting before posting to ensure that your photos are only visible to the intended viewers.
9.2. Assuming Default Settings are Private
Don’t assume that Facebook’s default settings are private. Facebook often updates its privacy policies, so it’s important to review your settings regularly to ensure they align with your preferences.
9.3. Ignoring Tag Suggestions
Facebook’s tag suggestion feature can sometimes lead to unintended sharing. Review tag suggestions carefully before approving them to avoid sharing photos with people you don’t want to see them.
10. Real-World Examples and Case Studies
Let’s look at some real-world examples of how people use Facebook’s privacy settings to manage their photos.
10.1. The Professional Photographer
A professional photographer uses Facebook to showcase their work but keeps personal photos private. They create a separate professional page for their photography business and use privacy settings to control who sees their personal photos.
10.2. The Family Historian
A family historian uses Facebook to store and share family photos but wants to keep them private from the general public. They create private albums for each branch of the family and share them only with family members.
10.3. The Privacy-Conscious User
A privacy-conscious user keeps most of their photos private and only shares them with a small group of close friends. They use Facebook Lists to manage their friends and adjust their privacy settings accordingly.
11. Keeping Up with Facebook’s Privacy Updates
Facebook’s privacy policies and settings are constantly evolving. Here’s how to stay informed about the latest changes.
11.1. Following Facebook’s Official Blog
Facebook’s official blog is a great source of information about privacy updates and new features. Subscribe to the blog to stay informed about the latest changes.
11.2. Checking Facebook’s Help Center
Facebook’s help center provides detailed information about privacy settings and how to use them. Check the help center regularly for updates and answers to common questions.
11.3. Reading Tech News and Blogs
Tech news and blogs often cover Facebook’s privacy updates and provide insights into how to protect your privacy online. Follow reputable tech news sources to stay informed.
12. The Future of Privacy on Social Media
As social media continues to evolve, privacy will remain a top concern for users. Here are some trends to watch.
12.1. Increased Emphasis on User Control
Social media platforms are likely to give users more control over their data and privacy settings. This includes options to delete data, limit tracking, and control who sees their content.
12.2. Rise of Decentralized Social Networks
Decentralized social networks, which are not controlled by a single entity, may become more popular as users seek greater privacy and control over their data.
12.3. AI and Privacy
Artificial intelligence (AI) will play an increasing role in privacy management. AI can help users identify and address privacy risks, automate privacy settings, and detect privacy breaches.
13. Conclusion: Mastering Facebook Privacy for Your Photos
Adding photos to Facebook without posting them is entirely possible with the right approach to privacy settings. By understanding the various options available, creating private albums, and regularly reviewing your settings, you can maintain control over your online presence.
Remember to visit dfphoto.net for more photography tips, tutorials, and community support. Whether you’re a seasoned photographer or just starting out, we’re here to help you improve your skills and connect with the photography world.
14. Call to Action: Explore dfphoto.net Today!
Ready to take your photography skills to the next level? Visit dfphoto.net today to explore our extensive collection of tutorials, guides, and community resources. Connect with fellow photographers, share your work, and discover new techniques to enhance your craft.
Address: 1600 St Michael’s Dr, Santa Fe, NM 87505, United States
Phone: +1 (505) 471-6001
Website: dfphoto.net
Unlock your creative potential and join the vibrant photography community at dfphoto.net!
Frequently Asked Questions (FAQ)
1. Can I make an existing Facebook post private?
Yes, you can edit the privacy settings of an existing Facebook post. Click the three dots in the upper right corner of the post, select “Edit Post,” and change the audience to “Only me” or any other desired setting.
2. Will my friends know if I hide a post from them?
No, Facebook does not notify your friends if you hide a post from them. They simply won’t see the post in their news feed or on your timeline.
3. Can I share a private album with specific friends?
Yes, when creating or editing an album, you can choose the “Specific Friends” option to share it only with the friends you select.
4. How do I find my activity log on Facebook?
To find your activity log, go to your profile page and click the “View Activity Log” button. This will show you a chronological list of all your activities on Facebook.
5. What happens when I tag someone in a photo?
When you tag someone in a photo, the photo may appear on their timeline and be visible to their friends, depending on their privacy settings. Be mindful of this when tagging people in your photos.
6. How do I control who can tag me in photos?
You can control who can tag you in photos by adjusting your profile and tagging settings. Go to “Settings & Privacy,” then “Settings,” and then “Profile and Tagging.”
7. Can I prevent people from seeing photos I’m tagged in?
Yes, you can review and approve or reject tags before they appear on your timeline. Go to “Settings & Privacy,” then “Settings,” and then “Profile and Tagging.”
8. How often should I review my Facebook privacy settings?
It’s a good idea to review your Facebook privacy settings at least once a year, or whenever Facebook announces changes to its privacy policies.
9. Are Facebook’s privacy settings the same on mobile and desktop?
Yes, Facebook’s privacy settings are generally the same on both mobile and desktop, although the layout and navigation may differ slightly.
10. What should I do if I accidentally post a photo publicly?
If you accidentally post a photo publicly, quickly edit the privacy settings to “Only me” or delete the post altogether.