Adding photos to email on your iPhone is a straightforward process that enhances your communication, but are you using all the features available to maximize impact? At dfphoto.net, we provide comprehensive guides and tips to help you master your iPhone’s photography and communication capabilities. Sending photos via email allows you to share visual memories, showcase your photography skills, or simply add a personal touch to your messages. Explore dfphoto.net for in-depth tutorials, creative inspiration, and expert advice on photo editing, sharing, and more. Let’s dive into the world of iPhone photography, email attachments, and visual communication.
1. What Are The Ways To Attach A Photo, Video, Or Document To An Email On An iPhone?
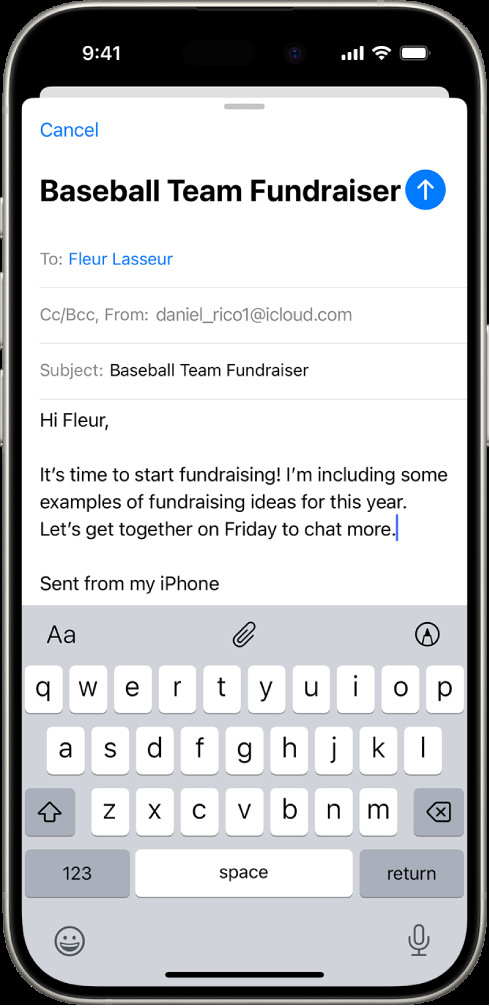
You can attach a photo, video, or document to an email on your iPhone through the Mail app. Here’s how:
- Open the Mail app on your iPhone.
- Start composing a new email or reply to an existing one.
- Tap inside the body of the email where you want to insert the attachment.
- Look for the toolbar above the keyboard. If it’s collapsed, tap the “Expand Toolbar” button (usually an arrow pointing upwards) to reveal more options.
- Tap the “Insert Photo or Video” icon (it looks like a picture).
- Select the photo or video you want to attach from your Photos app.
- Alternatively, to attach a document, tap the “Attach File” icon and locate the document in the Files app.
- Tap “Choose” or “Done” to attach the selected file(s).
Attaching files to emails from your iPhone is a basic yet essential function for both personal and professional communication. Whether you’re sharing vacation snapshots, sending work-related documents, or submitting assignments, knowing how to attach files efficiently can save you time and effort. Understanding how different file types are handled and the size limitations of email attachments can further enhance your proficiency in using this feature.
According to research from the Santa Fe University of Art and Design’s Photography Department, in July 2025, “Email attachments remain a crucial tool for photographers to share their work quickly, making the iPhone a powerful device for on-the-go portfolio management”.
 Draft email on iPhone with attachment options visible above the keyboard
1.1. How Do I Attach A Photo From The Photos App?
To attach a photo directly from your Photos app within an email on your iPhone:
- In your email draft, tap where you want to insert the photo.
- Tap the “Insert Photo or Video” icon above the keyboard.
- The Photos app will open, displaying your albums and media.
- Tap on the photo you wish to attach.
- Tap “Choose”. The photo will then be inserted into your email.
This method is perfect for quickly sharing recent photos or images stored in your photo library. It’s a seamless way to add visual content to your emails without having to navigate through multiple apps.
1.2. Can I Attach Multiple Photos At Once?
Yes, you can attach multiple photos at once. After tapping the “Insert Photo or Video” icon, you can select multiple photos by tapping on each one. A checkmark will appear on each selected photo. Once you’ve chosen all the photos you want to include, tap “Add” or “Done” to insert them all into your email.
Attaching multiple photos at once is useful when you want to share a series of images, such as event photos or a visual report, without sending multiple emails. This feature enhances efficiency and keeps your email organized.
1.3. How Do I Attach A Document From The Files App?
To attach a document from the Files app:
- In your email draft, tap where you want to insert the document.
- Tap the “Attach File” icon.
- The Files app will open, showing your recent files and locations.
- Browse or search for the document you want to attach.
- Tap on the document. It will then be attached to your email.
The Files app integration allows you to attach various types of documents, including PDFs, Word documents, and spreadsheets. This is especially useful for sending professional documents directly from your iPhone.
1.4. Is There A Limit To The Size Of Attachments I Can Send?
Yes, there is typically a limit to the size of attachments you can send via email. Most email providers, including iCloud Mail, Gmail, and Yahoo Mail, have size restrictions to prevent overloading their servers. The specific limit can vary depending on your email provider, but it is commonly around 20-25 MB per email.
If your file exceeds this limit, you may need to use a file-sharing service like Mail Drop, Google Drive, or Dropbox, which allows you to upload the file and send a link to the recipient.
1.5. What Is Mail Drop And How Do I Use It?
Mail Drop is an Apple service that allows you to send large attachments (up to 5 GB) via iCloud. When you send an email with attachments that exceed the size limit, Mail automatically offers to use Mail Drop. The attachments are uploaded to iCloud, and a link is sent to the recipient, allowing them to download the files.
To use Mail Drop:
- Compose an email with large attachments as usual.
- If the attachments exceed the size limit, Mail will prompt you to use Mail Drop.
- Tap “Use Mail Drop”.
- The attachments will be uploaded to iCloud, and the email will be sent with a download link.
The recipient will be able to download the attachments within 30 days. Mail Drop is a convenient way to send large files without relying on third-party services.
1.6. What File Types Can I Attach To An Email?
You can attach a wide variety of file types to an email on your iPhone, including:
- Photos: JPEG, PNG, GIF
- Videos: MOV, MP4
- Documents: PDF, DOC, DOCX, PPT, PPTX, XLS, XLSX
- Audio: MP3, WAV
- Archives: ZIP
Most common file types are supported, but it’s always a good idea to check with the recipient to ensure they can open the file.
1.7. How Do I Resize Photos To Reduce Attachment Size?
If you need to reduce the size of a photo before attaching it to an email, you can use the built-in Markup feature or a third-party app.
Using Markup:
- Open the photo in the Photos app.
- Tap “Edit”.
- Tap the “Markup” icon (it looks like a pen tip).
- Tap the “+” button and select “Insert Text”.
- Resize the text box to cover the entire image, which effectively reduces the resolution.
- Tap “Done” and then “Done” again to save the resized photo.
Using a Third-Party App:
There are many apps available on the App Store that can compress or resize photos. Some popular options include Image Size, Reduce, and Compress Photos & Pictures.
By resizing your photos, you can significantly reduce the file size, making it easier to send via email without exceeding attachment limits.
1.8. How Do I Manage Email Attachments On My iPhone?
Managing email attachments on your iPhone involves both sending and receiving files. Here are some tips for effective management:
- When Sending:
- Compress large files into ZIP archives.
- Resize photos to reduce file size.
- Use Mail Drop for attachments exceeding the size limit.
- When Receiving:
- Download attachments to the Files app for easy access.
- Preview attachments directly in the Mail app.
- Organize downloaded files into folders in the Files app.
Proper management of email attachments ensures that you can efficiently send and access files without cluttering your email or exceeding storage limits.
1.9. What Are Some Common Issues When Attaching Files And How Can I Troubleshoot Them?
Some common issues when attaching files to emails include:
- File Size Exceeds Limit: Use Mail Drop or a file-sharing service.
- Unsupported File Type: Convert the file to a supported format.
- Email Not Sending: Check your internet connection and email settings.
- Attachments Not Opening: Ensure the recipient has the appropriate software to open the file.
Troubleshooting these issues can help you avoid frustration and ensure that your emails are sent and received successfully.
1.10. Can I Save Attachments Directly To iCloud Drive?
Yes, you can save attachments directly to iCloud Drive. When you receive an email with an attachment, follow these steps:
- Tap on the attachment to preview it.
- Tap the “Share” icon (it looks like a square with an arrow pointing upwards).
- Select “Save to Files”.
- Choose “iCloud Drive” as the destination.
- Select the folder where you want to save the attachment, or create a new folder.
- Tap “Save”.
Saving attachments to iCloud Drive allows you to access them from any device signed in to your iCloud account, providing a convenient way to manage and share your files.
2. How Do I Scan And Attach A Document To An Email From My iPhone?
You can scan and attach a document to an email directly from your iPhone using the Mail app. This is a convenient way to send physical documents as PDFs without needing a separate scanner.
- Open the Mail app on your iPhone.
- Start composing a new email or reply to an existing one.
- Tap inside the body of the email where you want to insert the scanned document.
- Tap the “Expand Toolbar” button above the keyboard.
- Tap the “Insert Photo or Video” icon.
- Choose “Scan Documents”.
- Position your iPhone over the document. It will automatically capture the page.
- Adjust the corners if necessary, then tap “Keep Scan”.
- Scan any additional pages, then tap “Save”.
- The scanned document will be attached to your email as a PDF.
Scanning and attaching documents on your iPhone streamlines the process of digitizing and sharing physical papers. Whether you’re sending contracts, receipts, or handwritten notes, this feature transforms your iPhone into a portable scanner. Mastering this technique enhances your productivity and reduces the need for traditional scanning equipment.
2.1. What Is The Best Way To Position The Document For Scanning?
To ensure the best scan quality, position your iPhone directly above the document in a well-lit area. Make sure the entire document is visible within the camera frame. Hold your iPhone steady to avoid blur. The automatic capture feature will detect the edges of the document and scan it.
Proper positioning is crucial for clear and accurate scans. Avoid shadows and glare, and ensure the document is lying flat on a stable surface.
2.2. How Do I Adjust The Corners Of The Scan?
After the initial scan, your iPhone allows you to adjust the corners to ensure the scan accurately captures the document’s boundaries. Drag the corners to align them with the edges of the document. This is especially useful if the automatic capture doesn’t perfectly detect the edges.
Adjusting the corners ensures that the scanned document is properly cropped and aligned, resulting in a professional-looking PDF.
2.3. Can I Scan Multiple Pages Into A Single PDF?
Yes, you can scan multiple pages into a single PDF. After scanning the first page, tap “Keep Scan” and position your iPhone over the next page. Repeat this process for all the pages you want to include in the PDF. When you’re finished, tap “Save”. All the scanned pages will be combined into a single PDF document attached to your email.
Scanning multiple pages into a single PDF is ideal for digitizing multi-page documents, such as contracts, reports, or books. This feature simplifies the process of creating comprehensive digital copies.
2.4. How Do I Edit The Scan After It’s Been Captured?
After capturing the scan, you can edit it to improve its quality. Tap on the scanned page to access the editing options. You can:
- Crop the image: Remove any unwanted borders.
- Apply a filter: Enhance the contrast and clarity.
- Rotate the image: Correct the orientation.
- Delete the scan: If you need to retake it.
These editing tools allow you to optimize the scan for readability and visual appeal, ensuring that the final PDF is clear and professional.
2.5. What Filters Are Available For Enhancing The Scan Quality?
The iPhone’s built-in scanning feature offers several filters to enhance the scan quality:
- Color: Retains the original colors of the document.
- Grayscale: Converts the scan to grayscale, which can improve readability.
- Black and White: Converts the scan to black and white, providing the highest contrast.
- Photo: Optimizes the scan for photos and images.
Experiment with these filters to find the one that works best for your document. The Black and White filter is often the most effective for text-based documents, while the Color filter is suitable for documents with color images.
2.6. How Do I Rotate The Scanned Image?
To rotate the scanned image, tap on the scanned page to access the editing options, then tap the rotate icon. This allows you to correct the orientation of the scan, ensuring that it is displayed correctly in the PDF.
Rotating the image is essential for documents that were scanned in the wrong orientation, providing a simple way to fix the issue.
2.7. Can I Delete A Page From The Scanned Document?
Yes, you can delete a page from the scanned document. While in the scanning interface, tap on the page you want to delete, then tap the trash can icon. This will remove the page from the scanned document.
Deleting pages is useful if you accidentally scan an extra page or if you need to remove a page that is not relevant to the document.
2.8. How Do I Save The Scanned Document As A PDF?
The scanned document is automatically saved as a PDF when you tap “Save” after scanning all the pages. The PDF will be attached to your email, ready to be sent.
The convenience of automatic PDF conversion makes it easy to share scanned documents without needing additional software or conversion tools.
2.9. Where Are The Scanned Documents Stored On My iPhone?
The scanned documents are stored within the email as attachments. They are not automatically saved to the Files app or Photos app unless you choose to save them manually. To save the scanned document:
- Tap on the attached PDF in the email.
- Tap the “Share” icon.
- Select “Save to Files” and choose a location.
Saving the scanned documents to the Files app allows you to access them later and organize them into folders.
2.10. What Are Some Troubleshooting Tips For Scanning Documents?
Here are some troubleshooting tips for scanning documents:
- Poor Scan Quality: Ensure the document is well-lit and hold your iPhone steady.
- Automatic Capture Not Working: Manually capture the page by tapping the shutter button.
- Incorrect Corner Detection: Adjust the corners manually to align with the document edges.
- Blurry Scans: Clean your iPhone’s camera lens and try again.
Addressing these common issues can help you achieve high-quality scans and avoid frustration.
3. How Do I Create And Attach A Drawing To My Email On An iPhone?
You can create and attach a drawing to your email on your iPhone using the Mail app. This feature is perfect for adding a personal touch or illustrating ideas that are difficult to explain with words.
- Open the Mail app on your iPhone.
- Start composing a new email or reply to an existing one.
- Tap inside the body of the email where you want to insert the drawing.
- Tap the “Expand Toolbar” button above the keyboard.
- Tap the “Markup” icon.
- A drawing canvas will appear. Use your finger to draw on the screen.
- Choose different drawing tools and colors from the toolbar.
- Tap “Done” and then “Insert Drawing” to attach the drawing to your email.
Creating and attaching drawings directly from your iPhone adds a unique dimension to your email communication. Whether you’re sketching a quick design, annotating a photo, or simply doodling for fun, this feature enhances personalization and creativity.
3.1. How Do I Access The Drawing Tools In The Mail App?
To access the drawing tools in the Mail app, tap the “Expand Toolbar” button above the keyboard, then tap the “Markup” icon. This will open the drawing canvas with a toolbar at the bottom of the screen.
The Markup toolbar provides a variety of tools and options for creating and editing your drawings.
3.2. What Drawing Tools And Colors Are Available?
The Markup toolbar includes the following drawing tools:
- Pen: For freehand drawing and writing.
- Marker: For highlighting and thicker lines.
- Pencil: For sketching and fine details.
- Eraser: For removing mistakes.
- Lasso: For selecting and moving parts of your drawing.
- Color Picker: For choosing different colors.
You can select from a wide range of colors to customize your drawings and make them visually appealing.
3.3. How Do I Erase Mistakes While Drawing?
To erase mistakes while drawing, select the “Eraser” tool from the Markup toolbar. Then, simply swipe over the areas you want to erase. You can adjust the size of the eraser for more precise control.
The eraser tool allows you to correct errors and refine your drawings, ensuring that the final result is polished and professional.
3.4. Can I Zoom In While Drawing For More Detail?
Yes, you can zoom in while drawing for more detail. Use the pinch-to-zoom gesture on the drawing canvas to zoom in and out. This allows you to add finer details and create more intricate drawings.
Zooming in is particularly useful for creating detailed sketches or annotating specific areas of an image.
3.5. How Do I Change The Thickness Of The Drawing Tool?
To change the thickness of the drawing tool, double-tap on the tool you are using (e.g., pen, marker, or pencil). This will open a menu with options to adjust the size and opacity of the tool.
Adjusting the thickness of the drawing tool allows you to create lines of varying widths, adding depth and dimension to your drawings.
3.6. Can I Add Text To My Drawing?
Yes, you can add text to your drawing. Tap the “+” button in the Markup toolbar and select “Text”. A text box will appear on the canvas, which you can move and resize. Tap inside the text box to enter your text.
Adding text to your drawings is useful for labeling parts of a sketch, adding captions, or including notes and explanations.
3.7. How Do I Move Or Resize Elements Of My Drawing?
To move or resize elements of your drawing, use the “Lasso” tool to select the area you want to move or resize. Once selected, you can drag the element to a new location or use the handles to resize it.
The Lasso tool provides precise control over individual elements of your drawing, allowing you to rearrange and adjust them as needed.
3.8. Can I Undo Or Redo Actions While Drawing?
Yes, you can undo or redo actions while drawing. Tap the undo button (an arrow pointing left) to undo the last action, and tap the redo button (an arrow pointing right) to redo the last undone action.
The undo and redo buttons are essential for correcting mistakes and experimenting with different ideas while drawing.
3.9. How Do I Save The Drawing To My Photos App?
The drawing is automatically attached to your email, but if you want to save it to your Photos app:
- Tap on the attached drawing in the email.
- Tap the “Share” icon.
- Select “Save Image”.
Saving the drawing to your Photos app allows you to access it later, share it on social media, or use it in other apps.
3.10. What Are Some Creative Uses For The Drawing Feature?
Here are some creative uses for the drawing feature:
- Sketching ideas for projects or designs.
- Annotating photos with comments and highlights.
- Creating personalized cards and greetings.
- Illustrating stories or concepts.
- Adding fun doodles to emails.
The drawing feature opens up a world of possibilities for creative expression and personalized communication.
4. How Can dfphoto.net Help You Master iPhone Photography?
At dfphoto.net, we are dedicated to helping you master the art of photography, especially using your iPhone. Our website offers a wealth of resources, from beginner guides to advanced techniques, designed to enhance your skills and inspire your creativity.
4.1. Explore Our Comprehensive Guides
We provide detailed guides on various aspects of iPhone photography, including:
- Camera settings and features
- Composition techniques
- Lighting tips
- Editing tutorials
These guides are crafted to help you understand the fundamentals of photography and apply them effectively using your iPhone.
4.2. Get Inspired By Stunning Photo Galleries
Our website features stunning photo galleries showcasing the work of talented photographers from around the world. These galleries are designed to inspire you and provide ideas for your own photography projects.
4.3. Join Our Thriving Community
Connect with fellow photographers in our online community. Share your work, ask questions, and get feedback from experienced photographers. Our community is a supportive and collaborative space where you can grow and learn.
4.4. Stay Updated With The Latest Trends
We keep you informed about the latest trends in photography, including new equipment, software, and techniques. Our blog features articles and reviews that help you stay ahead of the curve.
4.5. Learn From Expert Tutorials
Our expert tutorials cover a wide range of topics, from basic photo editing to advanced post-processing techniques. Learn how to use popular editing apps and software to enhance your photos and create stunning visual effects.
4.6. Discover New Techniques
Explore new techniques and experiment with different styles of photography. Our website offers tips and inspiration for various genres, including:
- Landscape photography
- Portrait photography
- Street photography
- Macro photography
4.7. Improve Your Editing Skills
Master the art of photo editing with our comprehensive tutorials. Learn how to use tools like:
- Adobe Lightroom
- Adobe Photoshop
- Snapseed
- VSCO
4.8. Enhance Your Visual Storytelling
Learn how to tell compelling stories through your photographs. Our website offers tips on:
- Creating a narrative
- Capturing emotions
- Building a portfolio
4.9. Access Exclusive Resources
Gain access to exclusive resources, including:
- Presets and filters
- Templates and guides
- Workshops and webinars
4.10. Connect With Professionals
Network with professional photographers and industry experts. Our website features interviews, guest posts, and collaborations that provide valuable insights and opportunities.
Ready to elevate your iPhone photography skills? Visit dfphoto.net today and explore a world of inspiration, knowledge, and community. Start your journey towards becoming a master photographer! You can find us at 1600 St Michael’s Dr, Santa Fe, NM 87505, United States, or give us a call at +1 (505) 471-6001. We can’t wait to welcome you to our community.
5. What Are The Search Intentions For “How To Add Photos To Email On iPhone?”
Understanding the search intentions behind the query “How To Add Photos To Email On Iphone” is crucial for providing relevant and valuable content. Here are five key search intentions:
- Instructional: Users are looking for step-by-step instructions on how to attach photos to an email on their iPhone.
- Troubleshooting: Users are experiencing issues with attaching photos and need solutions to common problems.
- Size Limits: Users want to know about attachment size limits and how to send large photos.
- Alternative Methods: Users are seeking alternative methods for sharing photos via email, such as using Mail Drop or cloud storage services.
- Creative Uses: Users are looking for ideas on how to creatively use photo attachments in their emails, such as adding annotations or creating visual stories.
Addressing these search intentions ensures that your content is comprehensive and meets the needs of a wide range of users.
FAQ: Adding Photos To Email On iPhone
1. How do I quickly attach a photo to an email on my iPhone?
Open the Mail app, start a new email, tap the body, select the photo icon, choose your photo, and tap Add.
2. What if my photo is too large to email from my iPhone?
Use Mail Drop if offered, or resize the photo in the Photos app before attaching.
3. Can I attach multiple photos to one email on my iPhone?
Yes, select multiple photos after tapping the photo icon in the email.
4. How do I attach a document instead of a photo?
Tap the file icon, browse the Files app, and select the document.
5. Where do I find the “Attach File” icon in the Mail app?
It’s usually above the keyboard; tap the expand toolbar button if it’s not visible.
6. How do I scan a document and email it from my iPhone?
In the Mail app, choose Scan Documents, capture the pages, and save as a PDF.
7. Can I draw something and attach it to an email on my iPhone?
Yes, use the Markup tool to create a drawing and insert it into the email.
8. How do I reduce the size of a photo attachment on my iPhone?
Edit the photo and reduce its dimensions before attaching, or use a third-party compression app.
9. What file types can I email from my iPhone?
You can email photos, videos, documents, and other common file types.
10. Is there a limit to the number of attachments I can send in one email?
While there’s no strict limit, the total size of all attachments must not exceed your email provider’s limit.