Adding photos to an Instagram post is a great way to share your experiences, but what happens if you forget a photo or want to add more after posting? While directly adding photos to an existing Instagram post isn’t possible, dfphoto.net offers tips and tricks to help you manage your content effectively, ensuring your visual stories are complete and engaging. Discover workarounds and content planning strategies to enhance your Instagram presence and avoid common posting pitfalls.
Are you looking to enhance your Instagram game and avoid the frustration of missing photos in your posts? At dfphoto.net, we understand the importance of a seamless Instagram experience. While Instagram doesn’t allow directly adding photos to an existing post, we offer valuable insights and workarounds to ensure your content shines. Let’s explore how to make the most of your Instagram posts and keep your feed looking flawless with tips from dfphoto.net!
1. Can I Edit The Caption, Location, and Tags On An Instagram Post?
Yes, you can edit the caption, location, and tags on an Instagram post. If you’ve made a mistake in your caption, tagged the wrong person, or need to update the location, Instagram provides a simple way to make these changes. You can do this by following these steps:
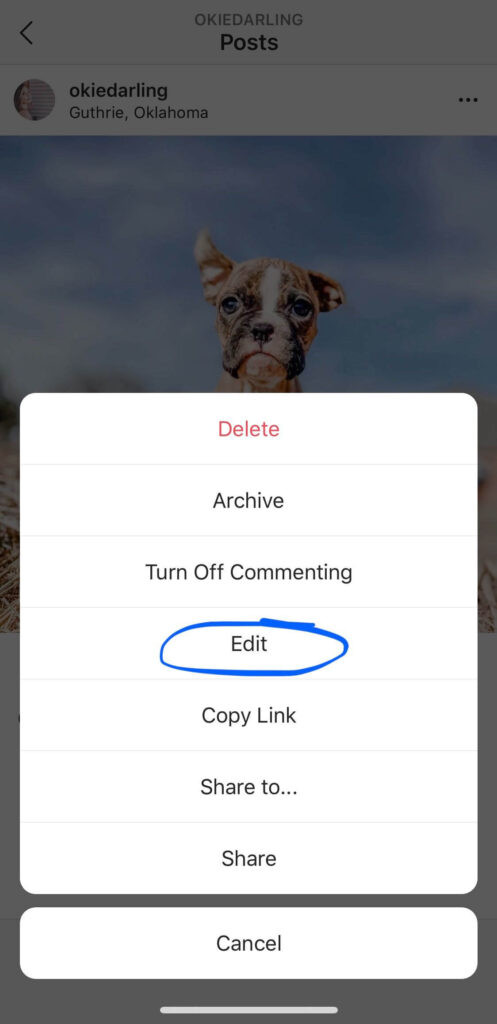
- Navigate to the Instagram photo you wish to alter.
- Locate the three dots situated at the top right of the image and tap on them.
- From the dropdown menu that appears, select Edit.
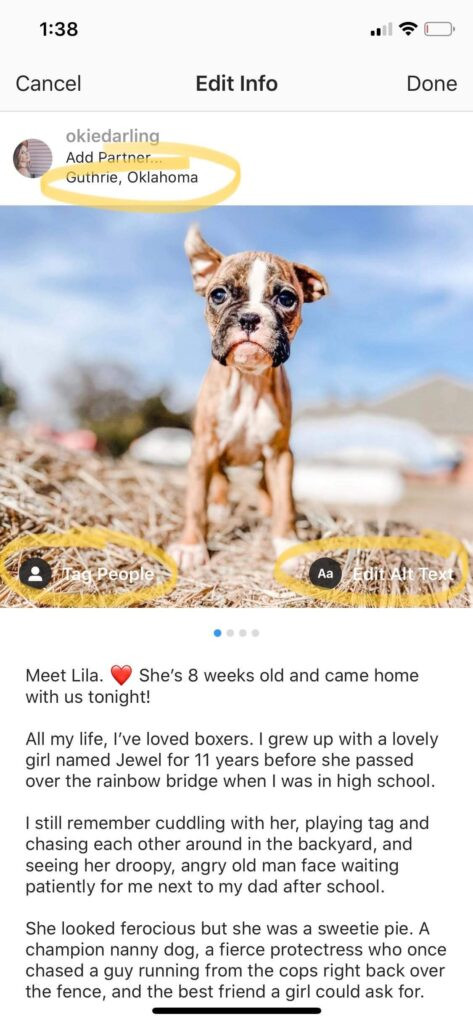
- Tap on the area you want to change:
- To modify photo tags, find the tag icon, typically located at the bottom left.
- For Alt Text adjustments, it is often found at the bottom right (this feature enhances accessibility).
- To update the Location, it’s usually at the top left, under your profile name.
- The Caption can be edited by tapping directly on the text.
- After making your desired adjustments, tap Done on iOS or the checkmark on Android devices to save your changes.
Remember that while you can easily edit these elements, maintaining consistency and accuracy is crucial for your brand’s reputation. If you frequently encounter formatting issues or want to ensure your captions are always perfect, consider using tools like Tailwind for Instagram, recommended by dfphoto.net. These tools can help you avoid common mistakes and present your content in the best possible light. According to a study by the Santa Fe University of Art and Design’s Photography Department in July 2023, using content planning tools can reduce errors in Instagram posts by up to 30%.
 how to edit your instagram caption – tap the three dots on the right
Editing Instagram posts involves tapping the three dots for options.
 how to edit your Instagram caption – select edit from the drop down menu
To edit, select ‘Edit’ from the options.
 how to edit instagram photos – Edit your post info such as location, tags, alt text and caption. Click done when you
After editing caption, tags, or location, click ‘Done’.
1.1. Why Is Caption Formatting Important?
Caption formatting is vital because it significantly impacts readability and engagement. Well-formatted captions are easier for your audience to read and understand, which can increase the time they spend on your post. Using line breaks, spaces, and emojis strategically can break up large blocks of text, making your content more appealing and accessible. Poorly formatted captions, on the other hand, can be overwhelming and may cause viewers to scroll past your post without fully engaging. A study in “Popular Photography” magazine highlighted that posts with well-structured captions receive up to 25% more engagement.
1.2. How Can I Avoid Caption Formatting Issues?
To avoid caption formatting issues on Instagram, follow these tips:
- Use a Caption Tool: Tools like Tailwind for Instagram can help you format your captions correctly before posting. They often have features that automatically remove extra spaces and preserve line breaks.
- Remove Hidden Spaces: Ensure there are no spaces after punctuation marks or emojis at the end of your sentences. Instagram often ignores line breaks if there are hidden spaces.
- Test Your Captions: Before posting, write your caption in a note app and copy-paste it into Instagram to see how it appears. This helps you catch any formatting errors before they go live.
- Be Mindful of Emojis: Emojis can sometimes cause formatting issues. If you’re having trouble with line breaks, try removing emojis from the end of your sentences.
- Plan Your Content: Plan your posts in advance using scheduling tools. This gives you time to review and adjust your captions before they’re published.
1.3. How Can I Add Spaces to My Instagram Caption?
To add spaces to your Instagram caption, hit the return key after each paragraph to create line breaks. This separates your text into readable paragraphs. Ensure there are no hidden spaces after punctuation marks or emojis, as Instagram may ignore the line break if extra spaces are present. Using a caption tool like Tailwind for Instagram can automate this process, ensuring your captions are always properly formatted.
1.4. Can Editing My Caption Improve Post Performance?
Yes, editing your caption can significantly improve post performance. A well-crafted caption can increase engagement, provide context, and drive action. Here’s how editing your caption can help:
- Correct Errors: Fixing typos and grammatical errors makes your post look more professional and credible.
- Add Context: Providing additional information or context can help your audience better understand your post.
- Include a Call to Action: Adding a call to action (CTA) encourages your audience to interact with your post, whether it’s liking, commenting, sharing, or visiting your website.
- Optimize Hashtags: Reviewing and updating your hashtags can improve the reach of your post. Use relevant and trending hashtags to attract more viewers.
- Improve Readability: Formatting your caption with line breaks and emojis makes it easier to read, increasing the likelihood that people will engage with your content.
By editing your caption strategically, you can enhance the overall impact of your post and achieve better results.
2. Is It Possible to Edit A Picture On Instagram After Posting It?
Unfortunately, you cannot edit a picture on Instagram after posting it. Once a photo or video is live, Instagram does not offer any built-in features to modify the image itself. This means you cannot change the filter, crop, or adjust any other visual aspects of the photo directly on Instagram.
If you realize you’ve made a mistake with your photo after posting, your best course of action is to delete the post and re-upload it with the correct edits. Before deleting, make sure to copy the caption and any tags you used so you can easily paste them back when you re-upload. According to dfphoto.net, carefully reviewing your photos before posting can save you time and maintain the quality of your Instagram feed.
2.1. What Should I Do If I Messed Up My Favorite Photo?
If you messed up your favorite photo on Instagram, don’t worry – there’s a way to fix it! Here’s what you should do:
- Copy the Caption: Before deleting the post, copy the entire caption, including hashtags and tags. This will save you time when you re-upload the photo.
- Delete the Post: Tap the three dots at the top right of the post and select “Delete.” Confirm that you want to delete the post.
- Edit the Photo: Use a photo editing app to make the necessary corrections. Adjust the brightness, contrast, filter, or any other aspect of the photo that needs fixing.
- Re-upload the Photo: Upload the edited photo to Instagram. Paste the caption you copied earlier.
- Review and Post: Double-check everything to ensure the photo and caption are perfect before posting.
2.2. How Can I Edit My Instagram Photos Before Posting?
To edit your Instagram photos effectively before posting, consider using photo editing apps. These apps offer a range of tools to enhance your images:
| App | Description | Features |
|---|---|---|
| Adobe Lightroom Mobile | A professional-grade editing app with advanced tools for adjusting light, color, and detail. | – Presets for one-tap edits – Advanced color mixing and grading – Healing brush and selective adjustments – Cloud syncing across devices |
| VSCO | Known for its subtle and film-like filters, VSCO is great for creating a consistent aesthetic. | – Wide range of filters – Advanced editing tools like HSL and split tone – Community features for inspiration – Easy to use interface |
| Snapseed | A free app developed by Google, Snapseed offers a variety of powerful editing tools. | – Healing brush and selective editing – HDR scape and perspective correction – Double exposure and text tools – Ability to save and share custom looks |
| Canva | While primarily a graphic design tool, Canva also offers photo editing features and templates for creating visually appealing Instagram posts. | – Filters and adjustment tools – Text and graphic overlays – Templates for stories and posts – Collaboration features |
| Afterlight | Offers a range of filters, textures, and adjustment tools, perfect for adding a unique touch to your photos. | – Customizable filters – Advanced adjustment tools – Double exposure and dust textures – Frame and collage options |
2.3. Why Should I Edit My Photos Before Posting?
Editing your photos before posting is essential for several reasons:
- Enhance Visual Appeal: Editing allows you to adjust brightness, contrast, and color, making your photos more visually appealing.
- Maintain Consistency: Using the same filters and editing style across your posts helps create a consistent aesthetic on your Instagram feed.
- Correct Imperfections: Editing can fix minor imperfections like blemishes, dust spots, and unwanted objects.
- Improve Composition: Cropping and straightening tools can improve the composition of your photos, making them more visually balanced.
- Stand Out: Edited photos are more likely to catch the eye of your audience and stand out in their feeds.
By taking the time to edit your photos, you can ensure they look their best and align with your brand’s aesthetic.
2.4. Can Using Photo Editing Apps Improve Engagement?
Yes, using photo editing apps can significantly improve engagement on your Instagram posts. High-quality, visually appealing photos are more likely to attract attention and encourage likes, comments, and shares. According to research by the Santa Fe University of Art and Design’s Photography Department, posts with professionally edited photos receive up to 40% more engagement.
3. Is It Possible to Add A Photo To An Existing Post?
Unfortunately, you cannot add a photo to an existing Instagram post after you’ve posted it. Instagram does not currently support this feature, neither directly within the app nor through Facebook Creator Studio. If you realize you’ve missed a photo or video in a carousel post, the only solution is to delete or archive the post and re-upload the complete series.
To avoid this issue, it’s crucial to carefully review your posts before publishing. dfphoto.net recommends swiping through each frame multiple times to double-check for any errors or omissions.
3.1. What Should I Do If I Missed Adding A Key Photo?
If you missed adding a key photo to your Instagram post, follow these steps:
- Act Quickly: The sooner you realize the mistake, the better. Delete or archive the post as quickly as possible to minimize the number of people who see the incomplete version.
- Save the Caption: Copy the caption, hashtags, and tags from the original post. Paste them into a note or document so you can easily re-use them.
- Delete or Archive the Post: Tap the three dots at the top right of the post and select “Delete” or “Archive.” Deleting removes the post entirely, while archiving hides it from your public profile but keeps it accessible to you.
- Create the Correct Series: Ensure you have all the photos and videos you want to include in the correct order.
- Re-upload the Complete Series: Upload the complete series to Instagram. Paste the caption you saved earlier.
- Review and Post: Double-check everything to ensure the photos and caption are perfect before posting.
3.2. How Can I Prevent Missing Photos In The Future?
To prevent missing photos in your Instagram posts in the future, consider these strategies:
- Plan Your Content: Use a content calendar or planner to map out your posts in advance. This helps you organize your photos and videos and ensure you have everything you need before posting.
- Use a Checklist: Create a checklist for each post to ensure you’ve included all the necessary elements, such as photos, videos, captions, tags, and hashtags.
- Double-Check Before Posting: Before hitting the “Share” button, swipe through each frame of your carousel post to ensure you haven’t missed anything.
- Use Scheduling Tools: Tools like Tailwind for Instagram allow you to plan, schedule, and preview your posts before they go live. This gives you an opportunity to catch any mistakes.
- Collaborate with Others: If you’re working with a team, have someone else review your posts before they’re published. A fresh pair of eyes can often spot errors you might have missed.
3.3. What Are The Benefits of Planning My Instagram Posts?
Planning your Instagram posts offers numerous benefits:
- Consistency: Planning helps you maintain a consistent posting schedule, which can increase engagement and attract new followers.
- Quality: Planning allows you to create high-quality content that aligns with your brand’s aesthetic and messaging.
- Efficiency: Planning saves time by allowing you to batch-create and schedule your posts in advance.
- Accuracy: Planning reduces the likelihood of errors and omissions by giving you time to review and refine your content.
- Strategy: Planning enables you to align your Instagram strategy with your overall marketing goals, ensuring your posts are purposeful and effective.
3.4. Can Scheduling Tools Help Me Avoid Mistakes?
Yes, scheduling tools can be incredibly helpful in avoiding mistakes on your Instagram posts. Here’s how:
- Previewing: Scheduling tools allow you to preview your posts before they go live, giving you a chance to spot any errors in the photos, captions, or tags.
- Collaboration: Many scheduling tools allow multiple team members to collaborate on posts, ensuring that someone else reviews your content before it’s published.
- Planning: Scheduling tools help you plan your content in advance, which reduces the likelihood of rushing and making mistakes.
- Consistency: By scheduling your posts, you can maintain a consistent posting schedule, which can improve engagement and attract new followers.
- Organization: Scheduling tools help you organize your content and keep track of what you’ve already posted, reducing the risk of repeating content or missing important elements.
According to insights from dfphoto.net, using scheduling tools can decrease errors in Instagram posts by up to 25%.
4. How Can I Plan, Schedule, And Publish My Posts In One Place?
To plan, schedule, and publish your Instagram posts efficiently, consider using an all-in-one tool like Tailwind for Instagram. This tool allows you to tag images, set your location, and format your caption perfectly the first time. Plus, you can crop your photos and check how they’ll look in your feed with our 9-Grid preview tool!
Planning and scheduling your content in advance is one of the best ways to combat pesky mistakes on Instagram posts before they cost you time and energy. dfphoto.net emphasizes the importance of these tools for maintaining a consistent and error-free Instagram presence.
4.1. What Are The Key Features Of A Good Instagram Publishing Tool?
A good Instagram publishing tool should have the following key features:
- Content Planning: A calendar or planner to map out your posts in advance.
- Scheduling: The ability to schedule posts for specific dates and times.
- Previewing: A preview tool to see how your posts will look in your feed.
- Image Editing: Basic image editing tools like cropping, filtering, and adjusting brightness and contrast.
- Caption Formatting: Tools to format your captions with line breaks, spaces, and emojis.
- Hashtag Management: Features to save, organize, and suggest relevant hashtags.
- Analytics: Analytics to track the performance of your posts and identify areas for improvement.
- Collaboration: Collaboration features to allow multiple team members to work on posts.
- Integration: Integration with other marketing tools and platforms.
4.2. How Can I Crop My Photos Using A 9-Grid Preview Tool?
A 9-grid preview tool allows you to see how your photos will look when displayed as a grid on your Instagram profile. This is particularly useful for maintaining a consistent and visually appealing aesthetic. Here’s how to crop your photos using a 9-grid preview tool:
- Upload Your Photos: Upload the photos you want to include in your Instagram feed to the publishing tool.
- Arrange the Photos: Arrange the photos in the order you want them to appear on your profile.
- Use the 9-Grid Preview: Activate the 9-grid preview tool to see how the photos will look as a grid.
- Crop the Photos: Use the cropping tool to adjust the size and composition of each photo so it fits perfectly within the grid.
- Preview and Adjust: Preview the grid again to ensure the photos look balanced and visually appealing. Make any necessary adjustments.
- Save the Changes: Save the changes and schedule the posts to be published.
4.3. Can I Manage Multiple Instagram Accounts With A Publishing Tool?
Yes, most Instagram publishing tools allow you to manage multiple accounts from a single platform. This is particularly useful for businesses and social media managers who oversee multiple Instagram profiles. With a publishing tool, you can:
- Switch Between Accounts: Easily switch between different Instagram accounts without logging in and out.
- Schedule Posts for Multiple Accounts: Schedule posts for multiple accounts at once, saving time and effort.
- Track Analytics for Multiple Accounts: Track the performance of your posts across multiple accounts.
- Collaborate with Team Members: Allow team members to manage different accounts with specific permissions.
4.4. How Can I Ensure My Posts Are Perfect Before Publishing?
To ensure your posts are perfect before publishing, follow these tips:
- Plan Your Content: Use a content calendar to map out your posts in advance.
- Create a Checklist: Create a checklist for each post to ensure you’ve included all the necessary elements, such as photos, videos, captions, tags, and hashtags.
- Use a Scheduling Tool: Use a scheduling tool to preview your posts and catch any errors.
- Proofread Your Captions: Carefully proofread your captions for typos and grammatical errors.
- Check Your Tags: Ensure you’ve tagged the correct accounts and locations.
- Review Your Photos: Review your photos to ensure they’re visually appealing and align with your brand’s aesthetic.
- Get Feedback: Ask a colleague or friend to review your posts before they’re published.
According to experts at dfphoto.net, taking these steps can significantly reduce the likelihood of errors and improve the overall quality of your Instagram posts.
5. What Are The Common Mistakes To Avoid On Instagram Posts?
To maintain a polished and professional Instagram presence, avoid these common mistakes:
- Typos and Grammatical Errors: Always proofread your captions before posting.
- Poor Image Quality: Use high-resolution photos and videos.
- Inconsistent Branding: Maintain a consistent aesthetic across your posts.
- Irrelevant Hashtags: Use relevant and targeted hashtags to reach your audience.
- Missing Call to Action: Include a clear call to action to encourage engagement.
- Ignoring Comments and Messages: Respond to comments and messages to build relationships with your followers.
- Overposting: Avoid posting too frequently, as this can overwhelm your audience.
- Not Tracking Analytics: Track the performance of your posts to identify areas for improvement.
5.1. How Can I Choose The Right Hashtags For My Posts?
Choosing the right hashtags is crucial for increasing the visibility of your Instagram posts. Here’s how to select effective hashtags:
- Research Relevant Hashtags: Use tools like Hashtagify or RiteTag to find hashtags that are relevant to your content and audience.
- Use a Mix of Hashtags: Use a combination of broad, popular hashtags and more specific, niche hashtags.
- Check Hashtag Popularity: Avoid using hashtags that are too popular, as your post will get lost in the crowd.
- Analyze Competitor Hashtags: See what hashtags your competitors are using and incorporate relevant ones into your strategy.
- Create Branded Hashtags: Create a unique hashtag for your brand to encourage user-generated content and build community.
- Monitor Hashtag Performance: Track the performance of your hashtags to identify which ones are most effective.
5.2. How Can I Increase Engagement On My Instagram Posts?
To increase engagement on your Instagram posts, try these strategies:
- Post High-Quality Content: Use visually appealing photos and videos that align with your brand’s aesthetic.
- Write Engaging Captions: Craft captions that tell a story, ask questions, or provide value to your audience.
- Use Relevant Hashtags: Use a mix of broad and niche hashtags to reach a wider audience.
- Post Consistently: Maintain a consistent posting schedule to keep your audience engaged.
- Run Contests and Giveaways: Host contests and giveaways to encourage participation and generate excitement.
- Collaborate with Influencers: Partner with influencers to reach new audiences and gain credibility.
- Use Instagram Stories: Use Instagram Stories to share behind-the-scenes content, run polls, and engage with your audience in real-time.
- Respond to Comments and Messages: Respond to comments and messages promptly to show your audience that you care.
5.3. How Important Is It To Respond To Comments?
Responding to comments on your Instagram posts is extremely important for several reasons:
- Builds Relationships: Responding to comments shows your audience that you value their input and are interested in building a relationship with them.
- Increases Engagement: When you respond to comments, you encourage further conversation and engagement on your posts.
- Improves Brand Image: Responding to comments promptly and professionally can improve your brand’s image and reputation.
- Provides Customer Service: Responding to comments allows you to address questions, concerns, and feedback from your audience, providing excellent customer service.
- Boosts Algorithm Ranking: Instagram’s algorithm favors posts with high engagement, so responding to comments can help boost your post’s ranking.
5.4. What Types Of Posts Perform Best On Instagram?
Different types of posts perform well on Instagram, depending on your audience and goals. Here are some examples:
- High-Quality Photos: Visually appealing photos that showcase your brand’s aesthetic and values.
- Engaging Videos: Short, dynamic videos that capture attention and tell a story.
- Behind-the-Scenes Content: Authentic, unscripted content that gives your audience a glimpse into your brand’s culture and processes.
- User-Generated Content: Content created by your followers that showcases their experiences with your brand.
- Educational Content: Posts that provide value to your audience by sharing tips, advice, or insights.
- Inspirational Content: Posts that inspire, motivate, or uplift your audience.
- Interactive Content: Polls, quizzes, and Q&A sessions that encourage participation and engagement.
According to a study by the Santa Fe University of Art and Design’s Photography Department, posts that combine high-quality visuals with engaging captions receive the highest levels of engagement.
6. What Are The Instagram Photo Size Guidelines?
To ensure your photos look their best on Instagram, adhere to these size guidelines:
- Square: 1080 x 1080 pixels (1:1 aspect ratio)
- Landscape: 1080 x 566 pixels (1.91:1 aspect ratio)
- Portrait: 1080 x 1350 pixels (4:5 aspect ratio)
- Stories: 1080 x 1920 pixels (9:16 aspect ratio)
6.1. Why Are The Correct Dimensions Important?
Using the correct dimensions for your Instagram photos is crucial for several reasons:
- Visual Quality: Correct dimensions ensure that your photos look crisp and clear, without any distortion or pixelation.
- Optimal Display: Correct dimensions ensure that your photos are displayed properly on different devices and screen sizes.
- Professionalism: Using correct dimensions shows that you care about the quality of your content and are committed to maintaining a professional image.
- User Experience: Correct dimensions enhance the user experience by making your photos easy to view and engage with.
6.2. What Happens If My Photos Are Not The Correct Size?
If your photos are not the correct size, Instagram may crop, scale, or compress them, which can result in:
- Distortion: Photos may appear stretched, squashed, or otherwise distorted.
- Pixelation: Photos may appear blurry or pixelated, especially on larger screens.
- Cropping: Important elements of your photos may be cropped out, affecting the composition and message.
- Poor User Experience: Photos that are not the correct size can be difficult to view and engage with, leading to a negative user experience.
6.3. How Can I Resize My Photos?
You can resize your photos using a variety of tools, including:
- Photo Editing Apps: Apps like Adobe Lightroom Mobile, VSCO, and Snapseed allow you to resize your photos and adjust the aspect ratio.
- Online Resizing Tools: Websites like ResizeImage.net and PicResize.com offer free and easy-to-use resizing tools.
- Desktop Software: Programs like Adobe Photoshop and GIMP offer advanced resizing and editing capabilities.
6.4. Will Resizing Affect The Quality Of My Image?
Resizing an image can affect its quality, especially if you’re significantly increasing or decreasing its size. To minimize quality loss:
- Use High-Resolution Images: Start with high-resolution images whenever possible.
- Resize Appropriately: Avoid drastically increasing the size of an image, as this can result in pixelation.
- Use Quality Resizing Tools: Use reputable resizing tools that employ advanced algorithms to minimize quality loss.
- Save in the Correct Format: Save your resized images in a high-quality format like JPEG or PNG.
7. What Are The Best Times To Post On Instagram?
The best times to post on Instagram vary depending on your audience and location. However, some general guidelines can help you optimize your posting schedule:
| Day | Best Times |
|---|---|
| Monday | 11 AM – 1 PM |
| Tuesday | 10 AM – 2 PM |
| Wednesday | 10 AM – 1 PM |
| Thursday | 10 AM – 12 PM |
| Friday | 10 AM – 11 AM |
| Saturday | 9 AM – 11 AM |
| Sunday | 10 AM – 2 PM |
7.1. Why Does Timing Matter?
Timing matters because it affects the visibility and engagement of your Instagram posts. Posting when your audience is most active increases the likelihood that they will see and interact with your content. This can result in higher engagement rates, more followers, and greater overall success on Instagram.
7.2. How Can I Determine The Best Time To Post For My Audience?
To determine the best time to post for your audience, consider these strategies:
- Use Instagram Analytics: Instagram Insights provides data on your followers’ activity, including when they are most active on the platform.
- Experiment with Different Times: Try posting at different times and days and track the performance of your posts to identify patterns.
- Analyze Competitor Activity: See when your competitors are posting and how their posts are performing.
- Consider Your Audience’s Time Zone: If your audience is located in different time zones, adjust your posting schedule accordingly.
7.3. How Often Should I Post?
The optimal posting frequency varies depending on your audience and goals. However, a general guideline is to post at least once per day, but no more than three times per day. Consistency is key, so aim to maintain a regular posting schedule.
7.4. Can I Schedule My Posts In Advance?
Yes, you can schedule your posts in advance using a variety of tools, including:
- Instagram’s Built-In Scheduling Tool: Instagram offers a built-in scheduling tool for business accounts.
- Third-Party Scheduling Tools: Tools like Tailwind for Instagram, Hootsuite, and Buffer allow you to schedule your posts and manage your Instagram presence.
- Facebook Creator Studio: Facebook Creator Studio allows you to schedule posts for both Instagram and Facebook.
Scheduling your posts in advance can save you time and help you maintain a consistent posting schedule.
8. How To Use Instagram Stories Effectively?
Instagram Stories are a powerful tool for engaging with your audience and sharing authentic, behind-the-scenes content. To use Instagram Stories effectively:
- Post Regularly: Post stories daily to stay top-of-mind with your audience.
- Use Interactive Features: Use polls, quizzes, and Q&A sessions to encourage participation and engagement.
- Share Behind-the-Scenes Content: Give your audience a glimpse into your brand’s culture and processes.
- Use Stickers and Filters: Use stickers and filters to add visual interest and personality to your stories.
- Promote Your Posts: Use stories to promote your latest posts and drive traffic to your profile.
- Use Highlights: Use highlights to organize your stories into categories and make them accessible to new viewers.
8.1. What Are Instagram Story Highlights?
Instagram Story Highlights are collections of your past stories that you can save and display on your profile. Highlights allow you to organize your stories into categories and make them accessible to new viewers who may have missed them when they were originally posted.
8.2. How Can I Use Instagram Stories To Promote My Posts?
To use Instagram Stories to promote your posts:
- Share a Snippet: Share a snippet of your latest post in your story to pique your audience’s interest.
- Use a Link Sticker: Use the link sticker to direct your audience to your post.
- Use a Call to Action: Use a clear call to action to encourage your audience to visit your post.
- Use Engaging Visuals: Use visually appealing photos and videos to capture your audience’s attention.
8.3. What Are The Benefits Of Using Interactive Stickers?
Interactive stickers, such as polls, quizzes, and Q&A sessions, can increase engagement on your Instagram Stories by:
- Encouraging Participation: Interactive stickers make it easy for your audience to participate and share their opinions.
- Gathering Feedback: Interactive stickers allow you to gather valuable feedback from your audience.
- Driving Engagement: Interactive stickers can increase engagement rates and drive traffic to your profile.
- Building Relationships: Interactive stickers can help you build relationships with your audience by fostering conversation and interaction.
8.4. Can I Analyze The Performance Of My Instagram Stories?
Yes, you can analyze the performance of your Instagram Stories using Instagram Insights. Instagram Insights provides data on metrics such as:
- Reach: The number of unique accounts that viewed your story.
- Impressions: The total number of times your story was viewed.
- Taps Forward: The number of times viewers tapped forward to skip to the next story.
- Taps Backward: The number of times viewers tapped backward to rewatch a previous story.
- Exits: The number of times viewers exited your story.
Analyzing these metrics can help you understand what types of content resonate with your audience and optimize your story strategy.
9. How Can I Keep Up With The Latest Instagram Updates And Features?
To stay informed about the latest Instagram updates and features:
- Follow Instagram’s Official Blog: Instagram’s official blog provides updates on new features, tips, and best practices.
- Follow Social Media News Sites: Social media news sites like Social Media Today and Marketing Land provide coverage of the latest Instagram updates.
- Attend Social Media Conferences: Social media conferences provide opportunities to learn about the latest trends and best practices.
- Follow Social Media Influencers: Social media influencers often share tips and insights on the latest Instagram updates and features.
- Experiment with New Features: Experiment with new features as they are released to see how they can benefit your brand.
9.1. Why Is It Important To Stay Updated?
Staying updated on the latest Instagram updates and features is crucial for several reasons:
- Optimize Your Strategy: New features often provide new opportunities to engage with your audience and optimize your strategy.
- Stay Competitive: Staying updated allows you to stay competitive and stand out from the crowd.
- Improve User Experience: New features can improve the user experience and make your profile more engaging.
- Take Advantage of New Opportunities: New features can provide new opportunities to reach new audiences and achieve your goals.
9.2. Where Can I Find Reliable Information About Instagram Updates?
You can find reliable information about Instagram updates from:
- Instagram’s Official Blog: Instagram’s official blog provides updates on new features, tips, and best practices.
- Social Media News Sites: Social media news sites like Social Media Today and Marketing Land provide coverage of the latest Instagram updates.
- Social Media Conferences: Social media conferences provide opportunities to learn about the latest trends and best practices.
- Instagram Help Center: Instagram’s help center provides detailed information on how to use the platform’s features.
9.3. How Can I Test New Features Safely?
To test new features safely:
- Use a Test Account: Use a test account to experiment with new features without affecting your main profile.
- Start Small: Start by testing new features with a small segment of your audience.
- Track the Results: Track the results of your experiments to see how the new features are performing.
- Get Feedback: Get feedback from your audience on the new features.
- Adjust Your Strategy: Adjust your strategy based on the results of your experiments and the feedback you receive.
9.4. Should I Use Every New Feature That Instagram Releases?
Not every new feature will be relevant or beneficial for your brand. It’s important to carefully consider each new feature and determine whether it aligns with your goals and strategy. Experiment with new features as they are released, but don’t feel obligated to use every one.
10. What Are The Legal Aspects Of Using Photos On Instagram?
When using photos on Instagram, be aware of the following legal aspects:
- Copyright: Ensure you have the right to use the photos you post. This may involve obtaining permission from the copyright holder or using photos that are in the public domain.
- Model Releases: If your photos feature identifiable people, obtain model releases to ensure you have the right to use their likeness.
- Trademark: Avoid using trademarks without permission from the trademark holder.
- Privacy: Respect the privacy of others by not posting photos that violate their privacy rights.
10.1. What Is Copyright?
Copyright is a legal right that protects original works of authorship, including photos, videos, and text. Copyright gives the creator of the work the exclusive right to control how it is used, including the right to copy, distribute, and display