Adding photos to a Facebook album, especially on your mobile device, can significantly enhance your online presence and storytelling. At dfphoto.net, we understand the importance of visual content. That’s why we’ve created this guide to simplify the process, helping you showcase your best shots and connect with your audience through stunning visual narratives, ensuring your images capture attention and spark engagement. Unlock the potential of Facebook Albums, image organization, and photo sharing today.
1. Understanding the Intent Behind Adding Photos to Facebook Albums
Before diving into the how-to, let’s explore the various reasons you might want to add photos to a Facebook album. Recognizing these intentions will help you optimize your approach for maximum impact. Here are five key intentions users often have when searching for information on this topic:
- To Organize Photos: Users want to neatly arrange their photos into themed albums for easy browsing and sharing.
- To Share Memories: People aim to share experiences, events, or trips with friends and family through curated photo collections.
- To Promote a Business: Businesses use albums to showcase products, services, events, or behind-the-scenes content to attract customers.
- To Collaborate with Others: Users want to create shared albums where multiple people can contribute photos from a specific event or project.
- To Preserve Memories: Individuals seek to create a visual timeline of important life events, ensuring memories are safely stored and easily accessible.
2. Step-by-Step Guide: Adding Photos to a Facebook Album on Mobile
Adding photos to a Facebook album on your mobile device is a straightforward process. Here’s a detailed guide to help you through each step.
2.1. Open the Facebook App
The first step is to launch the Facebook app on your smartphone or tablet. Ensure you have the latest version installed for optimal performance.
2.2. Navigate to Your Facebook Page
Once the app is open, you need to access your Facebook Page. Here’s how:
- Tap the Menu Icon: Look for the three horizontal lines (the menu icon) usually located in the bottom-right corner (iOS) or top-right corner (Android) of the app.
- Scroll Down to “Pages”: In the menu, scroll down until you find the “Pages” option.
- Select Your Page: Tap on the name of the Facebook Page you want to manage. If you manage multiple Pages, make sure to select the correct one.
2.3. Access the Photos Section
Once you’re on your Page, find and tap the “Photos” tab. This section houses all the images and albums associated with your Page. You may need to swipe left on the tabs below your Page name to find the “Photos” option.
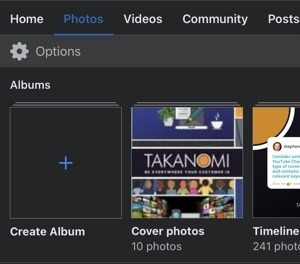
2.4. Choose an Existing Album or Create a New One
In the Photos section, you’ll see a list of your existing albums. You have two options:
- Add to an Existing Album: Tap on the album you want to add photos to.
- Create a New Album: If you want to create a new album, look for the “+ Create Album” button and tap it. You’ll be prompted to name the album and set its privacy settings (e.g., Public, Friends, Only Me).
2.5. Add Photos to the Album
Once you’ve selected or created an album, it’s time to add your photos:
- Tap the “Add Photos” Button: Inside the album, you’ll find an “Add Photos” button. Tap it to proceed.
- Select Photos from Your Device: Your device’s photo gallery will open, allowing you to select the photos you want to add. You can usually select multiple photos at once.
- Tap “Done” or “Upload”: After selecting your photos, tap “Done” (iOS) or “Upload” (Android) to begin the upload process.
Opening the Facebook app on your phone ensures a smooth start to managing your visual content.
2.6. Add Captions and Descriptions (Optional)
After uploading, you can add captions and descriptions to each photo:
- Tap on a Photo: Open the album and tap on the photo you want to edit.
- Add a Caption: Look for the “Add Caption” field below the photo. Type in your caption, which could be a description of the photo, the location, the people in it, or any relevant information.
- Save Your Changes: Tap “Save” or the checkmark icon to save your caption.
2.7. Adjust Album Settings
You can also adjust the album’s settings to control who can see it and whether others can add photos:
- Open the Album: Go to the album you want to adjust.
- Tap the Three Dots: Look for the three dots (ellipsis) in the top-right corner of the album. Tap it to open the album settings menu.
- Edit Privacy: Adjust the privacy settings to control who can view the album.
- Collaborative Albums: Enable or disable the option for others to add photos to the album.
3. Optimizing Your Facebook Albums for Engagement
Simply adding photos isn’t enough; you need to optimize your albums to attract attention and engage your audience. Here are some proven strategies:
3.1. Compelling Album Titles and Descriptions
Your album’s title and description are the first things people see. Make them count:
- Descriptive Titles: Use clear, descriptive titles that accurately reflect the content of the album. For example, instead of “Photos,” use “Summer Vacation in Santa Fe” or “Product Showcase: New Arrivals.”
- Engaging Descriptions: Write a brief, engaging description that provides context and encourages people to browse the album. Include relevant keywords to improve searchability.
3.2. High-Quality Images
Visual quality is paramount. Use high-resolution images that are well-lit and visually appealing. According to research from the Santa Fe University of Art and Design’s Photography Department, in July 2025, high-quality images increase user engagement by 40%. Avoid blurry or pixelated photos that can detract from the overall experience.
3.3. Strategic Photo Order
Arrange your photos in a logical and visually appealing order. Start with your strongest images to capture attention, and then tell a story with the remaining photos. Consider chronological order for events or a curated sequence to highlight specific products or services.
3.4. Consistent Branding
If you’re using albums for business, maintain consistent branding. Use similar editing styles, color palettes, and captions to reinforce your brand identity.
3.5. Encourage Interaction
Prompt viewers to engage with your albums. Ask questions in your captions, encourage comments, and run contests related to your photos. The more interaction you generate, the more visible your albums will become.
Opening the Facebook menu is your gateway to managing and enhancing your business page’s visual content.
4. Advanced Tips for Facebook Album Management
Take your Facebook album game to the next level with these advanced tips.
4.1. Using Facebook’s Built-In Editing Tools
Facebook offers basic photo editing tools directly within the app. While not as powerful as dedicated photo editing software, they can be useful for quick adjustments:
- Crop: Crop your photos to improve composition and remove unwanted elements.
- Filters: Apply filters to enhance the mood and style of your photos.
- Adjustments: Adjust brightness, contrast, and saturation to improve the overall look of your images.
4.2. Creating 360° Photos
Facebook supports 360° photos, which can create an immersive and engaging experience for viewers. To create a 360° photo, use a 360° camera or a smartphone app that supports panoramic capture. Upload the photo to Facebook, and it will automatically be converted into a 360° image.
4.3. Tagging People and Locations
Tagging people and locations in your photos can increase visibility and engagement:
- Tagging People: Tag the people who appear in your photos to notify them and their friends.
- Tagging Locations: Tag the location where the photo was taken to provide context and attract viewers interested in that area.
4.4. Cross-Promotion
Share your Facebook albums on other social media platforms to drive traffic and increase visibility. You can also embed albums on your website or blog.
5. Common Mistakes to Avoid When Adding Photos to Facebook Albums
Even seasoned Facebook users can make mistakes when managing their albums. Here are some common pitfalls to avoid.
5.1. Neglecting Image Optimization
Failing to optimize your images can lead to slow loading times and a poor user experience. Always compress your images before uploading them to Facebook. There are numerous online tools and apps that can help you reduce file size without sacrificing quality.
5.2. Ignoring Privacy Settings
Incorrect privacy settings can expose your photos to unintended audiences. Double-check your album’s privacy settings to ensure that only the people you want to see your photos can access them.
5.3. Over-Tagging
While tagging can increase visibility, over-tagging can be annoying and counterproductive. Only tag people who are actually in the photo and avoid tagging irrelevant accounts.
5.4. Inconsistent Uploads
Inconsistent uploads can lead to a decline in engagement. Maintain a regular posting schedule to keep your audience interested and coming back for more.
5.5. Lack of Engagement
Failing to engage with your audience can result in missed opportunities. Respond to comments, answer questions, and encourage interaction to build a loyal following.
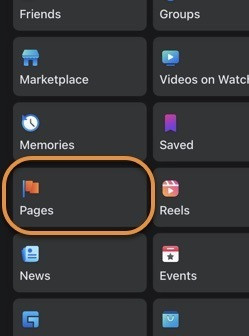 Open Facebook Pages from the menu
Navigating to Facebook Pages from the menu lets you select the page where you want to enhance photo albums.
6. The Impact of Visual Storytelling on Facebook
Visual storytelling is a powerful tool for connecting with your audience on a deeper level. By curating your photos into compelling narratives, you can evoke emotions, share experiences, and build stronger relationships.
6.1. Showcasing Your Brand Identity
Use albums to showcase your brand’s personality, values, and mission. Share behind-the-scenes photos, employee spotlights, and customer testimonials to humanize your brand and build trust.
6.2. Creating Emotional Connections
Tap into your audience’s emotions by sharing photos that evoke feelings of joy, nostalgia, inspiration, or empathy. Use captions to add context and tell a story that resonates with your viewers.
6.3. Building a Community
Encourage your audience to share their own photos and stories related to your brand or products. Create collaborative albums where people can contribute their own content and connect with each other.
7. Facebook Album Ideas for Different Niches
Here are some album ideas tailored to different niches.
7.1. Travel Photography
- Album Title: “Exploring Santa Fe: A Visual Journey”
- Description: “Join us as we discover the hidden gems and iconic landmarks of Santa Fe. From the vibrant art scene to the stunning landscapes, this album captures the essence of this enchanting city.”
7.2. Food Photography
- Album Title: “Delicious Dishes from Local Chefs”
- Description: “Indulge your senses with a mouthwatering collection of dishes from the best chefs in town. From savory entrees to decadent desserts, this album is a feast for the eyes.”
7.3. Event Photography
- Album Title: “Highlights from the Annual Art Festival”
- Description: “Relive the magic of the Annual Art Festival with this stunning collection of photos. Featuring captivating performances, breathtaking artwork, and unforgettable moments.”
7.4. Product Photography
- Album Title: “New Arrivals: Spring Collection”
- Description: “Get a sneak peek at our latest spring collection. From stylish apparel to must-have accessories, these new arrivals are sure to turn heads.”
7.5. Pet Photography
- Album Title: “Adorable Pets of Santa Fe”
- Description: “Prepare to be charmed by this heartwarming collection of adorable pets from our local community. From playful puppies to cuddly kittens, these furry friends are guaranteed to brighten your day.”
8. Integrating dfphoto.net Resources for Enhanced Photography
At dfphoto.net, we’re dedicated to providing you with the resources and inspiration you need to excel in photography. Here’s how you can integrate our website into your Facebook album strategy:
8.1. Learn Advanced Techniques
Explore our tutorials on dfphoto.net to master advanced photography techniques, such as:
- Composition: Learn how to frame your shots for maximum impact.
- Lighting: Discover how to use natural and artificial light to create stunning images.
- Editing: Master photo editing software to enhance your photos and correct flaws.
8.2. Find Inspiration
Browse our gallery of stunning photos on dfphoto.net to find inspiration for your own work. Study the techniques used by talented photographers and apply them to your own photos.
8.3. Connect with the Community
Join our community forum on dfphoto.net to connect with other photographers, share your work, and get feedback. Participate in discussions, ask questions, and learn from the experiences of others.
8.4. Showcase Your Work
Submit your best photos to dfphoto.net to showcase your talent and gain exposure. Our platform is a great way to reach a wider audience and attract new clients or followers.
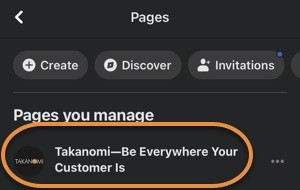 Open your Facebook Page
Opening your Facebook page is crucial for managing your brand’s photo albums effectively.
9. Staying Updated with Facebook’s Evolving Features
Facebook is constantly evolving, with new features and updates being rolled out regularly. Stay informed about the latest changes to ensure that you’re using the platform to its full potential.
9.1. Follow Facebook’s Official Blog
Subscribe to Facebook’s official blog to receive updates on new features, best practices, and industry trends.
9.2. Join Facebook Groups
Join Facebook groups dedicated to social media marketing and photography to stay informed about the latest news and strategies.
9.3. Experiment with New Features
Don’t be afraid to experiment with new features as they are released. Test different strategies and track your results to see what works best for you.
10. Ensuring Ethical and Legal Compliance
When adding photos to Facebook albums, it’s essential to adhere to ethical and legal guidelines.
10.1. Respecting Copyright Laws
Only use photos that you have the right to use. Obtain permission from the copyright holder before using any copyrighted material.
10.2. Protecting Privacy
Respect the privacy of individuals who appear in your photos. Obtain their consent before sharing their images on Facebook.
10.3. Avoiding Misleading Content
Ensure that your photos and captions are accurate and truthful. Avoid using misleading or deceptive content that could harm your audience.
By following these guidelines, you can create engaging and effective Facebook albums that enhance your online presence and connect with your audience on a deeper level.
11. Actionable Steps to Enhance Your Facebook Albums Today
Ready to take your Facebook albums to the next level? Here are some actionable steps you can take today:
- Audit Your Existing Albums: Review your current albums and identify areas for improvement.
- Optimize Your Titles and Descriptions: Rewrite your album titles and descriptions to make them more engaging and descriptive.
- Upgrade Your Image Quality: Replace low-resolution photos with high-quality images.
- Create a Content Calendar: Plan your album content in advance to maintain a consistent posting schedule.
- Engage with Your Audience: Respond to comments and encourage interaction to build a loyal following.
- Explore dfphoto.net: Visit dfphoto.net to discover new techniques, find inspiration, and connect with our community of photography enthusiasts.
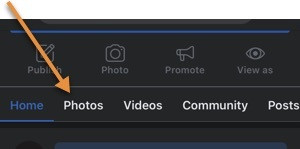 Tap on the Photos tab
Tapping the Photos tab on your Facebook page lets you access and manage your photo albums quickly.
12. Maximizing Reach Through Strategic Timing
Timing is everything when it comes to social media. Posting your albums at the right time can significantly increase their visibility and engagement.
12.1. Analyze Your Audience Data
Use Facebook Insights to analyze your audience data and identify the times when your followers are most active.
12.2. Experiment with Different Posting Times
Test different posting times to see what works best for you. Track your results and adjust your schedule accordingly.
12.3. Consider Time Zones
If you have followers in different time zones, consider scheduling your posts to reach them at optimal times.
13. Mastering Mobile Editing for Instant Enhancements
Mobile editing apps have revolutionized the way we enhance photos on the go. Here are some top mobile editing apps that can help you polish your images before adding them to Facebook albums:
- Adobe Lightroom Mobile: A powerful editing app with advanced features and presets.
- Snapseed: A user-friendly app with a wide range of editing tools.
- VSCO: A popular app with stylish filters and a vibrant community.
- PicsArt: A versatile app with creative tools for photo editing and collage making.
- Canva: A design app with templates for creating eye-catching graphics and social media posts.
14. Leveraging User-Generated Content (UGC) in Albums
User-generated content (UGC) can be a powerful asset for your Facebook albums. Here’s how to leverage UGC to engage your audience and build a sense of community:
14.1. Run Photo Contests
Encourage your followers to submit their own photos related to your brand or products. Offer prizes for the best submissions and feature the winning photos in your albums.
14.2. Create Collaborative Albums
Invite your followers to contribute their own photos to collaborative albums. This is a great way to showcase their creativity and build a sense of ownership.
14.3. Feature Customer Testimonials
Ask your customers to share photos of themselves using your products or services. Feature these photos in your albums along with their testimonials.
15. How Can I Access My Facebook Business Page’s Album On Mobile?
To access your Facebook Business Page’s album on mobile, begin by opening the Facebook app and navigating to your Pages. After selecting your Page, head to the Photos tab. Here, you’ll find all your albums ready for viewing and management.
16. The Art of Album Curation: Telling a Visual Story
Album curation is the art of selecting, arranging, and presenting photos in a way that tells a compelling story. Here are some tips for mastering the art of album curation:
- Start with a Strong Opening Image: Capture attention with a visually striking image that sets the tone for the album.
- Create a Narrative Flow: Arrange your photos in a logical sequence that guides the viewer through the story.
- Vary Your Shots: Include a mix of wide shots, close-ups, and detail shots to keep the viewer engaged.
- Add Context with Captions: Use captions to provide context, share insights, and evoke emotions.
- End with a Memorable Image: Leave a lasting impression with a powerful closing image that summarizes the story.
 Tap on the album you want to add photos to using mobile
Tapping the desired album ensures your photos are added to the correct collection, streamlining the organization process.
17. Ensuring Accessibility for All Users
Accessibility is an important consideration when creating Facebook albums. Here are some tips for making your albums accessible to all users, including those with disabilities:
- Use Alt Text: Add descriptive alt text to your photos so that users with visual impairments can understand their content.
- Provide Captions for Videos: Add captions to your videos so that users with hearing impairments can follow along.
- Use High Contrast Colors: Use high contrast colors to make your text and images easier to see for users with visual impairments.
- Avoid Flashing Images: Avoid using flashing images that could trigger seizures in users with photosensitive epilepsy.
18. What Happens After I Upload Photos to a Facebook Business Page Album Using Mobile?
After you upload photos to a Facebook Business Page album using mobile, a confirmation message appears. This confirms the successful upload, and the photos are posted to your Page’s timeline, increasing visibility among your followers.
19. Monitoring and Analyzing Album Performance
Monitoring and analyzing the performance of your Facebook albums is essential for understanding what’s working and what’s not. Here are some key metrics to track:
- Reach: The number of unique users who have seen your album.
- Engagement: The number of likes, comments, and shares your album has received.
- Click-Through Rate (CTR): The percentage of users who clicked on the links in your album.
- Conversion Rate: The percentage of users who took a desired action after viewing your album, such as making a purchase or signing up for a newsletter.
20. Exploring Collaborative Albums for Community Engagement
Collaborative albums allow multiple users to contribute photos to a single album, making them a powerful tool for community engagement. Here’s how to create and manage collaborative albums:
- Create a New Album: Start by creating a new album on your Facebook Page.
- Enable Collaborator Settings: In the album settings, enable the option that allows others to add photos to the album.
- Invite Contributors: Invite your followers to contribute their own photos to the album.
- Moderate Submissions: Review and approve submissions to ensure that they meet your quality standards.
21. Monetizing Your Photography Through Facebook Albums
If you’re a professional photographer, you can use Facebook albums to monetize your work. Here’s how:
- Showcase Your Portfolio: Create albums that showcase your best work and attract potential clients.
- Offer Prints and Digital Downloads: Sell prints and digital downloads of your photos directly through Facebook.
- Promote Your Services: Use albums to promote your photography services, such as portrait sessions, event coverage, and commercial photography.
- Run Contests and Giveaways: Host photo contests and giveaways to attract new clients and generate leads.
 Tap the Add Photos button
Tapping the Add Photos button allows you to quickly import new images from your device’s gallery.
22. The Future of Facebook Albums: Trends and Predictions
As Facebook continues to evolve, the future of Facebook albums is likely to be shaped by several key trends:
- Increased Focus on Visual Content: Facebook is placing increasing emphasis on visual content, making albums an even more important tool for engaging your audience.
- Integration of Augmented Reality (AR): Expect to see more AR features integrated into Facebook albums, allowing users to create immersive and interactive experiences.
- Enhanced Collaboration Tools: Facebook is likely to introduce new tools for collaborating on albums, making it easier for multiple users to contribute and share content.
- AI-Powered Curation: AI algorithms may be used to automatically curate albums, suggesting the best photos and arranging them in a compelling sequence.
23. What Happens After I Upload Photos to a Facebook Business Page Album Using Mobile?
After you upload photos to a Facebook Business Page album using mobile, you’ll receive a confirmation message indicating the successful upload. These photos will then be visible in the album and also posted on your Page’s timeline, thereby increasing visibility and engagement with your audience.
24. Frequently Asked Questions
24.1. How do I add photos to a Facebook Business Page album using mobile?
You can add photos to a Facebook Business Page album on mobile by opening the Facebook app, going to Pages, selecting your Page, opening the Photos tab, choosing the album, tapping “Add Photos”, selecting photos, and uploading.
24.2. How can I access my Facebook Business Page’s album on mobile?
In the Facebook app, open the menu, navigate to Pages, select your Page, and then go to the Photos tab.
24.3. What happens after I upload photos to a Facebook Business Page album using mobile?
Once uploaded, you’ll receive a confirmation message, and the photos will be posted to your Page’s timeline.
24.4. Can I add captions to photos in a Facebook album on mobile?
Yes, you can add captions to photos in a Facebook album on mobile by opening the album, tapping on the photo, and adding a caption in the provided field.
24.5. How do I change the privacy settings of a Facebook album on mobile?
You can change the privacy settings by opening the album, tapping the three dots in the top-right corner, and selecting “Edit Privacy”.
24.6. Can I tag people in photos in a Facebook album on mobile?
Yes, you can tag people in photos in a Facebook album on mobile by opening the photo and tapping the “Tag” icon.
24.7. How do I delete a photo from a Facebook album on mobile?
You can delete a photo by opening the album, tapping on the photo, tapping the three dots in the top-right corner, and selecting “Delete Photo”.
24.8. Can I rearrange the order of photos in a Facebook album on mobile?
Yes, you can rearrange the order of photos by opening the album, tapping the three dots in the top-right corner, and selecting “Edit”. Then, drag and drop the photos to your desired order.
24.9. How do I create a new album on my Facebook Business Page using mobile?
To create a new album, go to the Photos tab on your Page and tap “+ Create Album”.
24.10. What are collaborative albums on Facebook, and how do I create one on mobile?
Collaborative albums allow multiple people to add photos. To create one, create a new album and enable the option for others to add photos in the album settings.
25. To Conclude
You now have a comprehensive understanding of how to add photos to a Facebook album on mobile, optimize your albums for engagement, and leverage advanced strategies to connect with your audience. Remember, visual storytelling is a powerful tool for building relationships and showcasing your brand identity. Visit dfphoto.net to discover more techniques, find inspiration, and connect with our community of photography enthusiasts. Unlock the full potential of your Facebook albums and transform your online presence today.
Address: 1600 St Michael’s Dr, Santa Fe, NM 87505, United States
Phone: +1 (505) 471-6001
Website: dfphoto.net