In today’s digital age, email signatures are more than just closing remarks; they’re a crucial part of your professional identity. Adding a photo to your Outlook signature can significantly enhance your personal branding, making your emails more memorable and creating a stronger connection with recipients. Whether you’re aiming to personalize your business communications or simply want to add a friendly touch to your emails, incorporating a photo is a powerful step. This guide will walk you through the process of adding a photo to your signature in Outlook, ensuring your emails leave a lasting impression.
Step-by-Step Guide to Adding a Photo to Your Outlook Signature
-
Open Outlook and Access Signature Settings:
Begin by launching your Outlook application. To access the signature settings, start composing a new email message. In the message window, locate the Message menu. Depending on your Outlook window size and whether you are composing, replying, or forwarding, the Signature button may be positioned in slightly different locations within this menu. Click on Signature and then select Signatures from the dropdown menu. This action will open the Signatures and Stationery dialog box, where you can manage your email signatures. -
Create a New Signature (or Edit an Existing One):
Within the Signatures and Stationery dialog box, you’ll see options to manage your signatures. If you’re creating a signature for the first time or want to create a new one specifically with a photo, click on New. In the New Signature dialog box that appears, type a descriptive name for your new signature. This name will help you identify your signature later, especially if you plan to create multiple signatures for different purposes or email accounts. Alternatively, if you want to add a photo to an existing signature, select the signature you wish to modify from the Select signature to edit list. -
Compose Your Signature and Insert the Photo:
In the Edit signature section, you can now compose the text part of your email signature. This typically includes your name, title, company, contact information, and website. Outlook provides basic formatting options such as font style, size, color, and text alignment to customize your signature text. To insert your photo, look for the Image icon (it resembles a picture) within the formatting toolbar above the Edit signature box. Click this Image icon. This will open the Insert Picture dialog box, allowing you to browse your computer for the photo you want to include in your signature. Navigate to the location of your image file, select it, and click Insert. Outlook will then embed the selected photo into your signature within the Edit signature box.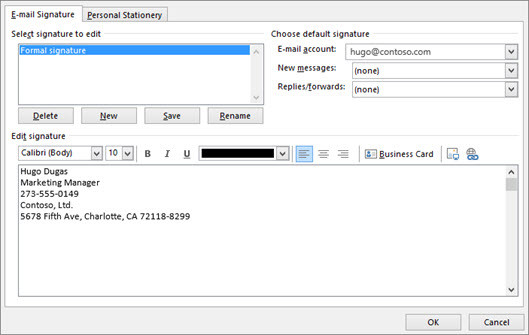 Type a new signature to use in your email
 -
Resize and Adjust Your Photo (Optional but Recommended):
Once your photo is inserted, it might appear larger or smaller than desired. To resize your image, right-click on the photo within the Edit signature box. From the context menu, choose Picture. This will open the Format Picture dialog box. Select the Size tab. Here, you can adjust the height and width of your photo. To maintain the original proportions of your image and prevent distortion, ensure the Lock aspect ratio checkbox is checked before making adjustments. Experiment with different sizes until you achieve the desired look for your signature. Click OK to apply the resizing changes. -
Configure Default Signature Settings:
After composing your signature and inserting your photo, configure when Outlook should automatically add this signature to your emails. In the Choose default signature section, you will find dropdown menus for E-mail account, New messages, and Replies/forwards.- In the E-mail account dropdown, select the specific email account you want to associate with this signature. This is particularly useful if you manage multiple email accounts in Outlook and want different signatures for each.
- For New messages, choose your newly created signature from the dropdown if you want it to be automatically added to all new emails you compose. If you prefer not to automatically add a signature to new messages, select (none).
- Similarly, for Replies/forwards, you can choose to automatically include your signature in reply and forwarded messages by selecting it from the dropdown. If you prefer not to automatically include a signature in replies and forwards, leave it as (none), which is the default option.
-
Save Your Signature and Insert Manually if Needed:
Once you have configured all settings to your preference, click OK to save your new signature and close the Signatures and Stationery dialog box. Note that if you were working on a new email message when creating the signature, Outlook will not automatically add the newly created signature to that particular message, even if you set it as the default for new messages. For that specific email, you’ll need to manually insert the signature. To do this, in the message window, go to the Message tab, click on Signature, and then choose your newly created signature from the dropdown menu. For all subsequent new emails, your signature will be automatically added based on your default settings.
Conclusion
Adding a photo to your Outlook signature is a straightforward process that can significantly enhance your email communication. By following these step-by-step instructions, you can create a professional and personalized email signature that helps you stand out and build stronger connections with your contacts. Take advantage of this feature to reinforce your personal or brand identity with every email you send.