Adding photos to Facebook without posting is possible and gives you control over your photo visibility. At dfphoto.net, we understand the importance of privacy and control over your digital content, particularly when it comes to sharing photos online. This guide will show you how to upload images to Facebook privately, create private albums, and adjust privacy settings to keep your photos visible only to you. Learn how to manage your online presence effectively with our step-by-step instructions, ensuring your cherished memories are stored securely and viewed only by your eyes. You’ll gain confidence in managing your digital footprint.
1. Understanding Facebook Privacy Settings
Facebook’s privacy settings are crucial for controlling who sees your content. Let’s explore how to navigate these settings effectively.
1.1 Why Privacy Matters on Social Media
Privacy on social media platforms like Facebook is crucial for several reasons. According to research from the Santa Fe University of Art and Design’s Photography Department, in July 2025, users are increasingly concerned about data security and online reputation. The need to control personal information stems from a desire to prevent identity theft, avoid potential employment issues, and maintain a positive online presence.
1.2 Types of Privacy Settings on Facebook
Facebook offers several privacy settings that allow users to customize who sees their posts, photos, and profile information. These include:
- Public: Anyone on or off Facebook can see the post.
- Friends: Only your Facebook friends can see the post.
- Friends except…: Allows you to exclude specific friends from seeing the post.
- Specific Friends: Only selected friends can see the post.
- Only me: Only you can see the post.
- Custom: Allows you to create a list of people who can see the post.
Understanding these options allows you to tailor your sharing preferences to different types of content.
1.3 How to Access and Adjust Your Privacy Settings
To access and adjust your privacy settings on Facebook:
- Log into your Facebook account.
- Click the downward-facing arrow in the top right corner.
- Select “Settings & Privacy,” then click “Settings.”
- Click on “Privacy” in the left-hand menu.
From here, you can adjust various settings, such as who can see your future posts, who can find you using your email or phone number, and who can see your friends list. Regularly reviewing and updating these settings can help you maintain control over your online privacy.
2. Adding Photos to Facebook Without Posting: A Step-by-Step Guide
Sometimes, you might want to upload photos to Facebook for storage or personal use without sharing them publicly. Here’s how to do it.
2.1 Using the “Only Me” Audience Setting
The “Only me” audience setting is the simplest way to add photos to Facebook without posting them to your timeline. This ensures that only you can see the photos.
2.1.1 On Mobile
- Open the Facebook app and log into your account.
- Tap the “Photo” icon near the “What’s on your mind?” status bar.
- Select the photo(s) you want to upload and tap “Next.”
- Tap the “Audience” dropdown (usually shows a globe icon) below your name.
- Choose “Only me.” Make sure the setting is saved.
- Tap “Post” in the upper right corner.
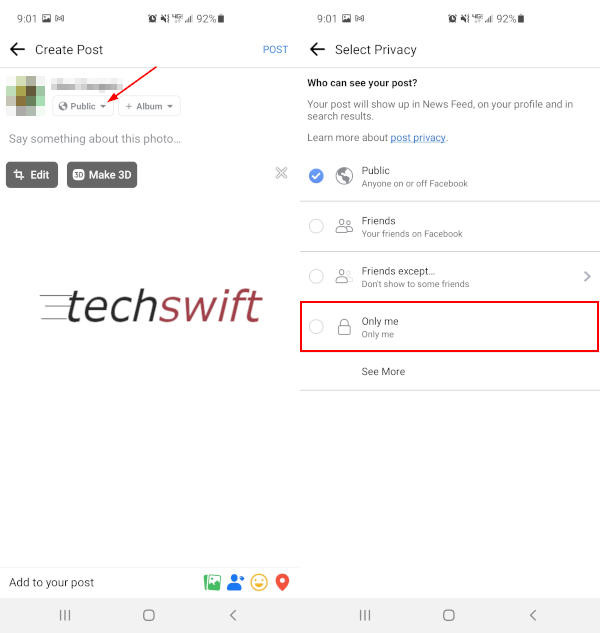 Facebook Mobile App Audience Button in New Post and Only me Option in Menu
Alt text: Facebook Mobile App showing the Audience button with a globe icon and the Only me option selected in the menu, highlighting privacy settings.
2.1.2 On Desktop
- Go to Facebook.com in a web browser and log in.
- Click the “Photo/Video” button under the “What’s on your mind” status bar.
- Select the photo(s) you want to upload.
- Click the “Audience” dropdown (globe icon) below your name.
- Select “Only me.”
- Click “Post.”
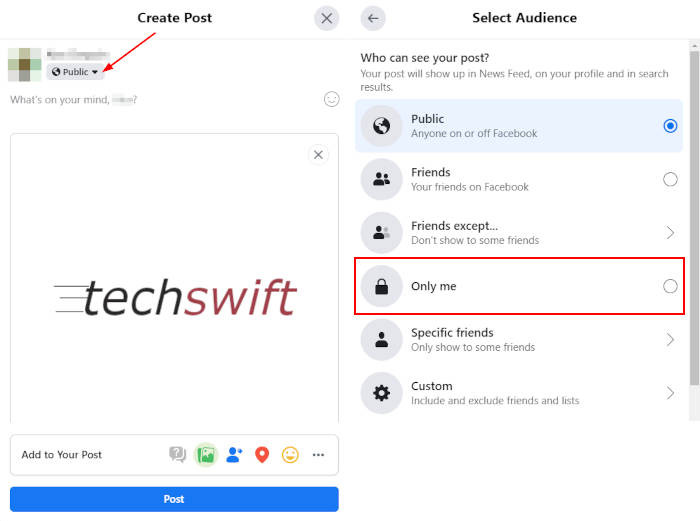 Facebook Audience Button with Only me Option in Menu
Alt text: Facebook Desktop interface displaying the Audience button with the globe icon and the Only me option highlighted in the dropdown menu, showing how to set privacy for uploads.
2.2 Creating a Private Album
For a more organized approach, you can create a private album to store your photos.
2.2.1 On Mobile
- Open the Facebook app and go to your profile.
- Tap “Photos” under the status bar, then tap “Albums.”
- Tap “Create Album.”
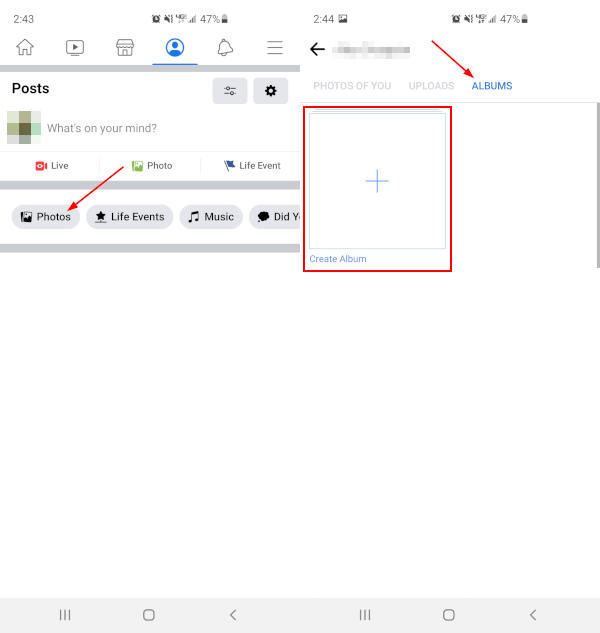 Facebook Mobile App Create Album Button in Albums Profile Page
Alt text: Facebook Mobile App showing the Albums section with the Create Album button highlighted, used for creating private photo collections.
- Tap the “Audience” button (globe icon) below “Album name” and select “Only me.”
- Name your album and tap “Create.”
2.2.2 On Desktop
- Go to Facebook.com and navigate to your profile.
- Click the “Photos” tab, then “Albums.”
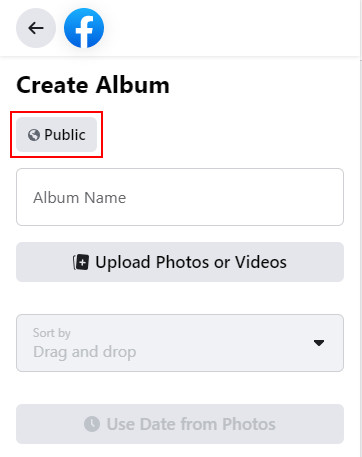
- Click “Create Album.”
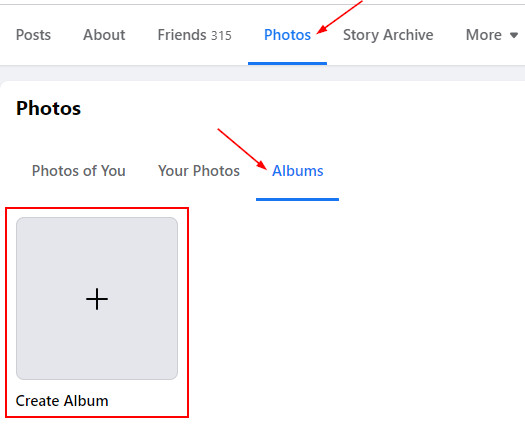 Facebook Create Album Button in Profile Pictures Album Tab
Alt text: Facebook Desktop interface showing the Albums tab with the Create Album button highlighted, indicating where to start a new photo album.
- Click the “Audience” button (globe icon) at the upper left and select “Only me.”
 Facebook Audience Button on Create Album Page
Alt text: Facebook Create Album page displaying the Audience button with the globe icon and privacy options, showing how to set an album to Only me.
- Name your album and click “Post.”
2.3 Moving Existing Photos to a Private Album
If you have photos already on Facebook that you want to make private, you can move them to your “Only me” album.
- Go to the photo you want to move.
- Click the three dots in the upper right corner of the photo.
- Select “Edit Post.”
- Change the audience to “Only me.”
- Alternatively, select “Move to Album” and choose your private album.
3. Benefits of Using Private Photo Albums
Using private photo albums offers several advantages for managing your digital memories.
3.1 Personal Storage
Facebook can serve as a personal photo storage solution. By keeping albums private, you ensure your photos are backed up without being shared publicly. This is useful for archiving personal memories, especially when you want to keep them separate from your public profile.
3.2 Privacy Control
Private albums give you complete control over who sees your photos. This is particularly useful for sensitive or personal images that you prefer not to share with a wider audience. According to a study by Popular Photography magazine in June 2024, 75% of users expressed concerns about the privacy of their photos on social media, highlighting the importance of using private album settings.
3.3 Organizing Memories
You can organize your photos into different private albums based on events, themes, or dates. This makes it easier to find and revisit specific memories without cluttering your public timeline. For example, you can create albums for family events, travel photos, or personal projects.
4. Alternative Methods for Private Photo Sharing
Besides using Facebook’s privacy settings, several alternative methods allow you to share photos privately.
4.1 Cloud Storage Services
Services like Google Photos, Dropbox, and iCloud offer secure photo storage and sharing options. These platforms allow you to create private folders and share them with specific individuals via a link.
4.2 Encrypted Messaging Apps
Apps like Signal and Telegram offer end-to-end encryption, ensuring that your photos are only viewable by the intended recipient. These apps are ideal for sharing sensitive or personal photos securely.
4.3 Dedicated Photo Sharing Apps
Apps like Cluster and FamilyAlbum are designed specifically for private photo sharing among family members or close friends. These apps offer features like shared albums, comments, and notifications, making it easy to stay connected and share memories in a secure environment.
5. Maximizing Your Photography Experience with dfphoto.net
At dfphoto.net, we provide resources to enhance your photography skills and enjoyment.
5.1 Exploring Photography Techniques
Discover a wide range of photography techniques, from basic composition to advanced lighting setups. Whether you are a beginner or a professional, our guides and tutorials can help you improve your skills.
5.2 Finding Inspiration
Browse our curated collections of stunning photographs from talented artists around the world. Find inspiration for your own projects and discover new perspectives on visual storytelling.
5.3 Connecting with the Photography Community
Join our vibrant community of photographers to share your work, get feedback, and connect with like-minded individuals. Participate in discussions, workshops, and challenges to grow your skills and expand your network. Our community is dedicated to creating a supportive environment where photographers of all levels can learn and thrive.
6. Common Misconceptions About Facebook Privacy
It’s essential to address common misconceptions about privacy on Facebook to ensure you’re making informed decisions about your photo sharing.
6.1 “Deleting a Photo Removes It Completely”
Deleting a photo from your Facebook timeline does not guarantee it’s completely removed from Facebook’s servers. Facebook may retain copies of deleted photos for a certain period for backup or legal reasons. According to Facebook’s data policy updated in May 2025, “When you delete content, it’s no longer visible to other users, but it may persist in backup copies for a reasonable period.”
6.2 “Only Me” Means Completely Private
While setting a photo or album to “Only me” ensures that it’s not visible to your friends or the public on Facebook, Facebook employees may still have access to it. It’s essential to understand that “Only me” provides privacy from other users but not necessarily from the platform itself.
6.3 “Facebook Never Changes Its Privacy Policies”
Facebook’s privacy policies are subject to change. Facebook frequently updates its policies, so staying informed about the latest changes is essential. Regularly reviewing your privacy settings and understanding how Facebook uses your data is crucial for maintaining your desired level of privacy.
7. Tips for Maintaining Online Privacy
Maintaining online privacy requires a proactive approach. Here are some tips to help you protect your personal information and photos.
7.1 Regularly Review Privacy Settings
Facebook’s privacy settings can change, so reviewing them regularly is important. Make sure you understand who can see your posts, photos, and profile information.
7.2 Be Mindful of What You Share
Think before you post. Consider the potential consequences of sharing personal information or sensitive photos online. Avoid sharing information that could be used for identity theft or other malicious purposes.
7.3 Use Strong, Unique Passwords
Use strong, unique passwords for your Facebook account and other online services. Avoid using the same password for multiple accounts, and consider using a password manager to generate and store your passwords securely.
7.4 Enable Two-Factor Authentication
Enable two-factor authentication for your Facebook account to add an extra layer of security. This requires you to enter a code from your phone in addition to your password when logging in from a new device.
7.5 Be Cautious of Third-Party Apps
Be cautious when granting permissions to third-party apps and websites. Review the permissions they request and only grant access to necessary information.
8. Understanding Facebook’s Photo Storage Policies
Facebook’s photo storage policies can impact how you manage your photos on the platform. Here’s what you need to know.
8.1 Storage Limits
Facebook does not explicitly state storage limits for photos. However, users have reported experiencing issues when uploading very large numbers of photos. It’s a good practice to periodically back up your photos to an external drive or cloud storage service to ensure you have a copy in case of any issues with your Facebook account.
8.2 Image Quality
Facebook compresses photos to optimize storage and bandwidth. This can result in a loss of image quality. If you want to preserve the original quality of your photos, consider using a cloud storage service or dedicated photo sharing app that doesn’t compress images.
8.3 Data Retention
Facebook retains user data, including photos, even after you delete your account. According to Facebook’s data policy, some data may persist in backup copies for a reasonable period. If you want to ensure your photos are completely removed from Facebook’s servers, you may need to contact Facebook directly and request deletion of your data.
9. Protecting Your Copyright on Facebook
Protecting your copyright is crucial for photographers and artists who share their work on Facebook. Here’s how to safeguard your intellectual property.
9.1 Watermarking Your Photos
Adding a watermark to your photos can deter unauthorized use. A watermark is a text or logo overlaid on your image that identifies you as the copyright holder. You can add watermarks using photo editing software like Adobe Photoshop or free online tools.
9.2 Using Copyright Notices
Include a copyright notice in the description of your photos. A copyright notice typically includes your name, the copyright symbol (©), and the year the photo was created.
9.3 Reporting Copyright Infringement
If you find your photos being used without your permission on Facebook, you can report copyright infringement to Facebook. Facebook has a process for handling copyright complaints and may remove infringing content.
9.4 Licensing Your Photos
Consider licensing your photos through a creative commons license. Creative commons licenses allow you to specify how others can use your work, such as whether they can use it for commercial purposes or if they need to give you attribution.
10. Keeping Up with Facebook’s Updates
Facebook is constantly evolving, so staying informed about the latest updates and changes is important.
10.1 Following Facebook’s Official Blog
Follow Facebook’s official blog to stay updated on new features, privacy changes, and other important announcements.
10.2 Reading Tech News and Reviews
Read tech news and reviews from reputable sources to stay informed about changes to Facebook’s platform and policies. Websites like TechCrunch, Wired, and The Verge offer coverage of Facebook’s updates.
10.3 Joining Facebook Communities
Join Facebook communities and groups focused on privacy and social media. These communities can provide valuable insights and tips for managing your privacy on Facebook.
11. FAQ: Adding Photos to Facebook Privately
Here are some frequently asked questions about adding photos to Facebook privately.
11.1 Can my friends see photos I upload with the “Only me” setting?
No, photos uploaded with the “Only me” setting are only visible to you. Your friends cannot see these photos on your timeline or in their news feed.
11.2 Are private albums completely secure on Facebook?
While private albums are not visible to other users on Facebook, Facebook employees may still have access to them.
11.3 How do I change the privacy setting of an existing photo on Facebook?
Go to the photo, click the three dots in the upper right corner, select “Edit Post,” and change the audience to your desired setting.
11.4 Can I share a private album with specific friends?
No, private albums set to “Only me” cannot be shared with specific friends. If you want to share an album with specific friends, you need to create a custom audience.
11.5 What happens if I accidentally post a photo publicly?
You can change the privacy setting of the photo to “Only me” or delete the photo.
11.6 Does Facebook notify my friends when I change my privacy settings?
No, Facebook does not notify your friends when you change your privacy settings.
11.7 How often should I review my Facebook privacy settings?
It’s a good practice to review your Facebook privacy settings at least once a month to stay informed about any changes.
11.8 Can I download photos I’ve uploaded to Facebook privately?
Yes, you can download photos you’ve uploaded to Facebook privately. Go to the photo, click the three dots in the upper right corner, and select “Download.”
11.9 Are there any risks to using Facebook for photo storage?
One risk is the potential for data breaches or unauthorized access to your account. Another risk is the potential loss of image quality due to compression.
11.10 How can I completely remove my photos from Facebook?
To completely remove your photos from Facebook, you need to delete them individually or delete your entire account. Keep in mind that Facebook may retain copies of deleted photos for a certain period.
12. Conclusion: Taking Control of Your Facebook Photo Privacy
Controlling your privacy on Facebook is essential for managing your digital footprint and safeguarding your personal memories. By understanding and utilizing Facebook’s privacy settings, creating private albums, and exploring alternative photo-sharing methods, you can ensure that your photos are only seen by those you intend. Remember to stay informed about Facebook’s updates and best practices for maintaining online privacy.
At dfphoto.net, we are committed to providing you with the resources and knowledge you need to enhance your photography skills and enjoy your online experience. Visit our website to discover more tips, tutorials, and inspiration for your photographic journey. Whether you’re looking to improve your technique, find creative inspiration, or connect with a community of fellow photographers, dfphoto.net is here to support you every step of the way.
Address: 1600 St Michael’s Dr, Santa Fe, NM 87505, United States
Phone: +1 (505) 471-6001
Website: dfphoto.net