Sending photos via email from your iPhone is a straightforward process, whether you’re sharing vacation snapshots with family, sending work-related images, or simply want to include a visual in your message. The iPhone’s Mail app makes it easy to attach photos, videos, and even documents to your emails. This guide will walk you through the simple steps to enhance your emails with visual content directly from your iPhone.
Attaching a photo to your email can be done in several ways, giving you flexibility based on where your photo is stored or how you want to capture it. Let’s explore the different methods to add photos to your emails on your iPhone.
Attaching Photos, Videos, and Documents from Files or Photos App
The most common way to attach a photo to an email on your iPhone is by accessing your existing media files. This includes photos and videos saved in your Photos app, as well as documents stored in your Files app. Here’s how to do it:
-
Open the Mail App: Start by launching the Mail app on your iPhone. This is the blue icon with a white envelope, typically found on your home screen.
-
Compose a New Email or Reply: Tap the compose button (usually a pencil icon in the bottom right corner) to start a new email. Alternatively, you can reply to an existing email if you wish to add a photo to your response.
-
Position the Cursor: In the body of your email, tap where you want to insert the attachment. This will bring up the keyboard and the formatting toolbar above it.
-
Access the Attachment Options: Look for the Expand Toolbar button above the keyboard. It’s usually a small arrow pointing upwards or a thin line. Tap this button to reveal more options. Then, tap the “+” icon which represents the attachment function.
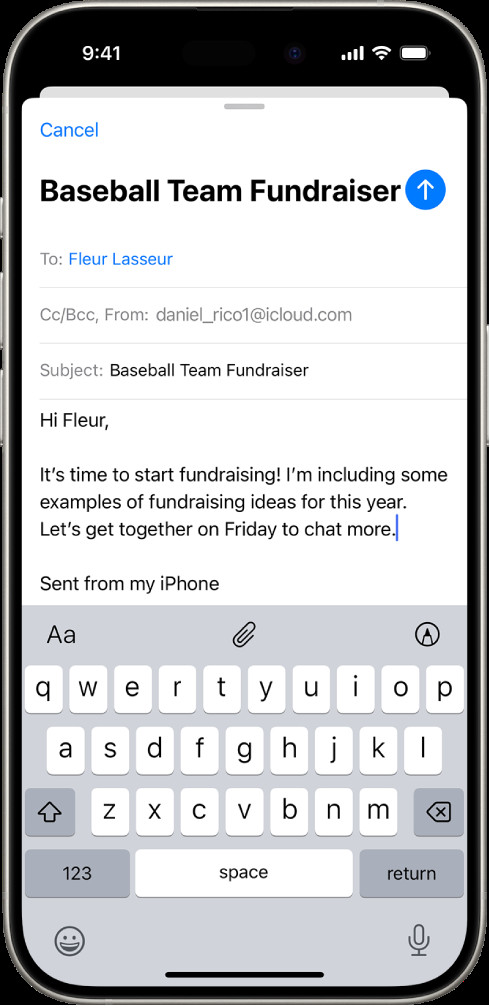 Draft email composition screen on iPhone with attachment options highlighted above the keyboard
 -
Choose Your File Source:
- To Attach a Document from Files: Tap the Attach File icon. This usually looks like a paperclip. This will open the Files app interface where you can browse through your stored documents. You can navigate through “Recent”, “Shared”, or “Browse” at the bottom of the screen to find your desired file. Tap on the file to attach it.
- To Attach a Photo or Video from Photos: Tap the Photo or Video icon. This will open your Photos app library. Select the photo or video you wish to attach. You can select multiple items if needed. Once you’ve made your selection, tap Done to return to your email draft.
Attaching Photos Directly from Camera: Taking a New Photo
Sometimes, you might want to take a photo right at the moment and immediately attach it to your email. The iPhone Mail app allows you to do this seamlessly:
- Follow Steps 1-4 above to get to the attachment options in your email draft.
- Select “Take Photo or Video” Option: Tap the Camera icon. This option will launch your iPhone’s camera.
- Take a Photo or Video: Capture your desired photo or video.
- Use or Retake: After taking the photo or video, you’ll have two options:
- Use Photo/Video: If you are satisfied with your capture, tap Use Photo or Use Video to insert it directly into your email as an attachment.
- Retake: If you are not happy with the result, tap Retake to take another shot.
Scanning and Attaching Documents as PDF
For sending physical documents like contracts, receipts, or notes, you can use your iPhone to scan them and attach them as PDF files directly to your email:
-
Follow Steps 1-4 from the first section to access the attachment options in your email draft.
-
Choose “Scan Document” Option: Tap the Scan Document icon. This will activate your iPhone’s document scanning feature.
-
Scan Your Document: Position your iPhone camera over the document you want to scan. The iPhone will automatically detect the document edges and capture the page. You can also manually tap the shutter button or a volume button to capture. Use the flash icon to toggle flash settings if needed.
An iPhone screen displaying the document scanning feature, with options to adjust flash and capture the document.
-
Review and Save Scan: After scanning, you can review the scan. Tap Retake to rescan the page or Keep Scan if you are satisfied. For multi-page documents, scan additional pages. Once done, tap Save.
-
Edit the Scanned Document (Optional): After saving, the scanned document will be attached to your email. You can tap on the scan to make edits such as:
- Crop: Adjust the boundaries of the scan using the crop tool.
- Filters: Apply different filters to enhance readability.
- Rotate: Rotate the image if needed.
- Delete: Delete the scan if you need to redo it.
Creating and Attaching a Drawing
For situations where you need to illustrate an idea or add a quick sketch, the iPhone Mail app lets you create a drawing and attach it to your email:
-
Follow Steps 1-4 from the first section to get to the attachment options.
-
Access Markup Toolbar: Tap the Markup icon to display the drawing toolbar.
-
Create Your Drawing: Choose a drawing tool (pen, marker, pencil) and a color from the toolbar. Use your finger to draw directly on the screen.
A view of the iPhone Markup toolbar, highlighting the drawing tools available for creating an attachment in email.
-
Finish and Insert Drawing: Once you’re done with your drawing, tap Done, then tap Insert Drawing. Your drawing will be attached to the email. You can tap on the drawing to resume editing if necessary.
Important Note on File Size: Be mindful of attachment file sizes. If your attachments are too large, you might encounter limitations from your email provider. For large files, the Mail app may offer to use Mail Drop, a service that allows you to send large attachments via iCloud. Follow the on-screen instructions if this occurs.
Adding photos and attachments to emails on your iPhone enhances your communication and allows you to share more than just words. Whether it’s photos, documents, scans, or drawings, the iPhone Mail app provides you with the tools to easily include visual and file attachments in your emails.