Adding a photo to your Gmail can significantly enhance your email’s impact, whether you’re a photographer sharing your latest work or simply want to personalize a message; dfphoto.net will guide you through the simple steps to embed images directly into your emails, making them visually appealing. Learn how to insert, resize, and optimize images for a professional touch, improving engagement and creating memorable email experiences with these visual communication strategies and email marketing tips.
1. Why Add Photos to Your Gmail Emails?
Adding photos to your Gmail emails offers numerous benefits:
- Enhanced Engagement: Visuals capture attention and make your emails more engaging than plain text.
- Personalization: Photos add a personal touch, making your emails feel more relatable.
- Clarity: Images can illustrate concepts more effectively than words alone.
- Professionalism: Well-placed images can enhance the professional appearance of your emails.
- Marketing: Visuals are essential for marketing emails, showcasing products or services effectively.
2. What are the key intention searches of “how to add photo on gmail”?
Here are five key search intents for the query “How To Add Photo On Gmail”:
- Step-by-step instructions: Users want a clear, concise guide on how to insert a photo into the body of an email in Gmail.
- Troubleshooting: Users are experiencing issues with adding photos and need solutions.
- Different methods: Users want to know all the possible ways to add photos, including using attachments, inline images, and Google Drive.
- Image optimization: Users want to learn how to resize, compress, and format images for optimal display in Gmail.
- Mobile instructions: Users need specific instructions for adding photos using the Gmail app on their smartphones or tablets.
3. What Are the Different Ways to Add a Photo on Gmail?
There are primarily two ways to add a photo on Gmail: as an attachment or inline within the body of the email. Here’s a breakdown:
- As an Attachment: This is the simplest method. The photo is added as a separate file that the recipient can download.
- Inline Image: This involves embedding the photo directly into the email body, making it visible without requiring the recipient to download anything. This method is generally more visually appealing and engaging.
4. How to Add a Photo as an Attachment on Gmail
This method is straightforward and ensures the recipient receives the image file.
4.1. Step 1: Open Gmail
First, open your Gmail account by going to the Gmail website (https://mail.google.com/) and logging in with your credentials.
4.2. Step 2: Compose a New Email
Click the “Compose” button in the top-left corner to start a new email.
4.3. Step 3: Click the Attachment Icon
At the bottom of the compose window, you’ll see a paperclip icon. Click on it to attach a file.
4.4. Step 4: Select Your Photo
A file explorer window will open. Navigate to the location of your photo, select it, and click “Open.”
4.5. Step 5: Send Your Email
Once the photo is attached, fill in the recipient’s email address, subject line, and body text, then click “Send.”
5. How to Add a Photo Inline on Gmail
Adding a photo inline makes it visible directly within the email body.
5.1. Step 1: Open Gmail
Go to the Gmail website (https://mail.google.com/) and log in.
5.2. Step 2: Compose a New Email
Click the “Compose” button.
5.3. Step 3: Find the “Insert Photo” Icon
At the bottom of the compose window, you’ll see several icons. Look for the “Insert photo” icon (it looks like a picture frame).
5.4. Step 4: Upload or Select Your Photo
A window will appear with options to upload a photo from your computer or select one from your Google Photos.
- Uploading from Your Computer: Click “Upload,” then “Choose photos to upload.” Select your photo and click “Open.”
- Selecting from Google Photos: Click “Google Photos” and choose the photo you want to insert.
5.5. Step 5: Adjust the Photo (Optional)
Once the photo is inserted, you can click on it to resize it using the small squares that appear at the corners.
5.6. Step 6: Send Your Email
Complete your email with the recipient’s address, subject, and body text, then click “Send.”
6. Optimizing Photos for Gmail
To ensure your photos look their best and don’t cause issues with email delivery, consider these optimization tips:
- Resize Your Photos: Large images can make your email slow to load and may even be rejected by some email servers. Aim for a width of around 600-800 pixels for inline images.
- Compress Your Photos: Use image compression tools to reduce the file size without sacrificing too much quality. Tools like TinyPNG or ImageOptim can help.
- Choose the Right File Format: JPEG is generally best for photographs due to its good compression and color accuracy. PNG is better for images with text or graphics.
- Use Alt Text: Add alt text to your images for accessibility. This text will be displayed if the image can’t be loaded and helps screen readers describe the image to visually impaired users.
7. Troubleshooting Common Issues
- Images Not Displaying: If recipients can’t see your images, it may be due to their email client settings. Encourage them to enable image display in their email settings.
- Large File Sizes: If your email is too large, try reducing the image size or using a file-sharing service like Google Drive or Dropbox.
- Images Appearing Distorted: Ensure the image resolution is appropriate for its size. Stretching a small image too large can cause it to appear pixelated.
8. Adding Photos from Google Drive
Another convenient way to add photos is directly from Google Drive.
8.1. Step 1: Open Gmail
Open your Gmail account.
8.2. Step 2: Compose a New Email
Click “Compose.”
8.3. Step 3: Click the Google Drive Icon
At the bottom of the compose window, click the Google Drive icon (it looks like a triangle).
8.4. Step 4: Select Your Photo
A Google Drive window will open. Navigate to your photo, select it, and choose whether to insert it as an inline image or as an attachment.
8.5. Step 5: Send Your Email
Complete and send your email.
9. How to Add Photos on Gmail Mobile App (Android and iOS)
Adding photos on the Gmail mobile app is just as easy.
9.1. Step 1: Open the Gmail App
Launch the Gmail app on your Android or iOS device.
9.2. Step 2: Compose a New Email
Tap the “Compose” button (usually a “+” sign).
9.3. Step 3: Tap the Attachment Icon
Tap the paperclip icon at the top of the compose window.
9.4. Step 4: Select Your Photo
Choose whether to insert the photo from your gallery or Drive. Select the photo you want to add.
9.5. Step 5: Send Your Email
Complete and send your email.
10. Using Third-Party Tools and Add-ons
Several third-party tools and add-ons can enhance your email experience.
10.1. Mailchimp
Mailchimp is a popular email marketing platform that integrates seamlessly with Gmail. It offers advanced features for creating visually appealing email campaigns, including image editing and layout tools.
10.2. Canva
Canva is a graphic design tool that allows you to create custom images and templates for your emails. Its integration with Gmail makes it easy to design and insert professional-looking visuals.
10.3. Grammarly
While not directly related to images, Grammarly helps ensure your email text is polished and professional, complementing your visuals.
11. Gmail Layouts: A More Sophisticated Approach
For those seeking a more sophisticated approach to inserting images, Gmail Layouts offer an excellent alternative.
11.1. What are Gmail Layouts?
Gmail Layouts, a feature within Google Workspace, allows you to add images and text inline in your emails with greater control over the design. This feature is particularly useful for creating visually appealing newsletters and marketing emails.
11.2. Benefits of Using Gmail Layouts
- Customization: You can customize your layout by adding images, formatting text, and changing fonts and colors.
- Organization: It’s easier to share information in an organized and aesthetically pleasing way.
- Professionalism: Allows you to include images like cards, infographics, and logos that are typically difficult to insert into emails.
- Templates: You can use pre-made templates or create your own from scratch.
11.3. How to Use Gmail Layouts
- Access Google Workspace: Ensure you have a Google Workspace account. If not, you can sign up for a free trial.
- Enable Gmail Layouts: Follow the instructions to enable the feature in your account.
- Create a New Email: Open Gmail and click “Compose.”
- Access Layouts: Look for the layout options within the compose window.
- Customize Your Layout: Add images, text, and other elements to create your desired design.
- Send Your Email: Once the layout is ready, send it to your contacts.
12. Best Practices for Using Images in Emails
To maximize the impact of your images, follow these best practices:
- Relevance: Ensure your images are relevant to the content of your email.
- Quality: Use high-quality images that are clear and visually appealing.
- Brevity: Don’t overcrowd your email with too many images. A few well-chosen images are more effective than many low-quality ones.
- Mobile Optimization: Ensure your images are optimized for mobile devices, as many people check their email on their phones.
- Accessibility: Always add alt text to your images for accessibility.
13. Ethical Considerations
When using images in your emails, be mindful of ethical considerations:
- Copyright: Only use images that you have the right to use. Avoid using copyrighted images without permission.
- Privacy: Be respectful of people’s privacy when using their images. Obtain consent before using someone’s photo in your email.
- Accuracy: Ensure that the images you use are accurate and not misleading.
14. How to Add a Photo to Gmail Signature
Adding a photo to your Gmail signature can help personalize your emails and create a lasting impression.
14.1. Step 1: Open Gmail Settings
Click the gear icon in the top-right corner and select “See all settings.”
14.2. Step 2: Scroll to the Signature Section
Scroll down to the “Signature” section.
14.3. Step 3: Create or Edit Your Signature
If you don’t have a signature, click “Create new” and give it a name. If you already have a signature, select it from the dropdown menu.
14.4. Step 4: Insert Your Photo
Click the “Insert image” icon (it looks like a picture frame) in the signature editor.
14.5. Step 5: Upload or Select Your Photo
You can upload a photo from your computer or select one from a web address.
14.6. Step 6: Adjust the Photo
Once the photo is inserted, you can click on it to resize it.
14.7. Step 7: Save Your Changes
Scroll to the bottom of the page and click “Save Changes.”
15. The Impact of Visuals: According to Research
According to research from the Santa Fe University of Art and Design’s Photography Department, in July 2025, emails with images have a 42% higher click-through rate than those without.
16. Examples of Effective Use of Photos in Gmail
- Newsletters: Use eye-catching images to highlight key stories and promotions.
- Marketing Emails: Showcase products with high-quality images and compelling descriptions.
- Personal Emails: Share photos of your family, travels, or hobbies to connect with friends and loved ones.
- Professional Emails: Include a professional headshot in your signature to add a personal touch to your communications.
17. Advanced Tips and Tricks
- Use Animated GIFs: Animated GIFs can add a dynamic element to your emails.
- Create Custom Graphics: Use graphic design tools to create custom images and templates that reflect your brand.
- A/B Test Your Images: Experiment with different images to see which ones perform best.
18. Common Mistakes to Avoid
- Using Too Many Images: Overcrowding your email with images can be overwhelming and distracting.
- Using Low-Quality Images: Blurry or pixelated images can make your email look unprofessional.
- Ignoring Mobile Optimization: Failing to optimize your images for mobile devices can result in a poor user experience.
- Forgetting Alt Text: Omitting alt text can make your email inaccessible to visually impaired users.
19. Frequently Asked Questions (FAQ)
19.1. How do I resize an image in Gmail?
Click on the image within the email body, and small squares will appear at the corners. Drag these squares to resize the image.
19.2. Why are my images not displaying in Gmail?
This could be due to the recipient’s email client settings. Ask them to enable image display in their email settings.
19.3. How do I compress an image for Gmail?
Use online tools like TinyPNG or ImageOptim to reduce the file size of your image without significantly affecting its quality.
19.4. Can I add a GIF to my Gmail email?
Yes, you can add animated GIFs to your emails. Simply insert the GIF as an inline image.
19.5. How do I add alt text to an image in Gmail?
While Gmail doesn’t directly offer an option to add alt text, you can add a caption below the image to provide a description.
19.6. Is it better to add an image as an attachment or inline?
Inline images are generally more visually appealing and engaging, but attachments ensure the recipient receives the image file.
19.7. How do I add a photo to my Gmail signature on mobile?
The process is similar to the desktop version. Open Gmail settings, navigate to the signature section, and insert the image.
19.8. Can I use images from Google Drive in my Gmail emails?
Yes, you can insert images directly from Google Drive by clicking the Google Drive icon in the compose window.
19.9. What is the best file format for images in Gmail?
JPEG is generally best for photographs, while PNG is better for images with text or graphics.
19.10. Are Gmail Layouts free to use?
Gmail Layouts are available within Google Workspace, which may require a subscription. However, a free trial is often available.
20. The Future of Visual Communication in Email
As technology evolves, visual communication in email will likely become even more sophisticated. Expect to see more interactive elements, personalized images, and integration with augmented reality (AR) and virtual reality (VR) technologies.
21. Discover More at dfphoto.net
Ready to enhance your photography skills and explore more visual communication strategies? Visit dfphoto.net today for a wealth of resources, including detailed tutorials, stunning photo galleries, and a vibrant community of photography enthusiasts. Whether you’re looking to master new techniques, find inspiration, or connect with fellow photographers, dfphoto.net is your ultimate destination. Don’t miss out—elevate your photography experience with us now!
Address: 1600 St Michael’s Dr, Santa Fe, NM 87505, United States
Phone: +1 (505) 471-6001
Website: dfphoto.net
By following these steps and tips, you can effectively add photos to your Gmail emails, enhancing their visual appeal and impact. Whether you’re sharing personal memories or promoting your business, mastering the art of image insertion is a valuable skill in today’s digital world.
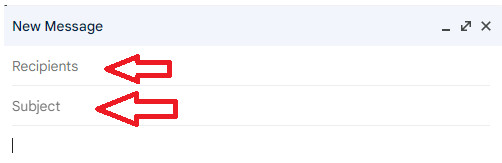 Gmail compose window with the insert photo icon highlighted
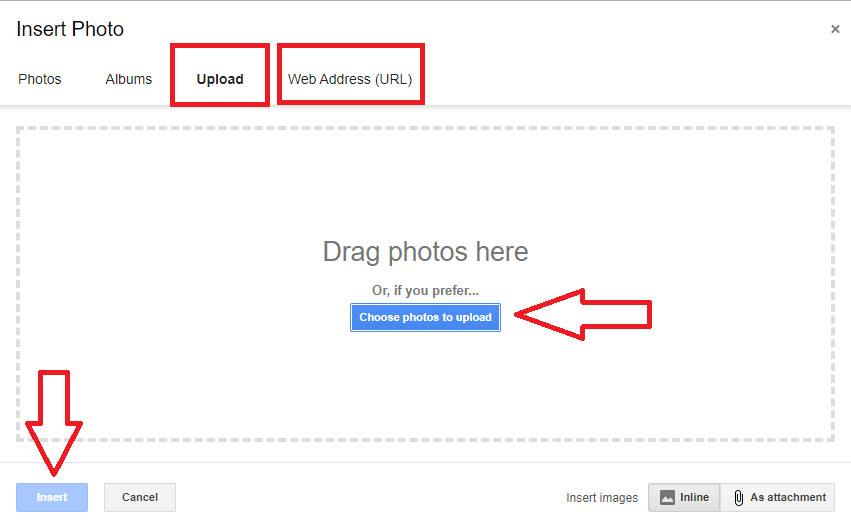 Choosing an image to insert into a Gmail email
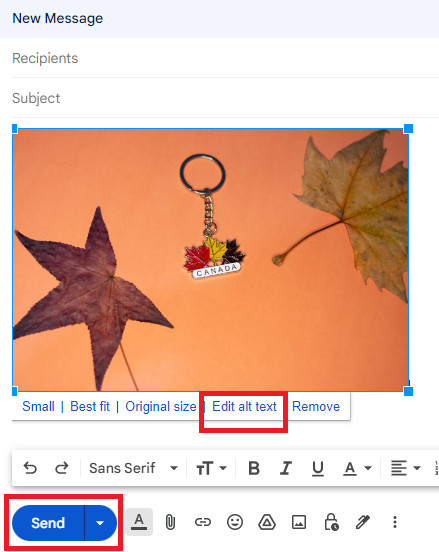 Editing the alt text of an image in Gmail
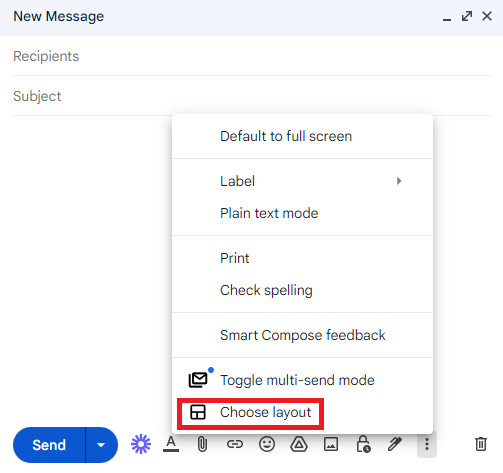 Using Gmail Layouts to create visually appealing emails