Adding names to photos helps you organize and quickly find the people and pets you cherish. This guide, brought to you by dfphoto.net, will show you exactly how to do this on your iPhone and explore creative ways to enhance your images with text. Learn how to tag faces, add captions, and create personalized memories, plus discover advanced photo editing tips to make your photos truly stand out with visual storytelling and digital artistry.
1. Why Should I Add Names to Photos?
Adding names to your photos isn’t just a fun activity; it’s a powerful organizational tool. You may ask yourself, why is this important?
Answer: Adding names simplifies photo organization and makes searching for specific people or pets much faster.
Think of it like creating a visual address book. Instead of scrolling endlessly, you can instantly find all photos featuring a specific person. Beyond convenience, it enriches your memories by preserving the context of each image. Imagine looking back years from now and instantly knowing who everyone is in your photos.
- Enhanced Searchability: Quickly locate photos of specific individuals.
- Memory Preservation: Adds valuable context to your visual memories.
- Organization: Streamlines your photo library for easier management.
2. How Do I Add Names to Photos on My iPhone?
The iPhone’s Photos app makes it easy to identify and tag people and pets in your images. Here’s a step-by-step guide:
Answer: You can add names to photos on your iPhone through the People & Pets album in the Photos app.
Steps:
- Open the Photos App: Launch the Photos app on your iPhone.
- Navigate to People & Pets: Scroll to the bottom and tap “People & Pets.” If you don’t see “People & Pets,” your phone may need to analyze your photos first. Leave your phone plugged in and locked overnight to allow this process to complete.
- Select the Person or Pet: Tap on the face you want to name.
- Add the Name: Tap “Name This Person” or “Name This Pet” and enter the appropriate name.
- Confirm: Tap “Done” to save the name.
 iPhone screen showing how to name a person in the Photos app
Alt text: Naming a person in the iPhone Photos app, showing the “Name This Person” option.
This process automatically applies the name to other photos in your library featuring the same person or pet, saving you time and effort.
3. Can I Add Names Directly From a Photo or Video?
Yes, absolutely. This is a quick and efficient way to tag individuals as you browse through your photos and videos.
Answer: Yes, you can add names directly from a photo or video by swiping up to see the details and tapping the question mark next to the person or pet.
Steps:
- Open the Photo or Video: Select the desired photo or video in the Photos app.
- Swipe Up: Swipe up on the photo or video to reveal more information.
- Identify Unnamed Faces: Look for question marks in the bottom-left corner, indicating unnamed individuals or pets.
- Tap and Name: Tap the question mark, then tap “Name This Person” and enter the name.
- Confirm: Tap “Done” to save.
 Screenshot of the iPhone Photos app showing unnamed faces with question marks
Alt text: The People & Pets collection in the iPhone Photos app, displaying grouped faces.
This method is particularly useful when you’re reviewing recent photos and want to quickly tag people as you go.
4. What If the Person or Pet Isn’t Recognized?
Sometimes, the Photos app might not automatically recognize a face. Don’t worry; you can still add them manually.
Answer: If a person or pet isn’t recognized, tap “Add People” at the bottom of the People & Pets album to manually add them.
Steps:
- Go to People & Pets: Open the Photos app and navigate to the “People & Pets” album.
- Tap Add People: Scroll to the bottom and tap “Add People.”
- Select Faces: Choose the faces you want to add from the displayed options.
- Name Them: Tap “Name This Person” or “Name This Pet” and enter the name.
- Confirm: Tap “Done.”
This ensures that even less prominent or less clear faces are correctly identified and tagged in your library.
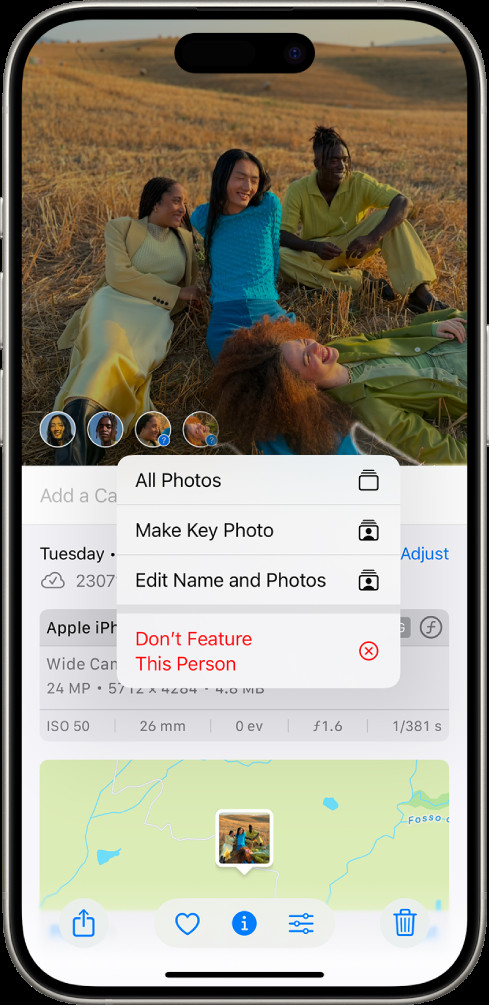
5. Can I Change the Key Photo for a Person or Pet?
The key photo is the image used to represent a person or pet in the People & Pets album. You can change it to your preferred shot.
Answer: Yes, you can change the key photo by tapping the More button, selecting Show Faces, and then choosing Make Key Photo.
Steps:
- Open People & Pets: Go to the “People & Pets” album in the Photos app.
- Select the Person or Pet: Tap on the person or pet whose key photo you want to change.
- Tap More: Tap the ellipsis button (…).
- Show Faces: Select “Show Faces.”
- Choose New Key Photo: Touch and hold the desired photo, then tap “Make Key Photo.”
This allows you to customize the appearance of your People & Pets album to best represent each individual.
6. How Do I Mark a Person or Pet as a Favorite?
Marking someone as a favorite makes it easier to find them quickly in your People & Pets album.
Answer: You can mark a person or pet as a favorite by touching and holding their photo in People & Pets and then tapping Favorite.
Steps:
- Go to People & Pets: Open the Photos app and go to the “People & Pets” album.
- Touch and Hold: Touch and hold the photo of the person or pet you want to favorite.
- Tap Favorite: Select “Favorite” from the options.
Favorited individuals will appear at the top of your People & Pets album for quick access.
7. What Should I Do If There Are Incorrect Names?
Sometimes, the Photos app might misidentify someone. It’s important to correct these errors to maintain an accurate library.
Answer: To fix incorrect names, tap the person or pet with the incorrect name, then either rename them for all items or correct a specific item.
Steps:
- Open People & Pets: Go to the “People & Pets” album.
- Select Incorrectly Named Person: Tap on the person or pet with the wrong name.
- Rename Options:
- Rename All Items: Tap the ellipsis button (…), then tap the name to edit it. Tap “Done.”
- Fix a Specific Item: Open the photo or video with the incorrect name, tap the ellipsis button (…), then tap “This is Not [Name].”
Correcting these errors ensures that your photo library remains accurate and well-organized.
8. Can I Sort People & Pets?
Sorting can help you quickly find specific individuals in your People & Pets album, especially as it grows.
Answer: Yes, you can sort People & Pets alphabetically or manually by tapping Sort and choosing Name or Custom.
Steps:
- Go to People & Pets: Open the Photos app and navigate to the “People & Pets” album.
- Tap Sort: Tap “Sort” at the top of the screen.
- Choose Sorting Method:
- Alphabetically: Tap “Name.”
- Manually: Tap “Custom,” then touch and hold a key photo and drag it to a new position.
Sorting alphabetically is useful for quickly finding someone by name, while manual sorting allows you to prioritize frequently accessed individuals.
9. How Do I Remove a Person or Pet From People & Pets?
If you no longer want a person or pet to appear in your People & Pets album, you can remove them.
Answer: To remove a person or pet, touch and hold their photo in People & Pets and then tap Hide [Name].
Steps:
- Go to People & Pets: Open the Photos app and navigate to the “People & Pets” album.
- Touch and Hold: Touch and hold the photo of the person or pet you want to remove.
- Tap Hide: Select “Hide [Name]” from the options.
Alt text: Options to hide or favorite a person in the iPhone Photos app.
This action hides the person or pet from the People & Pets album but does not delete the photos from your library.
10. How Does iCloud Photos Affect People & Pets?
iCloud Photos keeps your People & Pets album synchronized across all your Apple devices.
Answer: iCloud Photos keeps your People & Pets album up to date on all your devices.
When you name someone on your iPhone, the changes automatically appear on your iPad and Mac, ensuring a consistent and organized photo library across your ecosystem. This is particularly useful for those who use multiple Apple devices for photography and photo management.
11. What Are Some Creative Ways to Add Text to Photos?
Beyond just naming people, adding text to photos can enhance their storytelling potential.
Answer: Creative ways to add text include using photo editing apps to add captions, dates, locations, or artistic elements.
Here are a few ideas:
- Captions: Add context to your photos with short descriptions.
- Dates and Locations: Include when and where the photo was taken.
- Quotes: Overlay meaningful quotes that resonate with the image.
- Artistic Elements: Use text as a design element to enhance the visual appeal.
Software and Apps:
| App | Features |
|---|---|
| Adobe Photoshop Express | Text overlays, filters, and advanced editing tools. |
| Canva | Pre-designed templates and easy-to-use text tools for creating visually appealing graphics and images. |
| Phonto | Specifically designed for adding text to photos with a wide variety of fonts and customization options. |
12. How Can I Use Text to Tell a Story With My Photos?
Adding text can transform a simple photo into a compelling story.
Answer: Use text to provide context, emotions, or narrative elements that enhance the viewer’s understanding and connection to the photo.
Consider these techniques:
- Set the Scene: Describe the environment, atmosphere, or event.
- Share Emotions: Express the feelings captured in the photo.
- Add Dialogue: Create imagined conversations or thoughts.
- Provide Background: Offer historical or personal context.
By carefully crafting the text, you can elevate your photos from simple snapshots to engaging stories.
13. What Are Some Tips for Choosing the Right Font and Style?
The font and style you choose can significantly impact the message conveyed by your text.
Answer: Choose fonts that are legible, complement the photo’s mood, and align with the overall aesthetic.
Tips:
- Legibility: Ensure the font is easy to read at various sizes.
- Mood: Select a font that matches the photo’s tone (e.g., elegant script for a wedding photo, bold sans-serif for an action shot).
- Contrast: Use a font color that stands out against the background.
- Consistency: Maintain a consistent font style throughout your photo collection.
Experiment with different fonts and styles to find the perfect match for each photo.
14. How Do I Add Text to Photos on Android Devices?
Adding text to photos on Android devices is straightforward, thanks to various built-in features and third-party apps.
Answer: You can add text to photos on Android using the built-in Google Photos editor or third-party apps like PicsArt or Adobe Photoshop Express.
Steps Using Google Photos:
- Open Google Photos: Launch the Google Photos app on your Android device.
- Select a Photo: Choose the photo you want to edit.
- Tap Edit: Tap the “Edit” icon (usually three horizontal lines or a pencil).
- Select Text: Look for the “Text” option in the editing menu.
- Add Text: Type your desired text into the text box.
- Customize: Adjust the font, color, size, and placement of the text.
- Save: Tap “Done” or “Save” to apply the changes.
Popular Android Apps for Adding Text:
| App | Features |
|---|---|
| PicsArt | A comprehensive photo editor with a wide range of text options, stickers, and effects. |
| Adobe Photoshop Express | A mobile version of Photoshop with powerful text tools, filters, and editing capabilities. |
| Phonto | Specifically designed for adding text to photos, offering a vast library of fonts, styles, and customization options. |
| Text On Photo | A simple and user-friendly app dedicated to adding text to photos with various fonts, colors, and effects. |
| PicLab | Provides a variety of text styles, fonts, and design elements, allowing you to create unique and visually appealing text overlays. |
| Add Text to Photo | An easy-to-use app with a straightforward interface for adding text, captions, and quotes to your photos. |
| Desygner | Offers pre-designed templates and text layouts, making it easy to create professional-looking designs and add stylish text to your photos. |
| Over | A creative design app with a focus on text and graphics overlays, providing a vast selection of fonts, illustrations, and templates for enhancing your photos with text. |
These apps offer a variety of features, including font selection, color adjustments, and placement options, allowing you to create visually appealing and informative text overlays.
15. How Can I Protect My Photos With Watermarks?
Adding watermarks is essential for photographers to protect their work from unauthorized use.
Answer: You can protect your photos by adding watermarks using photo editing software or apps that allow you to overlay text or logos.
Steps:
- Choose a Watermarking Tool: Select a photo editing software or app that supports watermarking. Some popular options include Adobe Photoshop, Lightroom, and mobile apps like Watermark Photo.
- Open Your Photo: Import the photo you want to watermark into the chosen tool.
- Create Your Watermark: Design your watermark using either text (your name or website) or a logo.
- Adjust Placement and Opacity: Position the watermark in a non-intrusive yet visible area of the photo. Adjust the opacity to ensure it doesn’t distract from the image but is still noticeable.
- Save the Watermarked Photo: Save the watermarked photo to your desired location.
Watermarking helps safeguard your intellectual property and promotes your brand when your photos are shared online.
16. What Are Some Advanced Photo Editing Techniques for Adding Text?
Advanced photo editing techniques can help you seamlessly integrate text into your photos, creating visually stunning effects.
Answer: Techniques include using layer blending modes, text masks, and creative typography to enhance the visual impact of your photos.
Techniques:
- Layer Blending Modes: Use blending modes like “Multiply,” “Overlay,” or “Screen” in Photoshop to blend the text layer with the underlying image, creating unique visual effects.
- Text Masks: Create text masks by using text as a stencil to reveal parts of the underlying image. This technique adds depth and complexity to your text overlays.
- Creative Typography: Experiment with different fonts, sizes, and arrangements to create visually appealing typography designs. Use kerning and tracking to fine-tune the spacing between letters for a polished look.
- Drop Shadows and Outlines: Add subtle drop shadows or outlines to your text to make it stand out from the background. Adjust the color, size, and distance of the shadow or outline to achieve the desired effect.
- Distortion and Warping: Use distortion and warping tools in Photoshop to manipulate the shape of your text, making it follow the contours of objects in the photo or creating abstract designs.
- Gradients and Textures: Apply gradients or textures to your text to add depth and visual interest. Use clipping masks to confine the gradient or texture to the shape of the text.
These advanced techniques require practice but can significantly enhance the visual appeal of your photos with text.
17. How Can I Use Photo Editing Apps to Add Captions?
Photo editing apps provide a convenient way to add captions directly to your photos, enhancing their storytelling potential.
Answer: Use photo editing apps like Snapseed, VSCO, or Adobe Lightroom Mobile to add captions, adjust fonts, and customize the appearance of your text.
Steps:
- Choose a Photo Editing App: Select a photo editing app that supports text overlays.
- Open Your Photo: Import the photo you want to caption into the app.
- Select the Text Tool: Look for the “Text” or “Caption” option in the editing menu.
- Add Your Caption: Type your desired text into the text box.
- Customize: Adjust the font, color, size, and placement of the text.
- Save: Tap “Done” or “Save” to apply the changes.
These apps often provide a range of customization options, allowing you to match the caption’s style to the photo’s overall aesthetic.
18. What Is the Best Way to Add Dates and Locations to Photos?
Adding dates and locations to your photos can help you remember when and where they were taken, enriching your memories.
Answer: Use photo editing apps or metadata editing tools to add dates and locations to your photos, either as text overlays or embedded metadata.
Methods:
- Text Overlays: Use a photo editing app to add the date and location as text directly onto the photo.
- Metadata Editing: Use a metadata editing tool to embed the date and location information into the photo’s metadata. This information is stored within the photo file and can be viewed in photo management software.
Adding dates and locations helps you organize and relive your memories more effectively.
19. How Can I Use Quotes to Enhance My Photos?
Overlaying meaningful quotes on your photos can create powerful and evocative images.
Answer: Choose quotes that resonate with the photo’s subject or mood, and use photo editing tools to add the text in a visually appealing way.
Steps:
- Select a Quote: Choose a quote that complements the photo’s theme or message.
- Add the Quote: Use a photo editing app to add the quote as text to the photo.
- Customize: Adjust the font, color, size, and placement of the text to create a visually balanced composition.
Quotes can add depth and emotion to your photos, transforming them into inspiring works of art.
20. What Are Some Best Practices for Adding Text to Photos for Social Media?
Adding text to photos for social media can help you grab attention and convey your message effectively.
Answer: Keep the text concise, use visually appealing fonts, and ensure the text enhances rather than distracts from the photo.
Best Practices:
- Keep It Short: Use brief and impactful text to capture attention quickly.
- Choose Readable Fonts: Select fonts that are easy to read on small screens.
- Use High-Contrast Colors: Ensure the text stands out against the background.
- Consider Placement: Position the text in a way that doesn’t obstruct the main subject of the photo.
- Maintain Brand Consistency: Use consistent fonts, colors, and styles to reinforce your brand identity.
By following these best practices, you can create engaging social media content that resonates with your audience.
21. What Tools Can I Use to Edit Metadata in My Photos?
Editing metadata allows you to add or modify information about your photos, such as dates, locations, and copyright details.
Answer: Use tools like Adobe Bridge, ExifTool, or online metadata editors to add or modify metadata in your photos.
Tools:
- Adobe Bridge: A powerful photo management tool that allows you to view and edit metadata in a batch.
- ExifTool: A command-line tool for reading, writing, and editing metadata in a wide range of file formats.
- Online Metadata Editors: Web-based tools like Metadata2go or Online EXIF Editor that allow you to edit metadata directly in your browser.
Editing metadata helps you organize your photo library and protect your intellectual property.
22. How Can I Embed Copyright Information in My Photos?
Embedding copyright information in your photos is essential for protecting your intellectual property.
Answer: Use photo editing software or metadata editing tools to add copyright details, such as your name, website, and copyright symbol, to your photos’ metadata.
Steps:
- Choose a Tool: Select a photo editing or metadata editing tool that supports copyright embedding.
- Open Your Photo: Import the photo you want to protect into the chosen tool.
- Add Copyright Information: Enter your copyright details, including your name, website, and the copyright symbol (©).
- Save the Changes: Save the changes to embed the copyright information into the photo’s metadata.
Embedding copyright information helps prevent unauthorized use of your photos and ensures that your rights are protected.
23. Can I Add Animated Text to My Photos?
Adding animated text to your photos can create eye-catching and engaging visuals, perfect for social media or presentations.
Answer: Use video editing software or animation apps to add animated text to your photos, creating dynamic and visually appealing content.
Tools:
- Adobe After Effects: A professional video editing and motion graphics software that allows you to create complex text animations.
- Canva: Offers animated text options for creating engaging social media graphics.
- Lumii: A mobile app with tools to add animated text and effects to photos.
Tips for Creating Animated Text:
- Keep It Simple: Use clear and concise animations that are easy to follow.
- Match the Mood: Choose animations that complement the photo’s style and tone.
- Use Timing Effectively: Time the animations to coincide with key moments in the photo or video.
Animated text can transform your photos into captivating visuals that capture attention and convey your message effectively.
24. What Are Some Free Resources for Learning More About Photo Editing?
Learning photo editing can enhance your skills and help you create stunning visuals.
Answer: Explore online tutorials, courses, and communities to learn more about photo editing techniques and software.
Resources:
- YouTube Tutorials: Channels like Adobe Photoshop Tutorials and Phlearn offer free tutorials on various photo editing techniques.
- Adobe Photoshop Express: Offers various photo editing tools and features, including adding text.
- Skillshare: Provides a wide range of photo editing courses taught by industry experts.
- CreativeLive: Offers live workshops and on-demand courses on photography and photo editing.
- Online Communities: Join online forums and communities like Reddit’s r/photography to connect with other photographers and share tips and tricks.
25. Where Can I Find Inspiration for Adding Text to My Photos?
Finding inspiration can help you come up with creative ideas for adding text to your photos.
Answer: Explore online galleries, social media platforms, and design blogs to find inspiration for adding text to your photos.
Inspiration Sources:
- Instagram: Follow photographers and designers who use text overlays creatively.
- Pinterest: Search for “photo editing” or “text overlays” to find visual inspiration.
- Behance: Explore projects by designers and photographers to see how they use text in their work.
- Design Blogs: Read design blogs and articles to learn about current trends and techniques in typography and photo editing.
By exploring these resources, you can gather ideas and inspiration to enhance your photos with text in unique and creative ways.
Adding names and text to your photos is more than just a functional task; it’s an opportunity to enhance your memories, protect your work, and express your creativity. Whether you’re using your iPhone’s built-in features or exploring advanced photo editing techniques, the possibilities are endless. For more tips, tutorials, and inspiration, visit dfphoto.net and join our community of photography enthusiasts. Elevate your visual storytelling and capture the beauty of every moment with dfphoto.net.
If you’re eager to learn more and connect with a vibrant photography community, don’t hesitate! Visit dfphoto.net today to explore our comprehensive guides, discover breathtaking images, and engage with fellow photography lovers. Let’s transform your passion into stunning visual realities! Reach out to us at Address: 1600 St Michael’s Dr, Santa Fe, NM 87505, United States. Phone: +1 (505) 471-6001. Website: dfphoto.net.
FAQ: Adding Names to Photos
1. Why can’t I see the People & Pets album on my iPhone?
Answer: The People & Pets album may not appear immediately because your iPhone needs time to analyze your photos. Leave your phone plugged in and locked overnight to allow this process to complete.
2. Can I add names to photos on my iPad?
Answer: Yes, the process for adding names to photos on your iPad is the same as on your iPhone, provided you are using iCloud Photos to sync your library.
3. How do I correct a misidentified person in the People & Pets album?
Answer: To correct a misidentified person, tap the person with the incorrect name, then either rename them for all items or correct a specific item by tapping “This is Not [Name].”
4. Will the names I add sync across all my Apple devices?
Answer: Yes, if you are using iCloud Photos, the names you add will sync across all your Apple devices.
5. Can I add names to photos on my computer?
Answer: Yes, you can add names to photos on your computer using photo management software like Adobe Lightroom or Apple Photos.
6. What file formats support embedded metadata for names and copyright information?
Answer: JPEG, TIFF, and PNG are common file formats that support embedded metadata for names and copyright information.
7. How do I remove a name from a photo?
Answer: To remove a name from a photo, tap the person’s name, then tap “Remove Tag” or “This is Not [Name].”
8. Can I search for photos by name on my iPhone?
Answer: Yes, you can search for photos by name using the search bar in the Photos app.
9. Is there a limit to the number of people I can name in a photo?
Answer: No, there is no practical limit to the number of people you can name in a photo.
10. How do I ensure my watermarks are effective in protecting my photos?
Answer: Ensure your watermarks are visible but not intrusive, use a high-contrast color, and consider placing them in a location that is difficult to remove.
