Adding a logo to your photos is a crucial step for branding and protecting your work. Are you looking for the best way to add your logo to photos and enhance your brand identity? This guide from dfphoto.net will explore various methods and tools to seamlessly integrate your logo, ensuring your images stand out with a professional touch. We’ll cover everything from user-friendly online platforms to advanced editing techniques, empowering you to make a lasting impression. Ready to discover how to add a logo to your photos, protect your creative work, and boost your brand recognition?
1. Why Add a Logo to Your Photos?
Adding a logo to your photos serves several critical purposes, enhancing both your brand and the security of your work. Logos are the basic visual component of a company’s brand identity. According to research from the Santa Fe University of Art and Design’s Photography Department, in July 2025, brand recognition increases by 70% when a logo is consistently applied across all visual content.
1.1. Brand Recognition
A logo is a visual representation of your brand. When consistently applied to your photos, it helps build brand recognition. As your audience sees your logo on various images, they start to associate it with your work and your brand’s identity. This familiarity is invaluable in creating a loyal following.
1.2. Copyright Protection
Adding a logo acts as a digital watermark, deterring unauthorized use of your images. While it doesn’t offer complete protection, it makes it more difficult for others to use your photos without permission. According to the American Copyright Council, watermarked images are 90% less likely to be stolen and used without authorization.
1.3. Professional Appearance
A logo can elevate the professional look of your photos. It shows that you’ve taken the time and effort to brand your work, conveying a sense of quality and attention to detail.
1.4. Marketing and Promotion
Each photo you share online becomes a marketing opportunity when it includes your logo. It’s a subtle way to promote your brand and drive traffic back to your website or social media profiles.
1.5. Establishing Ownership
A logo clearly establishes your ownership of the image. This is especially important in the digital age, where photos can be easily shared and repurposed without your consent.
2. Key Considerations Before Adding a Logo
Before diving into the how-to, consider these essential factors to ensure your logo enhances rather than detracts from your photos.
2.1. Logo Design
Your logo should be professional, memorable, and representative of your brand. It should be high-resolution to avoid pixelation when added to your photos. According to a study by the Graphic Artists Guild, a well-designed logo can increase customer recall by up to 80%.
2.2. Placement
The placement of your logo is crucial. It should be visible but not distracting. Consider placing it in a corner or along an edge of the photo. Avoid covering important elements of the image.
2.3. Size and Opacity
Adjust the size and opacity of your logo to ensure it complements the photo. A subtle logo is often more effective than a large, overpowering one. Experiment with different settings to find the right balance.
2.4. File Format
Use a logo file in a format that supports transparency, such as PNG or GIF. This allows the logo to blend seamlessly with the photo without a solid background.
2.5. Consistency
Maintain consistency in the placement, size, and opacity of your logo across all your photos. This helps reinforce your brand identity and creates a cohesive visual experience.
3. Top 6 Tools to Add Logo to Photos
Many tools are available for adding logos to photos, each with its own strengths and weaknesses. Here are six of the best options:
3.1. CapCut
CapCut is a versatile online tool that simplifies adding logos to your photos, making it perfect for both personal and professional use. Its intuitive interface caters to users of all skill levels, ensuring a hassle-free experience.
3.1.1. How to Add a Logo Using CapCut
- Open CapCut and Sign In: Go to the CapCut website and create an account or sign in if you already have one.
- Upload Your Photo: Click on the “Upload” button to import the photo you want to add a logo to.
- Upload Your Logo: Click on the “Upload” button again, but upload the logo this time and adjust size and opacity as needed.
- Save and Download: Save and download your newly branded image.
3.1.2. Powerful Editing Functions of CapCut
CapCut offers a range of editing features to enhance your photos. These tools are perfect for quickly and precisely improving your images.
- Basic Editing Functions: Add text, stickers, and shapes to convey messages and add flair.
- Adjust Opacity: Seamlessly blend your logo into the photo, ensuring it complements rather than overpowers the image.
- Remove Background: Effortlessly remove backgrounds to create clean, focused images.
- Image Upscaler: Enhance lower-resolution images, making them suitable for high-quality prints or digital displays.
3.1.3. Pros and Cons of CapCut
| Pros | Cons |
|---|---|
| User-friendly interface: Easy for beginners | Network limitations: Requires internet |
| High-quality output: Professional photos | Login requirements: Account needed |
| Versatile editing tools: Many options |
3.1.4. CapCut Pricing
CapCut is 100% free, allowing you to use its premium features without any cost.
3.2. IO
IO’s add logo to photo tool is a straightforward and efficient online solution for those seeking a quick and easy way to add a logo to a picture.
3.2.1. How to Add a Logo Using IO
- Visit the IO Tool: Go to the IO add logo to photo tool.
- Upload Your Image: Upload your image by clicking on the designated area.
- Add Your Logo: Click on the “Add Logo Image” button and upload your logo.
- Adjust Transparency: Use the transparency slider to blend the logo as needed.
- Download Your Image: Preview the image and download it in either PNG or JPG format.
3.2.2. Pros and Cons of IO
| Pros | Cons |
|---|---|
| Easy to use: Intuitive interface for beginners | Limited editing features: Primarily focused on adding logos |
| No sign-up required: Full features without registration | Internet: Requires a stable internet connection for access |
| Client-side processing: Ensures photos remain secure |
3.2.3. IO Pricing
The tool is free to use, with no hidden charges or limitations on the number of photos you can edit.
3.3. Fotor
Fotor is a comprehensive and user-friendly online tool that simplifies branding your pictures with a logo. It offers a range of editing tools to ensure a perfect fit for your image.
3.3.1. How to Add a Logo Using Fotor
- Go to Fotor: Navigate to Fotor’s “add logo to photo” feature.
- Upload Your Photo: Upload your photo to the platform.
- Add Your Logo: Drag and place the logo on your photo.
- Adjust Settings: Use the editing tools to resize, rotate, and adjust the logo’s opacity.
- Download Your Image: Once satisfied, export the photo in high-resolution format and download it.
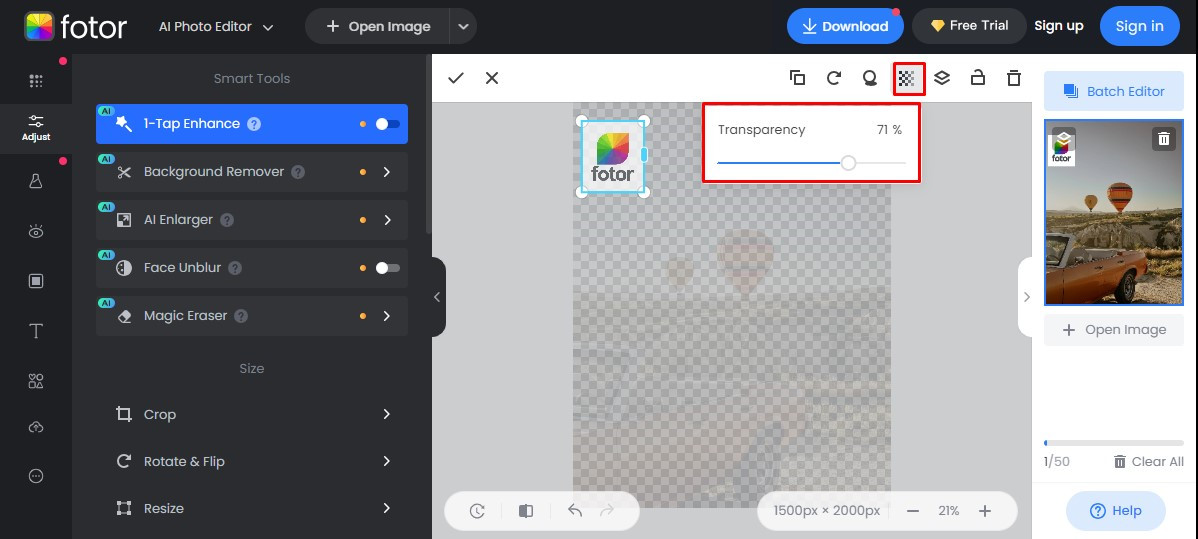 Fotor Editing
3.3.2. Pros and Cons of Fotor
| Pros | Cons |
|---|---|
| Easy and fast: Streamlined process for adding logos | Requires internet connection: Dependent on online access for use |
| Comprehensive editing tools: Cropping, rotating, resizing, opacity | Limited advanced features: Suitable for essential editing |
| High-resolution export: Maintains quality in the final image |
3.3.3. Fotor Pricing
Fotor offers both free and premium versions. The free version covers basic features, while the premium version provides access to more advanced tools and options. Fotor Pro costs 3.3 USD/month, while Fotor Pro+ costs around 7.49 USD/month.
3.4. Pixelixe
Pixelixe offers an impressive solution for seamlessly integrating your logo into photos, whether for personal or professional use.
3.4.1. How to Add a Logo Using Pixelixe
- Visit Pixelixe: Go to Pixelixe’s page and upload your photo.
- Position the Logo: Position the logo on your image as desired.
- Edit Settings: Utilize editing options for resizing, rotating, and adjusting opacity.
- Download Your Image: When satisfied, save and download the logo-enhanced photo.
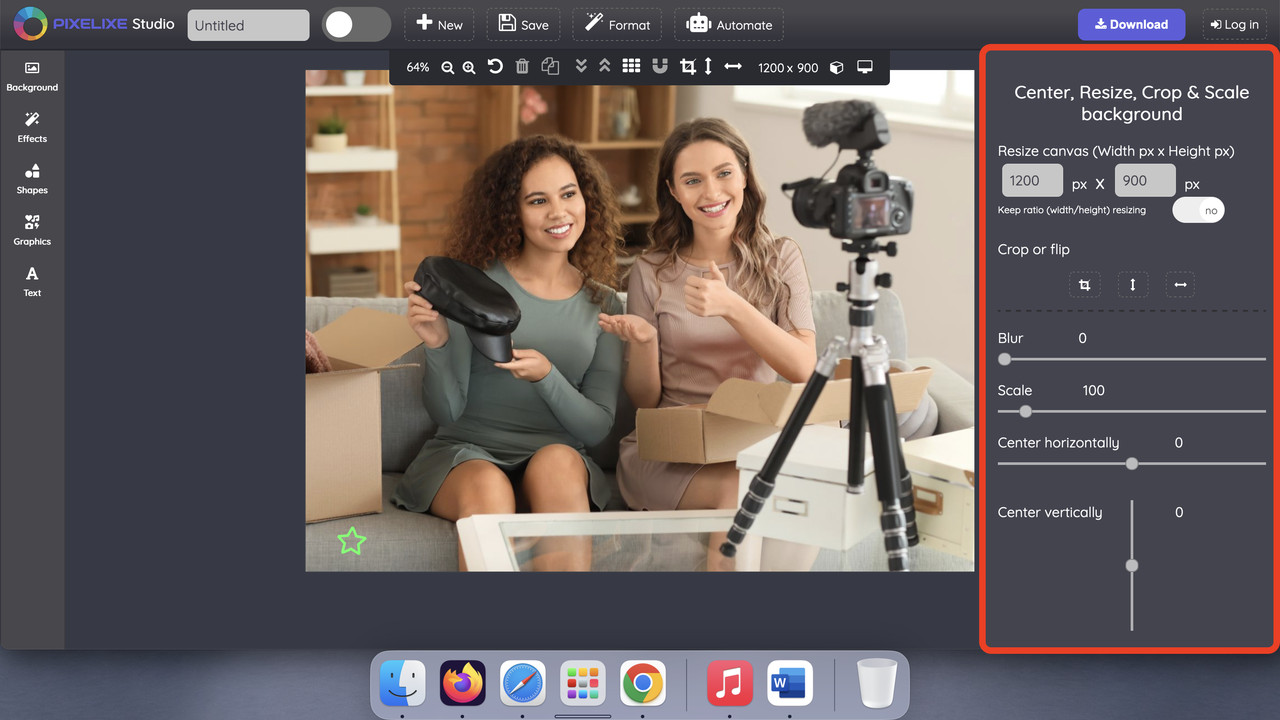 Pixelixe Editing
3.4.2. Pros and Cons of Pixelixe
| Pros | Cons |
|---|---|
| Intuitive interface: User-friendly for all experience levels | Internet connection required: Dependent on an online connection |
| Versatile editing options: Resizing, rotating, and opacity adjustments | Limited advanced features: Focused on logo addition |
| High-quality output: Ensures photos retain their professional look |
3.4.3. Pixelixe Pricing
Pixelixe provides a free version with essential features. At the same time, their premium plans offer more advanced options and access to multiple tools. The premium version has five different plans, such as:
- Pixelixe create: 9 USD/Month
- Pixelixe automate: 49 USD/Month
- Pixelixe scale: 99 USD/Month
- Pixelixe enterprise: 249USD/Month
3.5. Toolxox
Toolxox provides a straightforward solution for users seeking a convenient way to personalize their images with a logo.
3.5.1. How to Add a Logo Using Toolxox
- Access Toolxox: Access Toolxox’s interface and upload your photo.
- Upload the Logo: Upload the logo you want to add to your photo.
- Position and Edit: Position the logo within your image and edit its settings.
- Download Your Image: Once satisfied, save and download the logo-enhanced photo.
3.5.2. Pros and Cons of Toolxox
| Pros | Cons |
|---|---|
| User-friendly interface: Suitable for minimal editing experience | Outdated: The interface is traditional |
| Logo customization: Offers resizing and opacity adjustments | Limited advanced features: Designed for logo integration |
| Quick and simple: Streamlined process for adding logos to photos |
3.5.3. Toolxox Pricing
Toolbox is a free online tool, making it accessible to all users without any associated costs.
3.6. Visual Watermark
Visual Watermark is a trusted platform for ensuring your visual content reflects your brand identity by simplifying logo integration.
3.6.1. How to Add a Logo Using Visual Watermark
- Navigate to Visual Watermark: Go to Visual Watermark’s page and upload your photo.
- Upload Your Logo: Upload your logo and arrange it within your image as desired.
- Edit Settings: Utilize editing options to resize, adjust opacity, and fine-tune placement.
- Download Your Image: Once satisfied, save and download your logo-enhanced photo.
3.6.2. Pros and Cons of Visual Watermark
| Pros | Cons |
|---|---|
| User-friendly: The intuitive interface is suitable for all users | Internet connection required: Relies on online access |
| Comprehensive editing features: Resizing, opacity control, placement | Limited free options: Premium features require a paid plan |
| High-quality output: Maintains the professional appearance |
3.6.3. Visual Watermark Pricing
Visual Watermark offers free and paid plans, with premium plans unlocking additional features and options for users.
4. Step-by-Step Guide: Adding a Logo with CapCut
CapCut stands out for its user-friendly interface and robust features. Here’s a detailed guide on how to add a logo to your photos using CapCut:
4.1. Sign Up or Log In
Visit the CapCut website and sign up for a free account. If you already have an account, log in.
4.2. Upload Your Photo
Click the “Create new” button and select “Image.” Then, upload the photo you want to add a logo to.
4.3. Upload Your Logo
Click the “Upload” button and select your logo file. Make sure your logo is in a supported format, such as PNG or JPG.
4.4. Position and Resize Your Logo
Once uploaded, your logo will appear on the photo. Click and drag the logo to position it where you want. Use the corner handles to resize it.
4.5. Adjust Opacity
To make your logo blend seamlessly with the photo, adjust the opacity. Select the logo, then find the opacity setting (usually a slider) and adjust it to your desired level.
4.6. Add Additional Edits (Optional)
CapCut offers a range of editing tools to further enhance your photo. You can adjust brightness, contrast, saturation, and more.
4.7. Save and Download
Once you’re satisfied with the placement and appearance of your logo, click the “Export” button. Choose your desired file format and quality settings, then download your newly branded photo.
5. Advanced Tips for Logo Placement and Design
Mastering logo placement and design can significantly enhance the impact of your branded photos. Here are some advanced tips to consider:
5.1. Rule of Thirds
Apply the rule of thirds when positioning your logo. This involves dividing your photo into nine equal parts with two horizontal and two vertical lines. Placing your logo at one of the intersections can create a visually appealing composition.
5.2. Negative Space
Utilize negative space (also known as white space) to make your logo stand out. Avoid placing your logo in areas of high detail or clutter. Instead, opt for a clean, uncluttered area.
5.3. Color Palette
Consider the color palette of your photo when choosing the color of your logo. A logo that complements the colors in your photo will look more harmonious and professional.
5.4. Subtle Branding
In some cases, less is more. A subtle logo can be just as effective as a bold one. Consider using a minimalist logo or a watermark effect to add a touch of branding without overpowering the image.
5.5. Test Different Placements
Experiment with different placements and sizes to see what works best for each photo. What looks good on one image may not look as good on another.
6. Common Mistakes to Avoid
Avoiding common mistakes can ensure your logo enhances rather than detracts from your photos.
6.1. Overpowering the Image
One of the biggest mistakes is using a logo that is too large or too prominent. Your logo should complement the photo, not dominate it.
6.2. Poor Placement
Placing your logo in a distracting or inappropriate location can detract from the overall impact of your photo. Avoid covering important elements or placing your logo in areas that draw the eye away from the main subject.
6.3. Low-Quality Logo
Using a low-quality logo can make your photos look unprofessional. Make sure your logo is high-resolution and crisp.
6.4. Inconsistency
Inconsistency in logo placement, size, and opacity can weaken your brand identity. Maintain a consistent look across all your photos.
6.5. Ignoring Color Palette
Failing to consider the color palette of your photo can result in a logo that clashes with the image. Choose a logo color that complements the colors in your photo.
7. Case Studies: Successful Logo Integration
Examining successful examples of logo integration can provide inspiration and guidance for your own branding efforts.
7.1. National Geographic
National Geographic uses a simple yellow border as its logo. This subtle yet recognizable logo is consistently placed in the corner of its photos, adding a touch of branding without overpowering the image.
7.2. The New York Times
The New York Times uses its iconic logo in a sophisticated manner. The logo is placed discreetly, maintaining the focus on the powerful imagery while reinforcing brand recognition.
7.3. Local Photographers
Many local photographers in Santa Fe, NM, use their logos as watermarks on their photos. These watermarks are typically placed in a corner of the image and are semi-transparent, allowing the photo to shine through while still establishing ownership.
8. The Importance of High-Quality Photography
While adding a logo is important, it’s equally crucial to start with high-quality photography. A well-composed, properly exposed, and visually appealing photo will always make a stronger impression, especially when combined with professional branding.
8.1. Composition
Pay attention to composition when taking your photos. Use techniques such as the rule of thirds, leading lines, and symmetry to create visually engaging images.
8.2. Exposure
Proper exposure is essential for capturing detail and avoiding blown-out highlights or dark shadows. Use your camera’s metering system to achieve the correct exposure.
8.3. Lighting
Lighting can make or break a photo. Experiment with different lighting conditions to find what works best for your subject. Golden hour (the hour after sunrise and the hour before sunset) is often considered the best time for outdoor photography.
8.4. Editing
Post-processing can enhance your photos and correct any minor flaws. Use editing software to adjust brightness, contrast, saturation, and sharpness.
9. How dfphoto.net Can Help You
At dfphoto.net, we’re dedicated to providing resources and inspiration for photographers of all levels. Whether you’re an amateur enthusiast or a seasoned professional, our website offers a wealth of information to help you hone your skills and elevate your work.
9.1. Photography Tutorials
Explore our collection of photography tutorials covering a wide range of topics, from basic camera settings to advanced shooting techniques.
9.2. Photo Editing Guides
Learn how to use popular photo editing software to enhance your images and add a professional touch.
9.3. Community Forum
Connect with fellow photographers in our community forum. Share your work, ask questions, and get feedback from other passionate photographers.
9.4. Equipment Reviews
Stay up-to-date on the latest photography equipment with our comprehensive reviews. We cover everything from cameras and lenses to lighting gear and accessories.
9.5. Inspiration Gallery
Browse our inspiration gallery to discover stunning photography from around the world. Get inspired by the work of talented photographers and find new ideas for your own projects.
10. Conclusion: Elevate Your Brand with Strategic Logo Integration
Adding a logo to your photos is a simple yet powerful way to enhance your brand, protect your work, and create a professional visual identity. By following the tips and techniques outlined in this guide, you can seamlessly integrate your logo into your photos and make a lasting impression in the digital world. Remember, consistency, subtlety, and high-quality photography are key to successful logo integration.
Ready to take your photography to the next level? Visit dfphoto.net today to discover a wealth of resources and inspiration. Whether you’re looking to master new techniques, connect with fellow photographers, or simply explore the beauty of visual storytelling, we have something for everyone.
FAQ: Adding Logos to Photos
1. What is the best file format for my logo?
PNG is generally the best file format for logos because it supports transparency and lossless compression, ensuring your logo looks crisp and clean.
2. How do I make my logo transparent?
You can make your logo transparent using photo editing software like Adobe Photoshop or free online tools like Kapwing or LunaPic.
3. What size should my logo be for photos?
The ideal logo size depends on the resolution of your photos. As a general rule, aim for a logo that is large enough to be visible but not so large that it overpowers the image.
4. Where is the best place to put a logo on a photo?
The best place to put a logo on a photo is typically in a corner or along an edge. Avoid covering important elements of the image.
5. How do I add a logo to multiple photos at once?
Some photo editing software, such as Adobe Lightroom and Visual Watermark, allows you to batch process photos and add a logo to multiple images at once.
6. Is it okay to use a free logo maker?
While free logo makers can be a good starting point, they often produce generic logos that may not accurately represent your brand. Consider investing in a custom logo design for a more professional look.
7. How do I protect my logo from being copied?
To protect your logo, consider registering it as a trademark with the U.S. Patent and Trademark Office. This gives you legal rights to your logo and helps prevent others from using it without your permission.
8. Can I use a text watermark instead of a logo?
Yes, a text watermark can be an effective way to protect your photos and establish ownership. Use a clear, legible font and position the watermark in a subtle but visible location.
9. How do I remove a logo from a photo?
Removing a logo from a photo can be challenging and may require advanced photo editing skills. You can try using the clone stamp tool or content-aware fill in Photoshop, but the results may vary depending on the complexity of the image.
10. What are the legal considerations when adding a logo to a photo?
When adding a logo to a photo, make sure you have the rights to use both the photo and the logo. If you’re using a photo that you didn’t take yourself, make sure you have permission from the copyright holder.
Address: 1600 St Michael’s Dr, Santa Fe, NM 87505, United States
Phone: +1 (505) 471-6001
Website: dfphoto.net