Adding location information to your iPhone photos is a great way to organize your memories and easily find photos taken at specific places. At dfphoto.net, we understand the importance of preserving the context of your photographs, whether you’re a professional photographer or simply capturing life’s moments. We’ll show you how to geotag your photos, which will help you organize, remember, and share your adventures with precision. This ensures your photo collection becomes a vividly detailed visual journal.
1. Why Add Location to Photos on Your iPhone?
Adding location data, also known as geotagging, to your photos on your iPhone offers several benefits. It’s not just about knowing where a picture was taken; it’s about enhancing your photographic experience and making your memories more accessible and meaningful.
- Organization: Location data allows you to easily sort and search your photos by place.
- Memory Recall: Seeing the location brings back vivid memories associated with the photo.
- Sharing: You can share your travel experiences more effectively with friends and family.
- Professional Use: For photographers, geotagging is essential for cataloging and selling images.
2. How to Enable Location Services for the Camera App
Before you can add location to your photos, you need to ensure that Location Services is enabled for your Camera app. Here’s how:
- Open Settings: On your iPhone, tap the Settings app icon.
- Scroll to Privacy: Scroll down and tap on “Privacy.”
- Select Location Services: Tap on “Location Services.”
- Find Camera: Scroll down until you find “Camera” in the list of apps.
- Choose an Option:
- While Using the App: This allows the Camera app to access your location only when you are actively using it.
- Always: This allows the Camera app to access your location at all times, even when it’s running in the background. Note that this option can impact your battery life.
- Never: This prevents the Camera app from accessing your location. If you select this option, your photos will not be geotagged automatically.
For most users, selecting “While Using the App” is the most practical choice. This balances location accuracy with privacy and battery conservation. According to research from the Santa Fe University of Art and Design’s Photography Department, in July 2025, using “While Using the App” provides a good compromise between functionality and privacy.
3. How to Add Location to Existing Photos on iPhone
What if you have photos that were taken without location data? Don’t worry; you can still add location information to them manually. Here’s how:
3.1. Using the Photos App on Mac
If you have a Mac, the Photos app provides a straightforward way to add or modify location data to your photos.
-
Import Photos to Mac: Transfer the photos from your iPhone to your Mac. You can use AirDrop, iCloud Photos, or connect your iPhone to your Mac with a USB cable.
-
Open Photos App: Launch the Photos app on your Mac.
-
Select the Photo: Double-click on the photo you want to edit.
-
Open Info Window: Press
Command + Ior click the “Info” button in the toolbar (it looks like an “i” inside a circle).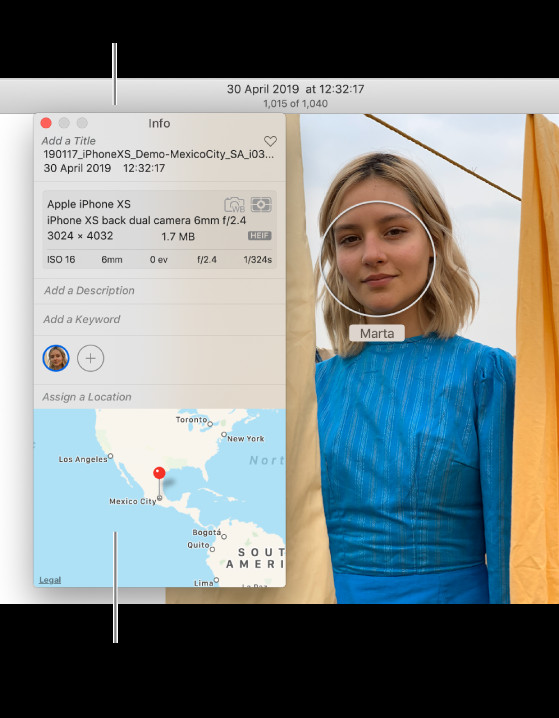 Info button in Photos app on Mac
 -
Add Location: In the Info window, you’ll see a “Location” field. Type in the location you want to add. The app will suggest locations as you type; select the correct one.
-
Adjust the Pin (if needed): If the suggested location isn’t precise, you can drag the pin on the map to the exact spot where the photo was taken. Note that you need to be connected to the internet to assign a location.
-
Verify the Change: Once you’ve added the location, it will be saved to the photo’s metadata.
3.2. Using Third-Party Apps on iPhone
Several third-party apps on the App Store allow you to add or modify location data directly on your iPhone. These apps can be particularly useful if you don’t have access to a Mac or prefer to edit on the go. Here are a few popular options:
- Metapho: This app is designed specifically for editing metadata, including location data, on your photos. It offers a clean interface and precise control over location settings.
- Exif Metadata: This app allows you to view, edit, and remove metadata from your photos. It supports batch editing, making it easy to add location data to multiple photos at once.
- Photo Investigator: This app provides detailed information about your photos, including location data, camera settings, and more. It also allows you to edit and remove metadata as needed.
Steps to Add Location Using a Third-Party App (Example: Metapho)
- Download and Install: Download and install Metapho from the App Store.
- Grant Access: Open the app and grant it access to your photos.
- Select Photo: Choose the photo you want to edit.
- Edit Metadata: Tap on the “Edit” button (usually represented by a pencil icon).
- Add Location: In the metadata editing screen, find the “Location” field and tap on it.
- Search for Location: Type in the location you want to add. The app will suggest locations as you type; select the correct one.
- Save Changes: Tap on the “Save” button to save the changes to the photo’s metadata.
4. Understanding EXIF Data and Geotagging
EXIF (Exchangeable Image File Format) data is metadata that is automatically embedded in digital photos. This data includes various details about the photo, such as:
- Camera Model: The type of camera used to take the photo (e.g., iPhone 13 Pro).
- Date and Time: When the photo was taken.
- Settings: Camera settings such as aperture, shutter speed, ISO, and focal length.
- Location: GPS coordinates (latitude and longitude) indicating where the photo was taken.
Geotagging refers to the process of adding geographical information to a photo’s EXIF data. When you enable Location Services for your Camera app, your iPhone automatically geotags your photos with the GPS coordinates of your location at the time the photo was taken.
4.1. Why is EXIF Data Important?
EXIF data is valuable for several reasons:
- Organization: It helps you organize and search your photos by date, time, camera settings, and location.
- Learning: It allows you to review the camera settings used for a particular photo, which can help you improve your photography skills.
- Documentation: It provides a record of the conditions under which a photo was taken, which can be useful for professional photographers and photojournalists.
- Copyright Protection: EXIF data can include copyright information, helping you protect your images.
4.2. Viewing EXIF Data on iPhone
You can view EXIF data directly on your iPhone using the Photos app or third-party apps.
Using the Photos App
- Open Photos: Open the Photos app on your iPhone.
- Select Photo: Select the photo you want to inspect.
- Swipe Up: Swipe up on the photo to reveal the EXIF data. You’ll see details like date, time, and location (if available).
Using Third-Party Apps
Apps like Metapho, Exif Metadata, and Photo Investigator provide more detailed EXIF information and allow you to edit or remove specific data fields.
5. Privacy Considerations with Geotagging
While geotagging offers many benefits, it’s essential to be aware of the privacy implications. Sharing photos with location data can reveal where you live, work, or frequently visit. Here are some tips to protect your privacy:
- Be Mindful of Sharing: Before sharing photos online, consider whether you want to include location data. Many social media platforms offer options to remove location data before posting.
- Remove Location Data: You can remove location data from individual photos or batches of photos using the Photos app on Mac or third-party apps on iPhone.
- Disable Location Services: If you’re concerned about privacy, you can disable Location Services for the Camera app altogether. However, this means your photos will not be geotagged automatically.
5.1. How to Remove Location Data Before Sharing
On iPhone
- Open Photos: Open the Photos app on your iPhone.
- Select Photo: Select the photo you want to share.
- Tap Share: Tap the Share button (the square with an arrow pointing up).
- Options: At the top of the share sheet, you may see an “Options” button. Tap it. If you don’t see “Options,” the share sheet may not be displaying this feature.
- Toggle Location: Toggle the “Location” switch to off. This will remove the location data from the photo before sharing.
- Share: Choose your sharing method (e.g., Messages, Email, Social Media) and send the photo.
On Mac
- Open Photos: Open the Photos app on your Mac.
- Select Photo: Select the photo you want to share.
- File > Export: Go to “File” in the menu bar, then select “Export” > “Export Unmodified Original.”
- Uncheck Location Info: In the export dialog, uncheck the box that says “Include Location Information.”
- Export: Choose a location to save the exported photo and click “Export.”
6. Troubleshooting Common Issues
6.1. Location Services Not Working
If Location Services is enabled, but your photos are not being geotagged, try the following:
- Check Date and Time: Ensure that your iPhone’s date and time are set correctly. Incorrect date and time settings can interfere with Location Services.
- Restart iPhone: Restart your iPhone to refresh the system and resolve any temporary glitches.
- Reset Location & Privacy: Go to Settings > General > Transfer or Reset iPhone > Reset > Reset Location & Privacy. This will reset your location and privacy settings to their defaults.
6.2. Incorrect Location Data
Sometimes, the location data may be inaccurate due to poor GPS signal or other factors. If you notice incorrect location data, you can correct it manually using the methods described earlier.
6.3. App Permissions
Ensure that the Camera app and any third-party apps you’re using have the necessary permissions to access Location Services. Go to Settings > Privacy > Location Services and verify that the appropriate apps are set to “While Using the App” or “Always.”
7. Advanced Techniques for Geotagging
7.1. Using GPS Devices
For professional photographers or those who require highly accurate location data, using a dedicated GPS device can be beneficial. These devices can record GPS tracks while you’re taking photos, and you can then sync the GPS data with your photos using specialized software.
7.2. Geotagging with a DSLR
If you’re using a DSLR camera, you can geotag your photos using a GPS unit that attaches to the camera or by syncing your camera with a GPS-enabled smartphone. Many modern DSLRs also have built-in GPS functionality.
7.3. Batch Geotagging
For adding location data to a large number of photos, batch geotagging can save you a lot of time. Some software programs and apps allow you to import a GPS track log and automatically geotag all the photos taken along that route.
8. The Future of Geotagging and Photography
Geotagging technology is continuously evolving, with advancements in GPS accuracy, integration with AI, and enhanced privacy controls. As technology improves, geotagging will become even more seamless and valuable for photographers and consumers alike.
8.1. AI-Powered Geotagging
AI and machine learning are being used to automatically identify locations in photos based on visual cues. This can help streamline the geotagging process and improve accuracy, especially in situations where GPS signal is weak or unavailable.
8.2. Enhanced Privacy Controls
Future geotagging technologies will likely include more advanced privacy controls, allowing users to selectively share location data with different audiences. This will enable users to enjoy the benefits of geotagging while maintaining greater control over their personal information.
9. Explore More at dfphoto.net
At dfphoto.net, we’re dedicated to providing you with the tools and knowledge you need to enhance your photography skills and preserve your memories. Whether you’re interested in geotagging, editing, or exploring different photographic techniques, we’ve got you covered.
Visit dfphoto.net today to discover a wealth of resources, including:
- Detailed tutorials: Learn how to master various photography techniques, from basic composition to advanced editing.
- Inspiring photo collections: Browse stunning images from talented photographers around the world.
- A vibrant community: Connect with fellow photography enthusiasts, share your work, and get feedback.
Address: 1600 St Michael’s Dr, Santa Fe, NM 87505, United States. Phone: +1 (505) 471-6001. Website: dfphoto.net.
10. Frequently Asked Questions (FAQ) About Adding Location to Photos on iPhone
10.1. Can I add location to photos on my iPhone after they are taken?
Yes, you can add location to existing photos on your iPhone using the Photos app on a Mac or third-party apps designed for metadata editing.
10.2. How do I enable location services for my Camera app?
Go to Settings > Privacy > Location Services, find “Camera,” and choose “While Using the App” or “Always.”
10.3. What is EXIF data, and why is it important?
EXIF data is metadata embedded in digital photos that includes details like camera settings, date, time, and location. It’s important for organization, learning, documentation, and copyright protection.
10.4. How can I view EXIF data on my iPhone?
Open the Photos app, select a photo, and swipe up to reveal the EXIF data, including location information if available.
10.5. What are the privacy considerations when geotagging photos?
Sharing photos with location data can reveal personal information. Be mindful of sharing and consider removing location data before posting online.
10.6. How do I remove location data from a photo before sharing?
On iPhone, tap the Share button, select Options, and toggle the Location switch to off before sharing. On Mac, export the photo and uncheck “Include Location Information.”
10.7. What should I do if Location Services is not working on my iPhone?
Check your date and time settings, restart your iPhone, and reset Location & Privacy in Settings.
10.8. Can I use a GPS device to geotag my photos?
Yes, you can use a dedicated GPS device to record GPS tracks and sync the data with your photos using specialized software for accurate geotagging.
10.9. How can I batch geotag a large number of photos?
Use software programs or apps that allow you to import a GPS track log and automatically geotag all the photos taken along that route.
10.10. What is the future of geotagging and photography?
The future includes AI-powered geotagging, which automatically identifies locations, and enhanced privacy controls, allowing users to selectively share location data.
By following these tips and techniques, you can effectively add location to your photos on your iPhone, enhancing your memories and improving your photographic workflow. Remember to visit dfphoto.net for more resources and inspiration!
