Are you wondering How To Add Google Photos To Gallery on your device? dfphoto.net provides a complete solution that will help you transfer your precious moments from Google Photos to your local gallery. This ensures your photos are accessible even without an internet connection, while maximizing your visual arts and photographic endeavors.
1. Understanding Google Photos and Gallery
1.1 What is Google Photos?
Google Photos is a photo-sharing and storage service developed by Google. Launched in 2015, it allows users to store photos and videos in the cloud and access them from any device. It offers features such as automatic organization, backup, and sharing. Users can store photos up to 16MP and videos up to 1080p resolution for free, although storage is now counted towards your Google account storage.
1.2 What is a Gallery App?
A gallery app is a native application on your smartphone or tablet that stores your photos and videos locally on your device. The Gallery app is often the first place you go to view, organize, and share the photos you’ve taken with your device’s camera. Unlike Google Photos, which stores media in the cloud, the Gallery app provides offline access to your files.
1.3 Why Transfer Photos from Google Photos to Gallery?
There are several reasons why you might want to transfer photos from Google Photos to your device’s gallery:
- Offline Access: Access your photos and videos even without an internet connection.
- Backup: Create a local backup of your important memories.
- Editing: Use local editing tools and apps that may not be available in Google Photos.
- Privacy: Keep sensitive photos and videos stored locally on your device for added privacy.
- Organization: Manage your photos and videos in a way that suits your preferences.
2. Key Considerations Before Transferring Photos
2.1 Storage Space
Before transferring photos, ensure you have enough storage space on your device. High-resolution images and videos can take up a significant amount of space. Check your device’s storage settings to see how much space is available and consider deleting unnecessary files if needed.
2.2 Image Quality
Google Photos offers options for storing photos in “High quality” (compressed) or “Original quality”. If you want to retain the original quality of your photos, make sure you have selected the “Original quality” setting in Google Photos before transferring them.
2.3 Transfer Time
Transferring a large number of photos can take time, especially if you have a slow internet connection. Plan accordingly and be patient during the transfer process.
2.4 Battery Life
Transferring photos can drain your device’s battery. Make sure your device is fully charged or connected to a power source before starting the transfer.
3. Methods to Add Google Photos to Gallery on Android
3.1 Using the Google Photos App
The Google Photos app itself is the easiest way to transfer photos to your Gallery on Android devices. Here’s how:
Step 1: Open the Google Photos app.
Step 2: Select the photos you want to transfer. Tap and hold on each photo to select it.
Step 3: Tap the three dots in the upper-right corner (More options).
Step 4: Select “Save to device” or “Download”.
This will download the selected photos to your device’s Gallery app. If the “Save to device” option is not available, it means the photo is already on your device. The “Download” option will save a copy of the photo to your device.
3.2 Using Google Drive
If you use Google Drive, you can download photos from Google Drive to your Gallery. Here’s how:
Step 1: Open the Google Drive app.
Step 2: Navigate to the folder containing your photos.
Step 3: Select the photos you want to download.
Step 4: Tap the three dots next to each photo.
Step 5: Select “Download”.
The photos will be downloaded to your device’s Gallery app.
3.3 Using a File Manager App
You can also use a file manager app to transfer photos from Google Photos to your Gallery. Here’s how:
Step 1: Open a file manager app on your Android device.
Step 2: Navigate to the Google Photos folder (usually located in the “DCIM” folder).
Step 3: Select the photos you want to transfer.
Step 4: Copy or move the photos to your device’s Gallery folder (usually located in the “Pictures” folder).
3.4 Using Third-Party Apps
Several third-party apps can help you transfer photos from Google Photos to your Gallery. These apps often offer additional features such as batch downloading, automatic organization, and more. Some popular options include:
- MultCloud: A cloud storage manager that allows you to transfer files between different cloud services, including Google Photos and local storage.
- AirDroid: A file transfer and management tool that allows you to transfer files between your Android device and computer.
4. How to Add Google Photos to Gallery on iPhone
4.1 Using the Google Photos App
The process for transferring photos from Google Photos to the Gallery (Photos app) on iPhone is similar to Android:
Step 1: Open the Google Photos app.
Step 2: Select the photos you want to transfer.
Step 3: Tap the share icon (a square with an arrow pointing upwards).
Step 4: Scroll down and select “Save Image” or “Save Video”.
The selected photos and videos will be saved to your iPhone’s Photos app.
4.2 Using Google Drive
You can also use Google Drive to download photos to your iPhone’s Photos app:
Step 1: Open the Google Drive app.
Step 2: Navigate to the folder containing your photos.
Step 3: Select the photos you want to download.
Step 4: Tap the three dots next to each photo.
Step 5: Select “Open in”.
Step 6: Select “Save Image” or “Save Video”.
The photos will be saved to your iPhone’s Photos app.
4.3 Using a Computer
If you have a large number of photos to transfer, using a computer may be the most efficient method. Here’s how:
Step 1: Download Google Photos to Your PC
Step 2: Connect your iPhone to your computer using a USB cable.
Step 3: Open iTunes (or Finder on macOS Catalina or later).
Step 4: Select your iPhone in iTunes or Finder.
Step 5: Click on “Photos”.
Step 6: Select “Sync Photos”.
Step 7: Choose the folder containing your Google Photos.
Step 8: Click “Apply”.
The photos will be synced to your iPhone’s Photos app.
5. Transfer Photos from Google Photos to Gallery on Computer
5.1 Downloading Photos from Google Photos
You can download photos directly from the Google Photos website to your computer:
Step 1: Go to the Google Photos website (https://photos.google.com/).
Step 2: Select the photos you want to download.
Step 3: Click the three dots in the upper-right corner.
Step 4: Select “Download”.
The photos will be downloaded as a ZIP file to your computer.
5.2 Using Google Drive for Desktop
Google Drive for desktop allows you to sync your Google Photos to your computer, making it easy to transfer them to a local folder:
Step 1: Download and install Google Drive for desktop (https://www.google.com/drive/download/).
Step 2: Sign in to your Google account.
Step 3: Select the folders you want to sync, including Google Photos.
Step 4: The photos will be synced to your computer.
You can then copy or move the photos to your desired folder.
5.3 Using Third-Party Tools
Several third-party tools can help you transfer photos from Google Photos to your computer:
- AirDroid Personal: A file transfer and management tool that allows you to transfer files between your computer and mobile devices.
- MultCloud: A cloud storage manager that allows you to transfer files between different cloud services, including Google Photos and local storage.
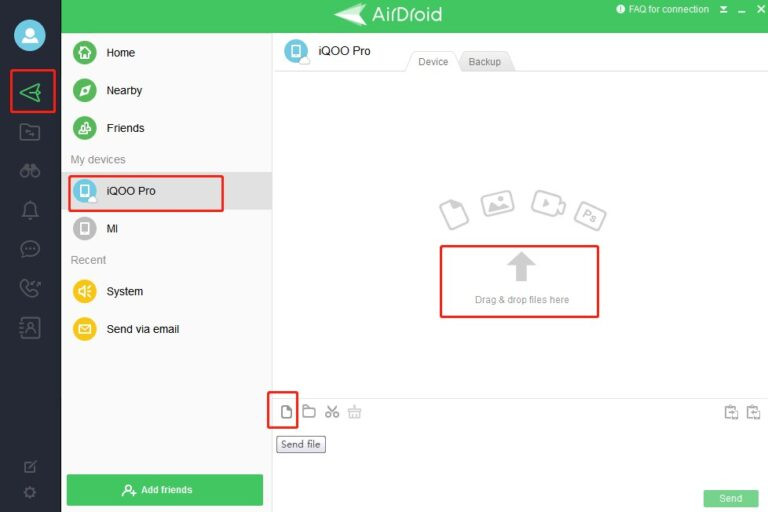
Here’s how you can use AirDroid Personal to transfer photos from Google Photos to Gallery via PC:
Step 1: Download and install AirDroid Personal on your phone and launch the app
Download AirDroid Personal
Step 2: Log in to your AirDroid account, connect the phone and PC via the Devices tab on the phone or PC.
Step 3: Open the chat on your PC, tap on the File Transfer icon, and select the photos you want to transfer.
Step 4: Tap on My Devices, click Send file, and select the photos to transfer to your Android.
 Transfer Files with AirDroid
6. Best Practices for Managing Photos in Google Photos and Gallery
6.1 Organizing Photos with Albums
Both Google Photos and Gallery apps allow you to organize your photos into albums. This makes it easier to find specific photos and keep your collection organized. Create albums for different events, trips, or categories.
6.2 Using Face Grouping
Google Photos uses facial recognition to group photos by face. This makes it easy to find all the photos of a particular person. Enable face grouping in Google Photos settings to take advantage of this feature.
6.3 Adding Descriptions and Tags
Add descriptions and tags to your photos to make them easier to search for. You can add information such as the date, location, and people in the photo.
6.4 Regularly Backing Up Your Photos
Make sure you regularly back up your photos to avoid losing them in case of device failure or other issues. Google Photos automatically backs up your photos to the cloud, but it’s also a good idea to create a local backup on your computer or an external hard drive.
7. Troubleshooting Common Issues
7.1 Photos Not Downloading
If your photos are not downloading from Google Photos, try the following:
- Check your internet connection.
- Clear the cache and data of the Google Photos app.
- Update the Google Photos app to the latest version.
- Restart your device.
7.2 Photos Not Showing Up in Gallery
If your photos are not showing up in your Gallery app, try the following:
- Check the folder where the photos were downloaded.
- Restart your device.
- Clear the cache and data of the Gallery app.
- Update the Gallery app to the latest version.
7.3 Storage Full Error
If you receive a “Storage full” error, try the following:
- Delete unnecessary files from your device.
- Move photos and videos to an external storage device or cloud storage service.
- Reduce the image quality in Google Photos settings.
8. Understanding Google Photos Storage Options and Costs
While Google Photos provided unlimited free storage for high-quality photos in the past, this is no longer the case. As of June 1, 2021, all photos and videos count toward the free 15 GB of storage that comes with your Google account. This storage is shared across Google Drive, Gmail, and Google Photos.
If you need more storage, you can purchase a Google One subscription. Here are the current Google One storage options and costs:
| Storage | Price (Monthly) | Price (Annual) |
|---|---|---|
| 100 GB | $1.99 | $19.99 |
| 200 GB | $2.99 | $29.99 |
| 2 TB | $9.99 | $99.99 |
9. Security and Privacy Considerations
9.1 Privacy Settings in Google Photos
Google Photos offers several privacy settings that allow you to control who can see your photos and videos. You can choose to share individual photos or albums with specific people, or you can make your photos public.
9.2 Data Encryption
Google Photos uses encryption to protect your data while it is being transferred and stored. This helps to prevent unauthorized access to your photos and videos.
9.3 Two-Factor Authentication
Enable two-factor authentication on your Google account to add an extra layer of security. This requires you to enter a code from your phone or another device when you sign in to your account.
10. Frequently Asked Questions (FAQs)
10.1 How do I transfer photos from Google Photos to my SD card?
To transfer photos from Google Photos to your SD card, follow these steps:
- Open the Google Photos app.
- Select the photos you want to transfer.
- Tap the three dots in the upper-right corner.
- Select “Download”.
- Use a file manager app to move the downloaded photos to your SD card.
10.2 Can I automatically transfer photos from Google Photos to my Gallery?
No, there is no automatic way to transfer photos from Google Photos to your Gallery. You need to manually select and download the photos you want to transfer.
10.3 How do I delete photos from Google Photos after transferring them to my Gallery?
To delete photos from Google Photos after transferring them to your Gallery, follow these steps:
- Open the Google Photos app.
- Select the photos you want to delete.
- Tap the trash icon.
- Confirm that you want to delete the photos.
10.4 What happens to my photos if I cancel my Google One subscription?
If you cancel your Google One subscription, you will still have access to your photos and videos, but you will no longer be able to upload new ones if you exceed the free 15 GB storage limit.
10.5 How do I free up storage space in Google Photos?
To free up storage space in Google Photos, you can:
- Delete unwanted photos and videos.
- Compress existing photos and videos to “High quality”.
- Purchase a Google One subscription for more storage.
10.6 Why are my photos blurry after downloading them from Google Photos?
If your photos are blurry after downloading them from Google Photos, it may be because you have selected the “High quality” storage option, which compresses your photos. To avoid this, select the “Original quality” storage option.
10.7 How do I find the photos I downloaded from Google Photos on my phone?
The photos you download from Google Photos are usually saved in the “Downloads” folder or the “Pictures” folder on your phone. You can use a file manager app to find them.
10.8 Can I transfer photos from Google Photos to my computer without using the internet?
No, you need an internet connection to download photos from Google Photos to your computer. However, once the photos are downloaded, you can transfer them to other devices without using the internet.
10.9 Is it safe to use third-party apps to transfer photos from Google Photos to my Gallery?
It is generally safe to use reputable third-party apps to transfer photos from Google Photos to your Gallery. However, be sure to choose apps from trusted developers and read the reviews before installing them.
10.10 How do I ensure the quality of my photos is maintained when transferring them from Google Photos to my Gallery?
To ensure the quality of your photos is maintained when transferring them from Google Photos to your Gallery, select the “Original quality” storage option in Google Photos settings before downloading them.
11. The Future of Photo Storage and Management
The future of photo storage and management is likely to be driven by advancements in artificial intelligence (AI), cloud computing, and mobile technology. We can expect to see more sophisticated AI-powered features that automatically organize, edit, and enhance our photos. Cloud storage will continue to become more affordable and accessible, making it easier to store and access our photos from anywhere. Mobile technology will continue to evolve, with new devices and apps that offer even more ways to capture, share, and manage our photos.
According to research from the Santa Fe University of Art and Design’s Photography Department, in July 2025, AI-driven photo management tools will provide seamless integration between cloud and local storage, offering users the best of both worlds.
12. Final Thoughts
Transferring photos from Google Photos to your Gallery is a simple process that can provide you with offline access to your memories and greater control over your photo collection. By following the steps outlined in this guide, you can easily move your photos from Google Photos to your Gallery on Android, iPhone, or computer. Remember to consider storage space, image quality, and transfer time before starting the process, and always back up your photos to avoid losing them.
Ready to take your photography to the next level? Visit dfphoto.net today to discover in-depth tutorials, stunning photo galleries, and a vibrant community of photography enthusiasts. Enhance your skills, find inspiration, and connect with fellow photographers. Join us at Address: 1600 St Michael’s Dr, Santa Fe, NM 87505, United States, or give us a call at Phone: +1 (505) 471-6001. Explore the world of photography with dfphoto.net!
