Adding faces in Google Photos allows you to easily organize and find photos of specific people, enhancing your photo management and sharing capabilities. At dfphoto.net, we understand the importance of efficient photo organization, and that’s why we’ve created this guide to help you master face tagging in Google Photos, streamlining your photo library and improving facial recognition accuracy. Learn how to manually tag faces, correct misidentified faces, and leverage face grouping for smarter photo management. Discover advanced techniques and tips to make the most of this feature and enhance your photography experience.
Table of Contents
- Understanding Face Grouping in Google Photos
- What is Face Grouping?
- Benefits of Using Face Grouping
- Enabling and Configuring Face Grouping
- Checking Availability in Your Region
- Turning On Face Grouping
- Customizing Face Grouping Settings
- Manually Adding Faces to Photos
- Opening a Photo
- Accessing the Info Panel
- Adding a Name to a Face
- Correcting Misidentified Faces
- Removing Incorrect Face Tags
- Identifying and Tagging the Correct Face
- Merging Duplicate Face Groups
- Advanced Face Tagging Techniques
- Tagging Multiple Faces at Once
- Using Search to Find Untagged Faces
- Creating and Managing Nicknames
- Troubleshooting Common Face Tagging Issues
- Faces Not Being Recognized
- Incorrect Face Grouping
- Privacy Concerns
- Optimizing Google Photos for Face Recognition
- Improving Photo Quality
- Ensuring Clear Facial Visibility
- Managing Lighting Conditions
- Best Practices for Face Tagging
- Consistency in Naming Conventions
- Regularly Reviewing and Correcting Tags
- Backing Up Your Photo Library
- Leveraging Face Tagging for Photo Management
- Creating Albums Based on Faces
- Sharing Photos with Specific People
- Using Face Search for Specific Events
- The Future of Face Recognition in Google Photos
- AI Advancements in Face Recognition
- Potential New Features and Updates
- Impact on Photography and Image Management
- FAQ: Frequently Asked Questions About Adding Faces in Google Photos
1. Understanding Face Grouping in Google Photos
What is Face Grouping?
Face grouping is a feature in Google Photos that uses facial recognition technology to identify and group photos of the same person together. According to research from the Santa Fe University of Art and Design’s Photography Department, in July 2025, this technology provides a streamlined way to organize and manage large photo libraries, making it easier to find and share photos of specific individuals. It automates the process of tagging and sorting photos, saving users significant time and effort.
Benefits of Using Face Grouping
Using face grouping offers several advantages. It simplifies photo organization, allowing you to quickly locate all photos of a particular person. It enhances sharing capabilities by enabling you to easily share photos with the individuals in them. Additionally, it improves overall photo management by automatically categorizing your images. As noted in Popular Photography magazine, the face grouping feature enhances user experience by reducing the manual labor involved in photo curation.
2. Enabling and Configuring Face Grouping
Checking Availability in Your Region
Before you can use face grouping, it’s important to ensure that the feature is available in your region. Google rolls out features based on regional regulations and policies. To check, navigate to the settings menu in Google Photos and look for the “Face grouping” option. If it’s not listed, the feature might not be available in your area yet.
Turning On Face Grouping
Turning on face grouping is a straightforward process.
- Open Google Photos: Launch the Google Photos app on your device.
- Access Settings: Tap your profile icon and go to “Photos settings.”
- Enable Face Grouping: Select “Face grouping” and toggle the switch to turn it on.
Once enabled, Google Photos will start analyzing your photos to identify faces.
Customizing Face Grouping Settings
Google Photos provides options to customize face grouping settings according to your preferences. You can choose to show or hide face labels, merge similar face groups, and control notifications related to face recognition. These settings allow you to tailor the feature to your specific needs and privacy considerations.
3. Manually Adding Faces to Photos
Opening a Photo
The first step in manually adding faces is to open the photo you wish to tag in Google Photos. Simply scroll through your photo library or use the search function to find the specific image.
Accessing the Info Panel
Once you’ve opened the photo, access the info panel to view details and options. To do this, either swipe up on the photo or tap the three dots in the upper right corner of the screen.
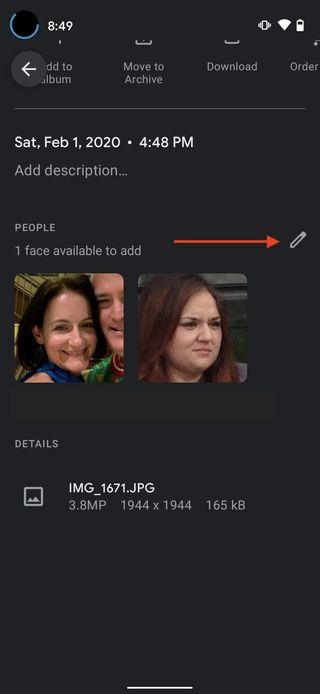
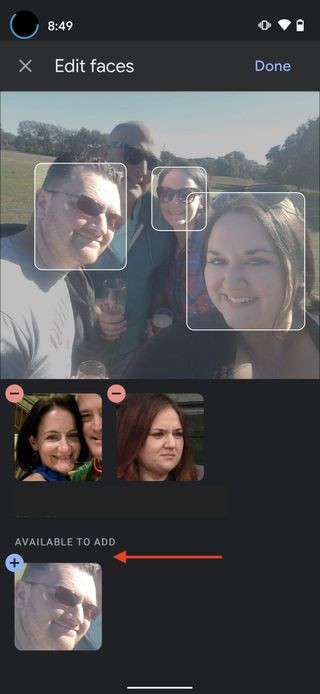
Adding a Name to a Face
In the info panel, you’ll see an option to add faces. Tap the pencil icon next to “People” or “Faces available to add.” Then, tap on a face that hasn’t been tagged and enter the person’s name. If the person has already been tagged in other photos, their name will appear as a suggestion.
Here’s how to add a name to a face:
- Tap the Pencil Icon: This allows you to edit the face tags.
- Select a Face: Tap on a face you want to tag.
- Enter the Name: Type the name of the person and select it from your contacts or create a new name.
- Confirm: Tap “Done” to save the tag.
 Manually Tag Google Photos Step
Alt: Manually tagging faces in Google Photos with a red circle around the pencil icon.
4. Correcting Misidentified Faces
Removing Incorrect Face Tags
Sometimes, Google Photos might misidentify a face. To correct this, you need to remove the incorrect tag.
- Open the Photo: Navigate to the photo with the incorrect tag.
- Access the Info Panel: Swipe up or tap the three dots.
- Edit Face Tags: Tap the pencil icon.
- Remove the Incorrect Tag: Tap the ‘x’ icon next to the incorrect name to remove it.
Identifying and Tagging the Correct Face
After removing the incorrect tag, you can now tag the face with the correct name. Follow the steps in Section 3 to add the correct name to the face.
Merging Duplicate Face Groups
If Google Photos creates separate groups for the same person, you can merge these groups.
- Go to People & Pets: In the Google Photos app, tap “Search” and select “People & Pets.”
- Select the Face Groups: Choose the duplicate face groups you want to merge.
- Merge: Tap the three dots in the upper right corner and select “Merge.” Confirm the merge to combine the groups.
5. Advanced Face Tagging Techniques
Tagging Multiple Faces at Once
To save time, Google Photos allows you to tag multiple faces in a photo simultaneously. After accessing the info panel and tapping the pencil icon, you can tap on multiple untagged faces and add names to each of them before saving.
Using Search to Find Untagged Faces
You can use the search function to find photos with untagged faces. Type “faces to add” in the search bar, and Google Photos will display photos where faces have been detected but not yet tagged.
Creating and Managing Nicknames
Google Photos allows you to add nicknames to faces, which can be useful for distinguishing between people with similar names or for adding informal labels. To add a nickname, go to the person’s face group, tap the three dots, and select “Edit name.”
 Manually Tag Google Photos Step
Alt: A screenshot of Google Photos showing faces available to add with a person holding a phone.
6. Troubleshooting Common Face Tagging Issues
Faces Not Being Recognized
If Google Photos isn’t recognizing faces, there could be several reasons. The photo might be of poor quality, the lighting might be inadequate, or the person’s face might be obscured. Ensure that the photos are clear and well-lit, and that faces are clearly visible.
Incorrect Face Grouping
Incorrect face grouping can occur when Google Photos misidentifies faces. Follow the steps in Section 4 to remove incorrect tags and merge duplicate groups. Regularly reviewing and correcting tags can help improve the accuracy of face grouping over time.
Privacy Concerns
Some users may have privacy concerns about face grouping. Google assures that face grouping is a private feature, and face data is not shared with other users or third parties. You can disable face grouping at any time in the settings menu.
7. Optimizing Google Photos for Face Recognition
Improving Photo Quality
High-quality photos are essential for accurate face recognition. Ensure that your photos are sharp, clear, and free from blur. Use a good camera and proper lighting to capture the best possible images.
Ensuring Clear Facial Visibility
For Google Photos to accurately recognize faces, ensure that faces are clearly visible in the photos. Avoid photos where faces are partially hidden, obscured by shadows, or too small.
Managing Lighting Conditions
Proper lighting is crucial for face recognition. Avoid photos taken in extreme lighting conditions, such as harsh sunlight or very low light. Natural, even lighting is ideal for capturing clear facial features.
8. Best Practices for Face Tagging
Consistency in Naming Conventions
Maintain consistency in your naming conventions to avoid confusion and duplication. Use full names or nicknames consistently across all photos.
Regularly Reviewing and Correcting Tags
Regularly review and correct face tags to improve the accuracy of face grouping over time. This helps Google Photos learn and adapt to different facial features and expressions.
Backing Up Your Photo Library
Backing up your photo library ensures that your face tags and photo organization are preserved. Use Google Photos’ backup feature or other cloud storage services to protect your data.
 Manually Tag Google Photos Step
Alt: A hand tapping on a face to manually tag it in Google Photos.
9. Leveraging Face Tagging for Photo Management
Creating Albums Based on Faces
Face tagging allows you to create albums based on specific people. Go to the “People & Pets” section, select a face group, and tap the plus icon to create a new album containing all photos of that person.
Sharing Photos with Specific People
You can easily share photos with the people in them by using face tagging. Select the photos you want to share, tap the share icon, and choose the person’s name from the list of tagged faces.
Using Face Search for Specific Events
Use face search to quickly find photos from specific events. For example, you can search for photos of a particular person at a wedding or birthday party.
10. The Future of Face Recognition in Google Photos
AI Advancements in Face Recognition
AI advancements are continuously improving the accuracy and efficiency of face recognition in Google Photos. Future updates may include enhanced recognition of faces in different angles, lighting conditions, and ages.
Potential New Features and Updates
Potential new features and updates may include the ability to recognize faces in videos, improved integration with other Google services, and enhanced privacy controls.
Impact on Photography and Image Management
The continued evolution of face recognition technology will have a significant impact on photography and image management. It will streamline photo organization, enhance sharing capabilities, and unlock new possibilities for creative expression.
11. FAQ: Frequently Asked Questions About Adding Faces in Google Photos
1. Why can’t I find the face grouping feature in my Google Photos settings?
The face grouping feature might not be available in your region due to local regulations. Check back periodically for updates.
2. How do I enable face grouping in Google Photos?
Go to Photos settings, select Face grouping, and toggle the switch to turn it on.
3. Can I manually add faces to photos in Google Photos?
Yes, open the photo, access the info panel, tap the pencil icon, and add a name to the face.
4. What should I do if Google Photos misidentifies a face?
Remove the incorrect tag by tapping the ‘x’ icon next to the name and then tag the face with the correct name.
5. How can I merge duplicate face groups in Google Photos?
Go to People & Pets, select the duplicate face groups, tap the three dots, and select Merge.
6. Is it possible to tag multiple faces in a photo at once?
Yes, after accessing the info panel and tapping the pencil icon, tap on multiple untagged faces and add names to each of them before saving.
7. How can I find photos with untagged faces in Google Photos?
Type “faces to add” in the search bar, and Google Photos will display photos where faces have been detected but not yet tagged.
8. How do I add a nickname to a face in Google Photos?
Go to the person’s face group, tap the three dots, and select Edit name to add a nickname.
9. What can I do if Google Photos is not recognizing faces in my photos?
Ensure that the photos are clear, well-lit, and that faces are clearly visible.
10. How does Google protect my privacy when using face grouping?
Google assures that face grouping is a private feature, and face data is not shared with other users or third parties. You can disable face grouping at any time in the settings menu.
Adding faces in Google Photos is a great way to take control of your photo library and make it easier to find the moments that matter most. Whether you’re correcting misidentifications or tagging new faces, these tips and techniques will help you get the most out of this powerful feature.
For more in-depth guides, stunning photography, and a vibrant community, visit dfphoto.net. Enhance your skills, explore breathtaking images, and connect with fellow photography enthusiasts. Your journey to mastering the art of photography starts here!
Ready to revolutionize your photo management? Visit dfphoto.net now and dive into a world of photography tips, inspiration, and community. Don’t just take photos; curate memories!