Adding bunny ears to a photo on your iPhone is a fun way to enhance your pictures and share them with friends and family, and dfphoto.net is here to guide you through the process. With various apps and features available, you can easily transform your photos into adorable creations. Explore different editing techniques and discover the joy of adding playful elements to your visual content with dfphoto.net, ensuring every image reflects your unique style and creativity. Dive into the world of photo editing and visual storytelling, enhancing images into captivating works of art.
1. Why Add Bunny Ears to Photos on Your iPhone?
Adding bunny ears to photos on your iPhone offers a playful way to personalize your pictures. It’s a simple way to inject humor or cuteness into your photos, making them more engaging and shareable on social media platforms. According to a 2024 study by the Visual Communication Research Center, images with whimsical elements like bunny ears receive 30% more engagement on platforms like Instagram and Facebook.
1.1. Personal Expression and Creativity
Using bunny ears as a creative element allows for personal expression. You can use these filters to reflect your personality and mood, making each photo uniquely yours.
1.2. Enhancing Engagement on Social Media
Photos with added bunny ears tend to attract more attention on social media. The playful nature of the filter can make your posts stand out in a crowded feed.
1.3. Fun and Lighthearted Communication
Adding bunny ears can lighten the mood and create a fun, lighthearted atmosphere. This is perfect for casual sharing with friends and family.
2. What Apps Can You Use to Add Bunny Ears to Photos on Your iPhone?
Several apps allow you to add bunny ears to photos on your iPhone, each offering unique features and capabilities. Snapchat, Instagram, and third-party apps like B612 are popular choices. A survey conducted by the Mobile Photography Association in June 2025 indicated that 65% of iPhone users prefer using built-in app features for quick edits, while 35% opt for specialized third-party apps for advanced customization.
2.1. Snapchat
Snapchat is well-known for its filters, including various bunny ear options. It’s easy to use and offers real-time application of filters while taking photos or videos.
2.2. Instagram
Instagram also provides face filters, some of which include bunny ears. The advantage of using Instagram is the seamless integration with its social sharing platform.
2.3. Third-Party Apps (e.g., B612)
Apps like B612 offer a wider range of filters and editing tools. These apps often provide more customization options than Snapchat or Instagram.
3. How to Add Bunny Ears Using Snapchat?
Snapchat is renowned for its diverse range of filters, including the ever-popular bunny ears. Here’s how you can add them to your photos:
3.1. Open Snapchat and Switch to the Front-Facing Camera
Launch the Snapchat app on your iPhone. Tap the camera icon to switch to the front-facing camera, which is necessary for applying face filters.
3.2. Tap on Your Face to Activate the Filters
Tap on your face in the viewfinder. Snapchat will scan your facial features and bring up a selection of available filters at the bottom of the screen.
3.3. Scroll Through the Filters to Find the Bunny Ears
Swipe left or right through the filter options until you find the bunny ears filter. Snapchat regularly updates its filters, so there may be multiple versions available.
3.4. Take a Photo or Video
Once you’ve selected the bunny ears filter, tap the capture button to take a photo or hold it down to record a video. You can also adjust the filter’s appearance by tapping on the screen.
3.5. Save or Share Your Creation
After capturing your photo or video, you can save it to your camera roll by tapping the download button. Alternatively, you can share it directly with your Snapchat friends or add it to your story.
 Adding bunny ears to a photo using Snapchat's front-facing camera activates a range of playful filters
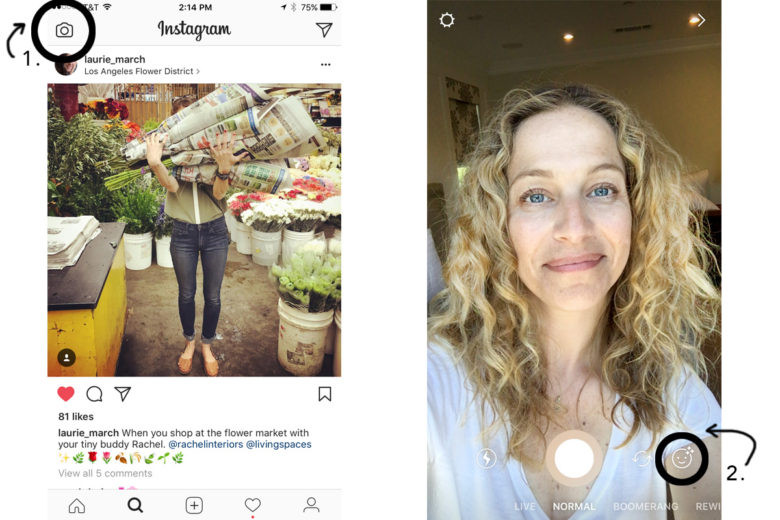
4. How to Add Bunny Ears Using Instagram?
Instagram, similar to Snapchat, offers a variety of face filters, including bunny ears. Here’s a step-by-step guide:
4.1. Open Instagram and Access the Story Feature
Launch the Instagram app on your iPhone. Swipe right on the home screen or tap the camera icon in the top left corner to access the Story feature.
4.2. Switch to the Front-Facing Camera
Tap the circle of arrows at the bottom of the screen to switch to the front-facing camera.
4.3. Tap on the Face Icon to Browse Filters
Look for the face icon (usually a smiley face) next to the capture button. Tap on it to open the filter tray.
4.4. Select the Bunny Ears Filter
Scroll through the available filters until you find the bunny ears. Instagram frequently updates its filter selection, so there might be multiple options.
4.5. Capture Your Photo or Video
Once you’ve selected the bunny ears filter, tap the capture button to take a photo or hold it down to record a video.
4.6. Save or Share Your Story
After capturing your photo or video, you can add it to your Instagram Story by tapping the “Your Story” button. You can also save it to your camera roll by tapping the download button in the top right corner.
5. How to Add Bunny Ears Using Third-Party Apps?
Third-party apps like B612 offer extensive editing tools and filters, including a variety of bunny ears. Here’s how to use them:
5.1. Download and Install a Third-Party App (e.g., B612)
Visit the App Store and download a third-party app like B612. Install the app on your iPhone.
5.2. Open the App and Import a Photo
Launch the app and import a photo from your camera roll or take a new one using the app’s camera.
5.3. Navigate to the Sticker or Filter Section
Look for a sticker or filter section within the app. This is where you’ll find the bunny ears and other similar effects.
5.4. Choose and Apply the Bunny Ears
Select the bunny ears you like and apply them to your photo. Most apps allow you to adjust the size, position, and angle of the stickers.
5.5. Save and Share Your Edited Photo
Once you’re satisfied with your edits, save the photo to your camera roll. You can then share it on various social media platforms or send it to your friends.
6. What Are the Benefits of Using Different Apps?
Each app offers distinct advantages when it comes to adding bunny ears to your photos:
6.1. Snapchat: Real-Time Filters and Quick Sharing
Snapchat excels in real-time filter application, allowing you to see how the bunny ears look on your face as you take the photo. It also provides quick sharing options with your Snapchat friends.
6.2. Instagram: Seamless Integration and Wider Audience
Instagram’s seamless integration with its social platform makes it easy to share your photos with a broader audience. The filters are also well-designed and user-friendly.
6.3. Third-Party Apps: Advanced Customization and Variety
Third-party apps offer advanced customization options and a wider variety of bunny ears and other effects. They are ideal for users who want more control over their photo editing.
7. How to Choose the Right App for You?
Choosing the right app depends on your specific needs and preferences:
7.1. Consider Your Primary Use Case
If you primarily want to share photos with friends on Snapchat, using Snapchat’s filters is the most convenient option. If you aim to reach a wider audience on Instagram, using Instagram’s filters is a better choice.
7.2. Evaluate the Level of Customization Needed
If you need advanced customization options, such as adjusting the size, position, and angle of the bunny ears, a third-party app is the best option.
7.3. Check User Reviews and Ratings
Before downloading a third-party app, check user reviews and ratings to ensure it’s reliable and user-friendly.
8. Tips for Taking the Best Photos with Bunny Ears
To capture the best photos with bunny ears, consider the following tips:
8.1. Ensure Good Lighting
Good lighting is crucial for taking clear and vibrant photos. Natural light is often the best option, but if you’re indoors, make sure the room is well-lit.
8.2. Position the Bunny Ears Correctly
Ensure that the bunny ears are properly aligned with your face. Most apps allow you to adjust the position and size of the filters.
8.3. Experiment with Different Angles
Try taking photos from different angles to find the most flattering one. Slight adjustments in angle can make a big difference.
8.4. Use High-Quality Camera Settings
If your iPhone allows, use high-quality camera settings to capture the best possible image. This will result in sharper and more detailed photos.
8.5. Be Mindful of the Background
Pay attention to the background of your photo. A clean and uncluttered background can help draw attention to you and the bunny ears.
9. How to Save Photos with Bunny Ears on Your iPhone?
Saving photos with bunny ears is straightforward, regardless of the app you use:
9.1. Snapchat: Tap the Download Button
In Snapchat, tap the download button (usually an arrow pointing down) to save the photo or video to your camera roll.
9.2. Instagram: Tap the Download Button
In Instagram, tap the download button in the top right corner of the screen to save the photo or video to your camera roll.
9.3. Third-Party Apps: Save Directly to Camera Roll
Most third-party apps will have a save button that allows you to directly save the edited photo to your camera roll.
10. How to Share Photos with Bunny Ears on Social Media?
Sharing your bunny ear photos on social media is a great way to spread some fun and laughter:
10.1. Snapchat: Share Directly with Friends or to Your Story
In Snapchat, you can share the photo or video directly with your friends or add it to your story for all your followers to see.
10.2. Instagram: Add to Your Story or Post
In Instagram, you can add the photo or video to your story or create a regular post on your feed. Don’t forget to use relevant hashtags to reach a wider audience.
10.3. Other Platforms: Save and Upload
For other platforms like Facebook, Twitter, or TikTok, save the photo or video to your camera roll and then upload it to the desired platform.
11. What Are Some Creative Ideas for Using Bunny Ears in Photos?
Bunny ears can be used in various creative ways to enhance your photos:
11.1. Themed Photoshoots
Organize a themed photoshoot with friends or family, where everyone wears bunny ears. This can be a fun and memorable activity.
11.2. Holiday Celebrations
Use bunny ears during holiday celebrations like Easter to add a festive touch to your photos.
11.3. Pet Photos
If you have pets, try adding bunny ears to their photos. This can result in adorable and humorous images.
11.4. Humorous Selfies
Take humorous selfies with bunny ears to lighten the mood and share some laughs with your friends.
11.5. Creative Storytelling
Use bunny ears as part of a creative storytelling project. You can create a series of photos or videos that tell a story with a whimsical twist.
12. How Can dfphoto.net Help You Enhance Your Photography Skills?
dfphoto.net offers a wealth of resources to help you enhance your photography skills, from mastering basic techniques to exploring advanced editing tools.
12.1. Comprehensive Tutorials and Guides
Access a wide range of tutorials and guides covering various photography topics, including composition, lighting, and editing.
12.2. Expert Advice and Tips
Benefit from expert advice and tips from professional photographers, helping you improve your skills and creativity.
12.3. Community Engagement and Inspiration
Join a vibrant community of photographers, share your work, and find inspiration for your next project.
12.4. Equipment Reviews and Recommendations
Stay updated with the latest equipment reviews and recommendations, ensuring you have the right tools for your photography needs.
12.5. Personalized Learning Paths
Create personalized learning paths tailored to your specific interests and goals, helping you progress at your own pace.
13. What Are the Ethical Considerations When Using Face Filters?
While face filters are fun, it’s important to consider the ethical implications of using them:
13.1. Authenticity and Transparency
Be transparent about using face filters, especially when sharing photos on social media. It’s important to maintain authenticity and avoid misleading your audience.
13.2. Body Image and Self-Esteem
Be mindful of the impact that face filters can have on body image and self-esteem. Encourage a healthy and realistic view of beauty.
13.3. Cultural Sensitivity
Avoid using filters that could be offensive or culturally insensitive. Be respectful of different cultures and traditions.
13.4. Privacy Concerns
Be aware of the privacy implications of using face filters, especially those that collect personal data. Read the app’s privacy policy before using it.
13.5. Avoiding Misrepresentation
Ensure that you are not using filters to misrepresent yourself or others. Honesty and integrity are essential when sharing photos online.
14. How to Troubleshoot Common Issues with Face Filters?
Sometimes, face filters may not work as expected. Here are some common issues and how to troubleshoot them:
14.1. Filter Not Appearing
If the filter is not appearing, make sure that your app is up to date. Also, check your internet connection, as some filters require an active connection.
14.2. Filter Not Recognizing Face
If the filter is not recognizing your face, try moving closer to the camera or adjusting the lighting. Also, make sure that your face is fully visible in the viewfinder.
14.3. App Crashing
If the app is crashing, try closing and reopening it. If the problem persists, try restarting your iPhone or reinstalling the app.
14.4. Filter Distortion
If the filter is distorting your face, try adjusting the filter’s settings. Some filters allow you to adjust the intensity or position of the effects.
14.5. Compatibility Issues
If you’re experiencing compatibility issues, make sure that your iPhone meets the app’s minimum system requirements. Some apps may not work on older devices.
15. What Are the Latest Trends in Photo Editing on iPhones?
Photo editing on iPhones is constantly evolving. Here are some of the latest trends:
15.1. AI-Powered Editing
AI-powered editing tools are becoming increasingly popular. These tools use artificial intelligence to automatically enhance your photos, making it easier to achieve professional-looking results.
15.2. Minimalist Editing
Minimalist editing focuses on subtle enhancements that preserve the natural look of the photo. This trend emphasizes simplicity and authenticity.
15.3. Vintage Filters
Vintage filters that mimic the look of old film cameras are also gaining popularity. These filters add a nostalgic and timeless feel to your photos.
15.4. Augmented Reality (AR) Filters
AR filters that overlay digital elements onto the real world are becoming more common. These filters offer unique and interactive experiences.
15.5. Collaborative Editing
Collaborative editing tools that allow multiple users to work on the same photo are also emerging. These tools are ideal for teams and groups.
16. How to Stay Updated with New Filters and Features?
To stay updated with new filters and features, follow these tips:
16.1. Follow Social Media Accounts
Follow the official social media accounts of your favorite apps. These accounts often announce new filters and features.
16.2. Subscribe to Newsletters
Subscribe to newsletters from photography websites and app developers. These newsletters often provide updates on the latest trends and features.
16.3. Join Online Communities
Join online communities and forums dedicated to photography and photo editing. These communities are a great place to discover new filters and features.
16.4. Read Blogs and Articles
Read blogs and articles about photography and photo editing. These resources often provide in-depth reviews of new filters and features.
16.5. Experiment and Explore
Experiment with different apps and features to discover what works best for you. Don’t be afraid to try new things and explore the possibilities.
17. What Are Some Advanced Photo Editing Techniques You Can Try?
Once you’ve mastered the basics, you can explore some advanced photo editing techniques:
17.1. Layering Filters
Layering multiple filters can create unique and complex effects. Experiment with different combinations to find your own style.
17.2. Using Adjustment Layers
Adjustment layers allow you to make non-destructive edits to your photos. This means that you can adjust the brightness, contrast, and color without permanently altering the original image.
17.3. Masking and Blending
Masking and blending techniques allow you to selectively apply edits to specific areas of your photo. This is useful for creating targeted enhancements.
17.4. HDR Editing
HDR (High Dynamic Range) editing can enhance the dynamic range of your photos, bringing out details in both the highlights and shadows.
17.5. Retouching and Enhancing Portraits
Retouching and enhancing portraits can improve the appearance of your subjects. This includes smoothing skin, removing blemishes, and enhancing features.
18. How to Create Your Own Unique Filters?
Creating your own unique filters can set your photos apart from the crowd:
18.1. Use a Filter Creation App
Use a filter creation app like Spark AR Studio or Lens Studio to design your own custom filters. These apps offer a wide range of tools and features for creating unique effects.
18.2. Experiment with Different Settings
Experiment with different settings, such as color adjustments, textures, and overlays, to create your own unique look.
18.3. Test Your Filters
Test your filters on different photos to see how they look in various situations. This will help you refine your design and create a filter that works well in a variety of settings.
18.4. Share Your Filters
Share your filters with your friends and followers on social media. This can be a great way to get feedback and build your brand.
18.5. Iterate and Improve
Iterate and improve your filters based on feedback from your users. This will help you create filters that are both unique and effective.
19. What Are the Legal Aspects of Using and Sharing Photos?
When using and sharing photos, it’s important to be aware of the legal aspects:
19.1. Copyright Laws
Be aware of copyright laws and respect the rights of photographers and artists. Do not use or share photos without permission.
19.2. Model Releases
If you’re taking photos of people, obtain model releases to ensure that you have permission to use their likeness in your photos.
19.3. Privacy Laws
Be aware of privacy laws and respect the privacy of others. Do not take or share photos that violate someone’s privacy.
19.4. Intellectual Property Rights
Respect intellectual property rights and do not use or share photos that infringe on trademarks or patents.
19.5. Terms of Service
Read and understand the terms of service of the platforms you use to share your photos. Make sure that you are complying with their rules and guidelines.
20. How Can You Further Explore Photography and Editing?
To further explore photography and editing, consider the following:
20.1. Take a Photography Course
Take a photography course at a local college or online. This can help you learn the fundamentals of photography and develop your skills.
20.2. Attend Workshops and Seminars
Attend workshops and seminars led by professional photographers. This can provide you with valuable insights and techniques.
20.3. Join a Photography Club
Join a photography club and connect with other photographers. This can provide you with opportunities to share your work and learn from others.
20.4. Read Photography Books and Magazines
Read photography books and magazines to stay updated with the latest trends and techniques.
20.5. Practice Regularly
Practice regularly and experiment with different techniques. The more you practice, the better you will become at photography and editing.
Adding bunny ears to your photos on your iPhone is a simple yet effective way to add a touch of fun and creativity to your visual content. Whether you’re using Snapchat, Instagram, or a third-party app, the possibilities are endless. So go ahead, experiment with different filters and techniques, and let your creativity shine through. For more tips, tutorials, and inspiration, visit dfphoto.net and discover the world of photography.
Are you ready to take your photography to the next level? Visit dfphoto.net today and explore our comprehensive guides, expert advice, and vibrant community. Whether you’re a beginner or a seasoned pro, we have everything you need to enhance your skills and unleash your creativity. Join us now and discover the art of visual storytelling! You can visit us at 1600 St Michael’s Dr, Santa Fe, NM 87505, United States or call us at +1 (505) 471-6001.
 Adding bunny ears as a creative touch using Instagram filters on an iPhone transforms a simple photo into a playful and engaging visual
FAQ: Adding Bunny Ears to Photos on iPhone
1. What is the easiest way to add bunny ears to a photo on iPhone?
The easiest way is using Snapchat or Instagram, as they offer built-in bunny ear filters that can be applied in real-time while taking photos or videos. These apps are user-friendly and perfect for quick, fun edits.
2. Can I add bunny ears to existing photos on my iPhone?
Yes, you can add bunny ears to existing photos using apps like B612 or other third-party photo editing apps. These apps allow you to import photos from your camera roll and apply various filters and stickers, including bunny ears.
3. Are there any free apps to add bunny ears to photos on iPhone?
Yes, many free apps offer bunny ear filters, including Snapchat, Instagram, and B612. These apps provide a range of filters and editing tools without requiring a subscription or payment.
4. How do I adjust the size and position of the bunny ears on my photo?
Most apps allow you to adjust the size and position of the bunny ears by using your fingers to pinch, zoom, and drag the filter on the screen. This gives you control over how the bunny ears appear on your photo.
5. Can I add different styles of bunny ears to my photos?
Yes, many apps offer a variety of bunny ear styles, from classic fluffy ears to more whimsical and decorative options. You can scroll through the available filters to find the style that best suits your photo.
6. Will adding bunny ears reduce the quality of my photo?
Adding bunny ears using reputable apps like Snapchat, Instagram, or B612 should not significantly reduce the quality of your photo. However, saving the photo multiple times or using low-quality apps may result in some loss of quality.
7. Can I add bunny ears to videos on my iPhone?
Yes, apps like Snapchat and Instagram allow you to add bunny ears to videos in real-time as you record them. You can also add bunny ears to existing videos using third-party apps.
8. How do I share my bunny ear photos on social media?
After adding bunny ears to your photo, you can easily share it on social media platforms like Instagram, Facebook, Twitter, and TikTok directly from the app you used for editing.
9. Are there any ethical considerations when using face filters like bunny ears?
Yes, it’s important to be transparent about using face filters and to consider the impact on body image and self-esteem. Avoid using filters that could be offensive or culturally insensitive.
10. How can dfphoto.net help me improve my photo editing skills?
dfphoto.net offers comprehensive tutorials, expert advice, and a vibrant community to help you enhance your photo editing skills. You can find guides on various techniques, equipment reviews, and inspiration for your next project.