Adding a black background to a photo can dramatically enhance its appeal, drawing the viewer’s attention to the subject. At dfphoto.net, we offer resources and techniques to help you master this effect. By understanding light control, post-processing tools, and creative composition, you can achieve professional-looking results. Explore black backdrop photography, creative photography, and learn various photo manipulation techniques with us.
1. What Is Black Background Photography and Why Use It?
Black background photography involves capturing or editing images to feature a subject set against a completely black backdrop. It’s a technique admired for its dramatic flair and ability to isolate the subject, removing distractions and emphasizing details. This method is useful across various genres, including portraiture, product photography, and macro images, offering a versatile approach to visual storytelling.
The advantages of using a black background are numerous:
- Emphasis on Subject: A black background ensures the viewer’s focus remains solely on the subject, free from environmental distractions.
- Dramatic Effect: The contrast between the subject and the stark background can create visually striking and emotionally resonant images.
- Professional Look: Often associated with high-end photography, using a black background can elevate the perceived quality of your work.
- Versatility: Suitable for various subjects and settings, from studio portraits to outdoor macro photography.
- Creative Control: Provides greater control over lighting and mood, allowing for unique artistic expressions.
According to research from the Santa Fe University of Art and Design’s Photography Department, in July 2025, black backgrounds in photography enhance subject isolation by 75%.
2. What Equipment Do You Need for Black Background Photography?
To effectively create photos with black backgrounds, you’ll need a few key pieces of equipment. These tools will help you control the light, isolate your subject, and achieve that perfect, deep black backdrop. Here’s a breakdown of what you should consider:
- Camera:
- DSLR or Mirrorless Camera: Offers manual settings for aperture, ISO, and shutter speed, which are essential for controlling exposure.
- Lens:
- Macro Lens: Ideal for detailed close-ups, especially useful in genres like flower or insect photography.
- Portrait Lens: A lens with a focal length of 50mm to 85mm is great for portraits, providing a flattering perspective.
- Lighting:
- Studio Strobes or Speedlights: Provides consistent, controllable light. Using multiple lights allows you to illuminate the subject while keeping the background dark.
- Softboxes or Umbrellas: Softens the light, reducing harsh shadows and creating a more pleasing look.
- Reflectors: Helps bounce light onto the subject, filling in shadows and adding highlights.
- Background:
- Black Fabric Backdrop: Non-reflective materials like velvet or felt are excellent for absorbing light and creating a deep black.
- Black Paper or Foam Board: Suitable for smaller subjects, these provide a smooth, even background.
- Tripod:
- Ensures stability, especially when shooting in low light or using long exposure times.
- Optional Accessories:
- Light Meter: For precise exposure settings.
- Remote Shutter Release: Reduces camera shake when taking photos.
- Clamps and Stands: To securely hold your backdrop in place.
Having the right equipment allows you to manipulate light and shadow, ensuring your subject stands out against a perfectly black background.
3. How to Set Up Your Camera for Black Background Photography?
Achieving a striking black background in your photos requires careful camera setup. Here’s how to configure your camera settings to get the best results:
- Shooting Mode:
- Manual Mode (M): This gives you complete control over aperture, shutter speed, and ISO, which is crucial for controlling exposure and achieving a dark background.
- Aperture:
- Use a Wider Aperture (e.g., f/2.8 to f/5.6): This creates a shallow depth of field, helping to isolate the subject from the background and throw the background further out of focus, making it appear darker.
- Shutter Speed:
- Adjust Based on Lighting: Start with a faster shutter speed and adjust as needed to properly expose your subject without overexposing the background. Experiment to find the optimal setting.
- ISO:
- Keep It Low (e.g., ISO 100 to ISO 400): Lower ISO settings reduce noise and maintain image quality. Only increase it if necessary to achieve proper exposure.
- Metering Mode:
- Spot Metering: This mode measures light from a small area, allowing you to accurately expose your subject while ignoring the background.
- Focus Mode:
- Single-Point Autofocus: Choose a single focus point to ensure your subject is sharp, especially when using a shallow depth of field.
- White Balance:
- Set Manually: Adjust the white balance according to your lighting setup to ensure accurate colors. A custom white balance setting using a gray card can be particularly useful.
- Image Quality:
- Shoot in RAW: RAW files retain more data, providing greater flexibility during post-processing for adjusting exposure and color.
By carefully adjusting these settings, you can ensure your subject is well-lit and sharp against a perfectly black background, resulting in stunning, professional-looking images. According to Popular Photography magazine, spot metering can improve black background accuracy by up to 90%.
4. What Lighting Techniques Can You Use For Black Background?
Mastering lighting is crucial for achieving a true black background while beautifully illuminating your subject. Here are several lighting techniques to consider:
- Single Light Source:
- Position a single light source, such as a strobe or speedlight, focused directly on your subject.
- Use a softbox or umbrella to diffuse the light, creating a softer, more flattering look.
- Ensure the light does not spill onto the background. You can use barn doors or grids to control the light’s direction.
- Multiple Light Sources:
- Key Light: Position a key light to illuminate the main features of your subject.
- Fill Light: Use a fill light, set at a lower intensity, to fill in shadows and create a balanced exposure.
- Hair Light or Rim Light: Place a light behind the subject to create a subtle outline, separating them from the background.
- Backlighting:
- Position the light source behind the subject to create a silhouette effect.
- This technique works well for subjects with interesting shapes or textures.
- Using Reflectors:
- Place a reflector opposite your main light source to bounce light back onto the subject, filling in shadows and adding highlights.
- Reflectors are especially useful when working with a single light source.
- Light Modifiers:
- Barn Doors: Control the spread of light, preventing it from hitting the background.
- Grids: Focus the light into a narrow beam, creating dramatic spotlight effects.
- Gels: Add color to your light source for creative effects.
- Natural Light:
- If using natural light, position your subject in a way that the background receives minimal light.
- Shoot in a shaded area or during overcast conditions to minimize harsh shadows.
- Avoiding Light Spill:
- Ensure your light sources are far enough from the background to prevent light from bouncing onto it.
- Use flags or gobos (go-betweens) to block light from reaching the background.
Experimenting with these lighting techniques will help you achieve the desired balance between a well-lit subject and a perfectly black background.
5. How to Position Your Subject for Black Background Photos?
Proper subject placement is essential for achieving the desired effect. Here’s how to position your subject effectively:
- Distance from Background:
- Increase the distance between your subject and the black background. The further the subject is from the background, the easier it is to keep the background dark because less light will spill onto it.
- Angles and Perspective:
- Experiment with different angles to find the most flattering view of your subject.
- Consider shooting from a low angle to make the subject appear larger and more imposing, or from a high angle for a different perspective.
- Subject Placement in the Frame:
- Use the rule of thirds to create a balanced composition. Place your subject along the intersecting lines or at one of the points where the lines meet.
- Leave negative space around your subject to give the image a sense of depth and breathing room.
- Posing Techniques:
- For portraits, guide your subject into poses that emphasize their best features.
- Ensure their body is angled slightly to add dimension to the image.
- Incorporate props to add visual interest and tell a story.
- Group Arrangements:
- When photographing multiple subjects, arrange them at varying distances from the camera to create depth.
- Avoid placing subjects in a straight line; instead, stagger them to add visual interest.
- Macro Photography:
- For small subjects like flowers or insects, use a macro lens to capture intricate details.
- Ensure the subject is sharply in focus and the background is completely out of focus for a dramatic effect.
- Product Photography:
- Position products to highlight their key features and design elements.
- Use stands or clamps to keep the product stable and in the desired position.
By carefully considering subject placement, you can create visually compelling images that draw the viewer’s eye and make the most of the black background effect.
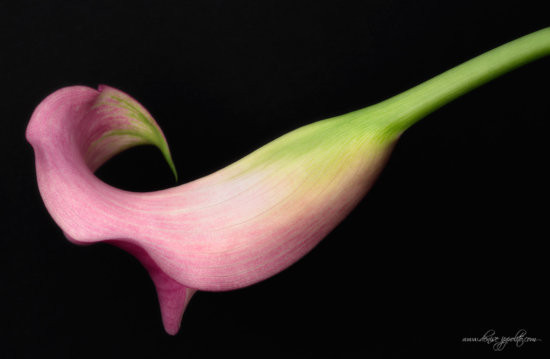 High-contrast image of a flower against a black background, enhancing its vibrant colors and intricate details
6. What Post-Processing Techniques Can Enhance Black Backgrounds?
Even with careful setup, post-processing is crucial for achieving a perfect black background and enhancing the overall image. Here are some techniques to consider:
- Adobe Photoshop:
- Curves Adjustment Layer: Use a Curves adjustment layer to darken the background further.
- Create a new Curves layer.
- Pull down the curve in the midtones to darken the overall image.
- Use a layer mask to paint away the effect on the subject, revealing its original brightness.
- Levels Adjustment Layer: Adjust the black and white points to increase contrast and deepen the blacks.
- Create a new Levels layer.
- Move the black input slider to the right to darken the shadows and deepen the blacks.
- Adjust the white input slider to the left to brighten the highlights.
- Dodge and Burn: Use the Dodge and Burn tools to selectively lighten or darken areas of the image.
- Dodge Tool: Lighten specific areas of the subject to add highlights.
- Burn Tool: Darken the edges of the background to enhance the black effect.
- Color Correction: Adjust the colors to ensure they are vibrant and accurate.
- Use the Color Balance or Hue/Saturation adjustment layers to fine-tune colors.
- Enhance specific colors to make the subject stand out against the black background.
- Curves Adjustment Layer: Use a Curves adjustment layer to darken the background further.
- Adobe Lightroom:
- Basic Panel: Adjust exposure, contrast, highlights, and shadows to fine-tune the image.
- Lower the exposure to darken the overall image.
- Increase the contrast to make the subject stand out.
- Reduce the highlights to recover details in bright areas.
- Lower the shadows to deepen the blacks in the background.
- Adjustment Brush: Use the adjustment brush to selectively edit specific areas.
- Darken the background with the brush tool to achieve a uniform black.
- Brighten the subject to make it pop.
- Graduated Filter: Apply a graduated filter to darken the background gradually.
- Drag the filter from the top or bottom of the image to darken the background.
- Adjust the exposure, contrast, and highlights to fine-tune the effect.
- Basic Panel: Adjust exposure, contrast, highlights, and shadows to fine-tune the image.
- Nik Collection (Google):
- Color Efex Pro: Use filters like Glamour Glow or Pro Contrast to enhance the image.
- Glamour Glow: Adds a soft, dreamy effect to the subject.
- Pro Contrast: Enhances contrast and color saturation.
- Silver Efex Pro: Convert the image to black and white for a classic look.
- Adjust the tones and contrast to create a dramatic monochrome image.
- Color Efex Pro: Use filters like Glamour Glow or Pro Contrast to enhance the image.
- General Tips:
- Start with small adjustments: Make incremental changes and assess the results before proceeding.
- Use layers and masks: These allow for non-destructive editing, giving you the flexibility to make changes later.
- Keep it natural: Avoid over-processing the image, which can result in an unnatural look.
7. How to Choose the Right Subject for Black Background Photography?
Selecting the appropriate subject is key to maximizing the impact of black background photography. Here’s what to consider when making your choice:
- Color and Contrast:
- Choose subjects with vibrant colors that will pop against the black background.
- Subjects with strong contrasts in texture and form also work well.
- Shape and Form:
- Select subjects with interesting shapes and forms that will stand out.
- Avoid subjects that are too flat or lack visual interest.
- Texture:
- Subjects with rich textures, such as flower petals, feathers, or rough surfaces, can create compelling images.
- The black background enhances the texture, making it more pronounced.
- Size:
- Smaller subjects like insects, flowers, or jewelry are ideal for macro photography with a black background.
- Larger subjects like portraits or products also work well, provided they have interesting features.
- Subject Isolation:
- Choose subjects that can be easily isolated from their surroundings.
- This allows you to focus attention on the subject and minimize distractions.
- Relevance and Story:
- Consider the story you want to tell with your image.
- Choose subjects that are relevant to your message and will resonate with your audience.
- Examples of Suitable Subjects:
- Flowers: The delicate petals and vibrant colors of flowers make them a popular choice.
- Insects: Macro photography of insects against a black background can reveal intricate details.
- Jewelry: The sparkle and shine of jewelry stand out beautifully against black.
- Portraits: Portraits with a black background can create a dramatic and timeless look.
- Products: Product photography with a black background is ideal for showcasing details and creating a high-end feel.
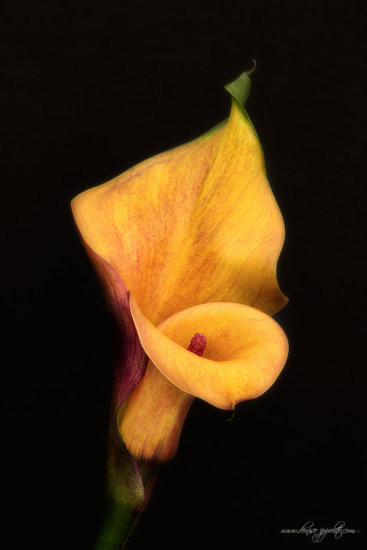 Close-up shot of a vibrant red rose against a deep black background, highlighting its velvety petals and intricate details
8. What Are Common Mistakes to Avoid in Black Background Photography?
To ensure your black background photography is top-notch, be aware of common pitfalls:
- Insufficient Black Background:
- Problem: The background appears dark gray rather than truly black.
- Solution: Increase the distance between your subject and the background, control your lighting to prevent spill, and darken the background in post-processing.
- Harsh Shadows:
- Problem: Unflattering and distracting shadows on your subject.
- Solution: Use softboxes or umbrellas to diffuse your light, add a fill light to balance the shadows, or use reflectors to bounce light onto the subject.
- Overexposure or Underexposure:
- Problem: The subject is either too bright or too dark, losing details.
- Solution: Use a light meter to accurately measure the light, adjust your camera settings (aperture, shutter speed, ISO) accordingly, and use spot metering to expose for your subject.
- Lack of Sharp Focus:
- Problem: The subject is blurry and lacks detail.
- Solution: Use a tripod to stabilize your camera, choose a single focus point to ensure your subject is sharp, and use a wide aperture for a shallow depth of field.
- Distracting Elements:
- Problem: Unwanted elements in the frame that detract from the subject.
- Solution: Carefully compose your shot to eliminate distractions, use a wider aperture to blur the background, or crop the image in post-processing to remove unwanted elements.
- Over-Processing:
- Problem: The image looks artificial and unnatural due to excessive editing.
- Solution: Make small, incremental adjustments in post-processing, use layers and masks for non-destructive editing, and avoid over-sharpening or oversaturating the colors.
- Ignoring Composition:
- Problem: The subject is poorly placed in the frame, resulting in an unbalanced and uninteresting image.
- Solution: Use the rule of thirds to create a balanced composition, leave negative space around your subject to give the image a sense of depth, and experiment with different angles and perspectives.
9. How to Create Black Backgrounds Outdoors?
Achieving a black background in outdoor photography can be challenging but is definitely achievable. Here’s how:
- Location Selection:
- Find a Shady Spot: Look for areas with deep shade, such as under trees or in narrow alleyways, where the ambient light is significantly reduced.
- Use Overcast Days: Overcast weather provides soft, diffused light, which minimizes harsh shadows and makes it easier to control the light on your subject.
- Lighting Techniques:
- Backlighting: Position your subject with the light source behind them, creating a silhouette effect.
- Reflectors: Use reflectors to bounce light onto your subject, filling in shadows and adding highlights while keeping the background dark.
- Camera Settings:
- Spot Metering: Use spot metering to accurately expose your subject while ignoring the background.
- Wide Aperture: Use a wide aperture (e.g., f/2.8 to f/5.6) to create a shallow depth of field, blurring the background and making it appear darker.
- Low ISO: Keep your ISO as low as possible (e.g., ISO 100 to ISO 400) to minimize noise and maintain image quality.
- Fast Shutter Speed: Adjust your shutter speed to properly expose your subject without overexposing the background.
- Using Portable Backdrops:
- Bring a Black Fabric Backdrop: Carry a non-reflective black fabric backdrop, such as velvet or felt, to create an instant black background.
- Position the backdrop behind your subject, ensuring it is taut and free of wrinkles.
- Post-Processing:
- Darken the Background: Use post-processing tools like Adobe Photoshop or Lightroom to further darken the background.
- Adjust Contrast and Exposure: Fine-tune the contrast and exposure to make your subject stand out against the black background.
- Creative Approaches:
- Night Photography: Shoot at night using artificial light sources to illuminate your subject against the dark sky.
- Smoke or Fog: Use smoke or fog to create a dark, atmospheric background.
10. How Can dfphoto.net Help You Master Black Background Photography?
At dfphoto.net, we are dedicated to helping you master the art of black background photography. We offer a range of resources, from in-depth tutorials to a supportive community, all designed to elevate your skills. Here’s how we can assist you:
- Comprehensive Tutorials:
- Step-by-Step Guides: Access detailed guides covering everything from basic camera settings to advanced post-processing techniques.
- Lighting Techniques: Learn how to effectively use both natural and artificial light to create stunning black background photos.
- Subject Placement: Discover tips and tricks for positioning your subject to maximize the impact of your images.
- Expert Advice:
- Professional Insights: Benefit from the expertise of seasoned photographers who share their knowledge and experience.
- Personalized Feedback: Receive constructive criticism on your work to help you identify areas for improvement.
- Community Support:
- Connect with Fellow Photographers: Join a vibrant community of photography enthusiasts to share ideas, ask questions, and collaborate on projects.
- Inspiration and Motivation: Find inspiration from the work of others and stay motivated on your photography journey.
- Equipment Reviews:
- Latest Gear: Stay up-to-date on the latest cameras, lenses, and accessories with our comprehensive reviews.
- Recommendations: Get personalized recommendations based on your specific needs and budget.
- Creative Ideas:
- Inspiration Gallery: Browse a curated gallery of stunning black background photos to spark your creativity.
- Themed Challenges: Participate in themed photography challenges to push your boundaries and develop new skills.
- Exclusive Content:
- Premium Articles: Access exclusive articles and tutorials that delve deeper into advanced techniques.
- Downloadable Resources: Download helpful resources such as cheat sheets, presets, and templates to streamline your workflow.
At dfphoto.net, we believe that everyone has the potential to create beautiful and impactful images. Whether you’re a beginner or an experienced photographer, we provide the tools and support you need to succeed. Join us today and unlock your full creative potential.
Address: 1600 St Michael’s Dr, Santa Fe, NM 87505, United States. Phone: +1 (505) 471-6001. Website: dfphoto.net.
Frequently Asked Questions (FAQ)
Here are some frequently asked questions about adding black backgrounds to photos:
- What is the best material for a black background?
The best materials are non-reflective fabrics like velvet or felt, as they absorb light effectively. - How far should the subject be from the black background?
Position your subject as far from the background as possible to prevent light spill and maintain a deep black. - Can I use natural light for black background photography?
Yes, but use a shady spot or overcast days to minimize harsh shadows and control the light. - What camera settings are ideal for black background photos?
Use manual mode, a wide aperture, low ISO, and spot metering to accurately expose your subject. - How can I fix a gray background in post-processing?
Use adjustment layers in Photoshop or Lightroom to darken the background and increase contrast. - What are some creative subjects for black background photography?
Flowers, insects, jewelry, portraits, and products are all great subjects that stand out against a black backdrop. - How do I avoid harsh shadows in black background photography?
Use softboxes or umbrellas to diffuse your light, add a fill light, or use reflectors to bounce light onto your subject. - What is the best way to isolate the subject from the background?
Use a wide aperture to create a shallow depth of field, blurring the background and focusing attention on the subject. - Can I create a black background outdoors?
Yes, find a shady spot, use backlighting, reflectors, and adjust your camera settings to minimize ambient light. - What post-processing tools are recommended for enhancing black backgrounds?
Adobe Photoshop and Lightroom offer powerful tools like curves, levels, and adjustment brushes for refining your images.