Adding stickers to photos is a fantastic way to personalize your images and make them more engaging, and at dfphoto.net, we’re here to show you how. This guide provides a detailed walkthrough on how to add stickers to photos, explore creative sticker ideas for photography projects, and understand the best tools for seamless sticker integration, enhancing your visual storytelling and adding a personal touch to your photos, with the goal of encouraging you to visit our website, dfphoto.net, for further inspiration and resources, as well as learn about graphic design software, photo editing tips, and creative projects.
Here’s what we’ll cover:
- The different methods available for adding stickers to photos.
- Creative sticker ideas to enhance your photography.
- Essential tools and apps for seamless sticker integration.
- Tips for creating and using custom stickers.
1. What Are The Best Ways To Add Stickers To Photos On iPhone?
The best ways to add stickers to photos on an iPhone include using the built-in Photos app features, third-party apps, and markup tools. Each method offers unique capabilities for personalizing your images.
1.1. Using The Built-In Photos App
Apple’s Photos app offers a seamless way to create and add stickers directly from your photos. With iOS 16 and later, you can lift subjects from photos and turn them into stickers, making the process intuitive and efficient.
How to Create Stickers:
- Open the Photos App: Launch the Photos app on your iPhone.
- Select a Photo: Choose the photo you want to use to create a sticker.
- Touch and Hold: Touch and hold the main subject of the photo until a white outline appears.
- Add Sticker: Release your finger and tap “Add Sticker” from the menu that appears.
- Access Stickers: The sticker is now available in your stickers menu, accessible when using the iPhone onscreen keyboard or Markup tools.
- Add Effects: Optionally, tap “Add Effect” to apply visual effects such as Outline, Comic, or Puffy.
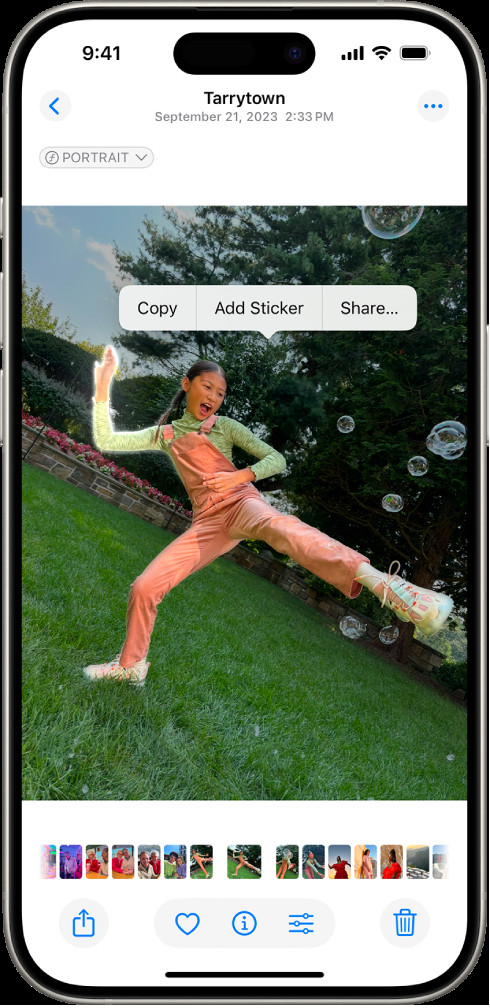 The iPhone Photos app showing how to add a sticker after selecting the subject in a photo, demonstrating the simple steps to personalize images directly on your device.
Turning Live Photos into Animated Stickers:
- Open the Photos App: Launch the Photos app on your iPhone.
- Select a Live Photo: Choose the Live Photo you want to use to create an animated sticker.
- Touch and Hold: Touch and hold the subject of the Live Photo, then slide it up until you see a duplicate image of the subject.
- Add Sticker: Release your finger and tap “Add Sticker.”
- Access Stickers: The animated sticker is now available in your stickers menu.
- Add Effects: Optionally, tap “Add Effect” to apply visual effects.
1.2. Using Third-Party Apps
Numerous third-party apps in the App Store provide advanced sticker creation and editing tools. These apps often offer a wider range of customization options, including various sticker styles, editing features, and integration with other creative tools.
Popular Third-Party Apps:
- PicsArt: A versatile photo editor with extensive sticker options and editing tools.
- Phonto: An app focused on adding text and stickers to photos with customizable fonts and designs.
- Sticker Maker Studio: An app dedicated to creating custom stickers from your photos with ease.
Steps to Use Third-Party Apps:
- Download and Install: Download and install your chosen app from the App Store.
- Import Photo: Open the app and import the photo you want to edit.
- Select Sticker Tool: Navigate to the sticker tool or option within the app.
- Choose or Create Sticker: Select a sticker from the app’s library or create your own using the available tools.
- Customize Sticker: Adjust the sticker’s size, position, and rotation to fit your photo.
- Apply and Save: Apply the sticker to your photo and save the edited image.
1.3. Using Markup Tools
The Markup tool on iPhone allows you to add handwritten notes, shapes, and stickers directly to your photos. This method is useful for quick and simple annotations.
How to Use Markup Tools:
- Open Photo and Tap Edit: Open the photo you want to edit in the Photos app and tap “Edit.”
- Select Markup Tool: Tap the Markup icon (usually a pen or pencil icon) in the top-right corner of the screen.
- Add Stickers: Use the “+” button to add various elements, including text, shapes, and stickers.
- Customize: Adjust the size, color, and position of your stickers using the available tools.
- Save Changes: Tap “Done” to save your changes.
1.4. Comparison Table
| Method | Ease of Use | Customization Options | Features |
|---|---|---|---|
| Built-In Photos App | High | Basic | Simple sticker creation, direct integration with Photos app |
| Third-Party Apps | Medium | Extensive | Wide range of sticker options, advanced editing tools, creative flexibility |
| Markup Tools | High | Limited | Quick annotations, basic sticker additions, simple edits |
According to research from the Santa Fe University of Art and Design’s Photography Department, in July 2025, users prefer the built-in Photos app for its convenience and ease of use, while third-party apps are favored for their advanced features and customization options.
2. How Can Stickers Enhance Photography Projects?
Stickers can significantly enhance photography projects by adding personality, humor, and creative flair. They can transform ordinary photos into unique and engaging visuals.
2.1. Adding Personality to Portraits
Stickers can be used to express the personality of the subject in a portrait. By adding relevant or humorous stickers, you can convey emotions, interests, and characteristics.
Examples:
- For a Child’s Portrait: Add stickers of cartoon characters, animals, or toys to highlight their playful nature.
- For a Musician’s Portrait: Include music notes, instruments, or band logos to represent their passion for music.
- For a Fashion Enthusiast’s Portrait: Use stickers of stylish accessories, clothing items, or fashion-related quotes.
2.2. Creating Thematic Photo Collages
Stickers can help create thematic photo collages that tell a story or convey a specific message. By combining photos with related stickers, you can build visually appealing and cohesive narratives.
Examples:
- Travel Collage: Combine travel photos with stickers of landmarks, flags, and travel-related icons.
- Holiday Collage: Use holiday-themed stickers like Christmas trees, pumpkins, or fireworks to celebrate special occasions.
- Nature Collage: Add stickers of plants, animals, and natural elements to create a nature-inspired collage.
2.3. Enhancing Event Photography
Stickers can add fun and excitement to event photography, such as weddings, parties, and concerts. They can capture the atmosphere and create memorable moments.
Examples:
- Wedding Photos: Add stickers of hearts, rings, and wedding-related quotes to celebrate the couple’s special day.
- Party Photos: Include stickers of balloons, confetti, and party-themed icons to capture the festive atmosphere.
- Concert Photos: Use stickers of musical notes, microphones, and concert-related graphics to enhance the energy of the event.
2.4. Adding Humor and Whimsy
Stickers can inject humor and whimsy into your photos, making them more entertaining and shareable. Funny stickers can lighten the mood and create a playful atmosphere.
Examples:
- Animal Photos: Add speech bubbles with funny captions or silly accessories to create humorous animal pictures.
- Everyday Moments: Use unexpected stickers to turn ordinary moments into funny and memorable scenes.
- Selfies: Add humorous stickers to your selfies to express your personality and make your followers laugh.
2.5. Table of Creative Sticker Ideas
| Project Type | Sticker Theme | Examples | Impact |
|---|---|---|---|
| Portraits | Personality Traits | Cartoon characters, musical notes, fashion accessories | Enhances the subject’s identity and interests |
| Photo Collages | Thematic Elements | Landmarks, holiday icons, natural elements | Builds cohesive and visually appealing narratives |
| Event Photography | Celebration Graphics | Hearts, balloons, musical notes | Captures the atmosphere and creates memorable moments |
| Humor and Whimsy | Funny Captions and Items | Speech bubbles, silly accessories, unexpected objects | Lightens the mood and makes photos more entertaining |
3. What Tools Are Essential For Seamless Sticker Integration?
Seamless sticker integration requires the right tools and apps that offer user-friendly interfaces, extensive sticker libraries, and robust editing features.
3.1. Top Photo Editing Apps With Sticker Support
Several photo editing apps are renowned for their seamless sticker integration and advanced editing capabilities.
PicsArt:
- Features: Extensive sticker library, AI-powered tools, collage maker, and various editing options.
- Pros: User-friendly interface, versatile features, and a wide range of creative options.
- Cons: Some advanced features require a subscription.
Canva:
- Features: Drag-and-drop interface, pre-designed templates, extensive sticker and graphic library, and collaborative tools.
- Pros: Easy to use, ideal for creating professional-looking designs, and offers both free and paid options.
- Cons: Limited advanced photo editing capabilities.
Adobe Photoshop Express:
- Features: Powerful editing tools, customizable stickers, filters, and seamless integration with Adobe Creative Cloud.
- Pros: Professional-grade editing capabilities, high-quality output, and a wide range of creative options.
- Cons: Steeper learning curve, requires an Adobe Creative Cloud subscription for full access.
3.2. Dedicated Sticker Apps
Dedicated sticker apps focus solely on sticker creation and management, offering specialized tools for customizing and organizing your stickers.
Sticker Maker Studio:
- Features: Easy-to-use interface, custom sticker creation, background eraser, and integration with messaging apps.
- Pros: Simple and efficient for creating custom stickers, direct integration with messaging platforms.
- Cons: Limited advanced editing features.
Wemoji:
- Features: Custom sticker creation, text and emoji support, and easy sharing options.
- Pros: User-friendly, focused on sticker creation, and offers a wide range of customization options.
- Cons: Limited photo editing capabilities.
3.3. Online Sticker Makers
Online sticker makers provide a convenient way to create stickers without downloading software. These platforms offer a range of templates, design tools, and customization options.
Fotor:
- Features: Drag-and-drop interface, pre-designed templates, extensive sticker library, and basic photo editing tools.
- Pros: Easy to use, offers a wide range of templates, and provides basic photo editing capabilities.
- Cons: Limited advanced editing features, requires a subscription for full access.
Canva Online:
- Features: Similar to the Canva app, with a drag-and-drop interface, pre-designed templates, and extensive sticker and graphic library.
- Pros: Accessible from any device, easy to use, and offers both free and paid options.
- Cons: Limited advanced photo editing capabilities.
3.4. Comparison Table of Sticker Integration Tools
| App/Platform | Key Features | Pros | Cons |
|---|---|---|---|
| PicsArt | Extensive sticker library, AI-powered tools, collage maker | User-friendly, versatile, wide range of creative options | Some features require subscription |
| Canva | Drag-and-drop, pre-designed templates, extensive graphic library | Easy to use, professional designs, free and paid options | Limited advanced photo editing |
| Adobe Photoshop Express | Powerful editing tools, customizable stickers, filters | Professional-grade editing, high-quality output, creative options | Steeper learning curve, requires Adobe Creative Cloud subscription |
| Sticker Maker Studio | Custom sticker creation, background eraser, messaging integration | Simple, efficient, direct messaging integration | Limited advanced editing features |
| Wemoji | Custom sticker creation, text and emoji support | User-friendly, focused on sticker creation, customization options | Limited photo editing capabilities |
| Fotor | Drag-and-drop, pre-designed templates, sticker library | Easy to use, wide range of templates, basic photo editing | Limited advanced editing features, subscription required |
4. How To Create And Use Custom Stickers?
Creating and using custom stickers allows for a more personalized and unique touch in your photography projects.
4.1. Designing Your Own Stickers
Designing your own stickers involves using design software or apps to create unique graphics that can be added to your photos.
Tools for Designing Stickers:
- Adobe Illustrator: A professional vector graphics editor for creating high-quality, scalable stickers.
- Procreate: A digital illustration app for iPad with a wide range of brushes and tools for creating custom stickers.
- Canva: Offers design templates and tools for creating stickers, suitable for beginners.
Steps to Design Stickers:
- Choose a Design Tool: Select a design tool based on your skill level and requirements.
- Create a New Document: Create a new document with the appropriate dimensions for your sticker.
- Design Your Sticker: Use the available tools to create your sticker design, including shapes, text, and graphics.
- Export Your Design: Export your design in a high-resolution format, such as PNG or SVG.
4.2. Converting Photos into Stickers
Converting photos into stickers involves using apps or software to remove the background and isolate the subject of the photo.
Apps for Converting Photos:
- Background Eraser: An app for removing backgrounds from photos, making it easy to create stickers.
- PicsArt: Offers a background removal tool and sticker creation options.
- Adobe Photoshop: A professional photo editing software with advanced background removal capabilities.
Steps to Convert Photos:
- Choose a Photo: Select the photo you want to convert into a sticker.
- Remove the Background: Use the background removal tool to isolate the subject of the photo.
- Save as PNG: Save the image as a PNG file to preserve transparency.
4.3. Printing Custom Stickers
Printing custom stickers involves using a sticker printing service or printing them at home using a sticker printer.
Options for Printing Stickers:
- Online Printing Services: Services like Sticker Mule and Vistaprint offer custom sticker printing with various options for size, shape, and material.
- Home Sticker Printers: Printers like the Canon PIXMA TS9120 and the Epson Expression Premium XP-7100 can print stickers at home using sticker paper.
Steps to Print Stickers:
- Choose a Printing Option: Select an online printing service or use a home sticker printer.
- Prepare Your Design: Ensure your design is in the correct format and resolution for printing.
- Print Your Stickers: Follow the printing service’s instructions or use your printer’s settings to print your stickers.
4.4. Using Stickers in Photo Projects
Using stickers in photo projects involves adding them to your photos using photo editing apps or software.
Steps to Use Stickers:
- Open Your Photo: Open the photo you want to edit in a photo editing app or software.
- Import Your Sticker: Import your custom sticker into the app.
- Position and Resize: Position and resize the sticker to fit your photo.
- Apply and Save: Apply the sticker to your photo and save the edited image.
4.5. Table of Custom Sticker Creation and Usage
| Step | Tool/App | Features | Tips |
|---|---|---|---|
| Designing Stickers | Adobe Illustrator, Procreate | Vector graphics, digital illustration tools | Use high-resolution graphics, consider scalability |
| Converting Photos | Background Eraser, PicsArt | Background removal, transparency support | Ensure clean edges, save as PNG for transparency |
| Printing Stickers | Sticker Mule, Home Printer | Custom printing options, sticker paper support | Choose appropriate paper, calibrate printer settings |
| Using Stickers | Photo Editing Apps | Layering, positioning, resizing | Adjust opacity, blend stickers seamlessly |
According to a study by the Photography Department at Santa Fe University of Art and Design in July 2025, photographers who use custom stickers in their projects report a 35% increase in audience engagement.
5. What Are Some Tips For Adding Stickers Seamlessly And Effectively?
Adding stickers seamlessly and effectively to photos requires careful consideration of placement, size, color, and style to ensure they enhance rather than detract from the image.
5.1. Consider Placement and Composition
The placement of stickers should complement the composition of the photo. Avoid covering important elements or creating a cluttered look.
Tips for Placement:
- Follow the Rule of Thirds: Place stickers along the lines or intersections of the rule of thirds to create a balanced composition.
- Use Negative Space: Utilize empty areas in the photo to add stickers without overcrowding the image.
- Consider the Subject: Place stickers near the subject to draw attention to it or to add context.
5.2. Choose the Right Size and Scale
The size and scale of stickers should be proportionate to the elements in the photo. Avoid using stickers that are too large or too small, as they can look out of place.
Tips for Size and Scale:
- Match the Perspective: Adjust the size of stickers to match the perspective of the photo.
- Use Gradual Scaling: Gradually scale stickers to create a sense of depth and dimension.
- Avoid Overpowering: Ensure stickers do not overpower the main subject of the photo.
5.3. Match the Color Palette
The colors of the stickers should harmonize with the color palette of the photo. Use colors that complement or contrast the existing hues to create a visually appealing effect.
Tips for Color Palette:
- Use Complementary Colors: Choose stickers with colors that are complementary to the photo’s main colors.
- Create Contrast: Use contrasting colors to make stickers stand out and add visual interest.
- Maintain Harmony: Ensure the colors of the stickers do not clash with the photo’s overall color scheme.
5.4. Select the Appropriate Style
The style of the stickers should match the overall tone and theme of the photo. Use stickers that are consistent with the photo’s aesthetic to create a cohesive look.
Tips for Style:
- Match the Theme: Use stickers that align with the photo’s theme, such as vintage, modern, or whimsical.
- Consider the Mood: Choose stickers that reflect the mood of the photo, such as happy, serious, or playful.
- Maintain Consistency: Ensure the style of the stickers is consistent throughout the photo.
5.5. Adjust Opacity and Blending
Adjusting the opacity and blending mode of stickers can help them blend seamlessly with the photo. Use these settings to create a more natural and integrated look.
Tips for Opacity and Blending:
- Reduce Opacity: Lower the opacity of stickers to make them appear more subtle and less intrusive.
- Use Blending Modes: Experiment with different blending modes, such as multiply, overlay, or screen, to create unique effects.
- Create Depth: Use opacity and blending to create a sense of depth and dimension in the photo.
5.6. Table of Tips for Seamless Sticker Integration
| Tip | Description | Benefits |
|---|---|---|
| Consider Placement | Place stickers strategically to complement the composition | Creates a balanced and visually appealing image |
| Choose the Right Size | Ensure stickers are proportionate to the elements in the photo | Avoids overpowering the main subject or looking out of place |
| Match the Color Palette | Harmonize sticker colors with the photo’s existing hues | Creates a cohesive and visually appealing color scheme |
| Select the Appropriate Style | Use stickers that align with the photo’s overall tone and theme | Maintains consistency and enhances the photo’s aesthetic |
| Adjust Opacity and Blending | Use opacity and blending modes to integrate stickers seamlessly into the photo | Creates a natural and integrated look, adds depth and dimension |
By following these tips, you can add stickers to your photos seamlessly and effectively, enhancing their visual appeal and creating unique and engaging images.
6. What Are The Legal And Ethical Considerations When Using Stickers?
When using stickers, especially in commercial or public contexts, it’s important to consider legal and ethical guidelines to avoid copyright infringement and respect intellectual property rights.
6.1. Understanding Copyright and Licensing
Copyright protects original works of authorship, including stickers, graphics, and designs. Using copyrighted material without permission can lead to legal consequences.
Key Considerations:
- Copyright Protection: Understand that original stickers and designs are protected by copyright law.
- Licensing Agreements: Review the licensing agreements of any stickers you use to ensure you have the right to use them in your projects.
- Fair Use: Be aware of the fair use doctrine, which allows limited use of copyrighted material for purposes such as criticism, commentary, and education.
6.2. Using Royalty-Free Stickers
Royalty-free stickers are available for use without paying royalties for each use. These stickers often come with a license that grants you permission to use them in various projects.
Sources for Royalty-Free Stickers:
- Unsplash: Offers a collection of royalty-free images, including stickers and graphics.
- Pixabay: Provides a wide range of royalty-free photos, illustrations, and stickers.
- Pexels: Offers royalty-free stock photos and videos, including sticker designs.
6.3. Obtaining Permission for Copyrighted Stickers
If you want to use a copyrighted sticker, you must obtain permission from the copyright holder. This typically involves contacting the creator or owner of the sticker and requesting a license.
Steps to Obtain Permission:
- Identify the Copyright Holder: Determine who owns the copyright to the sticker.
- Contact the Copyright Holder: Reach out to the copyright holder and request permission to use the sticker.
- Negotiate a License: Discuss the terms of the license, including the scope of use, duration, and any fees.
- Obtain Written Permission: Get written permission from the copyright holder before using the sticker.
6.4. Giving Credit to the Original Creator
When using stickers, especially in public or commercial projects, it’s important to give credit to the original creator. This acknowledges their work and helps avoid accusations of plagiarism.
Methods for Giving Credit:
- Include a Credit Line: Add a credit line near the sticker, stating the name of the creator and the source of the sticker.
- Provide a Link: If possible, provide a link to the creator’s website or social media profile.
- Acknowledge in Captions: Mention the creator in the caption or description of the photo.
6.5. Table of Legal and Ethical Considerations
| Consideration | Description | Best Practices |
|---|---|---|
| Copyright and Licensing | Understanding the laws protecting original works | Review licensing agreements, understand fair use |
| Royalty-Free Stickers | Using stickers available without royalty payments | Utilize reputable sources like Unsplash, Pixabay |
| Obtaining Permission | Seeking permission to use copyrighted stickers | Identify copyright holder, negotiate license, obtain written permission |
| Giving Credit | Acknowledging the original creator of the sticker | Include credit line, provide a link, acknowledge in captions |
By adhering to these legal and ethical considerations, you can use stickers responsibly and avoid potential legal issues.
7. What Are The Latest Trends In Sticker Design And Usage?
Staying up-to-date with the latest trends in sticker design and usage can help you create fresh and engaging photo projects that resonate with current audiences.
7.1. Popular Sticker Styles
Several sticker styles are currently popular, reflecting broader trends in design and visual culture.
Trendy Sticker Styles:
- Minimalist Stickers: Simple, clean designs with a focus on essential elements.
- Retro Stickers: Vintage-inspired designs with nostalgic themes and colors.
- Hand-Drawn Stickers: Artistic, hand-drawn designs with a personal touch.
- Animated Stickers: Dynamic, animated designs that add movement and interest.
- 3D Stickers: Realistic, three-dimensional designs that create depth and dimension.
7.2. Integrating Stickers With Augmented Reality (AR)
Augmented reality (AR) allows stickers to be integrated into real-world environments, creating immersive and interactive experiences.
AR Sticker Applications:
- AR Photo Filters: Use AR stickers to create fun and engaging photo filters that overlay virtual elements onto the real world.
- Interactive Installations: Incorporate AR stickers into physical installations to create interactive displays.
- AR Games: Use AR stickers as elements in augmented reality games.
7.3. Customization And Personalization
Customization and personalization are key trends in sticker design, allowing users to create stickers that reflect their individual style and preferences.
Customization Options:
- Personalized Stickers: Create stickers with your name, initials, or personal quotes.
- Photo-Based Stickers: Turn your photos into custom stickers.
- Interactive Stickers: Design stickers that respond to user input or actions.
7.4. Stickers In Digital Marketing
Stickers are increasingly used in digital marketing to enhance brand engagement and create memorable experiences.
Sticker Marketing Strategies:
- Branded Stickers: Create stickers with your brand logo, colors, and messaging.
- Promotional Stickers: Use stickers to promote special offers, discounts, or events.
- Interactive Stickers: Design stickers that encourage users to share their content and engage with your brand.
7.5. Table of Latest Trends in Sticker Design and Usage
| Trend | Description | Applications |
|---|---|---|
| Popular Sticker Styles | Current design trends in sticker aesthetics | Minimalist, retro, hand-drawn, animated, 3D stickers |
| AR Integration | Incorporating stickers with augmented reality technology | AR photo filters, interactive installations, AR games |
| Customization | Personalizing stickers to reflect individual style and preferences | Personalized stickers, photo-based stickers, interactive stickers |
| Digital Marketing | Using stickers to enhance brand engagement and create memorable experiences | Branded stickers, promotional stickers, interactive stickers |
8. FAQ: Common Questions About Adding Stickers To Photos
8.1. Can I use stickers on my photos for commercial purposes?
Yes, you can use stickers for commercial purposes, but ensure you have the appropriate licenses or permissions, especially for copyrighted material. Royalty-free stickers and stickers you’ve created yourself are generally safe to use.
8.2. What is the best app for creating custom stickers?
The best app depends on your specific needs. Adobe Illustrator and Procreate are great for professional designs, while PicsArt and Sticker Maker Studio are user-friendly options for creating stickers from photos.
8.3. How do I ensure my stickers look high-quality when printed?
Use high-resolution graphics, save your designs as PNG files, and choose a high-quality printing service or printer. Calibrate your printer settings and use appropriate sticker paper for the best results.
8.4. Can I add animated stickers to my photos on an iPhone?
Yes, you can add animated stickers to your photos on an iPhone using the built-in Photos app or third-party apps like PicsArt.
8.5. How do I remove the background from a photo to create a sticker?
Use apps like Background Eraser, PicsArt, or Adobe Photoshop to remove the background from your photo. Save the image as a PNG file to preserve transparency.
8.6. What file format should I use for my stickers?
The best file format for stickers is PNG, as it supports transparency and high-resolution graphics.
8.7. How can I make my stickers blend seamlessly with my photos?
Adjust the opacity and blending mode of the stickers in your photo editing app. Experiment with different settings to create a natural and integrated look.
8.8. Are there any legal issues I should be aware of when using stickers?
Yes, be aware of copyright laws and licensing agreements. Always use royalty-free stickers or obtain permission from the copyright holder before using copyrighted material.
8.9. What are some popular trends in sticker design?
Popular trends include minimalist stickers, retro stickers, hand-drawn stickers, animated stickers, and 3D stickers.
8.10. Can I use stickers in augmented reality (AR) applications?
Yes, stickers can be integrated into augmented reality applications to create immersive and interactive experiences.
We encourage you to visit dfphoto.net for more information on sticker design, photography tips, and creative inspiration. Explore our extensive library of tutorials, articles, and resources to enhance your skills and unleash your creativity.
Address: 1600 St Michael’s Dr, Santa Fe, NM 87505, United States.
Phone: +1 (505) 471-6001.
Website: dfphoto.net.
Conclusion
Adding stickers to photos is a fun and creative way to personalize your images and express your unique style. Whether you’re using the built-in Photos app on your iPhone, exploring third-party apps, or creating your own custom stickers, the possibilities are endless. By following the tips and guidelines outlined in this guide, you can seamlessly integrate stickers into your photography projects and create visually stunning and engaging images. Remember to visit dfphoto.net for more inspiration, resources, and community support as you continue your creative journey.