Adding stickers to photos is a fantastic way to personalize and enhance your visual content, and it is quite simple with the right tools. This article by dfphoto.net will guide you through the process of adding stickers to photos, whether you’re using an iPhone, Android device, or computer. Get ready to discover the creative possibilities and enhance your photography today!
1. What Are The Benefits Of Adding Stickers To Photos?
Adding stickers to photos offers numerous creative and practical benefits:
- Personalization: Stickers allow you to customize your photos and express your unique style.
- Enhanced Visual Appeal: Stickers can add fun, humor, or emphasis to your images, making them more engaging.
- Marketing and Branding: Businesses can use stickers to promote their brand, products, or services.
- Emotional Expression: Stickers can convey emotions and feelings that words sometimes can’t capture.
- Storytelling: Adding stickers can help tell a story or create a narrative within a photo.
2. What Are The Five Main Reasons To Add Stickers To Photos?
There are at least five major reasons why individuals add stickers to their photos:
- Creative Expression: Stickers allow for unique customization.
- Fun and Engagement: Stickers make photos more interesting.
- Branding: Businesses promote themselves using branded stickers.
- Emotional Communication: Stickers express feelings visually.
- Narrative Enhancement: Stickers add depth to storytelling.
3. How To Add A Sticker To A Photo On An iPhone?
Adding stickers to photos on an iPhone is straightforward, especially with the built-in Photos app features. Here’s how you can do it:
-
Using the Photos App:
- Open the Photos App: Launch the Photos app on your iPhone.
- Select a Photo: Tap on the photo you want to edit.
- Edit the Photo: Tap “Edit” in the top right corner.
- Markup Tool: Tap the markup icon (a pen inside a circle) at the top right.
- Add a Sticker: Tap the “+” button, then select “Add Sticker.”
- Choose a Sticker: Select a sticker from the available options or use Memoji stickers.
- Adjust the Sticker: Drag, pinch, or rotate the sticker to position it as desired.
- Save Changes: Tap “Done” to save the edited photo.
-
Using Third-Party Apps:
- Download an App: Download a sticker app from the App Store, such as “PicsArt” or “Studio.”
- Open the App: Launch the app and import the photo you want to edit.
- Add Stickers: Browse the sticker library and select the ones you like.
- Customize: Adjust the size, position, and opacity of the stickers.
- Save the Photo: Save the edited photo to your camera roll.
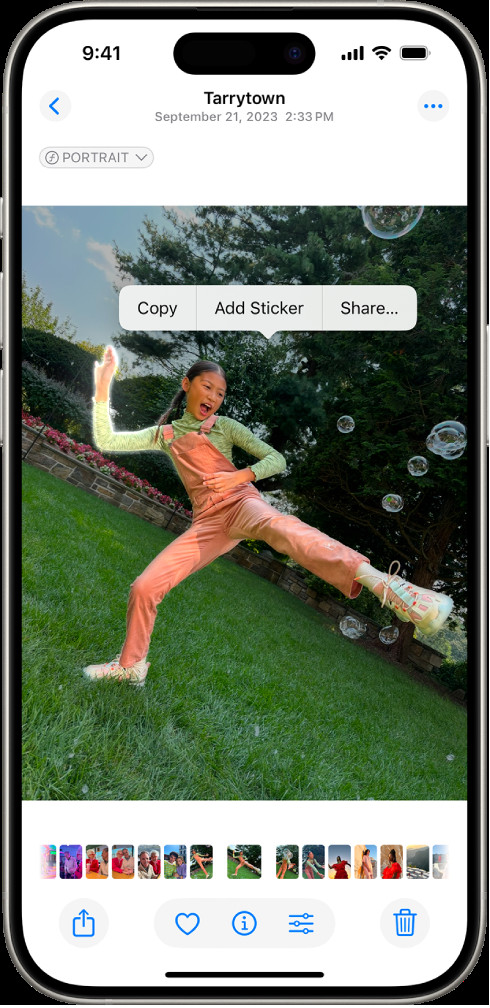 iPhone photo editing interface with the 'Add Sticker' option highlighted.
Alt: Adding stickers to a photo using the iPhone’s built-in photo editing tools.
3.1. How To Create Stickers From Your Photos On iPhone?
Creating stickers from your own photos on an iPhone is a fun way to personalize your messages and add a unique touch to your photos. Here’s how to do it:
-
Using the Photos App (iOS 16 and later):
- Open the Photos App: Launch the Photos app on your iPhone.
- Select a Photo: Tap a photo to open it in full screen.
- Touch and Hold: Touch and hold the main subject of the photo until a white outline appears.
- Add to Stickers: Slide your finger slightly, and an option to “Add Sticker” will appear. Tap it.
- Access Stickers: The sticker is now saved in your sticker drawer, accessible in Messages, Mail, and Notes.
-
Using Third-Party Apps:
- Download a Sticker Maker App: Get an app like “Sticker Maker Studio” or “Wemoji” from the App Store.
- Open the App: Launch the app and select the option to create a new sticker.
- Import Photo: Import the photo you want to use.
- Outline the Subject: Use the app’s tools to outline the subject you want to turn into a sticker. Some apps offer automatic cutout features.
- Customize: Add borders, text, or other effects to your sticker.
- Save and Export: Save the sticker and export it to WhatsApp or iMessage.
-
Tips for Better Stickers:
- High-Resolution Photos: Start with high-resolution photos for the best quality.
- Clean Backgrounds: Photos with clean, uncluttered backgrounds work best for easy cutout.
- Good Lighting: Ensure your photos have good lighting to enhance the sticker’s clarity.
- Use Templates: Many apps offer templates to help you create unique and fun stickers quickly.
3.2. How To Send Stickers In Messages On iPhone?
Sending stickers in Messages on your iPhone is a fun way to express yourself and add flair to your conversations. Here’s how you can do it:
-
Accessing the Stickers:
- Open Messages App: Launch the Messages app on your iPhone.
- Select a Conversation: Tap on the conversation you want to send a sticker to.
- Open the App Drawer: Tap on the App Store icon located to the left of the text input field.
- Find the Stickers Icon: Look for the stickers icon (usually a square smiley face). If you don’t see it, swipe left or tap the four-dots icon to find more apps.
-
Sending Pre-Installed Stickers:
- Select a Sticker Pack: Choose from the pre-installed sticker packs or any sticker packs you’ve downloaded from the App Store.
- Tap and Send: Tap on the sticker you want to send. It will appear in the message field.
- Send the Message: Tap the send button (the upward-pointing arrow) to send the sticker.
-
Using Memoji Stickers:
- Access Memoji: In the app drawer, select the Memoji icon (the animated face).
- Choose a Memoji Sticker: Select from the automatically generated Memoji stickers that reflect your facial expressions.
- Customize Memoji: You can create and customize your Memoji in the Messages app by tapping the “…” button and selecting “Edit.”
- Send Memoji Sticker: Tap the desired Memoji sticker to send it.
-
Using Animated Stickers:
- Find Animated Stickers: Some sticker packs include animated stickers. Look for stickers with subtle animations.
- Send Animated Stickers: Tap the animated sticker to send it, and it will play the animation in the message.
-
Adding Stickers to Messages:
- Drag and Drop: You can also drag and drop stickers directly onto messages, photos, or other stickers in the conversation.
- Resize and Rotate: Before releasing the sticker, you can pinch to resize or rotate it.
-
Downloading More Stickers:
- Visit the App Store: In the app drawer, tap the “+” button to visit the App Store.
- Browse Stickers: Search for sticker packs by keyword or browse the available categories.
- Download Stickers: Tap the “Get” button to download and install a sticker pack.
-
Tips for Sending Stickers:
- Express Yourself: Use stickers to convey emotions, reactions, and humor.
- Add to Photos: Drag stickers onto photos in the conversation for added fun.
- Combine Stickers: Layer multiple stickers to create unique visual effects.
- Stay Updated: Regularly check the App Store for new and trending sticker packs.
4. How To Add A Sticker To A Photo On An Android Phone?
Adding stickers to photos on an Android phone is simple, thanks to the numerous apps available on the Google Play Store. Here’s how you can do it:
-
Using Google Photos:
- Open Google Photos: Launch the Google Photos app on your Android device.
- Select a Photo: Tap on the photo you want to edit.
- Edit the Photo: Tap “Edit” at the bottom of the screen.
- Markup Tool: Choose the markup tool.
- Add Text or Drawings: Use the pen tool to add drawings or text as stickers. While Google Photos doesn’t have a dedicated sticker feature, this method allows you to personalize your photos.
- Save Changes: Tap “Save copy” to save the edited photo as a new file.
-
Using Third-Party Apps:
- Download an App: Download a sticker app from the Google Play Store, such as “PicsArt” or “Sticker Maker.”
- Open the App: Launch the app and import the photo you want to edit.
- Add Stickers: Browse the sticker library and select the ones you like.
- Customize: Adjust the size, position, and opacity of the stickers.
- Save the Photo: Save the edited photo to your gallery.
-
Creating Custom Stickers:
- Use a Sticker Maker App: Apps like “Sticker Maker” allow you to create stickers from your own photos.
- Select Photo: Choose a photo and use the app’s tools to cut out the part you want to use as a sticker.
- Add Text or Borders: Customize your sticker with text, borders, or other effects.
- Save and Use: Save the sticker and use it in your photos.
-
Apps Recommendation:
- PicsArt: A comprehensive photo editor with a vast library of stickers.
- Sticker Maker: Allows you to create custom stickers from your own photos.
- YouCam Perfect: Offers a wide range of stickers and beautifying tools.
-
Tips for Better Results:
- Use High-Quality Photos: Start with high-resolution photos for the best results.
- Experiment with Placement: Try different placements for the stickers to see what looks best.
- Adjust Opacity: Adjusting the opacity of the stickers can help them blend better with the photo.
- Combine Stickers: Use multiple stickers to create unique and interesting effects.
4.1. What Are The Best Sticker Apps For Android?
Choosing the right sticker app can significantly enhance your photo editing experience on Android. Here are some of the best sticker apps available on the Google Play Store:
-
PicsArt:
- Overview: PicsArt is a comprehensive photo editing app that offers a vast library of stickers, along with numerous other editing tools. It’s perfect for both beginners and advanced users.
- Key Features:
- A wide variety of stickers, updated regularly.
- Easy-to-use interface.
- Advanced editing tools like filters, effects, and collage maker.
- Ability to create custom stickers.
- Pros:
- Large community and resource base.
- Versatile editing options.
- Cons:
- Contains ads; subscription required for ad-free experience and premium features.
-
Sticker Maker:
- Overview: Sticker Maker is specifically designed for creating custom stickers from your photos. It’s ideal for users who want to personalize their sticker collection.
- Key Features:
- Easy-to-use tools for cutting out parts of photos.
- Ability to add text, borders, and other effects to stickers.
- Integration with WhatsApp and other messaging apps.
- Pros:
- Simple and straightforward interface.
- Excellent for creating personalized stickers.
- Cons:
- Limited editing features beyond sticker creation.
-
YouCam Perfect:
- Overview: YouCam Perfect is a beauty and selfie-focused photo editor with a wide range of stickers, filters, and beautifying tools.
- Key Features:
- A variety of stickers, including seasonal and trendy options.
- Beautifying tools for skin smoothing, reshaping, and more.
- Collage maker and photo grid options.
- Pros:
- User-friendly interface.
- Great for enhancing selfies and portraits.
- Cons:
- Many features are focused on beauty enhancements rather than general photo editing.
-
B612:
- Overview: B612 is another popular beauty and selfie app with a large collection of stickers and filters. It’s known for its real-time effects and easy-to-use interface.
- Key Features:
- A wide range of stickers and filters.
- Real-time beauty effects.
- AR stickers that move with your face.
- Pros:
- Fun and engaging interface.
- Great for creating playful selfies.
- Cons:
- Limited advanced editing features.
-
LINE Camera:
- Overview: LINE Camera is a versatile photo editing app with a large library of stickers, frames, and fonts. It’s a great all-around option for adding creativity to your photos.
- Key Features:
- Thousands of stickers, including LINE character stickers.
- A variety of frames and fonts.
- Beauty and editing tools.
- Pros:
- Extensive collection of stickers and decorative elements.
- User-friendly interface.
- Cons:
- Some stickers and features require in-app purchases.
-
Stickerfy:
- Overview: Stickerfy is a dedicated sticker app that allows you to create and discover stickers. It’s a great platform for sharing your creations with other users.
- Key Features:
- Tools for creating custom stickers.
- A community for discovering and sharing stickers.
- Integration with messaging apps.
- Pros:
- Focuses specifically on stickers.
- Community-driven content.
- Cons:
- May require some time to build a personalized sticker collection.
-
Phonto – Text on Photos:
- Overview: While not strictly a sticker app, Phonto is excellent for adding text-based stickers to your photos. It offers a wide range of fonts and customization options.
- Key Features:
- Over 400 fonts to choose from.
- Customizable text styles, sizes, and colors.
- Easy-to-use interface.
- Pros:
- Ideal for creating text-based stickers and captions.
- Simple and effective for adding typography to photos.
- Cons:
- Limited to text-based stickers; no image-based stickers.
-
Additional Tips for Choosing a Sticker App:
- Consider Your Needs: Determine what type of stickers you want to use and what features are most important to you.
- Read Reviews: Check user reviews on the Google Play Store to get an idea of the app’s performance and user satisfaction.
- Try Free Versions: Many apps offer free versions with limited features. Try these out before committing to a paid subscription.
- Check for Updates: Ensure the app is regularly updated to benefit from new features and bug fixes.
4.2. How To Send Stickers On Android?
Sending stickers on Android is a fun way to spice up your conversations. Here’s how to send stickers on various platforms:
-
WhatsApp:
- Open WhatsApp: Launch WhatsApp on your Android device.
- Select a Chat: Open the chat where you want to send a sticker.
- Open Emoji Menu: Tap the emoji icon to the left of the text input field.
- Select Sticker Icon: In the emoji menu, tap the sticker icon (usually located next to the GIF icon).
- Choose a Sticker: Select the sticker you want to send from the available packs.
- Send Sticker: Tap the sticker to send it.
-
Telegram:
- Open Telegram: Launch Telegram on your Android device.
- Select a Chat: Open the chat where you want to send a sticker.
- Open Emoji Menu: Tap the emoji icon in the text input field.
- Select Sticker Icon: Tap the sticker icon in the emoji menu.
- Choose a Sticker: Select the sticker from your sticker packs.
- Send Sticker: Tap the sticker to send it.
-
Facebook Messenger:
- Open Messenger: Launch Facebook Messenger on your Android device.
- Select a Chat: Open the chat where you want to send a sticker.
- Open Sticker Menu: Tap the sticker icon next to the text input field.
- Choose a Sticker Pack: Select a sticker pack from the available options.
- Select a Sticker: Tap the sticker you want to send.
- Send Sticker: The sticker will be sent automatically.
-
Using Gboard (Google Keyboard):
- Install Gboard: If you don’t have it already, download and install Gboard from the Google Play Store.
- Set Gboard as Default Keyboard: Go to Settings > System > Languages & input > Virtual keyboard and select Gboard.
- Open Any App: Open any app where you can type (e.g., messaging apps, email).
- Open Emoji Menu: Tap the emoji icon on the keyboard.
- Select Sticker Icon: Tap the sticker icon in the emoji menu.
- Choose a Sticker: Select a sticker from your sticker packs or create a custom sticker.
- Send Sticker: Tap the sticker to send it.
-
Creating Custom Stickers on Android:
- Download a Sticker Maker App: Download an app like “Sticker Maker” or “Sticker Studio” from the Google Play Store.
- Create Stickers: Use the app to create custom stickers from your photos.
- Add to Messaging Apps: Add the created stickers to WhatsApp or other messaging apps.
-
Tips for Sending Stickers Effectively:
- Use Relevant Stickers: Choose stickers that match the context of your conversation.
- Express Emotions: Use stickers to convey emotions and reactions.
- Combine with Text: Use stickers along with text to add emphasis or humor.
- Explore New Stickers: Regularly check for new sticker packs to keep your conversations fresh and engaging.
-
Troubleshooting:
- Stickers Not Showing: If stickers are not showing in a particular app, ensure that the app is updated to the latest version.
- Keyboard Issues: If you’re having trouble accessing stickers through your keyboard, try clearing the keyboard’s cache and data in Settings > Apps > [Your Keyboard App] > Storage.
- App Permissions: Ensure that the sticker app has the necessary permissions (e.g., access to photos) in Settings > Apps > [Your Sticker App] > Permissions.
5. How To Add A Sticker To A Photo On A Computer (Windows/Mac)?
Adding stickers to photos on a computer, whether it’s a Windows or Mac, offers more flexibility and advanced editing options compared to mobile devices. Here’s how you can do it:
-
Using Photo Editing Software:
-
Adobe Photoshop:
- Open Photoshop: Launch Adobe Photoshop on your computer.
- Open the Photo: Go to “File” > “Open” and select the photo you want to edit.
- Add a Sticker:
- Open Sticker Image: Go to “File” > “Open” and select the sticker image (PNG with transparency is ideal).
- Drag Sticker to Photo: Use the “Move Tool” (V) to drag the sticker onto your photo.
- Adjust Size and Position: Use “Edit” > “Free Transform” (Ctrl+T or Cmd+T) to resize and position the sticker.
- Apply Blending Options: Use blending options (e.g., Multiply, Overlay) for a seamless look.
- Save the Edited Photo: Go to “File” > “Save As” and choose your desired format (JPEG, PNG, etc.).
-
GIMP (Free Alternative):
- Open GIMP: Launch GIMP on your computer.
- Open the Photo: Go to “File” > “Open” and select the photo you want to edit.
- Add a Sticker:
- Open Sticker Image: Go to “File” > “Open as Layers” and select the sticker image.
- Adjust Size and Position: Use the “Scale Tool” (Shift+S) and “Move Tool” (M) to adjust the sticker’s size and position.
- Adjust Layers: Adjust the layer order to ensure the sticker is on top.
- Save the Edited Photo: Go to “File” > “Export As” and choose your desired format.
-
-
Using Online Photo Editors:
-
Canva:
- Open Canva: Go to the Canva website and log in or sign up.
- Create a Design: Click “Create a design” and choose the appropriate dimensions for your project.
- Upload Photo: Upload the photo you want to edit.
- Add Stickers:
- Browse Stickers: Go to the “Elements” tab and search for stickers.
- Add to Photo: Click on a sticker to add it to your photo.
- Adjust Size and Position: Drag the corners of the sticker to resize and move it to the desired position.
- Download the Edited Photo: Click “Share” > “Download” and choose your desired format.
-
Fotor:
- Open Fotor: Go to the Fotor website and launch the editor.
- Upload Photo: Upload the photo you want to edit.
- Add Stickers:
- Go to Stickers: Click on the “Stickers” tab.
- Choose a Sticker: Select a sticker from the available categories.
- Adjust and Position: Drag, resize, and rotate the sticker as needed.
- Save the Edited Photo: Click “Download” and choose your desired format.
-
-
Tips for Better Results:
- Use High-Resolution Images: Start with high-resolution photos and stickers for the best quality.
- Transparency: Use stickers with transparent backgrounds (PNG format) for a seamless look.
- Layering: Experiment with layering multiple stickers to create unique effects.
- Blending Options: Use blending options in Photoshop or GIMP to blend the sticker with the photo naturally.
-
Software and Tools:
- Adobe Photoshop: Professional-grade photo editing software with advanced features.
- GIMP: A free and open-source alternative to Photoshop.
- Canva: An online graphic design tool with a user-friendly interface and a wide range of templates and stickers.
- Fotor: An online photo editor with basic and advanced editing tools, including a sticker library.
5.1. How To Find Free Stickers Online?
Finding free stickers online can add a lot of fun and creativity to your projects without costing you a dime. Here’s how to find them:
-
Using Online Graphic Design Platforms:
-
Canva:
- What it Offers: Canva provides a vast library of free stickers, icons, and graphic elements. You can use these stickers in your designs directly on the platform.
- How to Find:
- Go to Canva and create a free account.
- Start a new design or open an existing one.
- Click on the “Elements” tab.
- Search for “stickers” or any specific type of sticker you need.
- Filter the results to show only free elements.
-
Adobe Creative Cloud Express (formerly Adobe Spark):
- What it Offers: Adobe Creative Cloud Express provides a selection of free design assets, including stickers, icons, and graphics.
- How to Find:
- Go to Adobe Creative Cloud Express and sign up for a free account.
- Start a new project.
- Click on the “Graphics” or “Design Assets” tab.
- Search for “stickers” and filter for free options.
-
-
Using Free Stock Photo and Graphic Websites:
-
Pixabay:
- What it Offers: Pixabay provides a vast collection of free stock photos, vectors, and illustrations, including many sticker designs.
- How to Find:
- Go to Pixabay.
- Search for “stickers” or any specific type of sticker you need (e.g., “free floral stickers”).
- Download the stickers in PNG format (for transparent backgrounds).
-
Unsplash:
- What it Offers: While primarily a stock photo site, Unsplash also offers a selection of free graphics and sticker-like images.
- How to Find:
- Go to Unsplash.
- Search for “stickers” or related terms.
- Download the images and use them as stickers in your projects.
-
Pexels:
- What it Offers: Similar to Pixabay and Unsplash, Pexels offers a wide range of free stock photos and graphics, including sticker designs.
- How to Find:
- Go to Pexels.
- Search for “stickers” or any specific sticker type.
- Download the images and use them as stickers.
-
-
Searching on Google Images:
- What it Offers: Google Images can be a great resource for finding free stickers, but you need to filter your search effectively.
- How to Find:
- Go to Google Images.
- Search for “free stickers PNG” or any specific type of sticker you need.
- Click on “Tools.”
- Under “Usage Rights,” select “Creative Commons licenses.”
- Ensure the stickers you download are free to use for your intended purpose and that you give appropriate attribution if required.
-
Visiting Dedicated Free Sticker Websites:
-
Vecteezy:
- What it Offers: Vecteezy provides a variety of free vector graphics, including stickers.
- How to Find:
- Go to Vecteezy.
- Search for “stickers” or any specific type of sticker.
- Filter for free licenses.
- Download the stickers in vector format (AI, EPS) for easy editing.
-
FreePik:
- What it Offers: FreePik offers a wide selection of free vectors, photos, and PSD files, including stickers.
- How to Find:
- Go to FreePik.
- Search for “stickers” or any specific sticker type.
- Filter for free resources.
- Download the stickers in vector or PSD format.
-
-
Using Social Media and Online Communities:
-
Pinterest:
- What it Offers: Pinterest is a visual discovery platform where you can find links to free stickers and design resources.
- How to Find:
- Go to Pinterest.
- Search for “free stickers” or any specific sticker type.
- Explore the pins and follow links to websites offering free stickers.
-
Reddit:
- What it Offers: Reddit communities (subreddits) focused on graphic design, freebies, and design resources often share links to free stickers.
- How to Find:
- Visit subreddits like r/freebies, r/graphic_design, or r/designresources.
- Search for posts related to free stickers.
-
-
Tips for Using Free Stickers:
- Check the License: Always check the license or usage rights before using any free sticker. Ensure that it is free for commercial use if you intend to use it for business purposes.
- Give Attribution: Some free stickers may require you to give attribution to the designer or website. Make sure to follow the attribution guidelines.
- Use PNG Format: For stickers with transparent backgrounds, download them in PNG format.
- Edit and Customize: Use photo editing software like GIMP or online tools like Canva to edit and customize the stickers to fit your project.
- Organize Your Stickers: Keep your downloaded stickers organized in folders for easy access.
- Be Specific with Your Searches: Use specific keywords when searching for stickers to narrow down your results and find exactly what you need (e.g., “free vintage floral stickers,” “free geometric stickers”).
5.2. How To Create Your Own Stickers On A Computer?
Creating your own stickers on a computer allows for full customization and personalization. Here’s how to do it using various software and techniques:
-
Using Adobe Photoshop:
- Prepare Your Image:
- Open Photoshop: Launch Adobe Photoshop on your computer.
- Create a New Document: Go to “File” > “New” and set the dimensions for your sticker (e.g., 300×300 pixels). Set the resolution to 300 DPI for high-quality printing.
- Import Your Image: Go to “File” > “Open” and select the image you want to turn into a sticker. Alternatively, you can create your design from scratch.
- Remove the Background (Isolate the Subject):
- Use the Quick Selection Tool: Select the “Quick Selection Tool” (W) from the toolbar.
- Select the Subject: Click and drag over the subject to select it. Refine the selection by using the “Add to Selection” and “Subtract from Selection” options in the toolbar.
- Refine Edge: Go to “Select” > “Select and Mask” to refine the edges of your selection. Adjust the “Smooth,” “Feather,” and “Contrast” settings for a clean edge.
- Create a Layer Mask: Click the “Layer Mask” icon at the bottom of the Layers panel to create a mask that hides the background.
- Add a Border (Optional):
- Add a New Layer: Create a new layer below the subject layer by pressing Ctrl+Shift+N (Cmd+Shift+N on Mac) and dragging the new layer below the subject layer in the Layers panel.
- Create a Stroke:
- Load Selection: Ctrl+Click (Cmd+Click on Mac) on the subject layer’s mask to load the selection.
- Expand Selection: Go to “Select” > “Modify” > “Expand” and enter a value for the border width (e.g., 5-10 pixels).
- Fill with Color: Select the new layer, then go to “Edit” > “Fill” and choose a color for the border.
- Save as PNG:
- Go to “File” > “Save As”.
- Choose PNG Format: Select “PNG” as the file format to preserve transparency.
- Save: Click “Save.”
- Prepare Your Image:
-
Using GIMP (Free Alternative):
- Prepare Your Image:
- Open GIMP: Launch GIMP on your computer.
- Create a New Document: Go to “File” > “New” and set the dimensions for your sticker.
- Import Your Image: Go to “File” > “Open” and select the image you want to turn into a sticker.
- Remove the Background:
- Use the Free Select Tool: Select the “Free Select Tool” (F) from the toolbar.
- Outline the Subject: Carefully outline the subject you want to isolate.
- Invert Selection: Go to “Select” > “Invert” to select the background.
- Delete Background: Press the “Delete” key to remove the background.
- Add Alpha Channel: If the background doesn’t become transparent, go to “Layer” > “Transparency” > “Add Alpha Channel.”
- Add a Border (Optional):
- Create a New Layer: Create a new layer below the subject layer.
- Outline the Subject: Use the “Free Select Tool” to outline the subject.
- Grow Selection: Go to “Select” > “Grow” and enter a value for the border width.
- Fill with Color: Select the new layer, then use the “Bucket Fill Tool” to fill the selection with a color.
- Save as PNG:
- Go to “File” > “Export As”.
- Choose PNG Format: Select “PNG” as the file format.
- Export: Click “Export.”
- Prepare Your Image:
-
Using Online Tools (Canva):
- Prepare Your Image:
- Go to Canva: Open Canva in your web browser and log in or sign up.
- Create a New Design: Click “Create a design” and choose custom dimensions for your sticker.
- Upload Your Image: Upload the image you want to use as a sticker.
- Remove the Background:
- Select the Image: Click on the image.
- Use Background Remover: Click on “Edit Image” and use the “Background Remover” tool (available for Canva Pro users). If you’re using the free version, you’ll need to manually remove the background using other tools or upload an image with a transparent background.
- Add a Border (Optional):
- Add an Element: Go to “Elements” and search for “circle” or “square.”
- Customize the Shape: Add a shape behind your image and customize its color and size to create a border effect.
- Download as PNG:
- Click “Download.”
- Choose PNG Format: Select “PNG” and check the “Transparent background” option (available for Canva Pro users).
- Download: Click “Download.”
- Prepare Your Image:
-
Tips for Designing Great Stickers:
- Use High-Resolution Images: Start with high-resolution images to ensure your stickers look sharp and clear.
- Keep it Simple: Simple, clean designs often work best for stickers.
- Use Contrasting Colors: Make sure your sticker stands out by using contrasting colors for the subject and background or border.
- Consider the Shape: Experiment with different shapes for your stickers, such as circles, squares, or custom outlines.
- Add Text Carefully: If you include text, make sure it’s legible and easy to read.
- Test Print: Before printing a large batch of stickers, do a test print to ensure the colors and quality are accurate.
-
Tools and Resources:
- Adobe Photoshop: Professional