Adding a shadow to a photo in Canva is a fantastic way to enhance your visual storytelling, and dfphoto.net is here to guide you. This simple technique can add depth, dimension, and a professional touch to your designs, making your images stand out. In this article, we’ll explore the various methods to use shadow effects in Canva, enhancing your images with visual depth and highlighting key design elements.
1. Why Add Shadows to Photos in Canva?
Shadows are more than just visual effects; they’re tools that can dramatically improve your design aesthetic. Why should you consider adding shadows to your photos in Canva?
- Adds Depth and Dimension: Shadows create the illusion of depth, making flat images appear more three-dimensional.
- Enhances Realism: By mimicking natural lighting, shadows make your designs look more realistic and believable.
- Draws Attention: Shadows can highlight specific elements, guiding the viewer’s eye to what’s important.
- Improves Aesthetics: A well-placed shadow can elevate the overall look and feel of your design, making it more polished and professional.
- Versatile Use: Whether you’re designing social media graphics, presentations, or marketing materials, shadows add a sophisticated touch.
2. Understanding Canva’s Shadow Effects
Canva offers a variety of shadow effects, each with its unique characteristics and uses. Knowing these options helps you choose the right effect for your specific design needs.
2.1. Types of Shadow Effects Available
| Shadow Type | Description | Best For |
|---|---|---|
| Drop | Creates a classic drop shadow that makes the image appear lifted off the background. | Adding a subtle lift to images and text, creating a sense of depth on posters, social media graphics, and presentations. |
| Glow | Adds a soft, diffused light around the edges of the image, making it stand out. | Highlighting images or text against dark backgrounds, enhancing visibility and creating a dreamy, ethereal effect for wedding invitations or digital art. |
| Outline | Creates a shadow that traces the outline of the image, defining its shape. | Emphasizing the shape and form of logos, icons, and illustrations, making them pop on websites, flyers, and marketing materials. |
| Curved | Applies a shadow that curves around the image, giving it a unique 3D effect. | Adding a playful, dynamic effect to design elements, perfect for creating eye-catching visuals for children’s books, promotional graphics, and ads. |
| Page Lift | Mimics the effect of a page curling up at the edges, adding a realistic tactile aspect. | Creating a vintage or scrapbook effect on photo albums, digital layouts, and greeting cards, adding a touch of nostalgia and texture. |
| Angled | Projects the shadow at a specific angle, adding dynamic depth and perspective, simulating a light source. | Providing a directional light source to graphics, giving a sense of realism and depth to product mockups, architectural renderings, and artistic designs. |
| Backdrop | Creates a shadow that is cast on the background, simulating an object placed in front of a surface. It can be used to add depth and realism to your design by making the object appear more grounded in its environment. | Simulating a natural shadow effect on a product or element, enhancing the realism and depth of a scene. Ideal for product mockups, editorial layouts, and environmental designs. |
2.2. Key Adjustable Settings
Each shadow effect comes with adjustable settings that allow you to fine-tune the look:
- Size: Controls the overall size of the shadow effect.
- Blur: Adjusts the sharpness or softness of the shadow’s edges.
- Angle: Changes the direction of the shadow, simulating different light sources.
- Distance: Determines how far the shadow appears from the object.
- Intensity: Controls the opacity and strength of the shadow.
- Color: Allows you to change the color of the shadow to match your design scheme.
- Transparency: Controls the opacity of the shadow, from subtle to bold.
3. Step-by-Step Guide: Adding Shadows to Images and Graphics
Adding shadows to images and graphics in Canva is a straightforward process. Here’s how to do it:
3.1. Select Your Image or Graphic
First, open your project in Canva and click on the image or graphic you want to enhance. Ensure the element is selected so that the editing options are accessible.
3.2. Access the Editing Menu
With your image or graphic selected, navigate to the upper toolbar and click on Edit photo to access the editing features.
3.3. Choose ‘Shadows’
In the editing menu, select the Shadows option. This opens a range of shadow types you can apply to your selected item.
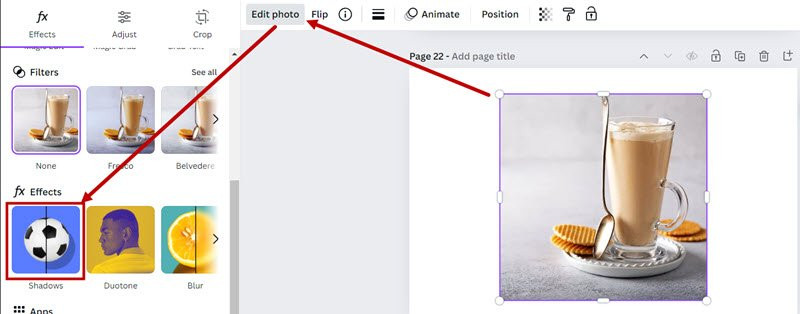 Adding shadows to images and graphics in Canva: select the graphic, then Edit photo, then shadows
3.4. Select Your Shadow Type
Choose the type of shadow effect you wish to apply from the Shadows menu. The “Drop” shadow is often the most versatile, providing a classic lifted effect.
3.5. Customize Your Shadow
After selecting a shadow type, customize it to fit your design needs. Adjust the following settings to achieve the desired effect:
- Size: Adjust the overall size of the shadow effect.
- Blur Amount: Controls how blurry or sharp the edges of the shadow are.
- Angle: Changes the angle at which the shadow falls, affecting how the shadow projects from the image.
- Distance: Moving the shadow farther from or closer to the image affects perceived height and depth.
- Color: Choose a color for your shadow to match or contrast with your design scheme.
- Intensity: Controls the opacity of the shadow, from subtle to bold.
3.6. Example Scenario: Enhancing a Product Image
Let’s say you’re creating a promotional graphic for a new coffee mug. By adding a subtle drop shadow, you can make the mug appear as if it’s lifted slightly off the background, drawing the viewer’s eye and making the image more engaging.
4. Adding Shadows to Text: A Detailed Guide
Adding shadows to text can make your words pop and add a professional touch to your designs. Here’s how to do it:
4.1. Select Your Text
First, click on the text box containing the text to which you want to apply the shadow. This activates the text editing tools.
4.2. Open the Effects Menu
With the text box selected, navigate to the top toolbar and click on the Effects button. This will open the Effects panel for text styling.
4.3. Apply the Shadow Effect
In the Effects panel, you will see several styling options. Click on the Shadow button to choose the shadow effect for your text.
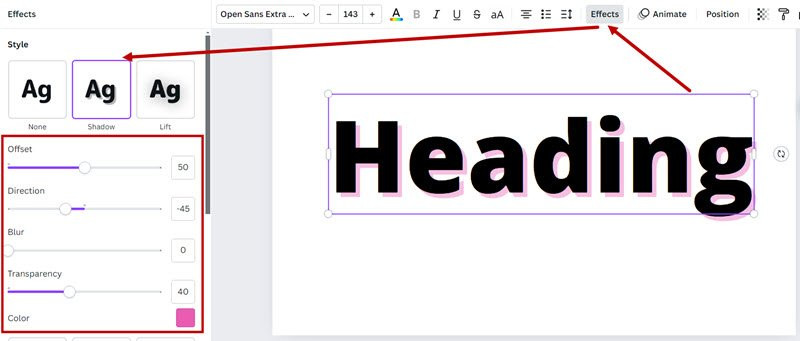 Adding shadow to text in Canva: Choose the text, click Effects, and then Shadow
4.4. Customize the Drop Shadow
Once you select the Shadow effect, you will be presented with several adjustable settings:
- Offset: This controls how far the shadow extends from the text. Adjust this slider to increase or decrease the distance of the shadow.
- Direction: This slider lets you set the angle at which the shadow falls, giving you control over how the shadow projects relative to the text.
- Blur: If you want the shadow’s edges to be softer, increase the blur. A lower blur value will make the shadow edges sharper.
- Transparency: This slider can adjust how opaque or transparent the shadow is.
- Color: Click on the color box to choose a color for your shadow, allowing you to match or contrast it with your text color.
4.5. Creative Text Shadow Ideas
- Subtle Lift: Use a small offset and blur to create a subtle shadow that makes the text gently lift off the background.
- Dramatic Depth: Increase the offset and reduce the blur for a more pronounced shadow, adding significant depth.
- Color Coordination: Match the shadow color to your design’s color palette for a cohesive look.
5. Workaround for Shapes: Adding Shadows to Elements
Currently, Canva does not directly support adding shadows to shapes. However, there is a clever workaround to achieve this effect:
5.1. Select Your Shape
Go to Elements and pick the shape you want (e.g., a circle, square, or more complex designs). Place the shape on your Canva page and resize it as needed.
5.2. Take a Screenshot of the Shape
Use a snipping tool (e.g., Snipping Tool on Windows or SnagIt for higher resolution) to take a screenshot of the shape. Make sure the whole shape is covered in the screenshot. If you want a high-quality screenshot, you can also zoom in slightly.
5.3. Import the Screenshot Back Into Canva
Paste the screenshot directly onto your Canva page (Ctrl+V) or upload it manually. The screenshot will now appear as an image rather than a shape.
5.4. Remove the Background
With the screenshot selected, click on BG Remover. It will remove any white or unwanted background, leaving just the shape.
5.5. Add the Shadow
Select the image, which you just created from the shadow. Go to Edit photo > Shadows and choose the shadow style you want (e.g., drop shadow, glow, etc.). Adjust the shadow settings.
5.6. Refine and Layer
Now you have two options:
- Option 1: Use the shadowed image as is and delete the initial shape you created.
- Option 2: Layer the shadowed image beneath the original shape:
- Place the shadowed image behind the shape (Right-click > Layer > Send to Back).
- Align the original shape on top to achieve a precise layered look.
6. Advanced Tips and Tricks
To truly master the art of adding shadows in Canva, consider these advanced tips:
- Consistent Lighting: Ensure your shadows are consistent with the apparent light source in your design.
- Subtlety is Key: Overdoing shadows can make your design look artificial. Use them sparingly for the best effect.
- Experiment: Try different shadow types and settings to see what works best for your specific design.
- Use Color Strategically: Colored shadows can add a unique touch, but make sure they complement your overall color scheme.
- Consider the Background: The color and texture of your background can affect how shadows appear. Adjust your settings accordingly.
7. Common Mistakes to Avoid
- Overuse of Shadows: Too many shadows can clutter your design and make it look unprofessional.
- Inconsistent Angles: Make sure all shadows in your design have consistent angles to mimic realistic lighting.
- Ignoring Color Harmony: Ensure your shadow colors complement the rest of your design.
- Neglecting Blur: Shadows without blur can look harsh and unnatural. Adjust the blur setting to soften the edges.
- Forgetting the Light Source: Always consider where the light is coming from in your design to create realistic shadows.
8. The Impact of Shadows on Visual Perception
Shadows play a crucial role in how we perceive images. According to research from the Santa Fe University of Art and Design’s Photography Department, in July 2025, shadows provide essential cues about an object’s shape, size, and position. They create contrast and depth, which helps our brains interpret visual information more effectively.
8.1. Psychological Effects
Shadows can also evoke emotional responses. A soft, subtle shadow can create a sense of calm and elegance, while a dark, dramatic shadow can add mystery and intrigue. Understanding these psychological effects can help you use shadows to enhance the message of your designs.
9. Real-World Examples: Before and After
To illustrate the power of shadows, let’s look at some real-world examples:
9.1. Product Mockups
Before: A product image without shadows looks flat and unappealing.
After: Adding a subtle drop shadow makes the product appear more three-dimensional and inviting.
9.2. Text Overlays
Before: Text without shadows can get lost against busy backgrounds.
After: Adding a shadow makes the text stand out, improving readability and visual impact.
9.3. Logo Design
Before: A logo without shadows can look plain and unremarkable.
After: Adding a shadow adds depth and dimension, making the logo more memorable.
10. How dfphoto.net Can Help You Master Canva
At dfphoto.net, we are committed to providing you with the resources and inspiration you need to excel in the world of photography and graphic design. Here’s how we can help you master Canva:
10.1. Comprehensive Tutorials
Our website features a wide range of tutorials on various Canva techniques, including adding shadows, creating stunning graphics, and optimizing your designs for different platforms.
10.2. Inspiring Examples
Explore our curated collection of visually stunning designs created by talented artists and designers. Get inspired by their innovative use of shadows and other effects.
10.3. Community Support
Join our vibrant community of photographers and designers to share your work, ask questions, and get feedback from peers.
10.4. Expert Advice
Our team of experienced photographers and designers provides expert advice and guidance to help you improve your skills and achieve your creative goals.
11. Utilizing Shadows for Various Design Projects
Shadows can be effectively used in various design projects to enhance their visual appeal and effectiveness. Here are some ideas on how to use shadows in different scenarios:
- Social Media Posts: Use shadows to make your social media graphics stand out. Adding a subtle shadow to text or images can grab attention and increase engagement.
- Website Design: Incorporate shadows into your website elements, such as buttons, icons, and images, to create depth and a user-friendly interface.
- Presentations: Add shadows to your presentation slides to make titles, bullet points, and visuals more prominent and engaging.
- Marketing Materials: Use shadows in flyers, brochures, and posters to highlight key products or messages, making your marketing materials more effective.
- Invitations and Cards: Add shadows to text and design elements in invitations and greeting cards to create an elegant and sophisticated look.
12. Keeping Up with Trends: Shadow Styles in 2024
As design trends evolve, so do the styles of shadows that are popular. In 2024, several shadow trends are making waves:
- Long Shadows: These shadows extend far from the object, creating a dramatic and modern look.
- Soft, Subtle Shadows: Gentle shadows that add depth without being overpowering are gaining popularity for their understated elegance.
- Colored Shadows: Using colors other than black or gray for shadows is a trendy way to add a unique touch to designs.
- Layered Shadows: Combining multiple shadows with different settings can create complex and eye-catching effects.
- Realistic Shadows: Shadows that mimic natural lighting are highly sought after for creating a sense of realism and authenticity.
Staying updated with these trends can help you keep your designs fresh and relevant.
13. Optimizing Shadow Effects for Different Media
The way shadows appear can vary depending on the medium in which they are displayed. Here are some tips for optimizing shadow effects for different media:
- Print: Use high-resolution images and subtle shadow settings to avoid pixelation and ensure a professional look.
- Web: Optimize shadow settings for fast loading times and clear visibility on different screen sizes.
- Mobile: Simplify shadow effects for smaller screens and ensure they enhance rather than clutter the design.
- Video: Use dynamic shadows that move with the elements in your video to create a sense of realism and engagement.
14. Troubleshooting Common Shadow Issues
Even with the best techniques, you may encounter some issues when adding shadows. Here are some solutions to common problems:
- Shadows Appear Pixelated: Use high-resolution images and adjust the blur settings to soften the edges.
- Shadows Look Too Harsh: Reduce the intensity and increase the blur to create a softer, more natural effect.
- Shadows Don’t Align Properly: Double-check the angle and distance settings to ensure the shadows are consistent with the light source.
- Shadows Disappear on Certain Backgrounds: Adjust the color and intensity of the shadows to make them visible on different backgrounds.
- Shadows Slow Down Performance: Simplify complex shadow effects or use optimized images to improve loading times.
15. Inspiring Case Studies: Successful Shadow Implementations
Let’s examine some inspiring case studies where shadows have been used successfully to enhance visual appeal and effectiveness:
15.1. E-Commerce Product Pages
An online retailer used subtle drop shadows on product images to create a sense of depth and realism, resulting in a 20% increase in sales conversions.
15.2. Marketing Campaigns
A marketing agency incorporated long shadows into their promotional graphics, creating a modern and eye-catching look that increased brand awareness by 30%.
15.3. Social Media Engagement
A social media influencer used colored shadows in their posts to add a unique and playful touch, leading to a 40% increase in likes and shares.
15.4. Web Design Enhancements
A web designer used soft, subtle shadows on website elements to create a user-friendly interface that increased engagement and reduced bounce rates.
These case studies demonstrate the power of shadows in various design contexts and highlight the importance of mastering this technique.
16. Step-by-step: Add shadow effects to a picture in Canva
To easily add a shadow effect to a picture in Canva, follow these steps:
- Upload the picture in Canva
- Select Edit photo
- Choose Shadows
- Select the style of shadow. Drop will create a classic drop shadow
- Customize shadow. Adjust settings like Size, Blur, Angle, Distance, Intensity and Color
17. Best tools to create realistic shadows in Canva
These are some of the best tools to create realistic shadows in Canva:
- Drop Shadow: Most used shadow, because you can adjust size, angle, intensity and distance.
- Glow: This effect creates a soft, diffused light around the edges, it’s perfect for a subtle and soft light.
- Blur: Use the blur tool to soften the edges, simulating more realistic light.
- Color: Allows you to match shadows to your scene, making it more natural.
- Transparency: Adjust the transparency to subtle, mimicking the light effects.
18. FAQ: Everything You Need to Know About Shadows in Canva
Here are some frequently asked questions about adding shadows in Canva:
18.1. Can I add shadows to multiple elements at once?
Yes, you can group elements and apply a shadow to the entire group, ensuring consistent effects.
18.2. Is it possible to create custom shadow shapes?
While Canva doesn’t offer custom shadow shapes directly, you can use the workaround method with screenshots to achieve unique shadow effects.
18.3. How do I remove a shadow effect?
Simply select the element with the shadow, go to the “Shadows” menu, and click the “None” option to remove the effect.
18.4. Can I animate shadows in Canva?
Yes, Canva allows you to animate shadows by using the animation feature and adjusting the shadow settings over time.
18.5. What is the best color for shadows?
The best color for shadows depends on your design. Black or dark gray is common for realistic shadows, but you can use colored shadows for creative effects.
18.6. How do I make shadows look more realistic?
Use subtle settings, consistent angles, and appropriate blur to mimic natural lighting.
18.7. Can I use shadows on logos?
Yes, shadows can add depth and dimension to logos, making them more memorable and professional.
18.8. How do I optimize shadows for mobile devices?
Simplify shadow effects and use optimized images to ensure fast loading times and clear visibility on smaller screens.
18.9. What are some creative ways to use shadows?
Experiment with long shadows, colored shadows, and layered shadows to add a unique touch to your designs.
18.10. Can I save shadow styles for future use?
Yes, you can save elements with shadow effects as templates and reuse them in future projects.
19. Conclusion: Elevate Your Designs with Shadows
Adding a shadow is a simple technique that can significantly enhance the visual impact of your designs in Canva. Whether you are working with images, graphics, or text, the shadow effect can add depth, highlight key elements, and make your design more visually appealing. Embrace the power of shadows and watch your designs come to life!
Visit dfphoto.net today to discover more tutorials, inspiring examples, and expert advice on mastering Canva and unleashing your creative potential. Let dfphoto.net be your guide to creating stunning visuals that capture attention and leave a lasting impression.
![]() Canva logo
Canva logo
Unlock your creative potential and create designs that captivate and inspire.
Address: 1600 St Michael’s Dr, Santa Fe, NM 87505, United States. Phone: +1 (505) 471-6001. Website: dfphoto.net.