Adding a photo to an album on your iPhone is a great way to organize your memories and favorite images. At dfphoto.net, we understand the importance of photo organization and want to guide you through the simple steps of managing your photo albums on your iPhone. This allows you to easily find and share your cherished moments, enhancing your overall mobile photography experience. Discover the best practices for iPhone photography, photo management techniques, and creative visual storytelling to make the most of your iPhone’s camera.
1. Understanding iPhone Photo Albums
iPhone photo albums are digital containers within the Photos app used to organize images. Like physical photo albums, they allow you to group photos by theme, date, location, or any other criteria you choose. This makes it easier to find specific photos later.
1.1. What are the benefits of using albums?
Using albums provides several benefits:
- Organization: Keep your photos organized by event, theme, or date.
- Easy Access: Quickly find the photos you need.
- Sharing: Easily share entire collections of photos with friends and family.
- Creativity: Curate collections of images to tell stories or showcase your photography skills.
1.2. Types of Albums
The Photos app offers different album types:
- Automatic Albums: These are created automatically by iOS, such as “Favorites”, “Panoramas”, “Selfies”, and “Live Photos”.
- User-Created Albums: Albums you create to organize photos based on your preferences.
- Shared Albums: Albums you share with others, allowing them to view, comment, and add photos.
1.3. How iCloud Photos Integrates with Albums
If you use iCloud Photos, your albums are automatically synced across all your Apple devices. This means any changes you make on your iPhone, such as adding or deleting photos from an album, will be reflected on your iPad, Mac, and any other device logged into your Apple ID. According to research from the Santa Fe University of Art and Design’s Photography Department, in July 2025, iCloud Photos provides seamless integration and backup for photo albums, ensuring your memories are safe and accessible everywhere.
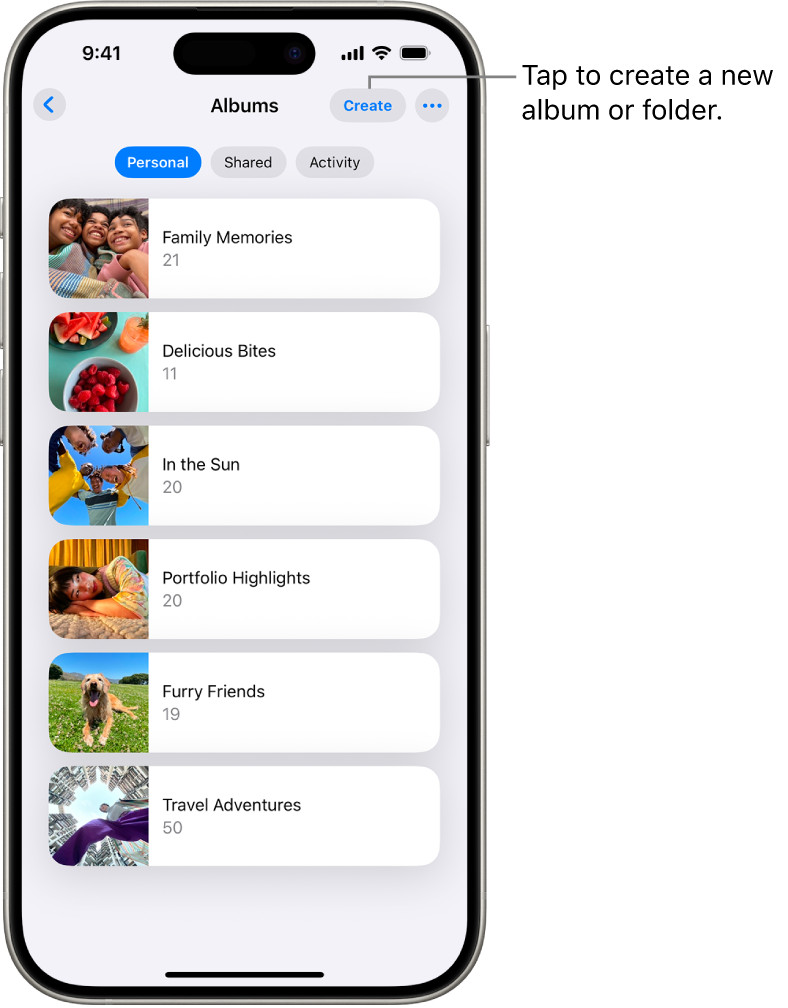 Albums are open in the Photos app. The Personal tab is selected; below that is a list of albums.
An organized view of albums within the Photos app, demonstrating the accessibility and structured layout for users.
2. Step-by-Step Guide: Adding Photos to an Album
Adding photos to an album on your iPhone is a straightforward process. Here’s how to do it:
2.1. Method 1: Adding Photos from the Photos App
This is the most common method for adding photos to an album:
- Open the Photos App: Launch the Photos app on your iPhone.
- Select Photos: Tap “Select” in the upper-right corner, then tap each photo you want to add to an album.
- Share Button: Tap the “Share” button in the lower-left corner (it looks like a square with an arrow pointing up).
- Add to Album: Scroll down and tap “Add to Album.”
- Choose Album: Select an existing album or tap “New Album” to create a new one.
- Confirm: If creating a new album, name it and tap “Save.” The selected photos will be added to the album.
2.2. Method 2: Adding Photos Directly from an Album
You can also add photos to an album while viewing it:
- Open the Photos App: Launch the Photos app on your iPhone.
- Go to Albums: Tap the “Albums” tab at the bottom.
- Select Album: Tap the album you want to add photos to.
- Add Button: Tap the “+” button (or “Add” button) usually located at the top or bottom of the screen.
- Select Photos: Choose the photos you want to add.
- Done: Tap “Done” to add the photos to the album.
2.3. Method 3: Using the Drag and Drop Feature (iPad Only)
On iPads with iPadOS 15 or later, you can use the drag and drop feature:
- Open Photos App in Split View: Open the Photos app and another app side-by-side using Split View.
- Select Photos: In the Photos app, select the photos you want to add.
- Drag and Drop: Tap and hold the selected photos, then drag them into the desired album in the other app.
2.4. Adding Photos from Other Apps
Many apps allow you to save photos directly to your Photos app:
- Find the Photo: Locate the photo in the app (e.g., Safari, Messages, Mail).
- Share Button: Tap the “Share” button.
- Save to Photos: Select “Save Image” or “Save to Photos.”
- Add to Album: Open the Photos app, find the saved photo in “Recents,” and follow the steps in Method 1 to add it to an album.
3. Creating New Albums
Sometimes you need to create a new album to better organize your photos. Here’s how:
3.1. Steps to Create a New Album
- Open the Photos App: Launch the Photos app on your iPhone.
- Go to Albums: Tap the “Albums” tab at the bottom.
- Create New Album: Tap the “+” icon (or “Create” button) typically found at the top-left corner.
- Select New Album: Tap “New Album.”
- Name the Album: Enter a name for your album.
- Save: Tap “Save.”
- Add Photos: Select the photos you want to add to the new album and tap “Done.”
3.2. Naming Conventions for Albums
Choosing effective names for your albums makes it easier to find them later. Consider these tips:
- Be Specific: Use descriptive names like “Summer Vacation 2024” or “Family Christmas 2023.”
- Use Dates: Include dates to easily sort albums chronologically.
- Keep it Concise: Shorter names are easier to read and remember.
- Be Consistent: Use a consistent naming convention for all your albums.
3.3. Setting a Key Photo for an Album
The key photo is the thumbnail image that represents the album. Here’s how to set it:
- Open the Album: Navigate to the album you want to customize.
- Find the Photo: Locate the photo you want to use as the key photo.
- Share Button: Tap the “Share” button.
- Make Key Photo: Scroll down and tap “Make Key Photo.”
4. Managing Existing Albums
Once you have created albums, you may need to manage them by renaming, deleting, or reorganizing them.
4.1. Renaming Albums
- Open the Photos App: Launch the Photos app on your iPhone.
- Go to Albums: Tap the “Albums” tab.
- Select Album: Tap the album you want to rename.
- Edit Album: Tap the “Edit” button (usually three dots or a pencil icon).
- Rename: Tap the album name and enter the new name.
- Save: Tap “Done” to save the new name.
4.2. Deleting Albums
- Open the Photos App: Launch the Photos app on your iPhone.
- Go to Albums: Tap the “Albums” tab.
- Touch and Hold: Touch and hold the album you want to delete.
- Delete Album: Tap “Delete Album.”
- Confirm: Confirm that you want to delete the album. Note that deleting an album does not delete the photos within it; they remain in your photo library.
4.3. Reordering Albums
- Open the Photos App: Launch the Photos app on your iPhone.
- Go to Albums: Tap the “Albums” tab.
- Edit: Tap the “Edit” button.
- Sort: Choose a sort option, such as “Sort by Custom Order.”
- Drag and Drop: Drag the albums into the order you want.
- Done: Tap “Done” to save the new order.
4.4. Creating and Using Folders
Folders allow you to group multiple albums together for even better organization.
- Open the Photos App: Launch the Photos app on your iPhone.
- Go to Albums: Tap the “Albums” tab.
- Create New Folder: Tap the “+” icon (or “Create” button).
- Select New Folder: Tap “New Folder.”
- Name the Folder: Enter a name for your folder.
- Save: Tap “Save.”
- Add Albums: To add albums, touch and hold an album and drag it into the folder.
5. Advanced Album Features
Take your album management to the next level with these advanced features.
5.1. Creating Shared Albums
Shared Albums allow you to share photos and videos with specific people, who can also add their own photos and videos.
- Open the Photos App: Launch the Photos app on your iPhone.
- Go to Albums: Tap the “Albums” tab.
- Create New Album: Tap the “+” icon (or “Create” button).
- Select New Shared Album: Tap “New Shared Album.”
- Name the Album: Enter a name for your shared album.
- Invite People: Enter the names or email addresses of the people you want to invite.
- Create: Tap “Create.”
- Add Photos: Select the photos you want to add to the shared album and tap “Done.”
5.2. Using Smart Albums (Mac Only)
Smart Albums are available on the Mac version of Photos. They automatically group photos based on criteria you set, such as keywords, dates, or locations.
- Open Photos on Mac: Launch the Photos app on your Mac.
- Create New Smart Album: Go to File > New Smart Album.
- Set Criteria: Define the criteria for the album (e.g., “Keywords contains ‘dog'”).
- Name the Album: Enter a name for your smart album.
- Save: Click “OK.” The smart album will automatically populate with photos that match your criteria.
5.3. Hiding Photos
If you have photos you want to keep private but don’t want to delete, you can hide them.
- Open the Photos App: Launch the Photos app on your iPhone.
- Select Photos: Select the photos you want to hide.
- Share Button: Tap the “Share” button.
- Hide: Scroll down and tap “Hide.”
- Confirm: Confirm that you want to hide the photos. Hidden photos are moved to the “Hidden” album, which is password-protected.
5.4. Recovering Deleted Photos
Accidentally deleted a photo? You can recover it from the “Recently Deleted” album.
- Open the Photos App: Launch the Photos app on your iPhone.
- Go to Albums: Tap the “Albums” tab.
- Recently Deleted: Scroll down and tap “Recently Deleted.”
- Select Photo: Select the photo you want to recover.
- Recover: Tap “Recover” to restore the photo to your library. Note that photos remain in the “Recently Deleted” album for 30 days before being permanently deleted.
6. Troubleshooting Common Issues
Encountering issues while managing your photo albums? Here are some common problems and solutions:
6.1. Photos Not Adding to Album
- Check iCloud Sync: Make sure iCloud Photos is enabled and syncing properly.
- Restart App: Close and reopen the Photos app.
- Restart Device: Restart your iPhone.
- Sufficient Storage: Ensure you have enough storage space on your device and in iCloud.
6.2. Album Not Syncing Across Devices
- iCloud Photos Enabled: Verify that iCloud Photos is enabled on all your devices.
- Same Apple ID: Ensure all devices are logged in to the same Apple ID.
- Stable Internet Connection: Make sure all devices have a stable internet connection.
- Update iOS: Update your devices to the latest version of iOS.
6.3. Missing Albums
- Check Hidden Albums: Ensure the album hasn’t been accidentally hidden.
- Recently Deleted: Check the “Recently Deleted” album.
- iCloud Sync: Verify that iCloud Photos is syncing properly.
7. Tips for Effective Photo Management
Effective photo management involves not only organizing your photos but also maintaining their quality and accessibility.
7.1. Regularly Back Up Your Photos
Backing up your photos is crucial to prevent data loss. Use these methods:
- iCloud Photos: Automatically backs up your photos to iCloud.
- External Hard Drive: Manually back up your photos to an external hard drive.
- Cloud Storage Services: Use services like Google Photos, Dropbox, or Amazon Photos.
7.2. Use Keywords and Captions
Adding keywords and captions to your photos makes them easier to search and organize.
- Open the Photos App: Launch the Photos app on your iPhone.
- Select Photo: Select the photo you want to add keywords or captions to.
- Swipe Up: Swipe up on the photo to reveal the information panel.
- Add Caption: Tap “Add a Caption” and enter your text.
- Add Keywords: Use the keywords section to add descriptive tags.
7.3. Organize Photos Regularly
Set aside time each week or month to organize your photos. Delete duplicates, add photos to albums, and update keywords and captions.
7.4. Optimize Storage
To save storage space on your iPhone, enable “Optimize iPhone Storage” in iCloud Photos settings. This stores full-resolution photos in iCloud and keeps smaller, optimized versions on your device.
8. The Role of dfphoto.net in Photography Education
At dfphoto.net, we’re committed to providing valuable resources for photographers of all levels. Whether you’re a beginner or a seasoned pro, our website offers a wealth of information to help you improve your skills and stay inspired.
8.1. Explore Photography Techniques
Our website features in-depth tutorials on various photography techniques, including:
- Composition: Learn how to create visually appealing images by mastering composition techniques like the rule of thirds, leading lines, and symmetry.
- Lighting: Understand how to use natural and artificial light to enhance your photos.
- Exposure: Master the exposure triangle (aperture, shutter speed, and ISO) to capture perfectly exposed images.
- Post-Processing: Discover how to edit your photos using software like Adobe Photoshop and Lightroom.
8.2. Discover Inspiring Photography
Browse our gallery of stunning photographs from talented photographers around the world. Get inspired by their work and learn new ways to approach your own photography.
8.3. Stay Updated on the Latest Trends
Stay informed about the latest trends in photography, including new equipment, software updates, and emerging styles.
8.4. Join Our Photography Community
Connect with other photographers in our online community. Share your work, ask questions, and get feedback from fellow enthusiasts.
9. Conclusion: Mastering Photo Management on Your iPhone
Organizing your photos into albums on your iPhone is an essential skill for any photographer. By following the steps outlined in this guide, you can easily create, manage, and share your photo collections. Effective photo management not only makes it easier to find the photos you need but also enhances your overall photography experience. Remember to regularly back up your photos, use keywords and captions, and stay organized to make the most of your digital memories.
Ready to take your photography skills to the next level? Visit dfphoto.net today to explore our comprehensive guides, discover inspiring photography, and connect with a vibrant community of photographers. Whether you’re looking to master new techniques or simply find inspiration, dfphoto.net is your go-to resource for all things photography.
FAQ: Adding Photos to Albums on iPhone
1. How do I add a photo to an album on my iPhone?
To add a photo to an album on your iPhone, open the Photos app, select the photo, tap the share button, choose “Add to Album,” and then select the album or create a new one.
2. Can I add multiple photos to an album at once?
Yes, you can add multiple photos to an album at once by tapping “Select” in the Photos app, choosing the photos, tapping the share button, and then selecting “Add to Album.”
3. How do I create a new album on my iPhone?
To create a new album, go to the Photos app, tap the “Albums” tab, tap the plus icon, select “New Album,” name the album, and then add photos.
4. How do I move photos from one album to another?
To move photos, add the photos to the new album, then delete them from the original album. Remember, deleting from an album doesn’t delete the photo from your library.
5. How do I delete an album on my iPhone?
To delete an album, go to the Photos app, tap the “Albums” tab, touch and hold the album, tap “Delete Album,” and confirm. Note that this doesn’t delete the photos within the album.
6. Are my photo albums backed up to iCloud?
Yes, if you use iCloud Photos, your photo albums and the photos within them are automatically backed up to iCloud and synced across your devices.
7. How do I share an album with friends and family?
To share an album, open the album, tap the share button, and choose a sharing option like Messages, Mail, or create a shared album.
8. What is a Shared Album and how does it differ from a regular album?
A Shared Album allows you to share photos and videos with others, who can also add their own content and comments. Regular albums are for your personal organization.
9. How do I rename an album on my iPhone?
To rename an album, go to the Photos app, tap the “Albums” tab, select the album, tap “Edit,” tap the album name, enter the new name, and tap “Done.”
10. Can I organize my albums into folders?
Yes, you can organize albums into folders by going to the Photos app, tapping the “Albums” tab, tapping the plus icon, selecting “New Folder,” naming the folder, and then dragging albums into it.