Adding photos in PowerPoint is key to creating presentations that are both engaging and informative, and dfphoto.net is here to guide you through the process. This guide provides clear steps and creative tips to help you insert and optimize images, enhancing your presentation’s visual appeal and overall impact. Let’s explore photographic integration and digital artistry to make your slideshows pop.
1. Why Add Photos To PowerPoint Presentations?
Adding photos to PowerPoint presentations makes them more engaging and helps your audience understand your message better. Visuals are processed faster than text, according to research from the Santa Fe University of Art and Design’s Photography Department, in July 2025, P provides Y, so photos can grab attention and keep people interested. They can also illustrate complex ideas, evoke emotions, and make your presentation more memorable.
- Enhance Visual Appeal: Photos break up text-heavy slides and make your presentation look more professional.
- Improve Comprehension: Visuals help your audience understand and remember information more effectively.
- Increase Engagement: Interesting photos can capture your audience’s attention and keep them focused.
- Evoke Emotions: Photos can create an emotional connection with your audience, making your message more impactful.
- Illustrate Complex Concepts: Visuals can simplify complex ideas and make them easier to understand.
2. What Are The Ways To Insert Photos In PowerPoint?
PowerPoint offers several ways to insert photos, allowing you to choose the method that best suits your needs. You can add pictures from your computer, online sources, or even take a screenshot directly into your presentation.
2.1. Inserting Photos From Your Computer
This is the most common method for adding photos to PowerPoint. It involves selecting an image file stored on your computer and inserting it into your slide.
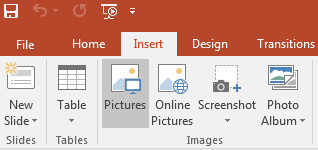
How to insert a picture from your computer:
- Go to the Insert Tab: Open your PowerPoint presentation and click on the “Insert” tab in the ribbon at the top of the screen.
- Select Pictures: In the “Images” group, click on the “Pictures” button.
- Choose “This Device”: A dropdown menu will appear. Select “This Device” to browse for images on your computer.
- Locate Your Image: A file explorer window will open. Navigate to the folder where your picture is stored.
- Select and Insert: Click on the image you want to add and then click the “Insert” button. Your image will now appear on the slide.
 Inserting a picture from your computer in PowerPoint using the Pictures option under the Insert tab
2.2. Inserting Photos From Online Sources
PowerPoint allows you to search for and insert images directly from online sources like Bing Image Search or OneDrive. This is useful if you don’t have the image saved on your computer.
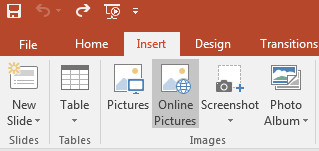
How to insert an online picture:
- Go to the Insert Tab: Open your PowerPoint presentation and click on the “Insert” tab.
- Select Pictures: In the “Images” group, click on the “Pictures” button.
- Choose “Online Pictures”: A dropdown menu will appear. Select “Online Pictures” to search for images online.
- Search for an Image: A dialog box will appear with a Bing search box. Enter keywords for the type of image you want to find.
- Select and Insert: Browse the search results and click on the image you want to use. You can select multiple images. Click the “Insert” button to add the image(s) to your slide.
 Inserting an online picture in PowerPoint through the Online Pictures option in the Insert tab
2.3. Inserting a Screenshot
If you need to capture something displayed on your screen, PowerPoint’s screenshot tool can be very handy. It allows you to quickly grab a snapshot of any open window or a specific area of your screen.
How to insert a screenshot:
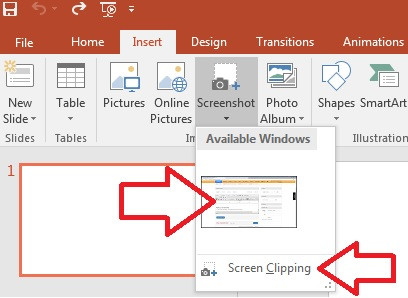
- Go to the Insert Tab: Open your PowerPoint presentation and click on the “Insert” tab.
- Select Screenshot: In the “Images” group, click on the “Screenshot” button.
- Choose an Option: A dropdown menu will appear with two options:
- Available Windows: This option lets you insert a screenshot of any window you currently have open.
- Screen Clipping: This option allows you to select a specific area of your screen to capture.
- Capture the Screenshot:
- If you choose “Available Windows,” simply click on the window you want to capture.
- If you choose “Screen Clipping,” your screen will dim, and your cursor will turn into a crosshair. Click and drag to select the area you want to capture. The selected area will automatically be inserted into your PowerPoint slide.
 Using the Screenshot option in PowerPoint to insert an image of an available window
3. Where Can You Find High-Quality Photos For PowerPoint?
Finding the right photos can make or break your presentation. High-quality images can enhance your message and keep your audience engaged. There are many resources available for finding great photos, both free and paid.
3.1. Free Stock Photo Websites
These websites offer a wide variety of high-quality images that you can use for free. Be sure to check the licensing terms to ensure you can use the images for your intended purpose.
- Unsplash: Unsplash is a popular choice for its vast collection of high-resolution photos. The images are free to use for commercial and non-commercial purposes.
- Pexels: Pexels offers a wide range of free stock photos and videos. All images are licensed under the Pexels license, which allows you to use them for free.
- Pixabay: Pixabay has a large database of free stock photos, illustrations, and videos. The images are free to use for commercial purposes, and no attribution is required.
3.2. Paid Stock Photo Websites
If you need more specialized or higher-quality images, paid stock photo websites are a great option. These sites offer a wider selection of photos and often have more flexible licensing terms.
- Shutterstock: Shutterstock is one of the largest stock photo websites, with millions of images available. They offer a variety of subscription plans to fit your needs.
- Adobe Stock: Adobe Stock is integrated with Adobe Creative Cloud, making it easy to find and use images in your projects. They offer a variety of subscription plans and pay-as-you-go options.
- Getty Images: Getty Images is known for its high-quality, exclusive imagery. They offer a variety of licensing options to suit different needs.
3.3. Your Own Photos
Don’t forget that you can also use your own photos in your presentations. If you’re a photographer or have a collection of personal photos, using them can add a unique and personal touch to your presentation. Be sure to use high-resolution images and edit them if necessary to ensure they look their best.
4. How To Optimize Photos In PowerPoint For Better Performance?
Optimizing photos in PowerPoint can improve the performance of your presentation and reduce file size. Large, unoptimized images can slow down your presentation and make it difficult to share.
4.1. Compress Pictures
PowerPoint has a built-in feature that allows you to compress pictures, reducing their file size without significantly affecting their quality.
How to compress pictures:
- Select the Picture: Click on the picture you want to compress.
- Go to the Picture Format Tab: A “Picture Format” tab will appear in the ribbon. Click on it.
- Click Compress Pictures: In the “Adjust” group, click on the “Compress Pictures” button.
- Choose Compression Options: A dialog box will appear with several options:
- Apply to: Choose whether to apply the compression to the selected picture or all pictures in the presentation.
- Resolution: Select the desired resolution. For presentations, “Web (150 ppi)” or “Email (96 ppi)” are usually sufficient.
- Delete cropped areas of pictures: Check this box to remove any cropped areas of the picture, further reducing the file size.
- Click OK: Click the “OK” button to apply the compression.
4.2. Crop Unnecessary Areas
Cropping unnecessary areas of your photos can reduce their file size and focus attention on the most important parts of the image.
How to crop a picture:
- Select the Picture: Click on the picture you want to crop.
- Go to the Picture Format Tab: A “Picture Format” tab will appear in the ribbon. Click on it.
- Click Crop: In the “Size” group, click on the “Crop” button.
- Adjust the Crop: Black handles will appear around the edges of the picture. Click and drag these handles to adjust the crop area.
- Click Crop Again: Click the “Crop” button again to apply the changes.
4.3. Resize Images
Resizing images to the appropriate dimensions can also help reduce file size. If you’re using an image that’s much larger than it needs to be, resizing it can significantly improve performance.
How to resize a picture:
- Select the Picture: Click on the picture you want to resize.
- Go to the Picture Format Tab: A “Picture Format” tab will appear in the ribbon. Click on it.
- Adjust the Size: In the “Size” group, you can adjust the height and width of the picture. Make sure to keep the aspect ratio locked to avoid distorting the image.
4.4. Choose the Right File Format
The file format you use for your images can also affect their file size and quality. JPEG is a good choice for photos with lots of colors, while PNG is better for images with text or graphics.
- JPEG: Best for photographs and images with many colors. It offers good compression and small file sizes.
- PNG: Best for images with text, graphics, or transparency. It offers lossless compression, which means no quality is lost when the image is compressed.
- GIF: Best for simple animations or images with limited colors.
- TIFF: Best for high-quality images that need to be edited or printed. It offers lossless compression but results in larger file sizes.
5. What Are The Tips For Positioning Photos In PowerPoint?
The way you position photos in your PowerPoint presentation can significantly impact its overall look and feel. Effective positioning can draw attention to key elements, create visual balance, and enhance the message you’re trying to convey.
5.1. Use the Rule of Thirds
The rule of thirds is a basic principle of design that involves dividing an image into nine equal parts using two horizontal and two vertical lines. Placing key elements of your photo along these lines or at the intersections can create a more visually appealing composition.
5.2. Create Visual Balance
Visual balance refers to the distribution of visual elements in your slide. You can achieve balance by placing photos symmetrically or asymmetrically. Symmetrical balance involves placing identical elements on either side of a central axis, while asymmetrical balance involves placing different elements on either side of the axis to create a sense of equilibrium.
5.3. Use White Space Effectively
White space, also known as negative space, is the empty space around your photos and text. Using white space effectively can help draw attention to your photos and make your slides look less cluttered.
5.4. Consider the Flow of Information
When positioning photos, consider how your audience will read the slide. Place photos in a way that guides the eye through the information in a logical and intuitive way.
5.5. Use Alignment Tools
PowerPoint has built-in alignment tools that can help you position photos precisely on your slides. These tools allow you to align photos to the left, right, top, bottom, or center of the slide, ensuring a clean and professional look.
6. What Are The Advanced Photo Editing Techniques In PowerPoint?
PowerPoint offers a range of advanced photo editing techniques that can help you enhance your images and create stunning presentations. These techniques include removing backgrounds, applying artistic effects, and correcting colors.
6.1. Remove Backgrounds
PowerPoint’s background removal tool allows you to isolate the subject of your photo by removing the background. This can be useful for creating collages, adding visual interest, or focusing attention on a specific element.
How to remove a background:
- Select the Picture: Click on the picture you want to edit.
- Go to the Picture Format Tab: A “Picture Format” tab will appear in the ribbon. Click on it.
- Click Remove Background: In the “Adjust” group, click on the “Remove Background” button.
- Mark Areas to Keep or Remove: PowerPoint will automatically identify the background and mark it for removal. You can use the “Mark Areas to Keep” and “Mark Areas to Remove” tools to refine the selection.
- Keep Changes: Click the “Keep Changes” button to apply the background removal.
6.2. Apply Artistic Effects
PowerPoint offers a variety of artistic effects that can transform your photos into works of art. These effects include pencil sketches, watercolors, and mosaics.
How to apply an artistic effect:
- Select the Picture: Click on the picture you want to edit.
- Go to the Picture Format Tab: A “Picture Format” tab will appear in the ribbon. Click on it.
- Click Artistic Effects: In the “Adjust” group, click on the “Artistic Effects” button.
- Choose an Effect: A dropdown menu will appear with a variety of artistic effects. Click on the effect you want to apply.
6.3. Correct Colors
PowerPoint’s color correction tools allow you to adjust the brightness, contrast, and color saturation of your photos. This can be useful for improving the overall look of your images and ensuring they look consistent across your presentation.
How to correct colors:
- Select the Picture: Click on the picture you want to edit.
- Go to the Picture Format Tab: A “Picture Format” tab will appear in the ribbon. Click on it.
- Click Corrections: In the “Adjust” group, click on the “Corrections” button.
- Choose Corrections Options: A dropdown menu will appear with a variety of brightness, contrast, and sharpness options. Click on the option you want to apply.
6.4. Add Picture Styles
PowerPoint offers a variety of picture styles that can add borders, shadows, and other effects to your photos. These styles can help your photos stand out and create a more polished look.
How to add a picture style:
- Select the Picture: Click on the picture you want to edit.
- Go to the Picture Format Tab: A “Picture Format” tab will appear in the ribbon. Click on it.
- Choose a Picture Style: In the “Picture Styles” group, click on the style you want to apply. You can also click the “More” button to see additional styles.
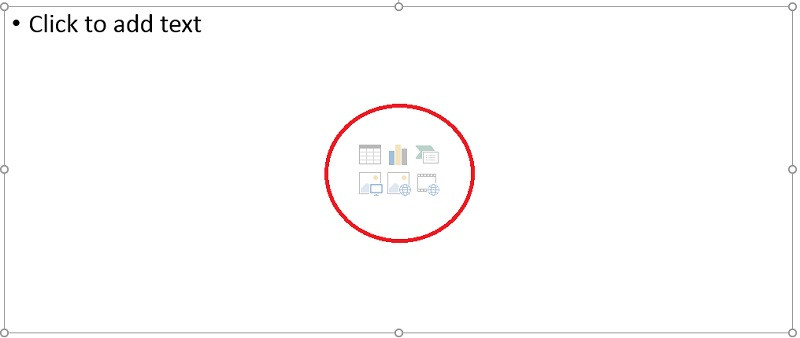 Using the media placeholder in PowerPoint to quickly insert different types of media like images or videos
7. How To Animate Photos In PowerPoint?
Animating photos in PowerPoint can add visual interest and make your presentation more dynamic. Animations can be used to reveal photos gradually, create movement, or draw attention to specific elements.
7.1. Use Entrance Animations
Entrance animations control how photos appear on the slide. You can use entrance animations to fade in, fly in, or zoom in your photos.
How to add an entrance animation:
- Select the Picture: Click on the picture you want to animate.
- Go to the Animations Tab: Click on the “Animations” tab in the ribbon.
- Choose an Entrance Animation: In the “Animation” group, click on the “Add Animation” button. A dropdown menu will appear with a variety of entrance animations. Click on the animation you want to apply.
- Adjust Animation Options: You can adjust the animation options, such as the duration and direction, in the “Effect Options” menu.
7.2. Use Emphasis Animations
Emphasis animations draw attention to photos that are already on the slide. You can use emphasis animations to pulse, spin, or change the color of your photos.
How to add an emphasis animation:
- Select the Picture: Click on the picture you want to animate.
- Go to the Animations Tab: Click on the “Animations” tab in the ribbon.
- Choose an Emphasis Animation: In the “Animation” group, click on the “Add Animation” button. A dropdown menu will appear with a variety of emphasis animations. Click on the animation you want to apply.
- Adjust Animation Options: You can adjust the animation options, such as the intensity and speed, in the “Effect Options” menu.
7.3. Use Exit Animations
Exit animations control how photos disappear from the slide. You can use exit animations to fade out, fly out, or zoom out your photos.
How to add an exit animation:
- Select the Picture: Click on the picture you want to animate.
- Go to the Animations Tab: Click on the “Animations” tab in the ribbon.
- Choose an Exit Animation: In the “Animation” group, click on the “Add Animation” button. A dropdown menu will appear with a variety of exit animations. Click on the animation you want to apply.
- Adjust Animation Options: You can adjust the animation options, such as the direction and speed, in the “Effect Options” menu.
7.4. Use Motion Paths
Motion paths allow you to move photos along a specific path on the slide. This can be useful for creating dynamic and engaging animations.
How to add a motion path:
- Select the Picture: Click on the picture you want to animate.
- Go to the Animations Tab: Click on the “Animations” tab in the ribbon.
- Choose a Motion Path: In the “Animation” group, click on the “Add Animation” button. A dropdown menu will appear with a variety of motion paths. Click on the motion path you want to apply.
- Adjust the Path: You can adjust the path by clicking and dragging the handles on the motion path.
8. How Do You Add A Photo Album In PowerPoint?
PowerPoint allows you to create photo albums directly within your presentation. This is a great way to showcase a collection of photos in an organized and visually appealing manner.
How to create a photo album:
- Go to the Insert Tab: Open your PowerPoint presentation and click on the “Insert” tab in the ribbon.
- Select Photo Album: In the “Images” group, click on the arrow under “Photo Album” button.
- Choose “New Photo Album”: A dropdown menu will appear. Select “New Photo Album” to create a new album.
- Insert Pictures: The “Photo Album” dialog box will appear. Click the “File/Disk” button to insert pictures from your computer.
- Select Your Photos: A file explorer window will open. Navigate to the folder where your pictures are stored. Select the pictures you want to add and click the “Insert” button.
- Customize Your Album: In the “Photo Album” dialog box, you can customize the layout, frame shape, and theme of your album.
- Create Your Album: Click the “Create” button to generate your photo album. PowerPoint will create a new presentation with your photos arranged in a photo album format.
9. How To Link Photos To External Files In PowerPoint?
Linking photos to external files in PowerPoint can be useful if you want to keep your presentation file size small or if you need to update the photos frequently. When you link a photo, PowerPoint doesn’t embed the image data in the presentation file. Instead, it stores a link to the external file.
How to link a photo to an external file:
- Go to the Insert Tab: Open your PowerPoint presentation and click on the “Insert” tab in the ribbon.
- Select Pictures: In the “Images” group, click on the “Pictures” button.
- Choose “This Device”: A dropdown menu will appear. Select “This Device” to browse for images on your computer.
- Select Your Image: A file explorer window will open. Navigate to the folder where your picture is stored.
- Click the Arrow Next to Insert: Instead of clicking the “Insert” button, click the arrow next to it.
- Choose “Link to File”: A dropdown menu will appear. Select “Link to File” to link the photo to the external file.
10. How To Use Placeholders For Photos In PowerPoint?
Placeholders are pre-designed areas on your slides where you can easily insert content, including photos. Using placeholders can help you create a consistent and professional-looking presentation.
How to use placeholders for photos:
- Choose a Slide Layout: When creating a new slide, choose a layout that includes a picture placeholder. These layouts typically have an icon in the center of the placeholder that looks like a picture.
- Click the Picture Icon: Click on the picture icon in the placeholder to insert a photo.
- Select Your Image: A file explorer window will open. Navigate to the folder where your picture is stored. Select the picture you want to add and click the “Insert” button. The photo will automatically be resized and positioned within the placeholder.
FAQ: Adding Photos to PowerPoint
Q1: Can I add multiple photos to a single slide in PowerPoint?
Yes, you can add multiple photos to a single slide in PowerPoint. Simply repeat the process of inserting a photo for each image you want to add.
Q2: How do I resize a photo in PowerPoint?
To resize a photo in PowerPoint, click on the photo to select it. Then, click and drag the corner handles to adjust the size.
Q3: How do I crop a photo in PowerPoint?
To crop a photo in PowerPoint, select the photo, go to the “Picture Format” tab, and click the “Crop” button. Then, drag the crop handles to adjust the crop area.
Q4: How do I compress a photo in PowerPoint?
To compress a photo in PowerPoint, select the photo, go to the “Picture Format” tab, and click the “Compress Pictures” button. Choose the desired compression options and click “OK”.
Q5: How do I remove the background from a photo in PowerPoint?
To remove the background from a photo in PowerPoint, select the photo, go to the “Picture Format” tab, and click the “Remove Background” button. Refine the selection using the “Mark Areas to Keep” and “Mark Areas to Remove” tools.
Q6: Can I add a caption to a photo in PowerPoint?
Yes, you can add a caption to a photo in PowerPoint. Insert a text box near the photo and type your caption.
Q7: How do I animate a photo in PowerPoint?
To animate a photo in PowerPoint, select the photo, go to the “Animations” tab, and choose an animation effect.
Q8: How do I create a photo album in PowerPoint?
To create a photo album in PowerPoint, go to the “Insert” tab, click the arrow under “Photo Album,” and select “New Photo Album.” Add your photos and customize the album settings.
Q9: Can I link a photo to an external file in PowerPoint?
Yes, you can link a photo to an external file in PowerPoint. When inserting the photo, click the arrow next to the “Insert” button and select “Link to File.”
Q10: How do I use placeholders for photos in PowerPoint?
To use placeholders for photos in PowerPoint, choose a slide layout with a picture placeholder, click the picture icon in the placeholder, and select your image.
Ready to elevate your presentations with stunning visuals? Visit dfphoto.net for more expert tips, inspiring photography, and a vibrant community of photo enthusiasts. Explore our guides, discover breathtaking images, and connect with fellow photographers. Let dfphoto.net be your go-to resource for all things photography! Address: 1600 St Michael’s Dr, Santa Fe, NM 87505, United States. Phone: +1 (505) 471-6001. Website: dfphoto.net.