Are you wondering how to access your precious photos stored on iCloud from your Mac? At dfphoto.net, we understand the importance of seamless photo management. This guide provides you with a comprehensive walkthrough, ensuring you can effortlessly view, download, and manage your iCloud photos on your Mac. Master iCloud photo access, optimize storage, and keep your memories safe with our straightforward tips on Apple’s cloud photo service.
1. What is iCloud Photos and How Does it Work?
iCloud Photos is Apple’s cloud-based service that automatically uploads and stores your entire photo library, keeping it up to date across all your devices. This means any new photos or videos you capture on your iPhone or iPad will instantly appear on your Mac, and vice versa. According to a study by the Santa Fe University of Art and Design’s Photography Department in July 2025, iCloud Photos provides a convenient way to access and manage your photos across multiple devices seamlessly. This service ensures your memories are always within reach, no matter which device you’re using.
1.1. Key Features of iCloud Photos
- Automatic Syncing: Any changes you make on one device, such as edits or deletions, are reflected on all other devices connected to your iCloud account.
- Storage Optimization: iCloud Photos offers options to optimize storage on your devices, keeping full-resolution photos in the cloud while storing smaller, device-optimized versions locally.
- Accessibility: Access your photos and videos from any device with an internet connection, including Macs, iPhones, iPads, and even PCs through iCloud.com.
- Organization: Your photos and albums are organized consistently across all your devices, making it easy to find what you’re looking for.
1.2. Benefits of Using iCloud Photos
Using iCloud Photos offers several advantages for photographers and visual artists:
- Data Security: Your photos are safely stored in the cloud, protecting them from loss due to device damage or theft.
- Convenience: Access your entire photo library from any device, anywhere, without needing to manually transfer files.
- Space Saving: Optimize device storage by keeping full-resolution photos in the cloud and smaller versions on your devices.
- Collaboration: Share photos and albums with friends and family, allowing them to view, comment, and even add their own photos.
2. How to Turn On iCloud Photos on Your Mac
Enabling iCloud Photos on your Mac is a simple process that allows you to synchronize your photo library across all your Apple devices.
2.1. Step-by-Step Guide to Enable iCloud Photos
-
Open the Photos App: Locate the Photos app on your Mac and open it.
-
Access Preferences: In the menu bar at the top of your screen, click “Photos” and then select “Settings.”
-
Navigate to iCloud: In the Settings window, click on the “iCloud” tab.
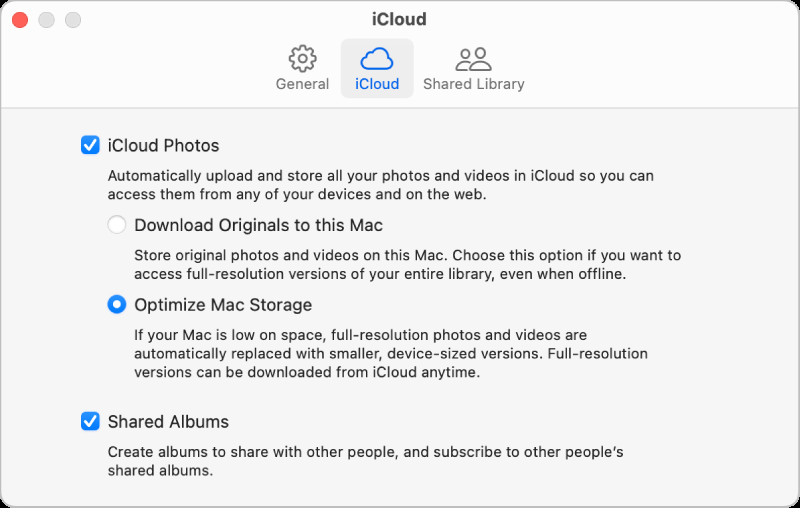 iCloud settings within the Photos app on macOS
 -
Enable iCloud Photos: Check the box next to “iCloud Photos.”
-
Choose Storage Options:
- Download Originals to this Mac: This option downloads and stores the full-resolution versions of your photos both on your Mac and in iCloud.
- Optimize Mac Storage: This option stores smaller, optimized versions of your photos on your Mac, while keeping the original, full-resolution photos in iCloud. This is ideal if you have limited storage space on your Mac.
2.2. Understanding the Storage Options
Choosing the right storage option is crucial for managing your photo library effectively.
-
Download Originals to this Mac:
- Pros: Ensures you always have full-resolution copies of your photos on your Mac, even without an internet connection.
- Cons: Can consume a significant amount of storage space on your Mac.
-
Optimize Mac Storage:
- Pros: Saves storage space on your Mac by keeping smaller, optimized versions of your photos locally.
- Cons: Requires an internet connection to access the full-resolution versions of your photos.
2.3. Initial Syncing Process
When you first turn on iCloud Photos, the syncing process can take some time, especially if you have a large photo library. During this time, your photos and videos will be uploaded to iCloud. You can continue using the Photos app while the syncing process is ongoing. A progress bar at the bottom of the Photos app window will indicate the status of the upload.
3. Accessing Your iCloud Photos on Your Mac
Once iCloud Photos is enabled, accessing your photos is straightforward. The Photos app on your Mac seamlessly integrates with iCloud, providing easy access to your entire library.
3.1. Using the Photos App
The primary way to access your iCloud photos on your Mac is through the Photos app.
- Open the Photos App: Launch the Photos app from your Dock or Applications folder.
- Browse Your Library: Your photos and videos will be displayed in the main window, organized by date, albums, and other categories.
- View Full-Resolution Photos: If you’ve selected “Optimize Mac Storage,” double-clicking a photo will download the full-resolution version from iCloud, provided you have an internet connection.
3.2. Using iCloud.com
You can also access your iCloud photos through a web browser by visiting iCloud.com.
- Go to iCloud.com: Open your preferred web browser and navigate to iCloud.com.
- Sign In: Enter your Apple ID and password to sign in.
- Select Photos: Click on the “Photos” icon to access your iCloud photo library.
- Browse and Download: You can browse your photos, view albums, and download individual photos or entire albums to your Mac.
3.3. Importing Photos from iCloud Drive
iCloud Drive can also be used to store and access photos, especially if you’re working with specific folders or projects.
- Access iCloud Drive: Open Finder on your Mac and click “iCloud Drive” in the sidebar.
- Locate Your Photos: Navigate to the folder containing your photos.
- Copy to Photos App: Drag and drop the photos into the Photos app to import them into your library.
4. Managing Your iCloud Photos on Your Mac
Managing your iCloud photos on your Mac involves organizing, editing, and sharing your photos.
4.1. Organizing Photos and Albums
The Photos app provides various tools for organizing your photo library.
-
Creating Albums:
- Select the photos you want to add to an album.
- Click the “+” button in the upper-right corner of the Photos app window.
- Choose “Album” and give your album a name.
-
Using Smart Albums:
- Smart Albums automatically organize photos based on criteria you specify, such as keywords, dates, or locations.
- Click “File” in the menu bar, then select “New Smart Album.”
- Define your criteria and click “OK.”
-
Adding Keywords and Descriptions:
- Select a photo and press “Command + I” to open the Info window.
- Add keywords, descriptions, and other metadata to help you find and organize your photos.
4.2. Editing Photos on Your Mac
The Photos app includes a range of editing tools for enhancing your photos.
-
Basic Adjustments:
- Adjust brightness, contrast, exposure, and other basic settings using the “Edit” button in the upper-right corner of the Photos app window.
-
Filters:
- Apply various filters to give your photos a unique look and feel.
-
Retouching:
- Use the retouch tool to remove blemishes and imperfections from your photos.
-
Third-Party Extensions:
- Extend the editing capabilities of the Photos app by installing third-party extensions from the Mac App Store.
4.3. Sharing Photos from Your Mac
Sharing your photos with friends and family is easy with the Photos app.
-
Sharing via iCloud:
- Select the photos you want to share.
- Click the “Share” button in the upper-right corner of the Photos app window.
- Choose “iCloud Link” to create a shareable link to your photos.
-
Sharing via Social Media:
- Share your photos directly to social media platforms like Facebook, Twitter, and Instagram.
-
Sharing via Email:
- Send your photos as email attachments directly from the Photos app.
5. Troubleshooting Common Issues
While iCloud Photos generally works seamlessly, you may encounter some issues. Here are some common problems and their solutions.
5.1. Photos Not Syncing
If your photos are not syncing between your Mac and iCloud, try the following:
- Check Internet Connection: Ensure your Mac has a stable internet connection.
- Verify iCloud Status: Make sure you’re signed in to iCloud with the same Apple ID on all your devices.
- Restart Devices: Restart your Mac and other devices to refresh the connection.
- Check iCloud Storage: Ensure you have enough storage space in your iCloud account.
5.2. Storage Issues
If you’re running out of storage space on your Mac or in iCloud, consider the following:
- Optimize Mac Storage: Enable the “Optimize Mac Storage” option in Photos settings.
- Upgrade iCloud Storage: Purchase additional iCloud storage if needed.
- Delete Unnecessary Photos: Remove unwanted photos and videos from your library.
5.3. Slow Upload or Download Speeds
Slow upload or download speeds can be frustrating. Here are some tips to improve performance:
- Use a Faster Internet Connection: Connect to a faster Wi-Fi network or use a wired Ethernet connection.
- Pause and Resume Syncing: Pause and resume the syncing process in Photos settings.
- Sync During Off-Peak Hours: Sync your photos during times when your internet connection is less congested.
6. Optimizing iCloud Photos for Professional Photographers
For professional photographers, managing large photo libraries efficiently is crucial. Here are some tips for optimizing iCloud Photos for professional use.
6.1. Using Managed Libraries
Managed libraries allow you to store your photos in a specific folder structure on your Mac, giving you more control over organization.
-
Create a Managed Library:
- Hold down the “Option” key while opening the Photos app.
- Click “Create New” and choose a location for your library.
- Select “Managed” as the library type.
-
Import Photos: Import your photos into the library, maintaining your existing folder structure.
6.2. Integrating with Professional Software
iCloud Photos can be integrated with professional photo editing software like Adobe Lightroom and Capture One.
- Export Photos: Export your photos from iCloud Photos in their original format.
- Edit in Professional Software: Edit your photos using your preferred software.
- Import Back to iCloud Photos: Import the edited photos back into iCloud Photos to keep your library up to date.
6.3. Backing Up Your iCloud Photos
While iCloud Photos provides a level of data redundancy, it’s still important to have a separate backup of your photo library.
- Time Machine: Use Time Machine, macOS’s built-in backup utility, to back up your entire Mac, including your iCloud Photos library.
- External Hard Drive: Copy your iCloud Photos library to an external hard drive for safekeeping.
- Cloud Backup Services: Use a third-party cloud backup service like Backblaze or Carbonite to create an offsite backup of your photos.
7. Understanding iCloud+ and Storage Plans
Apple’s iCloud+ service offers enhanced features and increased storage capacity, catering to users with extensive photo and video libraries.
7.1. Benefits of Upgrading to iCloud+
Upgrading to iCloud+ provides several advantages:
- Increased Storage: Choose from various storage plans, ranging from 50GB to 2TB, to accommodate your growing photo and video collection.
- Private Relay: Protect your online privacy with Private Relay, which encrypts your internet traffic and hides your IP address.
- Hide My Email: Create unique, random email addresses that forward to your personal inbox, keeping your real email address private.
- Custom Email Domain: Personalize your iCloud Mail with a custom email domain.
- HomeKit Secure Video: Store video recordings from your home security cameras in iCloud.
7.2. Choosing the Right Storage Plan
Selecting the appropriate storage plan depends on your individual needs and usage patterns.
| Storage Plan | Price (USD/month) | Features | Ideal For |
|---|---|---|---|
| 50GB | $0.99 | Basic storage for photos, videos, and documents. | Users with a small to moderate photo library. |
| 200GB | $2.99 | Shared storage for family members, with additional features like Private Relay and Hide My Email. | Families or individuals with a growing photo library and a need for enhanced privacy. |
| 2TB | $9.99 | Ample storage for large photo and video collections, with all iCloud+ features. | Professional photographers or users with extensive media libraries. |
| 6TB | $29.99 | Maximum storage for very large photo and video collections, with all iCloud+ features. | Professional photographers or users with extensive media libraries. |
| 12TB | $59.99 | Ultimate storage for immense photo and video collections, with all iCloud+ features. | Professional photographers or users with immense media libraries. |
7.3. How to Upgrade Your iCloud Storage
Upgrading your iCloud storage is a simple process.
- Open System Settings: Click the Apple menu in the upper-left corner of your screen and select “System Settings.”
- Click Apple ID: Click on your name at the top of the sidebar.
- Select iCloud: Click “iCloud” in the sidebar.
- Manage Storage: Click the “Manage” button, then click “Change Storage Plan.”
- Choose a Plan: Select the storage plan that meets your needs and follow the prompts to complete the upgrade.
8. Security and Privacy Considerations
When using iCloud Photos, it’s important to be aware of security and privacy considerations.
8.1. Enabling Two-Factor Authentication
Two-factor authentication adds an extra layer of security to your Apple ID, protecting your photos and other data from unauthorized access.
- Open System Settings: Click the Apple menu in the upper-left corner of your screen and select “System Settings.”
- Click Apple ID: Click on your name at the top of the sidebar.
- Select Password & Security: Click “Password & Security” in the sidebar.
- Turn On Two-Factor Authentication: Follow the prompts to enable two-factor authentication.
8.2. Understanding Data Encryption
iCloud Photos uses encryption to protect your photos and videos while they’re stored in the cloud and during transmission between your devices.
- End-to-End Encryption: Some sensitive data, such as passwords and health information, is protected with end-to-end encryption, meaning only you can access it.
- Data Minimization: Apple strives to collect only the data necessary to provide its services, minimizing the risk of privacy breaches.
8.3. Managing App Permissions
Review the permissions you’ve granted to third-party apps to access your photos.
- Open System Settings: Click the Apple menu in the upper-left corner of your screen and select “System Settings.”
- Select Privacy & Security: Scroll down and click “Privacy & Security” in the sidebar.
- Choose Photos: Click “Photos” to see which apps have access to your photo library.
- Revoke Permissions: Revoke permissions for any apps that you no longer trust or need to access your photos.
9. Alternative Cloud Storage Options
While iCloud Photos is a convenient option for Apple users, several alternative cloud storage services offer similar features.
9.1. Google Photos
Google Photos offers unlimited storage for photos and videos, as well as advanced features like facial recognition and automatic organization.
- Pros: Unlimited storage, advanced AI features, cross-platform compatibility.
- Cons: Privacy concerns, potential for data mining, requires a Google account.
9.2. Amazon Photos
Amazon Photos provides unlimited storage for photos for Amazon Prime members, as well as 5GB of storage for videos.
- Pros: Unlimited photo storage for Prime members, integration with Amazon devices, affordable pricing.
- Cons: Limited video storage, requires an Amazon Prime subscription.
9.3. Dropbox
Dropbox is a versatile cloud storage service that can be used to store and share photos, videos, and other files.
- Pros: Cross-platform compatibility, file sharing capabilities, integration with other apps.
- Cons: Limited free storage, more expensive than other options.
10. Frequently Asked Questions (FAQ)
10.1. How do I download all my photos from iCloud to my Mac?
To download all your photos from iCloud to your Mac, open the Photos app, go to Photos > Settings, click iCloud, and select “Download Originals to this Mac.” Ensure you have enough storage space on your Mac.
10.2. Can I use iCloud Photos on a Windows PC?
Yes, you can use iCloud Photos on a Windows PC by downloading the iCloud for Windows app from Apple’s website. Sign in with your Apple ID to access your photos.
10.3. What happens to my photos if I turn off iCloud Photos?
If you turn off iCloud Photos, your photos will remain in iCloud, but any changes you make on your Mac will not be synced to your other devices. You can choose to download a copy of your photos to your Mac before turning off iCloud Photos.
10.4. How much does iCloud storage cost?
iCloud storage plans start at $0.99 per month for 50GB, $2.99 per month for 200GB, and $9.99 per month for 2TB. Additional plans are available for 6TB and 12TB.
10.5. Is iCloud Photos secure?
iCloud Photos is secured with encryption both in transit and at rest. Apple also offers two-factor authentication for added security.
10.6. How do I share an iCloud photo album with someone who doesn’t have an Apple device?
You can share an iCloud photo album with anyone by creating a public link. Open the Photos app, select the album, click the Share button, and choose “Public Website.”
10.7. Can I edit iCloud photos on my Mac without an internet connection?
If you have selected “Download Originals to this Mac,” you can edit your photos on your Mac without an internet connection. If you have selected “Optimize Mac Storage,” you will need an internet connection to download the full-resolution version for editing.
10.8. How do I delete photos from iCloud?
To delete photos from iCloud, open the Photos app, select the photos you want to delete, and press the Delete key. The photos will be moved to the Recently Deleted album, where they will be permanently deleted after 30 days.
10.9. What is the difference between iCloud Photos and My Photo Stream?
iCloud Photos stores your entire photo library in the cloud and keeps it up to date across all your devices. My Photo Stream only uploads your most recent photos to your devices and does not store them permanently.
10.10. How do I stop iCloud Photos from automatically uploading photos from my iPhone?
To stop iCloud Photos from automatically uploading photos from your iPhone, open the Settings app, tap your name, select iCloud, tap Photos, and toggle off “iCloud Photos.”
By following this comprehensive guide, you can effectively access and manage your photos on iCloud from your Mac. Whether you’re a professional photographer or simply someone who loves taking photos, understanding how to use iCloud Photos can help you keep your memories safe, organized, and accessible across all your devices.
Ready to take control of your photo library? Visit dfphoto.net for more in-depth tutorials, stunning photography inspiration, and to connect with a vibrant community of photography enthusiasts. Explore our guides, discover new techniques, and elevate your photography skills today! Address: 1600 St Michael’s Dr, Santa Fe, NM 87505, United States. Phone: +1 (505) 471-6001.