iCloud Photos is a fantastic service for Apple users, automatically backing up your precious photo and video memories to the cloud. This ensures they are safely stored and readily available across all your Apple devices, from iPhones to iPads and Macs. But what if you want to access these photos on your Windows PC? Fortunately, Apple provides a seamless solution with iCloud for Windows, allowing you to view, download, and even upload photos to your iCloud library directly from your PC.
This guide will walk you through the simple steps to set up and use iCloud Photos on your Windows PC, ensuring you can effortlessly manage your photo library regardless of the device you are using.
Getting Started: Turn on iCloud Photos on Your PC
Before you can access your iCloud Photos on your PC, you need to ensure iCloud for Windows is installed and configured correctly. If you haven’t already, download iCloud for Windows from the official Apple website and follow the installation prompts. Make sure you have already set up iCloud and iCloud Photos on your Apple devices (iPhone, iPad, or Mac) and are signed in with the same Apple ID on both your Apple devices and your Windows PC.
Once iCloud for Windows is installed and you are signed in:
-
Open iCloud for Windows on your PC. You can usually find it in your Start Menu.
-
Locate iCloud Photos. It should be listed with other iCloud features.
-
Next to iCloud Photos, click the arrow to open the settings.
-
Turn on iCloud Photos by clicking the toggle switch.
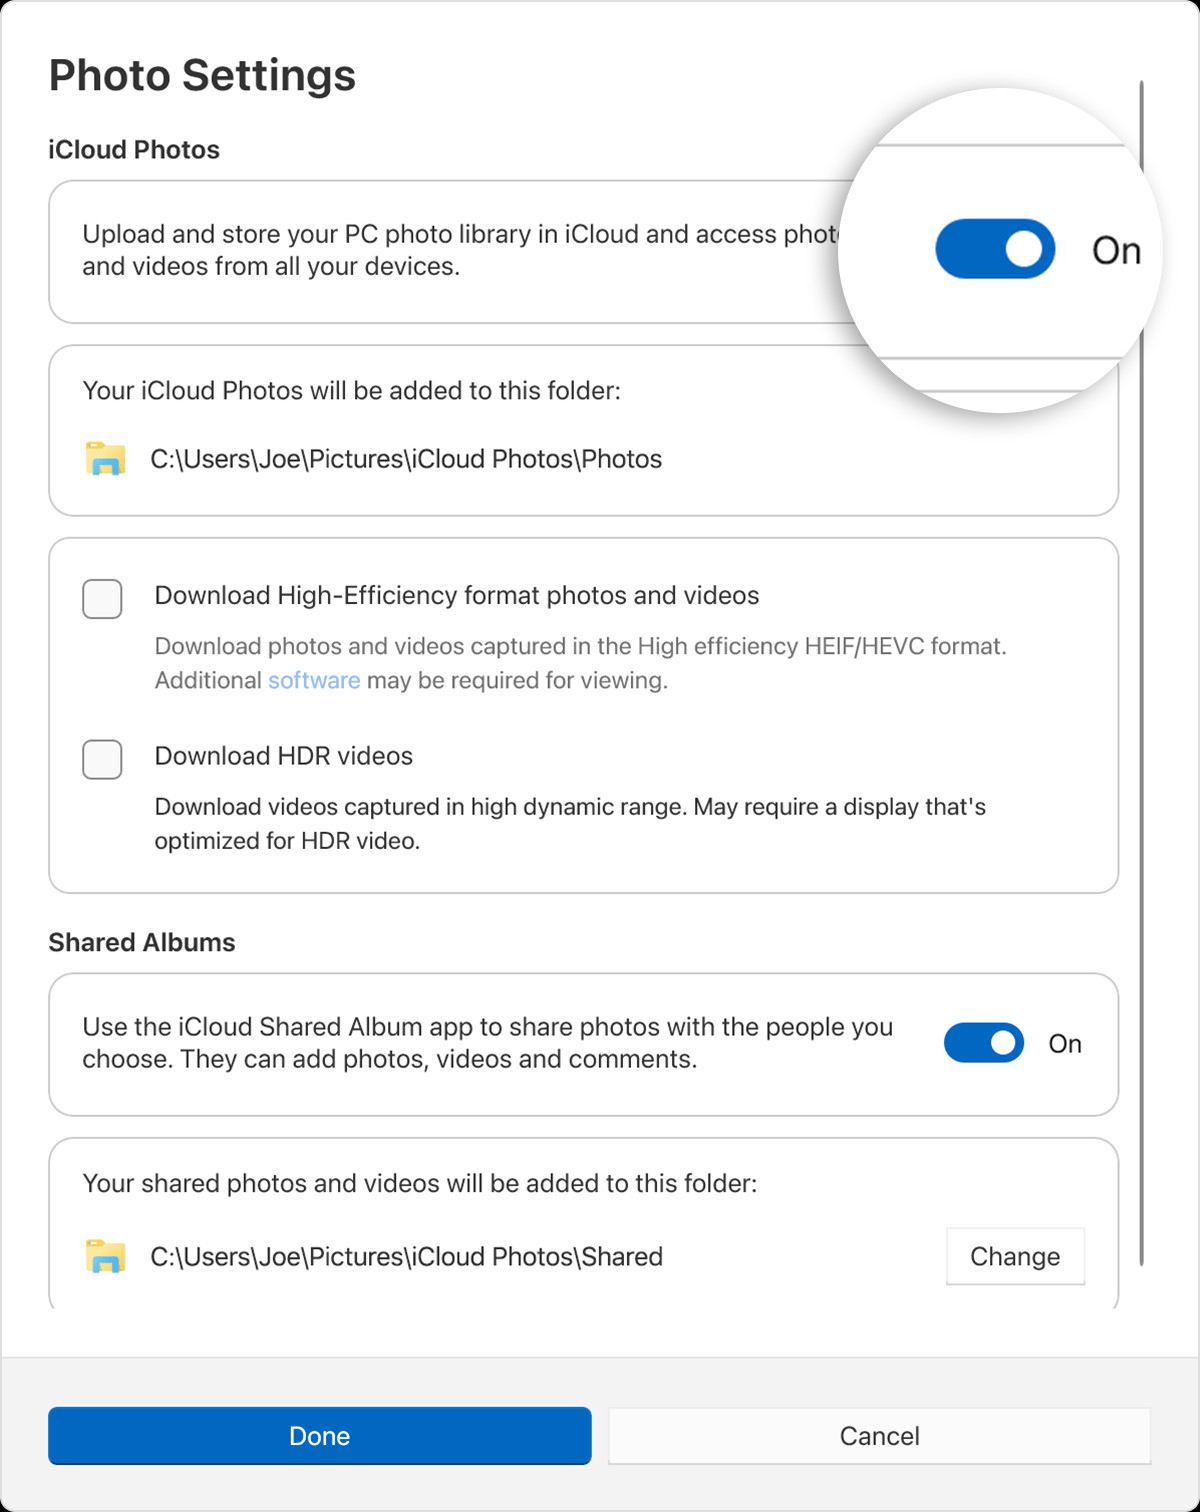 Turn on iCloud Photos in iCloud for Windows settings.
 -
For users of iCloud for Windows 14.2 or later, you have advanced download options. Click Advanced to customize your preferences for downloading photos and videos. You can choose between:
- “Download High-Efficiency format photos and videos”: This option saves space by downloading photos and videos in HEIF and HEVC formats respectively, which are high-efficiency formats.
- “Download HDR videos”: If you want to download HDR videos in their original HDR quality, select this option.
-
If you use Shared Albums to collaborate and share photos with others, turn on Shared Albums to access them on your PC as well.
-
Click Done to save your settings.
Note: You can change the location for Shared Albums, but it must be on your C: Drive. External drives are not supported for Shared Albums.
Finding Your iCloud Photos on Your PC
After enabling iCloud Photos, your photos and videos will be synced to a dedicated folder on your PC. You can access them through File Explorer. The default location for your iCloud Photos folder is:
C:Users[your user name]PicturesiCloud PhotosPhotos
Alternatively, you can access your iCloud Photos through the Photos app, especially in Windows 11:
Accessing iCloud Photos in Windows 11
- Open Microsoft Photos. You can find it in the Start Menu.
- In the left pane of the Photos app, you will see iCloud Photos listed. Select it to view your synced photos and videos.
Accessing iCloud Photos in Windows 10 or Later
- Open File Explorer. Click the folder icon on your taskbar or search for “File Explorer” in the Start Menu.
- In the Navigation pane on the left side of File Explorer, look for and click iCloud Photos. This will take you to your synced iCloud Photos library.
Downloading Photos and Videos from iCloud Photos
By default, iCloud Photos on PC works efficiently to save space. Thumbnails of your photos and videos are initially stored on your PC. When you want to view a specific photo or video in full resolution, it downloads from iCloud on demand. To download a file, simply double-click its thumbnail.
If you prefer to have certain photos and videos always available on your PC, even offline, you can use the “Always keep on this device” option:
- Open File Explorer and navigate to iCloud Photos in the Navigation pane.
- Select the photos and videos you want to keep permanently downloaded on your PC. You can select multiple items by holding down the Ctrl key while clicking.
- Right-click on your selection.
- Choose “Always keep on this device” from the context menu.
This will download the selected photos and videos and ensure they remain on your PC, even if you are offline.
Uploading Photos and Videos to iCloud Photos from Your PC
Uploading photos and videos from your PC to iCloud Photos is just as straightforward:
- Open File Explorer.
- In the Navigation pane, click iCloud Photos.
- Open another File Explorer window and navigate to the folder on your PC where the photos you want to upload are stored.
- Select the photos and videos you want to upload.
- Drag and drop the selected files into the iCloud Photos folder in the first File Explorer window.
The uploaded photos and videos will automatically sync to iCloud Photos and become available on all your Apple devices and on iCloud.com.
Important Note: Deleting photos or videos from the iCloud Photos folder in File Explorer or within the Microsoft Photos app on your PC will also delete them from iCloud Photos and all your connected Apple devices. Be cautious when deleting files to avoid accidental loss.
Conclusion
Accessing your iCloud Photos on a Windows PC is a breeze thanks to iCloud for Windows. By following these simple steps, you can seamlessly integrate your Apple photo library with your Windows environment, making it easy to view, manage, and share your photos across all your devices. Whether you are downloading photos for offline editing or uploading new photos from your PC, iCloud for Windows provides a convenient and efficient solution for managing your precious memories. Enjoy the flexibility of accessing your iCloud Photos on your PC and make the most of your photo library across all your devices.