iCloud Photos is an invaluable service for Apple users, seamlessly storing your entire photo and video library in iCloud. This allows you to effortlessly access your precious memories from all your Apple devices—Mac, iPhone, iPad, Apple TV, Apple Vision Pro—as well as PCs and via iCloud.com. Imagine capturing a moment on your iPhone and instantly having it available on your Mac for editing or sharing. This guide will walk you through exactly How To Access Icloud Photos On Mac, ensuring you can make the most of this powerful feature.
 An iPhone, MacBook, and iPad all showing memories from the same photo library.
Any new photos or videos you capture will automatically upload to iCloud, appearing on all devices linked to your Apple ID with iCloud Photos enabled. Your photos and albums maintain consistent organization across every device, and any edits or deletions you make are reflected everywhere. Setting up a new Mac? iCloud Photos will quickly synchronize your entire photo library, ready for you to enjoy.
Getting Started with iCloud Photos on Your Mac
Before diving in, ensure you have the Photos app ready on your Mac.
Enabling iCloud Photos on Your Mac
To begin accessing your iCloud Photo Library on your Mac, you’ll need to activate iCloud Photos within the Photos application settings. Here’s how to turn on iCloud Photos:
-
Open the Photos App: Locate and open the Photos application on your Mac. It’s typically found in your Applications folder or on your Dock.
-
Access Photos Settings: In the menu bar at the top of your screen, click on “Photos” and then select “Settings” (or “Preferences” in older macOS versions).
-
Navigate to iCloud: In the Settings window, click on the “iCloud” tab.
-
Enable iCloud Photos: Check the box next to “iCloud Photos”. This will activate iCloud Photos on your Mac.
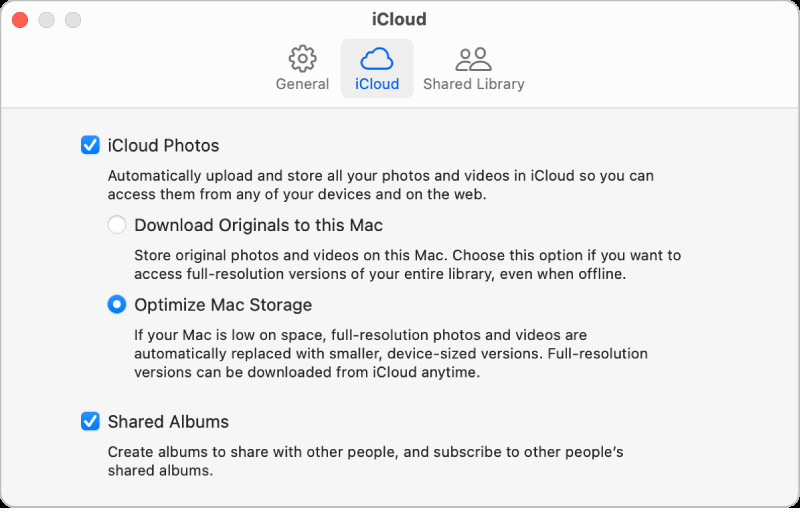 The iCloud pane of Photos settings showing the iCloud Photos checkbox highlighted.
 -
Choose Your Download Preference: After enabling iCloud Photos, you’ll be presented with two options for managing your photo storage on your Mac:
-
Download Originals to this Mac: Selecting this option ensures that full-resolution versions of all your photos and videos are stored both on your Mac and securely in iCloud. This is ideal if you have ample storage space on your Mac and want immediate access to your original files, even offline.
-
Optimize Mac Storage: This option is designed to save space on your Mac. When selected, smaller, space-saving versions of your photos are stored on your Mac, while the original, full-resolution versions are securely kept in iCloud. This is perfect if you have limited storage on your Mac but still want to browse your entire photo library. To access the original, full-resolution version for editing or sharing, Photos will download it from iCloud on demand. You can always revert to “Download Originals to this Mac” if you later want to store all originals locally.
-
Once you’ve made your selection, iCloud Photos will begin syncing your photo library. The initial upload to iCloud may take some time, especially if you have a large library. You can continue using Photos as usual while the synchronization process runs in the background.
To ensure seamless syncing across all your devices, remember to sign in with the same Apple ID and enable iCloud Photos on each device where you want to access your photos.
Disabling iCloud Photos on Your Mac
If you wish to stop syncing photos between your Mac and other devices via iCloud, you can easily turn off iCloud Photos on your Mac:
-
Open the Photos App: Open the Photos application on your Mac.
-
Access Photos Settings: Go to “Photos” > “Settings” in the menu bar.
-
Navigate to iCloud: Click on the “iCloud” tab.
-
Disable iCloud Photos: Deselect the checkbox next to “iCloud Photos”.
-
Choose Download or Remove: A dialog box will appear, asking you to choose between:
-
Download Originals: Click “Download Originals” to download the full-resolution photos and videos from iCloud to your Mac before disabling the service. This ensures you have a local copy of your iCloud Photo Library.
-
Remove from Mac: Click “Remove from Mac” to remove photos and videos that haven’t been fully downloaded to your Mac, potentially freeing up storage space. Your full photo library will remain safe in iCloud and accessible from your other devices.
-
After turning off iCloud Photos on your Mac, any new changes you make to your photo library on your Mac will not sync to iCloud, and vice versa. However, your photo library in iCloud remains intact and accessible from your other devices still using iCloud Photos.
Completely Stop Using iCloud Photos Across All Apple Devices
If you decide to discontinue using iCloud Photos entirely across all your Apple devices, follow these steps on your Mac:
-
Open System Settings: Click on the Apple menu in the top-left corner of your screen and select “System Settings”.
-
Access Apple ID: Click on your name at the top of the sidebar. If you are not signed in, click “Sign in” to log in with your Apple ID.
-
Navigate to iCloud Settings: Click on “iCloud”.
-
Manage Storage and Photos: Click the “Manage” button, then select “Photos”. Finally, click “Turn Off and Delete from iCloud.”
WARNING: Proceed with caution! Turning off and deleting from iCloud will result in your photos and videos being deleted from iCloud after 30 days. After this period, they will be permanently lost unless you click “Undo Delete” within those 30 days to recover them. Ensure you have backed up your photos elsewhere if you choose this option.
By following these instructions, you can effectively manage and access iCloud Photos on your Mac, tailoring the service to your storage needs and device usage. Whether you’re enabling it for seamless access, optimizing storage, or disabling it, you now have the knowledge to control your iCloud Photo Library on your Mac.
See also
Photos settings on Mac
Apple Support Article: Buy iCloud+ or upgrade your current storage plan
Apple Support Article: Set up and use iCloud Photos
Apple Support Article: Set up and use iCloud Photos on your Windows PC
