Accessing iCloud Photos from your MacBook allows you to keep your cherished memories synchronized across all your Apple devices. This article, brought to you by dfphoto.net, will walk you through the steps to easily access, manage, and optimize your iCloud Photos on your MacBook. Discover the seamless integration of your photo library and explore the world of digital asset management, image organization, and cloud photo storage solutions.
1. What Are The Benefits Of Using iCloud Photos On My MacBook?
Using iCloud Photos on your MacBook provides numerous benefits, including seamless synchronization, automatic backups, and optimized storage. With iCloud Photos, your entire photo and video library is stored securely in the cloud and is accessible across all your devices, so you can enjoy your memories wherever you are.
Here’s a breakdown of the benefits:
- Seamless Synchronization: Any changes you make to your photo library on your MacBook, such as edits, deletions, or additions, are automatically synced across all your devices connected to the same Apple ID. This ensures that your photo library is always up-to-date, no matter which device you’re using.
- Automatic Backups: iCloud Photos acts as a secure backup for your photo and video library. Even if something happens to your MacBook, your photos and videos are safely stored in the cloud and can be easily restored.
- Optimized Storage: iCloud Photos offers two storage options: “Download Originals to this Mac” and “Optimize Mac Storage.” The “Optimize Mac Storage” option is particularly useful if you have limited storage space on your MacBook. It stores smaller, optimized versions of your photos on your MacBook while keeping the original, high-resolution versions in iCloud. This frees up valuable storage space without sacrificing the quality of your photos.
- Easy Sharing: iCloud Photos makes it easy to share your photos and videos with friends and family. You can create shared albums that allow others to view, like, and comment on your photos. You can also share individual photos and videos via email, Messages, or other social media platforms.
- Access Anywhere: As long as you have an internet connection, you can access your iCloud Photos from any device, including your iPhone, iPad, Apple TV, PC, or even through a web browser on iCloud.com. This makes it incredibly convenient to view and share your photos, no matter where you are.
2. How Do I Enable iCloud Photos On My MacBook?
Enabling iCloud Photos on your MacBook is a straightforward process that involves accessing your Photos settings and selecting the iCloud Photos option. By turning on iCloud Photos, you ensure that your photo library is synchronized across all your Apple devices.
Here are the steps to enable iCloud Photos on your MacBook:
- Open the Photos App: Locate the Photos app on your MacBook and open it. You can find it in your Dock or by searching for it in the Launchpad.
- Access Photos Settings: Once the Photos app is open, go to the menu bar at the top of your screen and click on “Photos.” From the dropdown menu, select “Settings” (or “Preferences” in older versions of macOS).
- Navigate to the iCloud Tab: In the Settings window, click on the “iCloud” tab. This tab contains the settings related to iCloud Photos.
- Select the iCloud Photos Checkbox: In the iCloud tab, you will see a checkbox labeled “iCloud Photos.” Make sure this checkbox is selected. If it is not, click on it to enable iCloud Photos.
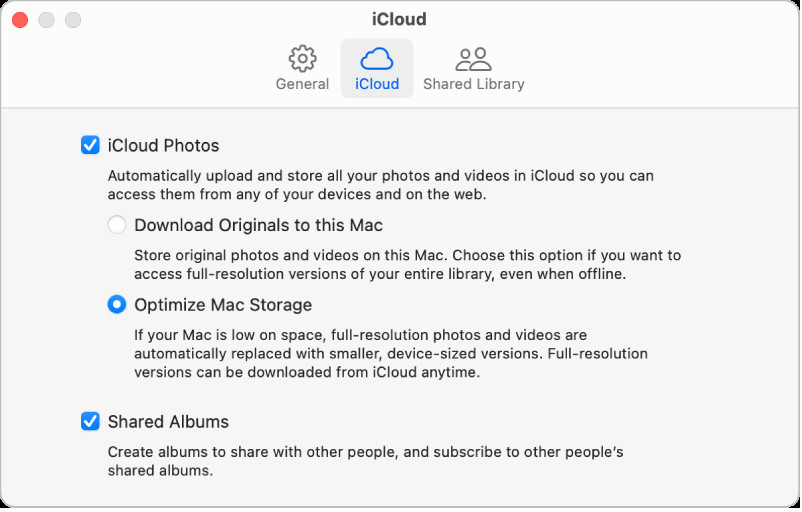 iCloud settings pane where the user is selecting iCloud photos checkbox to turn on iCloud Photos
-
Choose Storage Options: After selecting the iCloud Photos checkbox, you’ll be presented with two storage options:
- Download Originals to this Mac: This option stores the full-size versions of your photos and videos both on your MacBook and in iCloud. Choose this option if you want to have the original, high-resolution versions of your photos readily available on your MacBook, even when you’re offline.
- Optimize Mac Storage: This option stores smaller, optimized versions of your photos on your MacBook when storage space is limited, and keeps the original, full-size photos in iCloud. Choose this option to conserve space on your MacBook. To restore the originals to your Mac, just select “Download Originals to this Mac.”
-
Wait for Synchronization: Once you’ve selected your preferred storage option, iCloud Photos will begin to synchronize your photo library. This process may take some time, depending on the size of your library and the speed of your internet connection. You can continue to use the Photos app while your photos are being uploaded.
3. What Are The Different iCloud Photo Storage Options Available?
iCloud Photos offers two main storage options: “Download Originals to this Mac” and “Optimize Mac Storage.” Understanding the differences between these options is crucial for managing storage space on your MacBook while ensuring your photos are accessible.
Download Originals to this Mac
When you select “Download Originals to this Mac,” iCloud Photos stores the full-size, high-resolution versions of your photos and videos both on your MacBook and in iCloud. This option is ideal if you have ample storage space on your MacBook and want to have the original versions of your photos readily available, even when you’re offline.
Advantages:
- Offline Access: You can access your entire photo library, including the original, high-resolution versions of your photos, even without an internet connection.
- Faster Performance: Editing and working with photos is generally faster since the original files are stored locally on your MacBook.
- No Download Required: When you want to view or edit a photo, you don’t have to wait for it to download from iCloud.
Disadvantages:
- Storage Consumption: This option consumes a significant amount of storage space on your MacBook, especially if you have a large photo library.
- Less Efficient for Limited Storage: If you have limited storage space, this option may not be the most practical choice.
Optimize Mac Storage
When you select “Optimize Mac Storage,” iCloud Photos stores smaller, optimized versions of your photos on your MacBook and keeps the original, high-resolution versions in iCloud. This option is perfect if you have limited storage space on your MacBook and want to conserve space without sacrificing the quality of your photos.
Advantages:
- Conserves Storage Space: This option significantly reduces the amount of storage space used by your photo library on your MacBook.
- Ideal for Limited Storage: If you have a MacBook with limited storage, this is the most practical option.
- Originals Stored in iCloud: Your original, high-resolution photos are safely stored in iCloud and can be downloaded whenever you need them.
Disadvantages:
- Requires Internet Connection: To access the original, high-resolution versions of your photos, you need an internet connection to download them from iCloud.
- Slower Performance: Editing and working with photos may be slower since the original files need to be downloaded from iCloud.
- Potential Download Time: When you want to view or edit a photo, you may have to wait for it to download from iCloud.
Choosing the Right Option
The best storage option for you depends on your individual needs and preferences:
- If you have ample storage space on your MacBook and want to have offline access to your entire photo library, choose “Download Originals to this Mac.”
- If you have limited storage space on your MacBook and want to conserve space without sacrificing the quality of your photos, choose “Optimize Mac Storage.”
4. How Can I View My iCloud Photos On My MacBook?
Once you have enabled iCloud Photos on your MacBook, viewing your photos is simple and intuitive. Your iCloud Photos will appear directly within the Photos app, seamlessly integrated with your local photo library.
Here’s how you can view your iCloud Photos on your MacBook:
-
Open the Photos App: Locate the Photos app on your MacBook and open it. You can find it in your Dock or by searching for it in the Launchpad.
-
Browse Your Library: Once the Photos app is open, you will see your entire photo library, including both your local photos and your iCloud Photos. You can browse your photos by:
- Photos: This view displays all your photos and videos in chronological order.
- Albums: This view displays your photos organized into albums, including both albums you’ve created and automatically generated albums like “People,” “Places,” and “Imports.”
- Memories: This view displays automatically generated collections of photos and videos based on events, trips, and people.
-
Access iCloud Photos: Your iCloud Photos will be seamlessly integrated into your photo library. You don’t need to do anything special to access them. As long as you have an internet connection, you can view and interact with your iCloud Photos just like any other photo in your library.
 MacBook Photos App showing photos synchronized from iCloud
Downloading Photos from iCloud
If you have selected the “Optimize Mac Storage” option, your original, high-resolution photos may not be stored locally on your MacBook. In this case, you will need to download them from iCloud before you can view them in their full resolution.
To download a photo from iCloud:
- Double-click on the photo you want to view.
- If the photo is not already downloaded, you will see a download icon in the top-right corner of the window.
- Click on the download icon to download the original, high-resolution version of the photo from iCloud.
- Once the download is complete, the photo will be displayed in its full resolution.
5. How Do I Manage My iCloud Photo Storage?
Managing your iCloud Photo storage is essential to ensure you have enough space for all your photos and videos. Apple provides several tools and options to help you optimize your storage and make the most of your iCloud account.
Here are some tips for managing your iCloud Photo storage:
-
Check Your iCloud Storage Usage: The first step in managing your iCloud Photo storage is to check how much storage you’re currently using. To do this:
- Go to the Apple menu > System Settings, then click your name at the top of the sidebar.
- If you don’t see your name, click “Sign in” to sign in to your Apple Account or to create one.
- Click iCloud.
- The storage bar shows how much iCloud storage you’re using. Click Manage to see more details.
-
Optimize Mac Storage: As mentioned earlier, the “Optimize Mac Storage” option stores smaller, optimized versions of your photos on your MacBook while keeping the original, high-resolution versions in iCloud. This is a great way to conserve storage space on your MacBook without sacrificing the quality of your photos.
-
Delete Unwanted Photos and Videos: Regularly review your photo library and delete any unwanted photos and videos. This can free up a significant amount of storage space in iCloud.
-
Transfer Photos to an External Drive: If you have a large photo library and are running out of iCloud storage, consider transferring some of your photos to an external drive. This can free up space in iCloud while still allowing you to keep your photos safe and accessible.
-
Upgrade Your iCloud Storage Plan: If you need more storage space, you can upgrade your iCloud storage plan. Apple offers several different storage plans to choose from, ranging from 50GB to 2TB.
iCloud+ Plans
iCloud+ is Apple’s premium cloud storage service, offering additional features and storage options beyond the free 5GB plan. With iCloud+, you get increased storage capacity, as well as access to features like:
- iCloud Private Relay: This feature encrypts your internet traffic and hides your IP address to protect your online privacy.
- Hide My Email: This feature allows you to create unique, random email addresses that forward to your personal inbox, so you can keep your real email address private when signing up for online services.
- Custom Email Domain: This feature allows you to use a custom domain name with iCloud Mail.
- HomeKit Secure Video Support: This feature allows you to store video recordings from your HomeKit-enabled security cameras in iCloud.
Here are the available iCloud+ plans and their pricing:
| Plan | Storage | Price (per month) | Features |
|---|---|---|---|
| iCloud+ 50GB | 50GB | $0.99 | iCloud Private Relay, Hide My Email, Custom Email Domain, HomeKit Secure Video Support (1 camera) |
| iCloud+ 200GB | 200GB | $2.99 | iCloud Private Relay, Hide My Email, Custom Email Domain, HomeKit Secure Video Support (up to 5 cameras) |
| iCloud+ 2TB | 2TB | $9.99 | iCloud Private Relay, Hide My Email, Custom Email Domain, HomeKit Secure Video Support (unlimited cameras) |
| iCloud+ 6TB | 6TB | $29.99 | iCloud Private Relay, Hide My Email, Custom Email Domain, HomeKit Secure Video Support (unlimited cameras) |
| iCloud+ 12TB | 12TB | $59.99 | iCloud Private Relay, Hide My Email, Custom Email Domain, HomeKit Secure Video Support (unlimited cameras) |
Upgrading to an iCloud+ plan can provide you with the additional storage space you need for your photos and videos, as well as access to valuable privacy and security features.
6. How Do I Disable iCloud Photos On My MacBook?
While iCloud Photos offers numerous benefits, there may be situations where you want to disable it on your MacBook. Disabling iCloud Photos will stop the synchronization of photos between your MacBook and iCloud.
Here’s how you can disable iCloud Photos on your MacBook:
-
Open the Photos App: Locate the Photos app on your MacBook and open it.
-
Access Photos Settings: Go to the menu bar at the top of your screen and click on “Photos.” From the dropdown menu, select “Settings” (or “Preferences” in older versions of macOS).
-
Navigate to the iCloud Tab: In the Settings window, click on the “iCloud” tab.
-
Deselect the iCloud Photos Checkbox: In the iCloud tab, deselect the checkbox labeled “iCloud Photos.” This will disable iCloud Photos on your MacBook.
-
Choose Download or Remove: After deselecting the iCloud Photos checkbox, you’ll be presented with two options:
- Download: Click this option to download all your photos and videos from iCloud to your MacBook.
- Remove from Mac: Click this option to remove any photos and videos that have not been fully downloaded from your MacBook.
After you turn off iCloud Photos on your Mac, your photo library remains in iCloud and available to your other devices that use iCloud Photos.
7. What Are Some Common Issues With iCloud Photos And How Can I Troubleshoot Them?
While iCloud Photos is generally reliable, you may encounter some issues from time to time. Here are some common problems and how to troubleshoot them:
-
Photos Not Syncing: If your photos are not syncing between your MacBook and iCloud, try the following:
- Check Your Internet Connection: Make sure you have a stable internet connection.
- Sign Out and Back In: Sign out of your Apple ID on your MacBook and then sign back in.
- Restart Your MacBook: Restart your MacBook to refresh the system.
- Check iCloud Status: See if there are any known outages in your area.
-
Photos Not Downloading: If your photos are not downloading from iCloud to your MacBook, try the following:
- Check Your iCloud Storage: Make sure you have enough storage space in your iCloud account.
- Pause and Resume Downloading: Pause and resume the downloading process in the Photos app.
- Update macOS: Ensure your macOS is up to date.
-
iCloud Photos Taking Up Too Much Storage: If iCloud Photos is taking up too much storage on your MacBook, try the following:
- Optimize Mac Storage: Select the “Optimize Mac Storage” option in the Photos settings.
- Delete Unwanted Photos: Delete any unwanted photos and videos from your photo library.
- Transfer Photos to an External Drive: Consider transferring some of your photos to an external drive.
-
Photos App Crashing: If the Photos app is crashing, try the following:
- Restart Your MacBook: Restart your MacBook to refresh the system.
- Update macOS: Ensure your macOS is up to date.
- Rebuild the Photo Library: This will scan your library and rebuild a new version. This could take time depending on the size.
- Make sure Photos is closed.
- Press and hold the Option and Command keys while you open Photos.
- In the Repair Library window, click Repair to start the process.
If you’re still experiencing issues with iCloud Photos, you can contact Apple Support for further assistance.
8. How Do iCloud Shared Albums Work On My MacBook?
iCloud Shared Albums allow you to share your photos and videos with specific people and let them add their own photos and videos to the album. This is a great way to collaborate on photo collections with friends and family.
Here’s how iCloud Shared Albums work on your MacBook:
-
Create a Shared Album: To create a shared album:
- Open the Photos app on your MacBook.
- Select the photos and videos you want to include in the shared album.
- Click the Share button in the toolbar.
- Select “Shared Albums” from the share sheet.
- Enter the names or email addresses of the people you want to invite to the shared album.
- Give the shared album a name and click “Create.”
-
Invite People to the Shared Album: The people you invite to the shared album will receive an invitation via email or Messages. Once they accept the invitation, they will be able to view the photos and videos in the shared album.
-
View Shared Albums: To view shared albums on your MacBook:
- Open the Photos app.
- Click on “Shared” in the sidebar.
- You will see a list of all the shared albums you’ve created or been invited to.
- Click on a shared album to view its contents.
-
Add Photos and Videos to a Shared Album: To add photos and videos to a shared album:
- Open the Photos app.
- Select the photos and videos you want to add to the shared album.
- Click the Share button in the toolbar.
- Select “Shared Albums” from the share sheet.
- Choose the shared album you want to add the photos and videos to.
- Click “Post.”
-
Comment and Like Photos in a Shared Album: You can comment on and like photos and videos in a shared album. To do this, simply click on the comment or like icon below the photo or video.
iCloud Shared Albums are a fun and easy way to share your photos and videos with friends and family. They offer a collaborative experience, allowing everyone to contribute to the shared collection.
9. Can I Access iCloud Photos From My Windows PC?
Yes, you can access your iCloud Photos from your Windows PC using the iCloud for Windows app or through a web browser on iCloud.com. This allows you to view and download your photos and videos, even if you don’t have a Mac.
Using iCloud for Windows
The iCloud for Windows app provides a seamless way to access your iCloud Photos on your PC.
Here’s how to set it up:
- Download iCloud for Windows: Download the iCloud for Windows app from the Microsoft Store.
- Install iCloud for Windows: Follow the on-screen instructions to install the iCloud for Windows app on your PC.
- Sign In to iCloud: Open the iCloud for Windows app and sign in with your Apple ID and password.
- Select iCloud Photos: In the iCloud for Windows app, select the “Photos” checkbox.
- Choose Location of Your Photos: Click the “Options” button next to “Photos” and choose the location on your PC where you want to store your iCloud Photos.
- Apply: Click “Apply,” then click “Close.”
Once iCloud for Windows is set up, your iCloud Photos will be automatically downloaded to your PC. You can access them in the File Explorer, in the location you chose during setup.
Using iCloud.com
You can also access your iCloud Photos from your Windows PC through a web browser on iCloud.com.
Here’s how:
- Open a Web Browser: Open a web browser on your Windows PC, such as Chrome, Firefox, or Edge.
- Go to iCloud.com: Go to the iCloud website and sign in with your Apple ID and password.
- Click Photos: Click on the “Photos” icon.
- View Your Photos: You will see your entire iCloud Photos library. You can browse your photos, download them, and even upload new photos.
Accessing iCloud Photos from your Windows PC allows you to stay connected to your memories, no matter what device you’re using.
10. What Are Some Alternative Cloud Photo Storage Services To iCloud Photos?
While iCloud Photos is a popular choice for Apple users, there are several alternative cloud photo storage services available. These services offer similar features to iCloud Photos, such as automatic backups, synchronization across devices, and easy sharing.
Here are some popular alternatives:
- Google Photos: Google Photos is a free service that offers unlimited storage for photos and videos, as long as you’re willing to let Google compress them slightly. It also offers advanced features like facial recognition and automatic album creation.
- Amazon Photos: Amazon Photos is a service that comes with an Amazon Prime subscription. It offers unlimited storage for photos and 5GB of storage for videos.
- Dropbox: Dropbox is a general-purpose cloud storage service that can also be used for storing photos and videos. It offers file sharing and collaboration features, making it a good choice for teams.
- Microsoft OneDrive: Microsoft OneDrive is a cloud storage service that comes with a Microsoft 365 subscription. It offers file sharing and collaboration features, as well as integration with Microsoft Office apps.
- Flickr: Flickr is a photo-sharing website and cloud storage service that is popular among photographers. It offers a large storage capacity and a community where you can share and discover photos.
Here’s a comparison table of these cloud photo storage services:
| Service | Storage | Price | Features |
|---|---|---|---|
| iCloud Photos | 5GB (free), up to 12TB (paid) | Varies by plan | Automatic backups, synchronization across devices, easy sharing, iCloud Private Relay, Hide My Email, Custom Email Domain, HomeKit Secure Video Support |
| Google Photos | 15GB (shared with other Google services) | Free (with compression), paid for more storage | Automatic backups, synchronization across devices, easy sharing, facial recognition, automatic album creation |
| Amazon Photos | Unlimited photos (with Prime), 5GB videos | Included with Amazon Prime | Automatic backups, synchronization across devices, easy sharing |
| Dropbox | 2GB (free), up to 3TB (paid) | Varies by plan | File sharing, collaboration features, automatic backups, synchronization across devices |
| Microsoft OneDrive | 5GB (free), up to 6TB (paid) | Varies by plan | File sharing, collaboration features, automatic backups, synchronization across devices, integration with Microsoft Office apps |
| Flickr | 1000 photos | Free, paid for unlimited storage | Photo sharing, community features, large storage capacity |
When choosing a cloud photo storage service, consider your individual needs and preferences. Think about how much storage you need, what features are important to you, and what your budget is.
iCloud Photos offers a convenient way to store and access your photos and videos across all your Apple devices. By understanding how to enable iCloud Photos on your MacBook, manage your storage, and troubleshoot common issues, you can make the most of this powerful service. Whether you’re a professional photographer or simply someone who loves taking photos, iCloud Photos can help you keep your memories safe and accessible.
Ready to take your photography to the next level? Explore dfphoto.net today for insightful tutorials, stunning photo galleries, and a vibrant community of photography enthusiasts in the USA!
Address: 1600 St Michael’s Dr, Santa Fe, NM 87505, United States
Phone: +1 (505) 471-6001
Website: dfphoto.net
FAQ: Accessing iCloud Photos from Your MacBook
1. Is It Possible To Access iCloud Photos On My MacBook Without An Internet Connection?
Yes, you can access iCloud Photos on your MacBook without an internet connection if you have selected the “Download Originals to this Mac” storage option. This option stores the full-size versions of your photos and videos both on your MacBook and in iCloud, allowing you to view them even when you’re offline. However, if you have selected the “Optimize Mac Storage” option, you will need an internet connection to download the original, high-resolution versions of your photos from iCloud.
2. How Secure Is Storing My Photos On iCloud?
Storing your photos on iCloud is generally considered secure. Apple uses encryption to protect your data both in transit and at rest. However, like any cloud storage service, there is always a risk of data breaches or unauthorized access. To enhance the security of your iCloud account, it’s recommended to use a strong password and enable two-factor authentication.
3. What Happens To My Photos If I Cancel My iCloud Subscription?
If you cancel your iCloud subscription, you will no longer have access to the storage space provided by your paid plan. Apple will give you a grace period to download your photos and videos before they are deleted. After the grace period, any photos and videos that exceed the free 5GB storage limit will be deleted.
4. Can I Use iCloud Photos With Multiple Apple IDs On The Same MacBook?
No, you can only use iCloud Photos with one Apple ID at a time on your MacBook. If you want to use iCloud Photos with a different Apple ID, you will need to sign out of your current Apple ID and sign in with the new one.
5. How Long Does It Take For Photos To Sync Between My MacBook And iCloud?
The time it takes for photos to sync between your MacBook and iCloud depends on several factors, including the size of your photo library, the speed of your internet connection, and the current load on Apple’s servers. Generally, smaller photo libraries will sync more quickly than larger ones.
6. What File Formats Are Supported By iCloud Photos?
iCloud Photos supports a wide range of file formats, including JPEG, PNG, HEIC, HEIF, TIFF, and RAW. It also supports video formats like MOV, MP4, and AVI.
7. Can I Edit My iCloud Photos On My MacBook?
Yes, you can edit your iCloud Photos on your MacBook using the Photos app or other photo editing software. Any edits you make will be automatically synced across all your devices.
8. How Do I Recover Deleted Photos From iCloud?
You can recover deleted photos from iCloud within 30 days of deleting them. To do this, go to the “Recently Deleted” album in the Photos app or on iCloud.com and select the photos you want to recover.
9. Does iCloud Photos Support Live Photos?
Yes, iCloud Photos supports Live Photos, which are short videos captured along with still photos on iPhones. Live Photos will sync and play on your MacBook just like regular photos.
10. Is It Possible To Disable iCloud Photos For Specific Albums?
No, it is not possible to disable iCloud Photos for specific albums. When you enable iCloud Photos, all your photos and videos in your photo library will be synced to iCloud.
