Taking a passport photo might seem straightforward, but adhering to specific guidelines is crucial for acceptance. Whether you’re aiming for convenience or cost-effectiveness, understanding the nuances of capturing a compliant image is key. At dfphoto.net, we provide expert insights into visual arts and photography, ensuring you get it right the first time. This guide will walk you through the process, covering everything from setting up your shot to understanding the technical requirements, ensuring your passport application proceeds smoothly, alongside exploring photographic compositions and portrait photography.
1. What Are The Key Requirements For A Passport Photo?
The key requirements for a passport photo include specific guidelines regarding size, resolution, background, facial expression, and attire to ensure accurate identification. According to the U.S. Department of State, failing to meet these requirements is a common cause for passport application delays.
- Size and Resolution: Your photo must be 2×2 inches (51×51 mm) with a resolution of at least 300 DPI.
- Background: Use a plain white or off-white background without shadows or distractions.
- Facial Expression: Maintain a neutral expression with both eyes open and visible.
- Attire: Avoid wearing anything that obscures your face, such as hats or sunglasses, unless worn daily for religious reasons.
- Recency: The photo should be taken within the last six months to reflect your current appearance.
Understanding and adhering to these requirements will help you avoid delays and ensure your passport application is processed without issues.
2. What Equipment Do I Need To Take A Passport Photo At Home?
To take a passport photo at home, you need a digital camera or smartphone, a tripod, good lighting, and a plain white background. Using the right equipment ensures your photo meets the required standards.
- Digital Camera or Smartphone: A camera with at least 12 megapixels is recommended for clear, high-resolution images.
- Tripod: A tripod helps stabilize the camera, ensuring the photo is sharp and free of motion blur.
- Lighting: Natural daylight is best, but avoid direct sunlight. If using artificial light, ensure it’s consistent and doesn’t create shadows.
- Plain White Background: Use a white wall or a white sheet as a backdrop to meet the background requirements.
- Photo Editing Software: Software like Adobe Photoshop or GIMP can help adjust the photo’s size, resolution, and contrast.
Having these tools ready will make the process smoother and increase the likelihood of your photo being accepted.
3. How Do I Set Up The Lighting For A Passport Photo?
Setting up the lighting for a passport photo involves ensuring even illumination across your face to avoid shadows and glare. Proper lighting is crucial for a compliant photo.
- Natural Daylight: Position yourself near a window to take advantage of natural daylight. Avoid direct sunlight, which can cause harsh shadows.
- Soft Light: Use a sheer curtain or diffuser to soften the light. This helps eliminate harsh shadows and ensures even illumination.
- Avoid Backlighting: Make sure the light source is in front of you, not behind you, to prevent a silhouette effect.
- Consistent Lighting: If using artificial light, use two lamps placed at 45-degree angles to your face. Ensure the lamps have the same color temperature to maintain consistency.
- No Shadows: Check for shadows on your face or in the background. Adjust your position or lighting to eliminate them.
A well-lit photo ensures your features are clearly visible, meeting the passport photo requirements.
4. What Is The Best Way To Pose For A Passport Photo?
The best way to pose for a passport photo is to face the camera directly, maintain a neutral expression, and keep your eyes open and visible. Proper posing is essential for meeting the guidelines.
- Face Forward: Ensure you are facing the camera straight on, without tilting your head.
- Neutral Expression: Keep a neutral expression with your mouth closed. Smiling is generally not allowed.
- Eyes Open: Ensure your eyes are open and clearly visible. Avoid squinting or closing your eyes.
- Proper Distance: Position yourself about 4-5 feet (1.2-1.5 meters) away from the camera.
- Avoid Head Coverings: Do not wear hats or head coverings unless required for religious or medical reasons.
Following these posing tips will help you capture a photo that meets the stringent requirements.
5. What Clothing And Accessories Are Allowed In A Passport Photo?
In a passport photo, you should wear your normal everyday clothing, but avoid hats, sunglasses, and other accessories that obscure your face. Understanding the dress code is important for compliance.
- Everyday Clothing: Wear clothes you would typically wear on a daily basis.
- No Hats or Head Coverings: Avoid wearing hats or head coverings unless required for religious or medical reasons.
- No Sunglasses: Sunglasses are not allowed in passport photos.
- Prescription Glasses: If you wear prescription glasses, you may wear them in your photo as long as they do not obscure your eyes. Ensure there is no glare on the lenses.
- No Uniforms: Avoid wearing uniforms or clothing that resembles a uniform.
Dressing appropriately ensures that your photo is compliant and your application is not delayed.
6. How Do I Ensure My Photo Meets The Size And Resolution Requirements?
Ensuring your photo meets the size and resolution requirements involves cropping and resizing the image to 2×2 inches (51×51 mm) and maintaining a resolution of at least 300 DPI. Accurate dimensions are crucial.
- Crop Tool: Use a photo editing tool to crop the photo to the correct aspect ratio (2×2 inches).
- Resizing: Resize the image to the required dimensions (51×51 mm).
- Resolution: Check that the resolution is at least 300 DPI (dots per inch). This ensures the photo is clear and detailed.
- Online Tools: Use online passport photo tools that automatically crop and resize your photo to the correct specifications.
- Print Preview: Before printing, preview the photo to ensure it looks clear and is correctly sized.
Getting the size and resolution right is a key step in ensuring your photo is accepted.
7. How Do I Check If My Passport Photo Is Acceptable?
You can check if your passport photo is acceptable by using online validation tools or reviewing the guidelines provided by the U.S. Department of State. Verification is key to avoiding issues.
- Online Validation Tools: Use online tools that check your photo against passport photo requirements. These tools can identify issues such as incorrect size, resolution, or background.
- U.S. Department of State Guidelines: Review the detailed guidelines provided by the U.S. Department of State on their website.
- Checklist: Create a checklist based on the guidelines and review your photo against each requirement.
- Expert Review: If unsure, consult with a professional photographer or passport photo service.
- Preview: Before submitting, preview your photo to ensure it looks clear and meets all requirements.
Validating your photo beforehand can save you time and prevent delays in your passport application.
8. What Are The Common Mistakes To Avoid When Taking A Passport Photo?
Common mistakes to avoid when taking a passport photo include poor lighting, incorrect background, improper posing, and wearing prohibited items. Avoiding these errors ensures compliance.
- Poor Lighting: Avoid harsh shadows or uneven lighting on your face. Use natural or diffused light.
- Incorrect Background: Ensure the background is plain white or off-white without any patterns or distractions.
- Improper Posing: Face the camera directly with a neutral expression and eyes open.
- Prohibited Items: Do not wear hats, sunglasses, or other accessories that obscure your face.
- Low Resolution: Use a high-resolution camera or smartphone to capture a clear, detailed photo.
- Outdated Photo: Make sure the photo was taken within the last six months to reflect your current appearance.
Being aware of these common mistakes and taking steps to avoid them will increase the likelihood of your photo being accepted.
9. Can I Wear Glasses In My Passport Photo?
You can wear prescription glasses in your passport photo if they do not obscure your eyes. Sunglasses or tinted glasses are not allowed. Clarity and visibility are essential.
- Prescription Glasses Only: Only prescription glasses are allowed. Sunglasses or tinted glasses are prohibited.
- No Glare: Ensure there is no glare on the lenses that could obscure your eyes.
- Clear Visibility: Make sure your eyes are clearly visible through the lenses.
- Frame Position: Ensure the frames do not cover any part of your eyes.
- Medical Necessity: If you must wear glasses due to medical reasons, provide a signed statement from your doctor.
If possible, it’s generally recommended to remove glasses to avoid any potential issues.
10. How Do I Take A Passport Photo Of A Baby Or Young Child?
Taking a passport photo of a baby or young child requires patience and a few adjustments to the standard guidelines. Adjustments are made to accommodate young children.
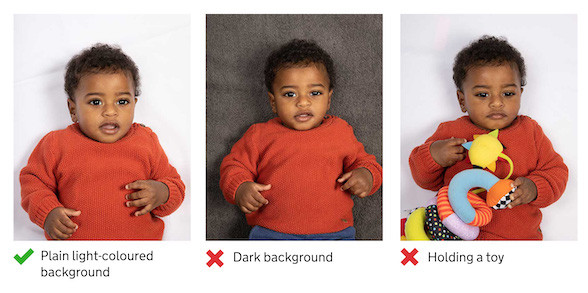
- Plain Background: Lay the baby on a plain white or light-colored sheet.
- No Support: Ensure your hands are not visible if you are supporting the baby’s head.
- Eyes Open: While not mandatory for infants, try to capture the photo when their eyes are open.
- Neutral Expression: A neutral expression is not required for children under six, but avoid excessive smiling or crying.
- No Toys or Pacifiers: Ensure the baby is not holding any toys or using a pacifier.
- Take Multiple Shots: Be prepared to take multiple photos to capture a suitable one.
According to the U.S. Department of State, children under one year old do not necessarily need to have their eyes open.
11. What Are The Digital Photo Requirements For Online Passport Applications?
Digital photos for online passport applications must meet specific size, resolution, and format requirements. Compliance with digital standards is crucial.
- File Size: The digital photo must be at least 50KB and no more than 10MB.
- Resolution: The photo should be at least 600 pixels wide and 750 pixels tall.
- File Format: The photo must be in JPEG (.jpg) format.
- Color: The photo must be in color.
- Unaltered: The photo must not be digitally altered or enhanced in any way.
- Background: The background must be plain white or off-white.
Adhering to these digital photo requirements ensures your online application is processed without delays.
12. How Do I Edit My Passport Photo To Meet Requirements?
Editing your passport photo involves adjusting the size, resolution, contrast, and color to meet official requirements. Precise adjustments are necessary.
- Photo Editing Software: Use software like Adobe Photoshop, GIMP, or online passport photo tools.
- Cropping: Crop the photo to the correct 2×2 inch (51×51 mm) aspect ratio.
- Resizing: Resize the image to the required dimensions.
- Adjusting Contrast: Adjust the contrast to ensure your features are clearly visible.
- Color Correction: Correct any color imbalances to ensure accurate skin tones.
- Removing Blemishes: Remove any blemishes or distractions in the background.
- Maintaining Natural Appearance: Avoid excessive editing that alters your natural appearance.
Always ensure that your edits comply with the passport photo guidelines to avoid rejection.
13. What Are The Regulations Regarding Religious Head Coverings In Passport Photos?
Religious head coverings are allowed in passport photos as long as they do not obscure your face. Respect for religious practices is accommodated.
- Religious Requirement: The head covering must be worn daily for religious reasons.
- Face Visibility: The head covering should not obscure your face. Your forehead, cheeks, and chin must be clearly visible.
- No Shadows: Ensure there are no shadows on your face caused by the head covering.
- Statement: You may need to provide a signed statement attesting that the head covering is worn daily for religious reasons.
- Consistent Attire: The head covering should be worn consistently with your regular religious attire.
Compliance with these regulations ensures that your religious practices are respected while adhering to passport photo requirements.
14. Can I Use A Filter On My Passport Photo?
No, you cannot use a filter on your passport photo. The photo must accurately represent your natural appearance without any alterations. Accuracy is paramount.
- No Filters: Filters are strictly prohibited as they alter your appearance.
- Natural Appearance: The photo must accurately reflect your current and natural appearance.
- No Retouching: Avoid any retouching or enhancements that change your facial features.
- Original Photo: Use the original, unaltered photo directly from your camera or smartphone.
- Color Accuracy: Ensure the colors in the photo are accurate and not distorted by filters.
Using a filter can lead to rejection of your passport photo and delays in your application.
15. What Should I Do If My Passport Photo Is Rejected?
If your passport photo is rejected, review the rejection reasons, correct the issues, and retake the photo. Addressing the issues promptly is crucial.
- Review Rejection Reasons: Understand why your photo was rejected. Common reasons include incorrect size, poor lighting, or improper posing.
- Correct Issues: Address the specific issues identified in the rejection notice.
- Retake Photo: Retake the photo, ensuring you follow all the guidelines.
- Use Validation Tools: Use online validation tools to check the new photo before submitting.
- Professional Help: If unsure, seek help from a professional photographer or passport photo service.
- Resubmit Application: Resubmit your passport application with the corrected photo.
Addressing the rejection reasons promptly and accurately will help ensure your application is processed smoothly.
16. What Online Tools Can Help Me Take A Compliant Passport Photo?
Several online tools can help you take a compliant passport photo by providing templates, editing features, and validation checks. Convenience and accuracy are key.
- Persofoto: Persofoto is a popular tool that offers passport photo templates and compliance checks.
- Visafoto: Visafoto provides automated cropping and resizing to meet passport photo specifications.
- IDPhotoDIY: IDPhotoDIY allows you to upload and edit photos with predefined templates.
- Passport Photo Online: This tool checks your photo against official guidelines and offers editing options.
- Smartphone Apps: Mobile apps like Passport Booth and PhotoAiD can assist in taking and editing photos on your smartphone.
Using these online tools can simplify the process and increase the chances of your photo being accepted.
17. How Can A Professional Photographer Help With My Passport Photo?
A professional photographer can ensure your passport photo meets all requirements by using professional equipment, lighting, and expertise. Expertise guarantees compliance.
- Professional Equipment: Photographers use high-quality cameras and lighting equipment to capture clear, well-lit photos.
- Expert Knowledge: They are knowledgeable about passport photo guidelines and can ensure your photo meets all requirements.
- Posing Assistance: Photographers can guide you on proper posing and facial expressions.
- Editing Services: They can professionally edit your photo to meet size, resolution, and color requirements.
- Guaranteed Acceptance: Many photographers offer a guarantee that your photo will be accepted.
- Convenience: They provide a hassle-free experience, saving you time and effort.
Hiring a professional photographer can provide peace of mind and ensure your passport photo is compliant.
18. What Are The Differences Between Passport Photos And Visa Photos?
The differences between passport photos and visa photos lie in their specific size, background, and facial expression requirements, which vary by country. Understanding these differences is crucial.
- Size: Passport photos are typically 2×2 inches (51×51 mm), while visa photo sizes vary depending on the country.
- Background: Both require a plain white or off-white background, but specific shades may vary.
- Facial Expression: Passport photos require a neutral expression, while some visa photos may allow a slight smile.
- Glasses: Regulations on wearing glasses differ. Some countries allow prescription glasses, while others require them to be removed.
- Head Coverings: Rules for religious head coverings are generally consistent, but specific requirements may vary.
- Country-Specific Requirements: Visa photos must adhere to the specific guidelines of the country for which you are applying.
Always check the specific requirements for the type of photo you need to ensure compliance.
19. How Can I Avoid Glare On My Glasses In A Passport Photo?
To avoid glare on your glasses in a passport photo, adjust the lighting, tilt your head slightly, or remove your glasses altogether. Minimizing glare is essential for visibility.
- Adjust Lighting: Use diffused lighting to reduce reflections on the lenses.
- Tilt Head: Tilt your head slightly to change the angle of the glasses and minimize glare.
- Anti-Glare Coating: Ensure your glasses have an anti-glare coating.
- Professional Assistance: Consult with a professional photographer who can use specialized lighting techniques.
- Remove Glasses: If possible, remove your glasses to avoid any potential glare issues.
- Multiple Shots: Take multiple photos and choose the one with the least glare.
Taking these steps will help ensure your eyes are clearly visible in the photo.
20. What Are The Passport Photo Requirements For Different Countries?
Passport photo requirements vary by country, including differences in size, background, and facial expression. Adhering to specific country guidelines is essential.
- United States: 2×2 inches (51×51 mm), plain white background, neutral expression.
- United Kingdom: 45×35 mm, light grey or cream background, neutral expression.
- Canada: 50×70 mm, white background, neutral expression.
- Australia: 45×35 mm, plain white or light grey background, neutral expression.
- European Union: Varies by country, but generally 45×35 mm, light-colored background, neutral expression.
Always check the specific requirements for the country you are applying to, as guidelines can change.
21. How To Take Passport Photo For US Citizen Living Abroad?
For a US citizen living abroad, taking a passport photo requires adhering to US Department of State guidelines, which may be done at a local photo studio or using online tools. Convenience and compliance are key.
- US Guidelines: Follow the US Department of State’s guidelines for size (2×2 inches), background (white), and expression (neutral).
- Local Photo Studio: Visit a local photo studio familiar with US passport photo requirements.
- Online Tools: Use online passport photo services that adjust photos to US specifications.
- Digital Submission: If applying online, ensure the photo meets the digital requirements for file size and resolution.
- Print Quality: If printing, use high-quality photo paper and ensure the print is clear and accurate.
Following these steps ensures that US citizens living abroad can obtain compliant passport photos.
22. What Are The Most Common Reasons For Passport Photo Rejection By The US Department Of State?
The most common reasons for passport photo rejection by the US Department of State include issues with size, background, expression, and photo quality. Avoiding these errors is crucial.
- Incorrect Size: Photos that are not 2×2 inches (51×51 mm) are rejected.
- Poor Background: Backgrounds that are not plain white or off-white are common causes for rejection.
- Improper Expression: Smiling, frowning, or having the mouth open can lead to rejection.
- Poor Quality: Blurry, pixelated, or low-resolution photos are often rejected.
- Wearing Glasses: Not removing glasses when required or glare on the lenses can cause rejection.
- Head Coverings: Wearing hats or head coverings that are not for religious purposes is not allowed.
Being aware of these common pitfalls can help applicants avoid rejection and ensure their applications are processed smoothly.
23. Can I Retake A Passport Photo If I Don’t Like How It Looks?
You can retake a passport photo if you don’t like how it looks, as long as the new photo meets all the official requirements. Satisfaction and compliance are both important.
- Compliance First: Ensure the new photo meets all passport photo requirements.
- Appearance: While compliance is key, you can retake the photo to improve your appearance.
- Timeframe: Retake the photo within the required timeframe (usually within the last six months).
- Professional Opinion: Seek advice from a professional photographer if you are unsure.
- Resubmission: Resubmit your application with the new photo.
Retaking the photo ensures you are satisfied with your passport photo while meeting official standards.
24. What Are The Guidelines For Hairstyle In A Passport Photo?
The guidelines for hairstyle in a passport photo require that your hair does not obscure your face, and your hairline must be visible. Clarity and natural appearance are key.
- Face Visibility: Your hair should not cover your eyes, forehead, or ears.
- Hairline Visible: Ensure your hairline is visible and not obscured by bangs or other hairstyles.
- Natural Look: Maintain a natural hairstyle that represents your everyday appearance.
- No Headbands: Avoid wearing headbands, hats, or other accessories that cover your hair unless for religious reasons.
- Volume: Excessive hair volume that distorts your head shape should be avoided.
Following these guidelines will ensure your hairstyle does not cause your passport photo to be rejected.
25. How Do I Ensure My Skin Tone Is Accurate In A Passport Photo?
Ensuring your skin tone is accurate in a passport photo involves using proper lighting, avoiding filters, and adjusting the color balance in photo editing software. Accurate representation is essential.
- Proper Lighting: Use natural or diffused lighting to avoid harsh shadows and color distortion.
- Avoid Filters: Do not use filters, as they can alter your skin tone.
- Color Balance: Adjust the color balance in photo editing software to correct any color imbalances.
- Monitor Calibration: Calibrate your monitor to ensure accurate color representation.
- Professional Help: Consult with a professional photographer for expert assistance in capturing accurate skin tones.
- Print Check: If printing, check the print to ensure the skin tone is accurate.
Accurate skin tone representation ensures your passport photo meets official requirements and reflects your true appearance.
26. Is It Better To Take A Passport Photo At Home Or At A Pharmacy?
Whether it’s better to take a passport photo at home or at a pharmacy depends on your equipment, skills, and convenience preferences. Each option has its pros and cons.
-
At Home:
- Pros: Cost-effective, convenient, and allows multiple retakes.
- Cons: Requires proper equipment and skills to meet guidelines.
-
At A Pharmacy:
- Pros: Professional equipment and knowledge of requirements.
- Cons: More expensive and less control over the final result.
Consider your resources and expertise to determine the best option for you.
27. How Do I Prepare My Face For A Passport Photo?
To prepare your face for a passport photo, ensure it is clean, well-groomed, and free of any distractions that could obscure your features. Preparation ensures the best result.
- Clean Face: Wash your face to remove any dirt or oil.
- Grooming: Ensure your eyebrows are well-groomed, and any facial hair is neatly trimmed.
- Minimize Makeup: Use minimal makeup to maintain a natural appearance.
- Avoid Shine: Use a mattefying product to reduce shine on your face.
- Rest: Get enough rest to avoid dark circles under your eyes.
- Check for Distractions: Ensure there are no temporary marks or blemishes that could distract from your features.
Taking these steps will help you present your best and most accurate self in your passport photo.
28. What Is The Best Time Of Day To Take A Passport Photo?
The best time of day to take a passport photo is during daylight hours, ideally in the morning or early afternoon, to take advantage of natural, diffused light. Optimal lighting is key.
- Natural Light: Use natural daylight for even and consistent illumination.
- Morning/Early Afternoon: These times typically provide softer, more diffused light.
- Avoid Direct Sunlight: Avoid taking photos in direct sunlight, which can create harsh shadows.
- Cloudy Days: Overcast or cloudy days can provide excellent diffused light.
- Indoor Lighting: If using indoor lighting, ensure it is consistent and free of shadows.
Taking your passport photo during the best time of day will help ensure proper lighting and accurate representation.
29. What Are The Tips For Taking A Clear Passport Photo With A Smartphone?
Tips for taking a clear passport photo with a smartphone include using a tripod, ensuring good lighting, and using the correct camera settings. These techniques ensure quality.
- Use A Tripod: Stabilize your smartphone with a tripod to avoid blurry photos.
- Good Lighting: Ensure there is ample and even lighting to illuminate your face.
- Camera Settings: Use the highest resolution and quality settings on your smartphone camera.
- Focus: Tap the screen to focus on your face and ensure it is sharp.
- Avoid Zoom: Do not use digital zoom, as it can reduce image quality.
- Multiple Shots: Take multiple photos and choose the clearest one.
Following these tips will help you capture a clear and compliant passport photo with your smartphone.
30. How Do I Avoid Red Eye In My Passport Photo?
To avoid red eye in your passport photo, use proper lighting techniques, disable the flash, or use photo editing software to correct any red eye that appears. Prevention and correction are key.
- Proper Lighting: Ensure there is sufficient ambient lighting to reduce the need for flash.
- Disable Flash: If possible, disable the flash on your camera.
- Increase Distance: Increase the distance between the camera and the subject to reduce red eye.
- Photo Editing Software: Use photo editing software to remove any red eye that appears.
- Red-Eye Reduction Feature: Use the red-eye reduction feature on your camera.
Taking these steps will help you avoid red eye and ensure your passport photo is compliant.
Navigating the intricacies of passport photos might seem daunting, but with the right knowledge and tools, you can achieve professional-quality results from the comfort of your home. Remember, a compliant photo is key to a smooth passport application process.
Ready to explore more about photography and visual arts? Visit dfphoto.net for in-depth articles, tutorials, and inspiration. Enhance your skills, discover new techniques, and connect with a community of photography enthusiasts. Whether you’re a beginner or a seasoned pro, dfphoto.net is your go-to resource for all things photography. Address: 1600 St Michael’s Dr, Santa Fe, NM 87505, United States. Phone: +1 (505) 471-6001. Website: dfphoto.net. Join us and unlock your creative potential today!
FAQ
1. Can I smile in my passport photo?
No, you must maintain a neutral expression with your mouth closed. According to the U.S. Department of State, smiling can distort your facial features and make it harder to identify you.
2. What should I do if I wear glasses for medical reasons and can’t remove them?
If you must wear glasses for medical reasons, provide a signed statement from your doctor. Ensure there is no glare on the lenses and that your eyes are clearly visible.
3. Can I wear makeup in my passport photo?
Yes, you can wear makeup, but it should be minimal and natural. Avoid heavy makeup that significantly alters your appearance.
4. How recent does my passport photo need to be?
Your passport photo must be taken within the last six months to accurately reflect your current appearance.
5. What size should my passport photo be?
Your passport photo must be 2×2 inches (51×51 mm). This is a strict requirement, and incorrect sizes will lead to rejection.
6. What is the best color to wear for a passport photo?
It’s best to wear clothing that contrasts with the white background. Avoid wearing white or light colors that may blend in with the background.
7. Can I take a selfie for my passport photo?
While you can use your own device, it’s recommended to have someone else take the photo to ensure proper distance and framing. Selfies can often result in poor angles and lighting.
8. What is the best type of lighting for a passport photo?
Natural daylight is the best type of lighting. Avoid direct sunlight, which can cause harsh shadows. Diffused light provides even illumination and accurate skin tones.
9. Can I wear jewelry in my passport photo?
You can wear jewelry as long as it doesn’t obscure your face. Avoid large or reflective jewelry that could cause glare or shadows.
10. How do I submit a digital passport photo online?
Ensure your digital photo meets the size and resolution requirements (at least 600×750 pixels) and is in JPEG (.jpg) format. Upload the photo through the online passport application portal.