Having a treasure trove of photos on your Android phone is fantastic, allowing you to capture memories on the go. But what happens when you need to view, edit, or back up these precious moments on your PC? Transferring photos from your Android device to your computer is a common need, and thankfully, there are several straightforward methods to achieve this. Whether you’re looking for speed, convenience, or offline solutions, this guide will walk you through the best ways to transfer your photos from Android to PC, ensuring you pick the perfect method for your needs.
Method 1: The Reliable USB Cable Transfer
For a direct, fast, and often the simplest method, using a USB cable and File Explorer is a top choice. This method leverages the familiar interface of Windows File Explorer to drag and drop your photos directly from your Android phone to your PC. It’s a wired solution, which some users prefer for its reliability and speed, especially when transferring large numbers of photos.
Step-by-Step Guide: Transfer Photos from Android to PC via USB
-
Establish a USB Connection Between Your Android and PC.
Using your phone’s USB cable, connect your Android smartphone to your Windows PC. Ensure the cable is properly connected to both devices for a stable transfer.
-
Select USB Connection Mode on Your Android Device.
Once connected, look at your Android phone’s screen. You should see a notification, often appearing as “Charging this device via USB”. Swipe down from the top of your screen to access your notifications and tap on this notification.
-
Choose “File Transfer” or “MTP” Option.
After tapping the USB notification, you’ll be presented with different USB options. Select “File Transfer” or “MTP” (Media Transfer Protocol). This setting allows your PC to access your Android’s files, including your photos.
Alt Text: Android phone screen showing USB settings, highlighting the “File Transfer” option to enable photo transfer to PC.
-
Access Your Android Device in File Explorer on Your PC.
Open File Explorer on your Windows PC. You can do this by clicking the folder icon on your taskbar or searching for “File Explorer” in the Windows search bar. In the File Explorer window, you should see your Android device listed under “This PC” or “Devices and drives”. Click on your Android device’s name to browse its file system.
-
Locate Your Photos on Your Android Device.
Navigate through your Android’s folders to find your photos. Typically, photos are stored in the “DCIM” (Digital Camera Images) folder, often within a “Camera” subfolder for photos taken with your camera app. You might also find photos in the “Pictures” folder, which can contain screenshots, downloaded images, or photos from other apps. If you use an SD card, you may need to navigate to “SD Card” first, then look for DCIM or Pictures.
-
Drag and Drop Photos to Your PC.
Once you’ve found your photos, select the ones you want to transfer. You can select multiple photos by holding down the Ctrl key while clicking on individual photos, or select a range of photos by clicking the first photo, holding the Shift key, and clicking the last photo in the range. To copy all photos in a folder, simply press Ctrl + A.
Open another File Explorer window (Right-click the File Explorer icon in your taskbar and click ‘File Explorer’) and navigate to the folder on your PC where you want to save your photos. Then, simply drag and drop the selected photos from the Android device window to your chosen folder on your PC.
Alt Text: File Explorer windows showing photo transfer from Android phone folder to a PC folder using drag and drop method.
Advantages of USB Transfer
- Speed: USB transfer is generally faster than wireless methods, especially for large photo libraries.
- Simplicity: It’s a straightforward method, requiring no additional software installation.
- Offline Capability: Works without needing an internet connection.
- Album Structure: Allows you to copy entire photo albums, maintaining their organization.
Limitations of USB Transfer
- No Message Photo Transfer: You typically cannot directly transfer photos embedded in text messages using this method.
- No Differential Backup: It doesn’t offer automatic detection of new photos for incremental backups.
- Limited Organization Features: File Explorer doesn’t offer advanced photo organization features like grouping by date during transfer.
Method 2: Wireless Freedom with Wi-Fi Transfer
For a cable-free experience, transferring photos over Wi-Fi offers great convenience. While Android doesn’t natively offer direct Wi-Fi transfer to PC, user-friendly apps like Droid Transfer bridge this gap, providing a seamless wireless connection for photo management. Droid Transfer, in conjunction with its Android companion app, Transfer Companion, offers enhanced control and features compared to standard methods.
Step-by-Step Guide: Transfer Photos from Android to PC via Wi-Fi using Droid Transfer
-
Ensure Both Devices are on the Same Network.
Make sure both your Android phone and your PC are connected to the same Wi-Fi network. This is essential for establishing a wireless connection between the devices.
-
Install and Launch Droid Transfer and Transfer Companion.
Download and install Droid Transfer on your Windows PC and Transfer Companion on your Android phone. You can download both applications for free from the Droid Transfer website. Launch both applications on their respective devices.
-
Connect via QR Code Scan.
On your Android device, in the Transfer Companion app, tap “Scan Droid Transfer QR code”. Then, use your phone’s camera to scan the QR code displayed in the Droid Transfer application on your PC screen. This QR code scan establishes a secure Wi-Fi connection between your devices.
Alt Text: Android phone scanning a QR code displayed on a PC screen to establish a Wi-Fi connection for photo transfer using Droid Transfer.
-
Navigate to the “Photos” Section in Droid Transfer.
Once connected, in the Droid Transfer interface on your PC, click on the “Photos” category. This will display all the photos stored on your Android device, organized into albums and categories.
-
Select Photos for Transfer.
Choose the photos you wish to transfer to your PC. Droid Transfer offers flexible selection options:
- Select individual photos by clicking on them.
- Select entire albums or photo categories (like Camera Roll, Downloads, Screenshots) to transfer all photos within them.
- Use Ctrl + A on your keyboard to select all photos currently displayed.
-
Initiate Photo Transfer to PC.
After selecting your photos, click the “Save to PC” button in the toolbar at the top of the Droid Transfer window. Choose the desired folder on your PC where you want to save the transferred photos. Click “OK” to begin the wireless photo transfer.
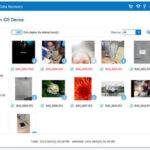
Alt Text: Droid Transfer software interface showing photo selection and the “Save to PC” button for transferring Android photos wirelessly.
Droid Transfer ensures your photos are copied in their original quality, supporting various image formats like JPEG, PNG, GIFs, WebP, and more.
Enhanced Photo Backup with Droid Transfer’s Differential Backup
Droid Transfer excels in regular photo backups with its “Export New Photos” feature. Upon connecting your Android, Droid Transfer intelligently identifies new photos since your last backup. This allows you to selectively copy only the latest additions to your photo library, saving time and storage space.
When exporting new photos, Droid Transfer provides an invaluable option to organize your photos by date. You can choose to save your photos into folders automatically created and named by year, month, and day, making photo management and archiving incredibly efficient.
After backing up, Droid Transfer can also prompt you to delete the backed-up photos from your Android device, freeing up valuable storage space. This feature ensures you don’t have duplicate photos cluttering your phone after a successful backup.
Alt Text: Droid Transfer software asking user if they want to delete photos from Android after they have been successfully backed up to PC.
Key Features of Droid Transfer for Photo Management
- Versatile Connection: Offers both Wi-Fi and USB cable connection options.
- Selective and Batch Transfer: Transfer individual photos, albums, or entire categories.
- Differential Backup: Efficiently backs up only new photos.
- Date-Based Organization: Automatically organizes photos into date-structured folders.
- Delete After Backup: Option to remove backed-up photos from Android.
- Message Photo Extraction: Can save photos directly from text messages.
Watch a video tutorial on transferring photos with Droid Transfer.
Learn more about Droid Transfer | Download Droid Transfer for Free
Advantages of Wi-Fi Transfer (using Droid Transfer)
- Wireless Convenience: No need for cables.
- Comprehensive Features: Offers advanced photo management and backup options.
- Message Photo Support: Can transfer photos from text messages.
- Organized Backups: Date-based folder organization for easy archiving.
Considerations for Wi-Fi Transfer (using Droid Transfer)
- Requires Software: Needs installation of Droid Transfer and Transfer Companion.
- Network Dependent: Relies on a stable Wi-Fi connection.
Method 3: Cloud Sync with Google Photos
Google Photos is a popular cloud-based service that seamlessly syncs photos across your devices. This method provides automatic photo backup and access from any device logged into your Google account, including your PC. It’s ideal for users who want continuous, automatic photo syncing and easy access across platforms.
Step-by-Step Guide: Sync Photos from Android to PC using Google Photos
-
Open the Google Photos App on Your Android Device.
Locate and open the Google Photos application on your Android smartphone. It usually comes pre-installed on most Android devices.
-
Sign in to Your Google Account.
If you’re not already signed in, sign in to your Google account within the Google Photos app. This is the account that will be used to sync your photos to the cloud and make them accessible on your PC.
-
Access Your Profile and Backup Settings.
Tap on your profile picture or initial, usually located in the top right corner of the Google Photos app. This will open a menu.
-
Turn On Backup & Sync.
In the menu, check for “Backup is off”. If it says “Backup is off”, tap on it and then tap “Turn on backup” on the next screen to activate photo backup to Google Photos.
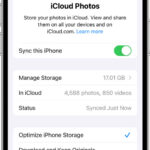
Alt Text: Google Photos app on Android showing the option to “Turn on backup” to start syncing photos to Google Photos.
-
Allow Backup to Complete.
Google Photos will now begin backing up your photos and videos to the cloud. The initial backup time depends on the size of your photo library and your internet connection speed. Ensure your device is connected to Wi-Fi for a faster and more stable backup process.
-
Access Google Photos on Your PC via Browser.
Once the backup is complete, open your preferred web browser on your PC and go to photos.google.com.
-
Sign in to Your Google Account on the Web.
Sign in to the same Google account you used on your Android device. You will now see all your synced photos and videos from your Android device available in Google Photos on your PC.
-
Download Photos to Your PC.
To download photos to your PC, select the photos you want to save. You can select individual photos by clicking the circle in the top-left corner of each photo. For batch selection, click the circle of the first photo, hold the Shift key, and click the circle of the last photo in the range.
After selecting your photos, click the three-dot menu (More options) in the top right corner and choose “Download”.
Alt Text: Google Photos website interface showing selected photos and the “Download” option from the three-dot menu.
Google Photos may limit downloads to batches of 500 photos at a time. For larger libraries, consider using Google Takeout.
Tip for Downloading Large Photo Libraries from Google Photos
If you need to download more than 500 photos, Google Takeout (takeout.google.com/settings/takeout/custom/photos) is a valuable service. It allows you to download your entire Google Photos library as a ZIP file to your computer. Note that while Google Takeout downloads all your photos, it does not maintain album structures; photos are organized into folders by year taken.
Advantages of Google Photos Sync
- Automatic Sync: Photos are automatically backed up and synced across devices.
- Cross-Platform Access: Access your photos from any device with Google Photos.
- Album Preservation: Maintains photo album structures during sync and download (except with Google Takeout).
Limitations of Google Photos Sync
- Storage Limits: Free Google account storage is limited to 15GB, shared across Google Drive, Gmail, and Google Photos. Larger storage requires a paid Google One subscription.
- Internet Dependency: Requires an active internet connection for syncing and access. Slow connections can impact syncing speed and offline access to new photos.
- Download Limits: Google Photos has download limits (around 500 photos per download operation), which can be cumbersome for large photo libraries.
Method 4: Bluetooth for Occasional Transfers
Bluetooth offers a wireless transfer option when USB or Wi-Fi connections are not available. While generally slower than other methods, Bluetooth can be useful for transferring a small number of photos when other options are limited. Setting up Bluetooth pairing initially takes a bit more effort, but once configured, it allows for basic wireless photo transfer.
Step 1: Bluetooth Setup on Android and PC
-
Enable Bluetooth on Your Android Device.
Go to “Settings” on your Android phone, then find and tap on “Bluetooth”. Toggle the Bluetooth switch to the “ON” position. Ensure your device is set to “discoverable” so your PC can find it.
-
Enable Bluetooth on Your PC.
On your Windows PC, go to “Start” > “Settings” > “Bluetooth & devices”. Turn the Bluetooth switch to “ON”.
-
Pair Your Android and PC.
On your PC’s Bluetooth settings, click “Add device” > “Bluetooth”. Your PC will scan for nearby Bluetooth devices. Select your Android device from the list. A pairing code will appear on both your PC and Android. Verify that the codes match and click “Connect” or “Yes” on your PC and “Pair” on your Android to confirm the pairing.
Alt Text: Bluetooth pairing process on PC showing the selection of an Android device and confirmation of pairing codes.
-
Configure File Receiving on Your PC.
In your PC’s Bluetooth settings, click “Send or receive files via Bluetooth”. In the window that appears, select “Receive files”. Your PC is now ready to receive files via Bluetooth.
Alt Text: Bluetooth File Transfer window on PC with “Receive files” option selected, preparing to receive photos from Android via Bluetooth.
Step 2: Transfer Photos via Bluetooth
-
Open the Photos App on Your Android Device.
Open the Gallery or Photos app on your Android phone and select the photos you want to transfer.
-
Select Photos to Share.
Choose the photos you want to send to your PC. You can select photos individually, by date, or by album, depending on your gallery app.
-
Share via Bluetooth.
Tap the “Share” icon (often three dots connected by lines) and choose “Bluetooth” from the sharing options.
Alt Text: Android phone screen showing photo sharing options with Bluetooth selected as the transfer method.
-
Accept File Transfer on Your PC.
You’ll receive a notification on your PC that files are being sent via Bluetooth. A window will pop up asking you to accept the incoming files. Choose a location on your PC to save the transferred photos and click “Finish”.
Alt Text: Windows notification window showing incoming Bluetooth file transfer from Android and prompting user to accept and save files.
Advantages of Bluetooth Transfer
- No USB or Wi-Fi Required: Useful in situations where other connections are unavailable.
- Direct Wireless Transfer: Provides a direct, albeit slower, wireless connection.
Disadvantages of Bluetooth Transfer
- Slow Transfer Speed: Significantly slower than USB or Wi-Fi, making it impractical for large photo transfers.
- Complex Setup: Initial pairing process can be more involved than other methods.
- No Album Transfer: Does not maintain or transfer album structures.
- Unreliable Connection: Bluetooth connections can sometimes be less stable, especially for large transfers, potentially leading to interruptions.
Conclusion: Choosing the Right Photo Transfer Method
Transferring photos from your Android phone to your PC doesn’t have to be a hassle. As you’ve seen, there are several effective methods, each with its own strengths and weaknesses. The best method for you will depend on your specific needs and preferences.
To summarize our recommendations:
-
For the most feature-rich and robust solution, choose Droid Transfer. It offers a comprehensive set of features, including Wi-Fi and USB connectivity, differential backups, date-based organization, and even message photo transfer. Droid Transfer provides unparalleled control and flexibility for managing your Android photos on your PC.
-
For quick, simple, and direct transfers, especially for large photo libraries, using a USB cable and File Explorer is an excellent choice. It’s fast, reliable, and requires no extra software. However, it lacks advanced features like differential backup and message photo transfer.
-
If you want seamless, automatic photo syncing and cross-device access, Google Photos is the way to go. It ensures your photos are always backed up and accessible from anywhere, but be mindful of the storage limits and internet dependency.
Thank you for reading this guide. We hope it has equipped you with the knowledge to confidently transfer your photos from your Android device to your PC using the method that best suits your workflow!
Publisher: Wide Angle Software
Read Next: 3 Best Ways to Backup Your Android Phone >
[
Droid Transfer](/droidtransfer/transfer-photos-from-android-to-pc.php) The Ultimate tool for transferring photos and more from Android to PC.
Related Articles
How to Transfer Photos from Android to Android
3 ways to transfer files from Android to PC using WiFi
 3 Ways to Backup Android SMS and MMS 3 Ways to Backup Android SMS and MMS
 How to Transfer Music from your Phone to a PC How to Transfer Music from your Phone to a PC
▷ Free Download
Droid Transfer X
The best way to transfer Android Photos and more to your PC via Wi-Fi or USB.
Find out more > Try Droid Transfer free, today!