Capturing a screenshot on your iPhone is a fundamental skill, whether you want to share a funny chat, save a memorable moment from social media, or document an error message for troubleshooting. Apple has made taking screenshots incredibly easy, but the method varies slightly depending on your iPhone model. This guide will walk you through the simple steps to take a photo of your iPhone screen, ensuring you never miss capturing important on-screen information.
Taking a Screenshot on iPhones with Face ID (iPhone X and Later)
If you own an iPhone model with Face ID, such as iPhone 14, iPhone 13, iPhone 12, iPhone 11, iPhone XS, iPhone XR, or iPhone X, the process is straightforward and relies on button combinations.
-
Locate the Side Button and Volume Up Button: The Side button is on the right side of your iPhone, while the Volume Up button is on the left.
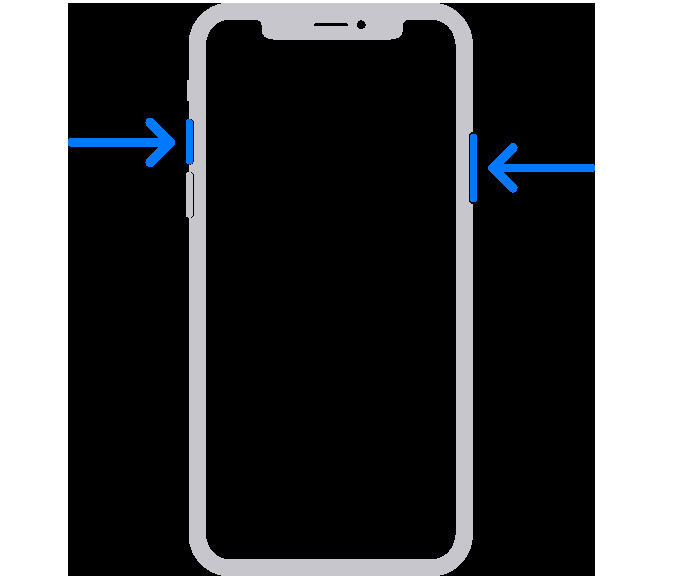 Arrows indicating the side button and volume up button on an iPhone with Face ID.
 -
Press and Quickly Release: Simultaneously press the Side button and the Volume Up button. Make sure to release them quickly. Holding them for too long might trigger other functions like the emergency SOS or volume controls.
-
Screenshot Confirmation: A brief screen flash will confirm that you’ve successfully taken a screenshot. A thumbnail of the screenshot will then appear momentarily in the bottom left corner of your screen.
-
Access or Dismiss: Tap the thumbnail to instantly open and edit your screenshot. If you don’t need to interact with it immediately, simply swipe left on the thumbnail to dismiss it, and the screenshot will be saved automatically.
Taking a Screenshot on iPhones with Touch ID and the Side Button
For iPhone models that feature a Touch ID sensor and a Side button, like iPhone SE (2nd and 3rd generation), iPhone 8, iPhone 8 Plus, iPhone 7 and iPhone 7 Plus, the method is slightly different but equally simple.
-
Identify the Side Button and Home Button: The Side button is on the right side, and the Home button is the circular button at the bottom center of your iPhone’s front face.
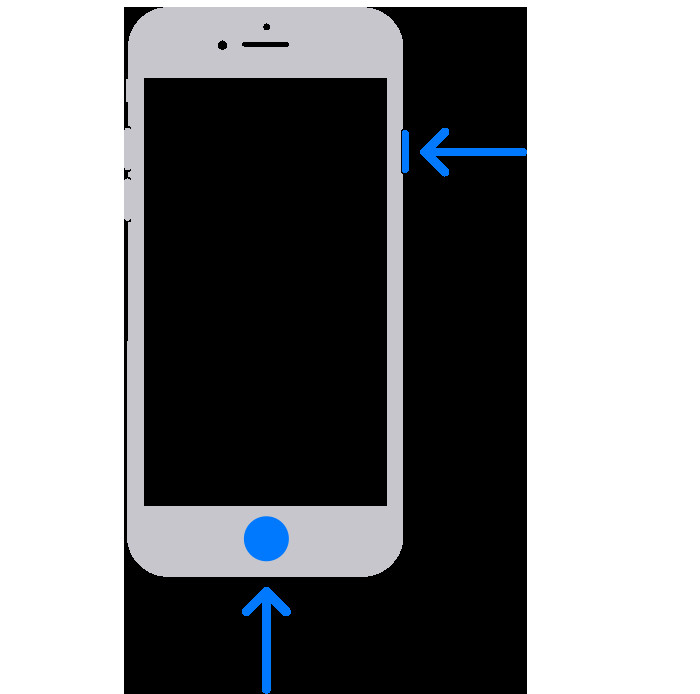 Arrows pointing to the side button and the home button on an iPhone with Touch ID and side button.
 -
Simultaneous Press and Release: Press the Side button and the Home button at the same time. Ensure you release both buttons quickly to capture the screenshot effectively.
-
Visual Cue and Thumbnail: Just like with Face ID iPhones, your screen will flash briefly to indicate a successful screenshot, and a thumbnail will pop up in the lower-left corner.
-
Interact with the Thumbnail: Tap the thumbnail to open and edit, or swipe it left to dismiss and save the screenshot.
Taking a Screenshot on iPhones with Touch ID and the Top Button
Older iPhone models with Touch ID and a Top button, such as the original iPhone SE, iPhone 6s, iPhone 6s Plus, iPhone 6, and iPhone 6 Plus, use the Top button for screenshot capture.
-
Locate the Top Button and Home Button: The Top button is on the top right edge of your iPhone, and the Home button remains at the bottom center front.
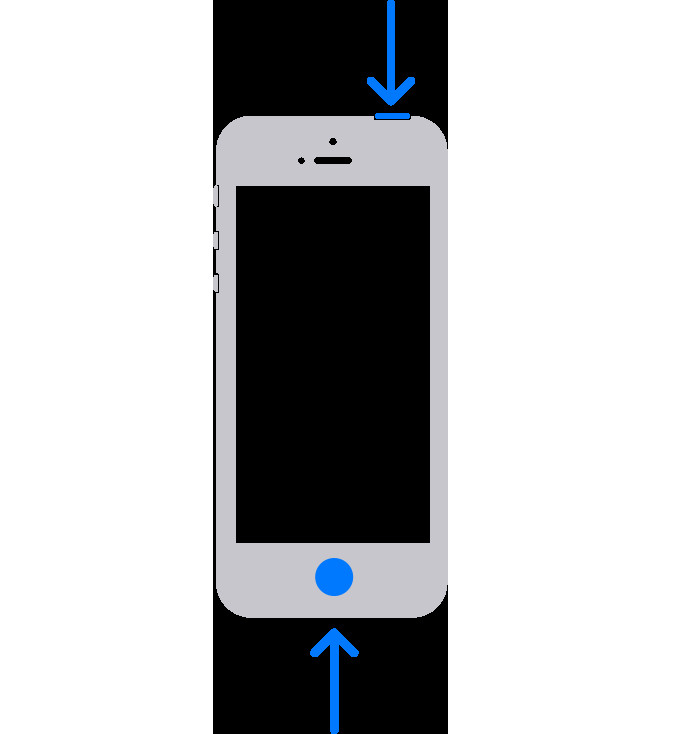 Arrows highlighting the top button and home button on an iPhone with Touch ID and top button.
 -
Press and Release Together: Press the Top button and the Home button at the same time and quickly release them.
-
Screenshot Feedback: A screen flash will signal that the screenshot has been taken, and a thumbnail will appear at the bottom left.
-
Manage the Thumbnail: Tap to edit or swipe away to save your captured screen image.
Where to Find Your Screenshots
All your captured iPhone screenshots are conveniently stored in a dedicated album within the Photos app.
-
Open Photos App: Launch the Photos application on your iPhone.
-
Navigate to Albums: Tap on the “Albums” tab, typically located at the bottom of the screen.
-
Find the Screenshots Album: Scroll down to the “Media Types” section and tap on “Screenshots”. Here, you’ll find all the screenshots you’ve taken, neatly organized for easy access, sharing, or editing.
Mastering the art of taking screenshots on your iPhone is incredibly useful for a variety of situations. By following these simple steps tailored to your specific iPhone model, you can effortlessly capture and save anything displayed on your screen.