For those just starting out in photography, the idea of taking a truly great photo can seem straightforward – simply point your camera and press the button. However, anyone who has ventured into learning how to take good photos quickly realizes there’s a much deeper art and science to it than that.
From carefully selecting your subject matter and crafting an engaging composition to mastering the nuances of light, capturing a compelling photograph requires thoughtful consideration and practice.
If you’re eager to elevate your photography skills and learn how to take good photos, this guide is packed with essential tips to help you improve. By grasping these fundamental techniques, you’ll see a significant enhancement in your photographic results.
The exciting outcome of learning how to take good photos? It opens up a world of opportunities. The more skilled you become at producing professional-looking photographs, the stronger your online photography portfolio will become. And a standout online portfolio is your key to attracting more photography jobs and clients.
So, let’s dive into the essential elements that will transform your approach to photography and help you take good photos consistently.
1. Master the Art of Composition for Impactful Photos
Define a Clear Focal Point to Draw the Viewer’s Eye
 An old SLR camera with a blurred background, emphasizing the lens as the focal point
The focal point of your photograph is the primary point of interest, the element you want to immediately capture the viewer’s attention. This could be anything – a solitary tree in a landscape, a striking architectural detail, or the expressive eyes of a portrait subject. Understanding how to establish a strong focal point is a cornerstone of learning how to take good photos. Before you even frame your shot, pause and ask yourself, “What is the most important thing I want people to notice in this picture?”
Once you’ve identified your focal point, your next step is to enhance its prominence within the frame. Many compositional guidelines will help you make your focal point compelling, ensuring it effectively draws in the viewer and holds their gaze.
Utilize the Rule of Thirds for Balanced and Dynamic Images
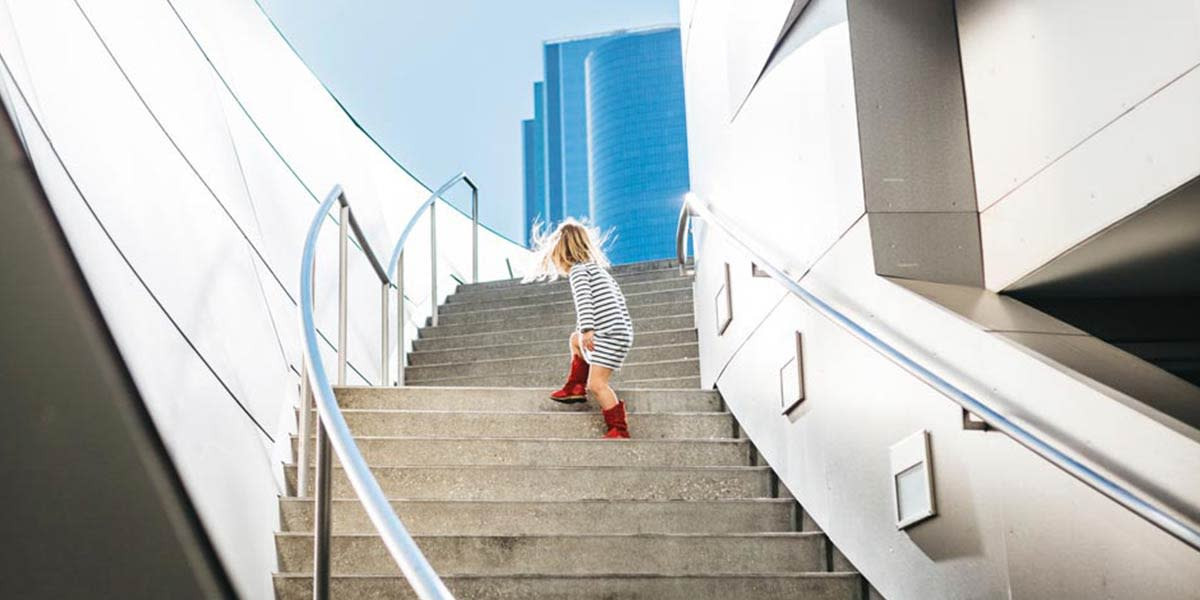 A young girl walking up stairs, positioned off-center according to the rule of thirds
Instead of automatically placing your focal point directly in the center of the frame, consider using the rule of thirds to create more visually engaging compositions. This principle suggests imagining your frame divided into nine equal rectangles by two horizontal and two vertical lines, much like a tic-tac-toe board. According to the rule, you should position your main subject and other crucial elements along these lines or at the points where they intersect.
The rule of thirds is one of the simplest yet most effective techniques for learning how to take good photos. It helps you move beyond static, centered compositions and achieve a more dynamic balance between your subject and the surrounding background, preventing portraits from looking like simple headshots.
Guide the Eye with Leading Lines for Engaging Pathways
Leading lines are compositional elements within your photo that act as visual pathways, naturally directing the viewer’s eye towards the focal point. These lines can be formed by a variety of elements in your scene, such as roads stretching into the distance, fences receding into the background, architectural lines of buildings, hallways that draw the eye inward, rows of trees, or even patterns of shadows.
The key to effectively using leading lines is to strategically use them to guide attention exactly where you intend it to go. This could mean leading the viewer directly to your main subject or taking them on a visual journey through various parts of your composition, creating a sense of depth and exploration.
The direction of your leading lines also plays a role in the emotional impact of your photographs. For instance, vertical leading lines often convey a sense of power and height, creating an imposing mood, while horizontal leading lines tend to evoke feelings of calm, peace, and tranquility. To further understand how this technique can significantly improve your ability to take good photos, explore resources specifically focused on how to use leading lines in your photography.
Explore Perspective to Transform Your Visual Storytelling
Perspective is an incredibly powerful tool that dramatically influences the composition and impact of any photograph. Simply by adjusting your shooting angle or the distance from your subject, you can completely alter the mood and the message conveyed by your images.
A straightforward way to see this in action is to photograph the same subject from different viewpoints – from above and from below. A high, bird’s-eye view can diminish the perceived size and importance of a person in your shot, making them seem small or vulnerable. Conversely, shooting from a low angle can make the same person appear dominant and towering. Similarly, capturing a subject from a distance can make them seem insignificant within their environment, while moving in close to fill the frame can communicate a sense of power, intimacy, or immediacy.
Therefore, when setting up any photograph, dedicate time to actively consider perspective. Don’t hesitate to move around your subject, experiment with different angles, and observe how drastically these changes can affect the overall mood and narrative of your composition. This thoughtful approach to perspective is a significant step towards mastering how to take good pictures.
Create Depth to Add Dimension and Realism
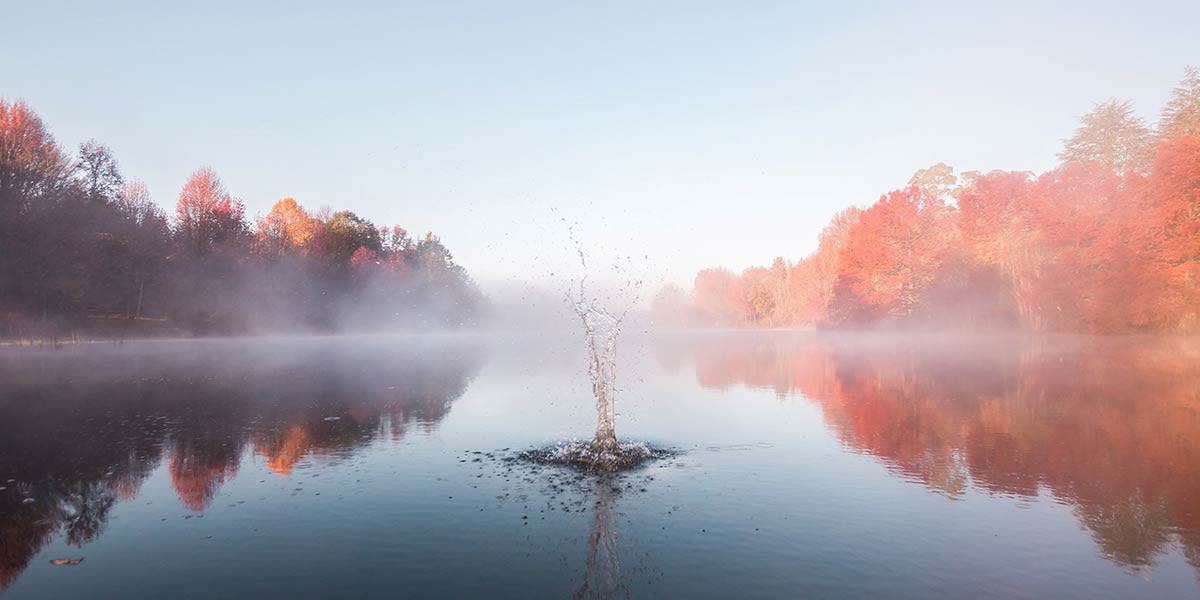 A rock breaking the surface of a lake with fog in the distance, illustrating depth through foreground, middle ground, and background
Learning how to convey depth in your photographs is another crucial element in understanding how to take good photos. Without depth, images can appear flat, lifeless, and unengaging. The most effective way to create a sense of depth is to incorporate elements in the foreground, middle ground, and background of your composition. For example, instead of photographing a portrait subject directly against a plain wall, position them slightly forward and choose a background that offers layers and visual interest. This separation helps to pull the viewer into the scene and makes the image feel more three-dimensional.
Utilize Bokeh to Make Your Subject Stand Out
 A couple walking with sparklers, the background beautifully blurred with bokeh
Incorporating a bokeh effect is a powerful technique to enhance depth and visual appeal in your photos. Bokeh refers to the aesthetically pleasing blur in the out-of-focus areas of an image, often seen in professional photography. Photographers frequently use bokeh to ensure the subject remains sharp and clear while softening the background into a dreamy blur. This technique makes the subject visually “pop” out from the background, drawing the viewer’s attention directly to it.
One simple way to achieve bokeh is to position your subject close to the camera and photograph them against a background that is further away. If you are using a zoom lens, you have even more control. Use it at its maximum focal length to minimize the depth of field, thereby intensifying the bokeh effect. Once you become adept at understanding when and how to effectively use bokeh, you’ll be well on your way to mastering how to take good photos.
Frame Your Shots for Focused Attention
Framing is another valuable composition technique that can significantly enhance your photography skills and help you take good photos. Framing involves using elements within your scene to create a natural border around your subject, effectively isolating it and directing the viewer’s gaze. These natural frames can be diverse, such as a doorway, an archway, overhanging tree branches, or even a hole in a wall. This method of framing not only focuses attention on your focal point but also adds layers to your image, enriching the composition.
Furthermore, if the frame is positioned relatively close to the camera, it can serve as a foreground element, adding depth to your image. Similar to the bokeh effect, you can intentionally keep the frame out of focus by manually adjusting your focus and zooming in on a subject in the middle ground. This ensures that the frame enhances the image without distracting from the main subject.
Fill the Frame to Eliminate Distractions
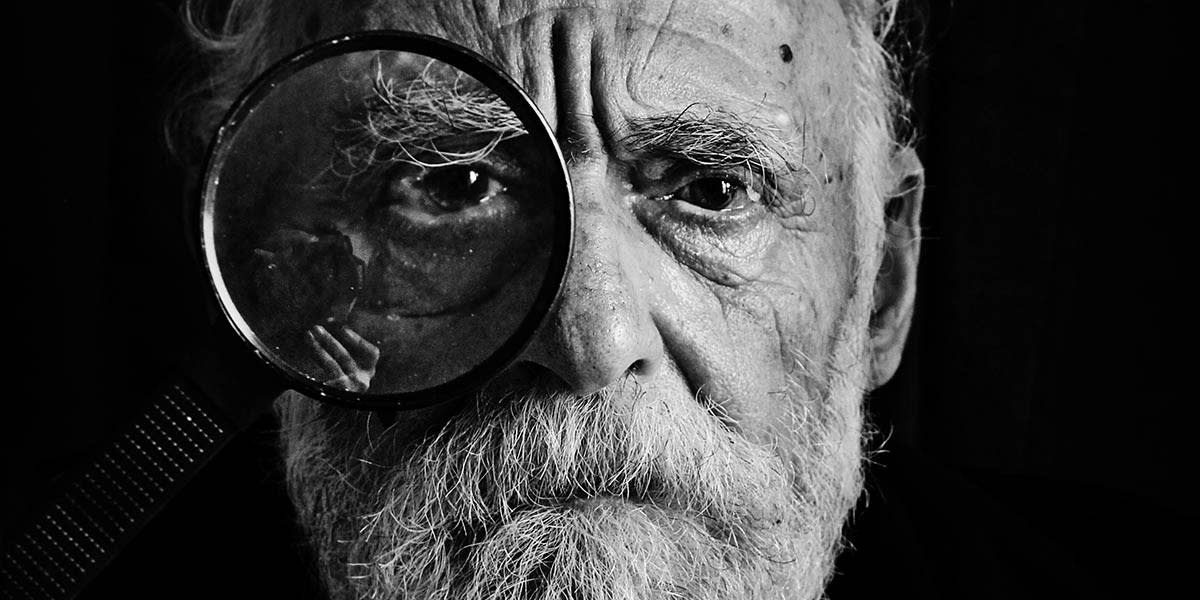 A close-up portrait of an elderly man with a magnifying glass, filling the frame
Photography instructors often advise students learning how to take good photos to “fill the frame.” This is excellent advice because leaving too much empty space around your main subject can introduce distracting background elements that detract from the overall composition.
For example, when shooting a portrait, instead of including the entire person and a lot of their surroundings, consider framing the shot to include only from the waist up, or even more intimately, just fill the frame with their face. Eliminating unnecessary space around the subject results in a more engaging and professional-looking photograph.
Seek Patterns and Symmetry, Then Introduce Contrast
Incorporating patterns or symmetrical elements into your photographs can significantly increase their visual appeal. Humans are naturally drawn to patterns, making their inclusion a strong technique when learning how to take good photos. Patterns and symmetry create visual rhythm and predictability that is pleasing to the eye.
Therefore, always be on the lookout for opportunities to include patterns, symmetry, and the repetition of shapes or colors in your photography. To make these compositions even more compelling, consider introducing an element that disrupts the pattern. This disruption serves as a natural focal point, drawing the eye and creating visual interest. A simple illustration of this would be a photograph of a picket fence where one picket is broken or missing, immediately catching the viewer’s attention.
2. Light is Key: Mastering Illumination for Stunning Photos
 A man working in a machine shop, illuminated by off-camera lighting to control shadows and highlights
Ensuring your photographs are well-lit is absolutely essential to making your pictures look professional, and it’s an aspect that is often underestimated by beginner photographers. The first and most basic step is to ensure there is sufficient light to make your subject clearly visible. Insufficient light can severely limit your camera’s ability to capture details effectively.
If you are using your camera in automatic mode (which, to be clear, is generally not the best approach for learning how to take good photos, but we’ll discuss manual settings later), the camera will likely compensate for lack of light by increasing the ISO setting or using a longer exposure time. This often leads to undesirable results such as grainy images or motion blur. Furthermore, attempting to brighten underexposed images in Photoshop or other editing software can reveal significant noise and further degrade image quality.
Conversely, too much harsh light can be equally problematic, creating harsh shadows that detract from your photo. Therefore, take time to carefully evaluate your location and the angle from which you are shooting to ensure the scene is adequately and favorably lit. Another effective approach to managing light is to utilize photography lighting equipment.
3. Invest in Lighting Equipment to Enhance Your Control
Relying solely on natural or ambient light can be limiting when you are aiming to take good photos consistently. Professional photographers understand the importance of light control and invest considerable time in planning and manipulating lighting using a variety of tools. However, you don’t need a huge budget to significantly improve the lighting in your photography.
Explore the Versatility of Light Reflectors
An affordable and incredibly useful piece of equipment for managing light is a light reflector. A 5-in-1 light reflector, often available for around $20, provides a range of options for manipulating light. These reflectors typically come with reversible covers made from different reflective materials, each serving a unique purpose. For example, silver covers reflect bright, direct light, ideal for increasing intensity. White covers provide a softer, more diffused reflection, perfect for gentle fill light. Black covers are used to subtract light, creating shadows and adding contrast to a scene.
Light reflectors are an excellent starting point for understanding light manipulation and are invaluable tools for anyone learning how to take good photos. They offer a simple yet effective way to control and shape light in various shooting conditions.
Maximize Flash and Diffusers for Balanced Lighting
 A man jumping, surrounded by white powder, captured with dramatic flash photography
If you appreciate that lighting is fundamental to making photographs look professional, you might be considering investing in advanced lighting equipment like studio strobes. However, don’t overlook the potential of your camera flash!
If you tend to avoid using your flash because you find the light too harsh, know that there are numerous ways to soften and control flash output. Investing in an external flash unit is a significant step up. External flashes, whether mounted on your camera’s hot-shoe or used off-camera, offer far greater flexibility than built-in flashes. One key advantage is the ability to aim the flash, rather than having the light blast directly at your subject.
This directional control allows you to bounce the flash off nearby surfaces like ceilings or walls. Bouncing flash creates a much broader and softer light source, reducing harsh shadows and providing more even illumination. Additionally, a wide variety of flash diffusers are available for external flashes, designed to soften the light even further without needing to bounce it.
If an external flash is not yet in your budget, there are more affordable options for diffusing the light from your camera’s built-in flash. A diffuser specifically designed for built-in camera flashes is a great example. These accessories, often costing under $20, attach to your camera and use translucent materials to soften the harshness of the flash.
Many photographers also get creative with DIY solutions for flash diffusion, using everyday items like translucent plastic containers cut and shaped to fit over the flash unit.
Use Light Creatively for Mood and Drama
Lighting is far more than just ensuring a scene is bright enough. You can creatively use light to dramatically alter the mood and atmosphere of your photos. Mastering these creative lighting techniques is crucial for truly learning how to make your photographs look professional and impactful.
Examples of creative lighting techniques include:
 Sunset reflecting on a pool by the beach, showcasing dramatic backlighting
4. Master Photo Editing to Refine Your Images Professionally
It’s important to understand that taking good photos is only half the process. Learning how to edit photos like a professional is equally crucial for achieving stunning final results.
Photoshop is often considered the professional photographer’s essential tool. Almost every image can benefit from editing adjustments, whether it’s basic cropping, fine-tuning brightness and contrast, correcting colors, or more advanced enhancements.
Investing time in learning the capabilities of photo editing software is highly worthwhile. Numerous online tutorials are available, including extensive resources on the Adobe website.
If you don’t have access to Photoshop or are seeking a more budget-friendly option, many excellent free Photoshop alternatives exist. GIMP is one of the most widely used and powerful free alternatives.
Regardless of the photo editing software you choose, a key principle to remember is to apply adjustments with a light touch. Beginner photographers often tend to over-edit their images, leading to unnatural and artificial-looking results. Start by experimenting with preset looks to establish a consistent style, and then make subtle, incremental adjustments. Overdoing edits can make your touch-ups obvious and detract from the realism of your photographs.
5. Understand Your Camera Settings for Creative Control
 Camera settings displayed for capturing a sunset, emphasizing manual control over aperture, shutter speed, and ISO
Relying solely on your camera’s automatic settings will limit your growth in understanding how to take good pictures. While automatic modes can be convenient and sometimes effective, they significantly restrict your creative control and ability to handle challenging or unique shooting situations.
For example, if you aim to capture a silhouette, your camera in automatic mode might attempt to expose for the subject, resulting in an overexposed background and losing the silhouette effect. If you are shooting at night, automatic settings might choose a long exposure that blurs motion when you want to capture sharp details. Therefore, familiarizing yourself with your camera’s manual settings is a critical step in learning how to make pictures look professional and achieve your creative vision.
For guidance on mastering manual settings, explore resources like our complete guide to manual settings on your DSLR camera.
6. Utilize a Tripod for Stability and Versatility
We’ve already discussed essential lighting equipment, but there’s another piece of photography gear that is highly recommended for anyone serious about learning how to take good photos: a tripod.
Even if you have a steady hand and are comfortable shooting handheld, a tripod unlocks a range of photographic techniques that are impossible without one. Just a few examples include tethered photography, capturing stunning long exposures, or even creating your own 3D images.
A tripod also allows you to meticulously set up your shot and then manage other aspects of the scene while keeping your camera perfectly positioned and ready. For instance, you might want to compose a shot and then direct a model, adjust lighting, or simply wait for the perfect moment without needing to recompose.
You don’t need to spend a fortune to acquire a quality tripod. For insights into the variety of tripods available, research resources on must-have portrait photography accessories.
7. Consider Upgrading Your Photography Gear
By implementing the photography tips outlined above, you will undoubtedly see significant improvements in your photos without any additional investment. However, if you are working with outdated equipment and have the budget to upgrade, investing in new camera bodies, lenses, and accessories can further enhance your capabilities. To help you navigate the numerous options, consult guides that offer advice on choosing new gear:
8. Showcase Your Photography Professionally Online
 A photography website template on a laptop screen, highlighting the Amazon theme
Build Your Portfolio with Format
Rated #1 online portfolio builder by photographers.
Now that you are equipped with insights into how to take good photos, it’s time to present your beautiful work to the world.
To showcase your photos professionally, establishing your own online photography portfolio is essential. Don’t worry if website building seems daunting; with a user-friendly website builder it’s surprisingly easy, even if you’ve never built a website before!
Look for a platform that offers customizable templates, allowing you to create an online portfolio website that truly reflects your unique style. Another important feature to seek is a platform that provides a free trial; this lets you explore its features and ensure it meets your needs before committing financially.
Once you select a platform that offers the tools you need, you’ll be fully prepared to showcase your photography like a seasoned professional.
Looking for more advanced tips on how to take good photos?
8 Common Beginner Photography Mistakes (And How To Avoid Them)
Expert Tips for More Powerful Action in Photography
9 Insights for Better Portrait Photography
