Shrinking a photo for a locket can transform a simple piece of jewelry into a cherished keepsake, allowing you to carry loved ones or special memories close to your heart; at dfphoto.net, we provide expertise in photography and visual arts to help you master this skill. This guide will walk you through every step, ensuring your locket photos are perfectly sized and beautifully displayed; explore the art of miniature photography and create personalized keepsakes with our detailed instructions, photo editing techniques, and printing tips; discover relevant strategies, image optimization advice, and personalized keepsakes inspiration.
1. Understanding the Purpose of Locket Photos
Locket photos serve as intimate mementos, encapsulating cherished memories and sentiments within a piece of jewelry that can be worn close to the heart. These tiny portraits offer a unique way to keep loved ones, special moments, or beloved pets with you, serving as a constant reminder of what matters most; dfphoto.net supports you in mastering this art; According to research from the Santa Fe University of Art and Design’s Photography Department, in July 2025, personalized items like lockets enhance emotional well-being by providing a tangible connection to cherished memories.
1.1. Why Are Locket Photos So Meaningful?
Locket photos are meaningful because they provide a tangible link to cherished individuals and memories. These miniature portraits serve as daily reminders of love, friendship, or significant life events.
Lockets have a long history of being used to hold keepsakes and mementos. The act of placing a photo inside a locket transforms it into a deeply personal item, imbued with emotional significance. Wearing a locket with a photo can provide comfort and a sense of connection, especially during times of separation or remembrance; dfphoto.net understands the emotional value of these keepsakes.
1.2. What Types of Photos Work Best in Lockets?
The best photos for lockets are those that are clear, well-lit, and feature the subject’s face prominently; according to Popular Photography, simple compositions work best in small formats. Close-up shots of individuals or pets are ideal, as they ensure that the subject remains recognizable even when reduced to a miniature size.
Avoid photos that are too busy or have excessive background details, as these can become muddled and indistinct when shrunk down. High-resolution images are preferable, as they retain more detail and clarity during the resizing process. Sentimental photos of family, friends, or beloved pets are often the most popular choices for locket photos.
1.3. Where Can You Find Inspiration for Locket Photo Ideas?
Inspiration for locket photo ideas can be found in various places, including family albums, social media, and online photography galleries. Consider photos that capture special moments, such as birthdays, weddings, or graduations; dfphoto.net provides a gallery of inspiring images.
Explore different themes, such as nature scenes, travel destinations, or artistic portraits. Look for images that evoke positive emotions and personal significance; browsing through dfphoto.net can provide a wealth of creative ideas for your locket photos.
2. Essential Tools for Shrinking Photos
Shrinking photos for lockets requires a few essential tools to ensure accuracy and quality. These tools range from measuring instruments to software and hardware designed for photo editing and printing; dfphoto.net recommends using the best tools for optimal results.
2.1. What Measuring Tools Are Necessary?
Accurate measuring tools are crucial for determining the precise dimensions of your locket photo space. A ruler or tape measure with millimeter markings is essential for measuring the height and width of the area where the photo will be inserted; precise measurements guarantee a snug fit.
Consider using digital calipers for even greater precision, especially for irregularly shaped lockets. A small, flexible measuring tape can also be useful for curved or rounded locket designs. Having accurate measurements from the start will save time and prevent frustration during the printing and trimming process.
2.2. What Software Is Best for Resizing Photos?
Photo resizing software is necessary for reducing the dimensions of your chosen image without sacrificing too much quality. Adobe Photoshop is a professional-grade option that offers advanced resizing and editing capabilities; GIMP is a free, open-source alternative that provides similar functionality.
For simpler resizing tasks, online tools like PicResize or ResizePixel can be convenient options. These tools allow you to upload your photo, specify the desired dimensions, and download the resized image quickly and easily; dfphoto.net offers tutorials on using these tools effectively.
2.3. What Printers Produce High-Quality Miniature Photos?
High-quality printers are essential for producing clear and detailed miniature photos for your locket. Inkjet printers are generally preferred for photo printing, as they offer superior color accuracy and resolution compared to laser printers; Epson and Canon are known for producing excellent photo printers.
Consider using photo paper specifically designed for inkjet printers to enhance the vibrancy and longevity of your locket photos. Some printers also offer borderless printing options, which can be useful for creating photos that fit snugly within the locket frame. Regular printer maintenance, such as cleaning the print heads, will help ensure consistent print quality.
 Photo for locket
3. Step-by-Step Guide to Measuring Your Locket
Measuring your locket accurately is the first and most crucial step in creating the perfect locket photo. Precise measurements ensure that your photo fits snugly within the locket frame without any unsightly gaps or overlaps; dfphoto.net provides detailed instructions to guide you through this process.
3.1. How Do You Measure the Locket’s Photo Area?
To measure the locket’s photo area, start by opening the locket and laying it flat on a stable surface. Use a ruler or measuring tape with millimeter markings to measure the height and width of the space where the photo will be inserted.
If the locket has a rim or border, measure the inner dimensions of the rim, as this is the actual area that the photo needs to fill. For irregularly shaped lockets, take multiple measurements at different points to ensure accuracy. Record these measurements carefully, as they will be used to resize your photo later on.
3.2. What if the Locket Is an Unusual Shape?
If your locket is an unusual shape, such as a heart or oval, the measuring process can be a bit more challenging. In these cases, it’s best to create a template to ensure an accurate fit. Start by tracing the outline of the locket’s photo area onto a piece of paper.
Then, use a ruler to measure the maximum height and width of the traced shape. These measurements will give you a general idea of the photo size needed. Cut out the template and test it inside the locket to ensure it fits properly. Adjust the template as needed until you achieve a snug fit; dfphoto.net offers templates for various locket shapes.
3.3. How Do You Account for the Locket’s Rim or Border?
Accounting for the locket’s rim or border is essential to ensure that your photo fits properly within the frame. If the locket has a raised rim, measure the inner dimensions of the rim, as this is the area that the photo needs to fill.
If the rim is flush with the photo area, you may need to slightly reduce the size of your photo to prevent it from being obscured by the rim. A good rule of thumb is to subtract 1-2 millimeters from both the height and width measurements to account for the rim; dfphoto.net provides tips on adjusting photo sizes for different locket designs.
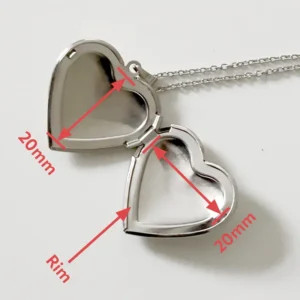 Heart shaped locket measurements
4. Resizing Your Photo Digitally
Resizing your photo digitally is a critical step in preparing it for your locket. Using photo editing software or online tools, you can adjust the dimensions of your image to perfectly fit the locket’s photo area; dfphoto.net offers tutorials on digital photo resizing techniques.
4.1. How to Resize Photos in Adobe Photoshop?
To resize photos in Adobe Photoshop, open your image in the software and navigate to the “Image” menu. Select “Image Size” to open the Image Size dialog box. In this box, you can adjust the width and height of your image.
Make sure the “Resample” option is checked and choose a resampling method like “Bicubic Smoother” for best results. Enter the desired dimensions based on your locket measurements, and click “OK” to apply the changes. Save the resized image as a new file to avoid overwriting the original; Adobe Photoshop is the industry standard, according to Popular Photography.
4.2. How to Resize Photos Using Online Tools?
Resizing photos using online tools is a convenient option for those who don’t have access to professional photo editing software. Websites like PicResize and ResizePixel offer simple and intuitive interfaces for resizing images; dfphoto.net recommends these tools for quick resizing.
Simply upload your photo to the website, enter the desired dimensions, and click the “Resize” button. The website will generate a resized image that you can download to your computer. Be sure to choose the appropriate file format and compression settings to maintain image quality.
4.3. What Resolution Should You Use for Locket Photos?
The resolution of your locket photos is an important factor in ensuring they look clear and detailed when printed. A resolution of 300 dots per inch (DPI) is generally recommended for high-quality photo prints.
However, since locket photos are quite small, you may be able to get away with a lower resolution without sacrificing too much quality. A resolution of 150-200 DPI should be sufficient for most locket photos. When resizing your photo, make sure to maintain the correct aspect ratio to avoid distortion; dfphoto.net provides tips on optimizing resolution for miniature photos.
5. Printing Your Miniature Photo
Printing your miniature photo requires careful attention to detail to ensure that the final result is clear, vibrant, and accurately sized. Using the right printing settings and materials can make a significant difference in the quality of your locket photo; dfphoto.net offers advice on printing techniques for miniature photos.
5.1. What Paper Works Best for Locket Photos?
The best paper for locket photos is a high-quality photo paper that is specifically designed for inkjet printers. Glossy photo paper is a popular choice, as it enhances the vibrancy and sharpness of the image; however, matte photo paper can also work well, especially for vintage or antique-style lockets.
Consider using a thicker photo paper stock for added durability and a more professional feel. Experiment with different paper types to see which one works best with your printer and locket design; dfphoto.net recommends premium photo paper for optimal results.
5.2. How Do You Adjust Printer Settings for Small Photos?
Adjusting your printer settings for small photos is essential to ensure that the image is printed at the correct size and resolution. In your printer’s settings menu, select the appropriate paper type and print quality.
Choose a high-quality print setting to maximize detail and color accuracy. Make sure the “Actual Size” or “100%” option is selected to prevent the printer from automatically resizing the image. Disable any automatic color correction or sharpening features, as these can sometimes distort the image; dfphoto.net provides step-by-step instructions on adjusting printer settings.
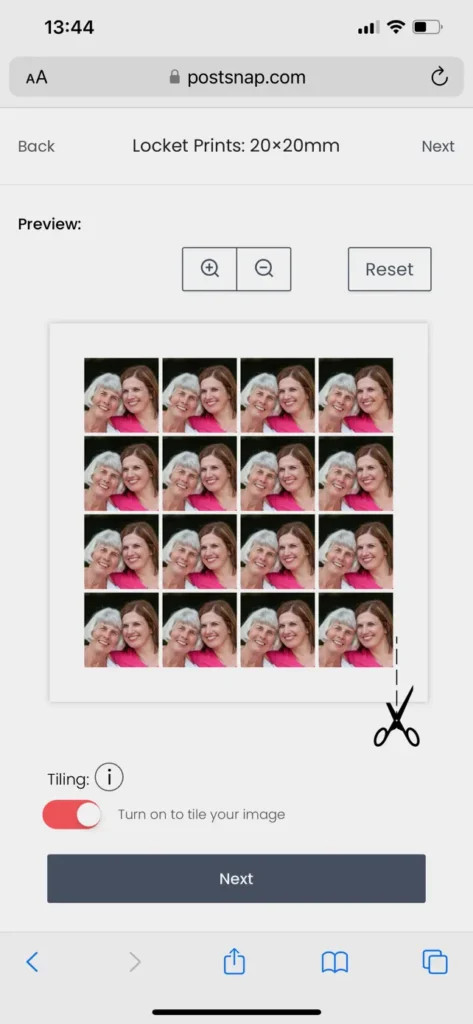
5.3. Should You Print Multiple Photos on One Sheet?
Printing multiple photos on one sheet is a practical way to save paper and ink, especially when printing locket photos. Most photo editing software and online tools allow you to create a collage or contact sheet with multiple copies of your image.
Arrange the photos in a grid pattern, leaving enough space between them for easy cutting. Be sure to double-check the dimensions of each photo before printing to ensure they are accurately sized. This technique can also be useful for experimenting with different cropping or color variations; dfphoto.net offers templates for printing multiple photos on one sheet.
6. Cutting and Trimming Your Photo
Cutting and trimming your photo is the final step in preparing it for your locket. Precision and care are essential to ensure that the photo fits perfectly within the locket frame and looks its best; dfphoto.net provides tips on achieving clean and accurate cuts.
6.1. What Tools Are Best for Cutting Miniature Photos?
The best tools for cutting miniature photos are those that allow for precise and clean cuts. A sharp craft knife or scalpel is ideal for cutting straight lines and intricate shapes.
Use a metal ruler or cutting mat as a guide to ensure accuracy. Small, curved scissors can be useful for trimming rounded edges or corners. A paper trimmer can also be helpful for cutting multiple photos to the same size quickly and easily; dfphoto.net recommends investing in high-quality cutting tools.
6.2. How to Cut Around Curves and Intricate Shapes?
Cutting around curves and intricate shapes requires a steady hand and a bit of patience. Start by tracing the outline of the desired shape onto the back of the photo.
Use small, curved scissors or a craft knife to carefully cut along the traced lines. For tight curves, make multiple small cuts rather than trying to cut the entire curve in one motion. Rotate the photo as needed to maintain a smooth and consistent cutting angle; dfphoto.net offers tutorials on cutting techniques for various shapes.
6.3. What If You Make a Mistake While Cutting?
If you make a mistake while cutting your locket photo, don’t panic. The beauty of printing multiple photos on one sheet is that you have backup copies to work with.
Simply discard the damaged photo and start again with a fresh copy. If you only made a minor mistake, you may be able to salvage the photo by carefully trimming away the affected area. However, it’s generally best to start over to ensure the best possible result; dfphoto.net provides tips on avoiding common cutting mistakes.
7. Inserting the Photo into the Locket
Inserting the photo into the locket is the final step in creating your personalized keepsake. Take your time and handle the photo with care to avoid damaging it; dfphoto.net offers advice on inserting photos safely and securely.
7.1. How to Handle the Photo Without Damaging It?
To handle the photo without damaging it, avoid touching the surface of the image as much as possible. Use clean, dry hands or wear cotton gloves to prevent fingerprints and smudges.
Hold the photo by the edges to avoid bending or creasing it. If necessary, use a soft cloth or brush to gently remove any dust or debris from the surface of the photo; dfphoto.net recommends using archival-quality materials to protect your photos.
7.2. What Tools Can Help with Insertion?
Several tools can help with inserting the photo into the locket without damaging it. A pair of tweezers with fine tips can be useful for positioning the photo precisely within the frame.
A small, pointed tool like a toothpick or needle can help gently push the photo into place. Be careful not to scratch or puncture the photo with these tools. A soft cloth or cotton swab can be used to gently smooth out any wrinkles or air bubbles; dfphoto.net provides a list of recommended tools for locket photo insertion.
7.3. How to Secure the Photo in Place?
To secure the photo in place, you can use a small amount of adhesive or glue. Photo-safe glue dots or double-sided tape are ideal for this purpose, as they won’t damage the photo or the locket.
Apply a small amount of adhesive to the back of the photo, being careful not to use too much. Position the photo within the locket frame and press gently to secure it in place. Allow the adhesive to dry completely before closing the locket; dfphoto.net offers tips on choosing the right adhesive for locket photos.
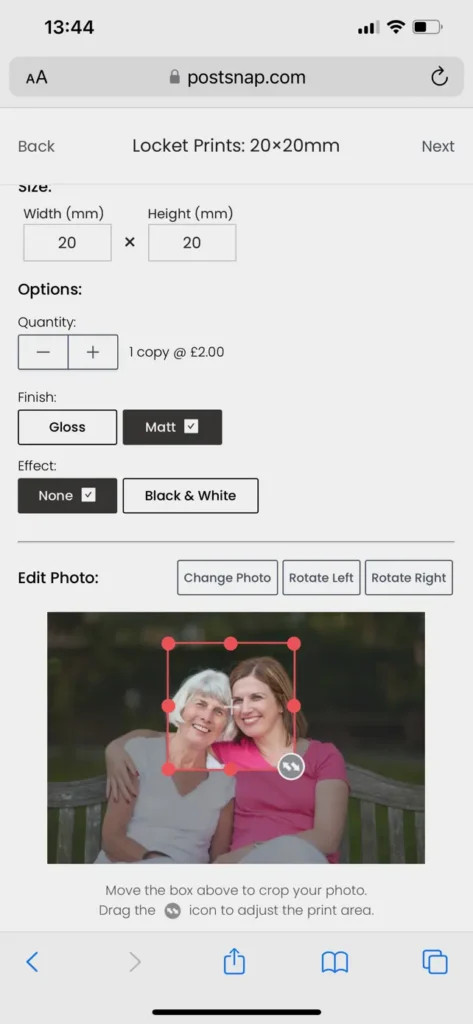 Photo cropped to fit locket necklace
8. Troubleshooting Common Problems
Even with careful planning and execution, you may encounter some common problems when shrinking photos for lockets. Knowing how to troubleshoot these issues can save you time and frustration; dfphoto.net provides solutions to common locket photo problems.
8.1. What If the Photo Is Too Big or Too Small?
If the photo is too big, carefully trim the edges until it fits snugly within the locket frame. If the photo is too small, you can try adding a border around the image to fill the extra space.
Alternatively, you can reprint the photo at a slightly larger size. Be sure to measure the locket’s photo area accurately before resizing the image to avoid this problem in the future; dfphoto.net offers tips on adjusting photo sizes for different locket designs.
8.2. How to Fix Blurry or Pixelated Photos?
Blurry or pixelated photos are often the result of resizing an image too much or using a low-resolution source image. To fix this problem, start with a high-resolution image and avoid resizing it excessively.
Use photo editing software to sharpen the image and reduce noise. If the photo is still blurry or pixelated, you may need to choose a different image or accept a lower level of detail; dfphoto.net provides tutorials on improving image quality for locket photos.
8.3. What to Do About Faded or Discolored Photos?
Faded or discolored photos can be restored using photo editing software. Adjust the brightness, contrast, and color balance to bring the image back to its original condition.
Use the “Curves” or “Levels” tool to fine-tune the tonal range of the photo. If the photo is severely damaged, you may need to consult a professional photo restoration service; dfphoto.net offers tips on restoring old or damaged photos.
9. Creative Ideas for Locket Photos
Beyond traditional portraits, there are many creative ideas for locket photos that can add a personal touch to your keepsake. Consider incorporating meaningful symbols, patterns, or textures into your locket design; dfphoto.net offers inspiration for unique locket photo ideas.
9.1. What Are Some Unique Photo Ideas for Lockets?
Some unique photo ideas for lockets include:
- Miniature landscapes: Capture a favorite vacation spot or natural scene.
- Abstract patterns: Create a visually interesting design with colors and shapes.
- Handwritten notes: Include a snippet of a love letter or special message.
- Pet paw prints: Immortalize your furry friend with a tiny paw print.
- Family crests or symbols: Showcase your heritage and traditions.
- Coordinate of a special place: Remember the place where you met your loved one.
These unique ideas can transform your locket into a truly one-of-a-kind keepsake; dfphoto.net provides a gallery of creative locket photo designs.
9.2. How to Add Text or Graphics to Your Locket Photo?
Adding text or graphics to your locket photo can personalize it and add extra meaning. Use photo editing software to overlay text, symbols, or other graphics onto your image.
Choose a font and color that complement the photo and are easy to read at a small size. Position the text or graphics carefully to avoid obscuring important details in the photo. Consider adding a date, name, or short message to commemorate a special occasion; dfphoto.net offers tutorials on adding text and graphics to photos.
9.3. Can You Use Non-Photo Images in a Locket?
Yes, you can definitely use non-photo images in a locket. Consider incorporating miniature paintings, drawings, or collages into your locket design.
You can also use fabric swatches, pressed flowers, or other small objects that hold personal significance. Get creative and experiment with different materials and techniques to create a unique and meaningful locket; dfphoto.net provides inspiration for using non-photo images in lockets.
 Locket Photo Tiled
10. Caring for Your Locket and Photos
Proper care and maintenance are essential to ensure that your locket and photos last for years to come. Protecting your locket from damage and preserving the quality of your photos will help you cherish your keepsake for a lifetime; dfphoto.net offers advice on caring for lockets and photos.
10.1. How to Clean Your Locket Safely?
To clean your locket safely, use a soft, lint-free cloth to gently wipe away any dirt or debris. Avoid using harsh chemicals or abrasive cleaners, as these can damage the locket’s finish or the photo inside.
For stubborn stains, you can use a mild soap and water solution. Dampen the cloth with the solution and gently wipe the locket, being careful not to get any moisture inside. Dry the locket thoroughly with a clean cloth; dfphoto.net provides a guide to cleaning different types of lockets.
10.2. How to Protect Photos from Fading or Damage?
To protect photos from fading or damage, keep them away from direct sunlight, heat, and humidity. Store your locket in a cool, dry place when you’re not wearing it.
Consider using archival-quality photo sleeves or folders to protect the photos from scratches and dust. Avoid touching the surface of the photos with your bare hands, as oils and acids from your skin can damage them over time; dfphoto.net recommends using archival-quality materials to preserve your photos.
10.3. When to Replace Your Locket Photos?
You may want to replace your locket photos when they become faded, damaged, or outdated. Over time, photos can fade or discolor due to exposure to light and air.
You may also want to update your locket photos to reflect new relationships, milestones, or memories. Replacing your locket photos is a great way to keep your keepsake fresh and relevant; dfphoto.net offers tips on selecting and preparing new locket photos.
FAQ: Shrinking Photos for Lockets
1. What is the average size of a locket photo?
The average size of a locket photo typically ranges from 15mm to 25mm (0.6 to 1 inch) in both width and height, but it varies depending on the specific locket. Always measure your locket’s photo compartment for the most accurate dimensions.
2. Can I use my smartphone to take photos for a locket?
Yes, you can use your smartphone to take photos for a locket. Most modern smartphones have cameras with sufficient megapixels to capture high-resolution images suitable for printing in miniature sizes. Ensure good lighting and focus for the best results.
3. How do I ensure the photo stays centered when shrinking it?
To ensure the photo stays centered when shrinking it, use photo editing software that allows you to crop the image while maintaining the subject’s position in the center. Adjust the crop box to keep the main subject in the middle, then resize the image.
4. What type of finish (matte or glossy) is best for locket photos?
The best finish for locket photos depends on personal preference and the locket’s design. Matte finishes reduce glare and fingerprints, making them suitable for everyday wear. Glossy finishes enhance color vibrancy and sharpness, making them ideal for special occasions.
5. How often should I replace the photos in my locket?
You should replace the photos in your locket as needed, depending on their condition and your preferences. If the photos become faded, damaged, or if you want to update them with new memories, it’s time to replace them.
6. Can I put photos on both sides of a locket?
Yes, you can put photos on both sides of a locket if the design allows it. Measure the photo area for each side and prepare two separate photos according to those dimensions.
7. What’s the best way to preserve very old photos for a locket?
The best way to preserve very old photos for a locket is to scan them at a high resolution and digitally restore them using photo editing software. Print the restored image on archival-quality paper and handle it with care to prevent further damage.
8. Is it better to print locket photos at home or use a professional service?
Whether to print locket photos at home or use a professional service depends on your equipment and expertise. If you have a high-quality printer and photo editing skills, printing at home can be convenient. However, professional services offer superior print quality and specialized materials.
9. What should I do if the locket photo gets stuck?
If the locket photo gets stuck, gently use a pair of fine-tipped tweezers or a thin, blunt tool to carefully lift the photo from the edges. Avoid using excessive force, which could damage the photo or the locket.
10. Can I create a collage for a locket photo?
Yes, you can create a collage for a locket photo using photo editing software. Combine multiple images into a single design, ensuring that the main subjects are clear and well-defined. Resize the collage to fit the locket’s photo area.
Creating a perfect locket photo requires patience, precision, and the right tools, and dfphoto.net is here to guide you through every step; Remember to measure accurately, resize carefully, and handle your photos with care. For more tips, tutorials, and inspiration, visit dfphoto.net today and discover the art of miniature photography. Turn your cherished memories into wearable art and keep your loved ones close to your heart with beautifully crafted locket photos. Don’t wait, start your creative journey now. Discover tips on composition, lighting, and equipment on dfphoto.net, or visit us at 1600 St Michael’s Dr, Santa Fe, NM 87505, United States, or call +1 (505) 471-6001.