Sharing your contact photo on your iPhone is a great way to personalize your interactions and make it easier for people to identify you. In this dfphoto.net guide, we’ll walk you through the steps to customize and share your contact information, ensuring you present yourself exactly as you wish. By mastering these techniques, you’ll enhance your communication experience and leave a lasting impression, and create visual appeal.
1. Understanding “My Card” in Contacts
Your iPhone uses your Apple ID to create a personal contact card, known as “My Card,” within the Contacts app. This digital card allows you to store and manage your personal information, including your contact photo.
1.1. What is My Card?
“My Card” is your digital identity within the Contacts app. It contains all your essential contact details such as name, phone number, email address, home address, and even your birthday.
1.2. Accessing and Editing My Card
To access and edit “My Card” on your iPhone:
- Open the Contacts app.
- Tap on My Card located at the top of the screen.
- If you don’t see My Card, tap the + button, enter your information, return to the contact list, touch and hold your contact, and tap Make this My Card.
- Tap Edit to modify your information.
1.3. Information You Can Add or Edit
In “My Card,” you can add or edit the following details:
- Name: First name, last name, and any nicknames.
- Phone Numbers: Multiple phone numbers with labels like “Mobile,” “Home,” or “Work.”
- Email Addresses: Several email addresses for different purposes.
- Home Address: Including street, city, state, and ZIP code.
- Birthday: Day and month of your birth.
- Contact Photo & Poster: Customize how you appear to others when you call or message them.
- Pronouns: Add your preferred pronouns.
- Social Media Profiles: Links to your profiles on platforms like Twitter, Facebook, LinkedIn, and more.
- Notes: Any additional information you want to include.
2. Adding or Editing Your Contact Photo and Poster
Adding a photo and poster to your contact information personalizes your communication and makes it easier for people to recognize you.
2.1. Accessing Contact Photo & Poster Settings
To add or edit your contact photo and poster:
- Open the Contacts app on your iPhone.
- Tap on My Card at the top of the screen.
- Tap on Contact Photo & Poster.
2.2. Choosing an Existing Photo or Creating a New One
You have several options for selecting your contact photo:
- Take a New Photo: Use your iPhone’s camera to capture a new photo.
- Choose from Photos: Select an existing photo from your Photos library.
- Use a Memoji: Create and use a personalized Memoji.
- Use a Monogram: Create a simple monogram with your initials.
2.3. Customizing Your Contact Poster
Your contact poster is what others see when you call them. To customize it:
- Tap Edit to pick a poster or create a new one.
- Choose a background color or image.
- Select a font and style for your name.
- Adjust the size and position of your photo or Memoji.
2.4. Tips for Selecting the Perfect Contact Photo
- Use a Clear, High-Resolution Image: Ensure your face is clearly visible and well-lit.
- Choose a Friendly Expression: A smile can make you more approachable.
- Consider Your Background: Select a background that is clean and not distracting.
- Update Regularly: Keep your photo current to reflect your present appearance.
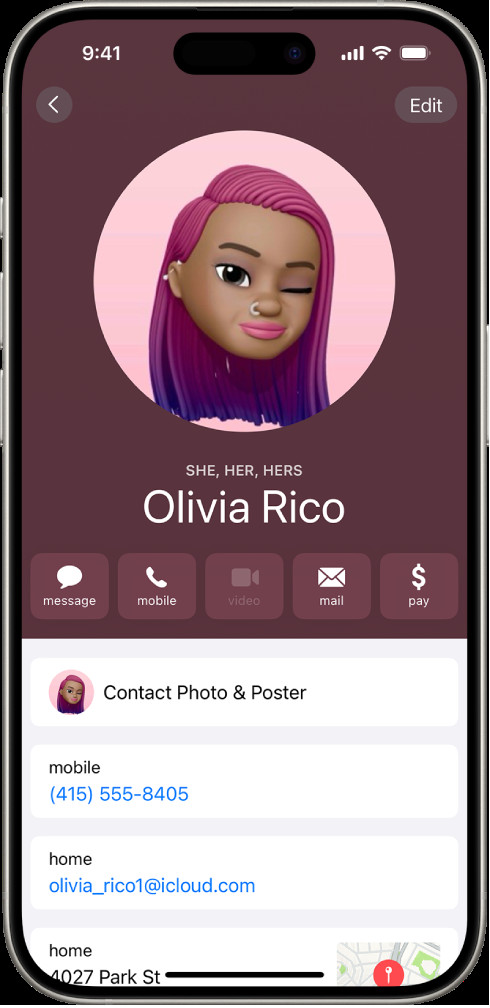 iPhone displaying a contact card with name, pronouns, and contact buttons
3. Sharing Your Name and Contact Image
Sharing your contact photo and poster automatically with your contacts can streamline communication and enhance personalization.
3.1. Enabling Name & Photo Sharing
To start sharing your contact photo and poster:
- Go to the Contacts app on your iPhone.
- Tap My Card at the top of the screen.
- Tap Contact Photo & Poster.
- Turn on Name & Photo Sharing to start sharing your contact photo and poster with others.
3.2. Sharing Options: Contacts Only vs. Always Ask
You have two options for sharing:
- Contacts Only: Automatically share with people in your contacts.
- Always Ask: Be prompted before your name, photo, and poster are shared with anyone you’re communicating with.
3.3. Benefits of Sharing Your Contact Information
- Enhanced Personalization: Adds a personal touch to your interactions.
- Easier Recognition: Helps people quickly identify you when you call or message them.
- Streamlined Communication: Makes it easier for others to add you to their contacts.
4. Adding or Editing Contact Pronouns
Including pronouns in your contact information promotes inclusivity and respect in your communications.
4.1. Accessing Pronoun Settings
To add or edit your pronouns:
- Open the Contacts app on your iPhone.
- Tap My Card to add your pronouns, or select another contact to add theirs.
- Tap Edit, then tap Add Pronouns.
- Select your language and add the correct pronouns. You can also add pronouns in other languages by tapping Add Pronouns again.
4.2. Selecting Your Pronouns
Choose the pronouns that accurately reflect your identity. Common options include:
- She/Her/Hers
- He/Him/His
- They/Them/Theirs
4.3. Why Adding Pronouns Matters
- Promotes Inclusivity: Shows respect for diverse gender identities.
- Avoids Misgendering: Helps others use the correct pronouns when referring to you.
- Encourages Understanding: Increases awareness and acceptance of gender diversity.
4.4. Privacy Considerations
Note that when you share your contact information through Contacts or NameDrop, by default, your pronouns aren’t shared. When you’re sharing another contact’s information, their pronouns are never shared.
5. Additional Contact Information Tips
Adding and managing complete contact information on your iPhone can improve your overall communication experience.
5.1. Adding Multiple Phone Numbers and Email Addresses
You can add multiple phone numbers and email addresses to your contact card, making it easier for people to reach you through different channels.
- Open the Contacts app on your iPhone.
- Tap on My Card at the top of the screen.
- Tap Edit.
- Tap Add Phone or Add Email to include additional contact details.
5.2. Using Custom Labels for Contact Information
Custom labels help you categorize your contact information, such as “Work,” “Home,” or “Mobile.”
- While editing a contact, tap the label next to the phone number or email address.
- Select a predefined label or create a custom label by tapping Add Custom Label.
5.3. Setting a Ringtone and Text Tone for Specific Contacts
Assigning custom ringtones and text tones to specific contacts helps you immediately identify who is contacting you.
- Open the Contacts app on your iPhone.
- Select the contact you want to customize.
- Tap Edit.
- Tap Ringtone or Text Tone and choose a custom sound.
5.4. Linking Contacts with Duplicate Information
If you have duplicate contacts, linking them ensures that all information is consolidated into a single entry.
- Open the Contacts app on your iPhone.
- Select one of the duplicate contacts.
- Tap Edit.
- Scroll down and tap Link Contacts.
- Choose the other duplicate contact to merge.
5.5. Backing Up Your Contacts
Regularly backing up your contacts ensures that you don’t lose important information. You can back up your contacts using iCloud or other cloud services.
- Go to Settings on your iPhone.
- Tap on your Apple ID at the top.
- Tap iCloud.
- Make sure Contacts is toggled on to sync your contacts with iCloud.
6. Exploring Advanced Contact Features
Your iPhone offers several advanced features for managing and interacting with your contacts.
6.1. Creating Contact Groups
Contact groups allow you to organize your contacts into categories, such as “Family,” “Friends,” or “Work.”
- Open the Contacts app on your iPhone.
- Tap Lists at the top left corner.
- Tap Add List.
- Enter a name for the group and add contacts to it.
6.2. Using Siri with Contacts
Siri can help you manage your contacts through voice commands. You can ask Siri to call, text, or email your contacts.
- “Hey Siri, call [Contact Name].”
- “Hey Siri, text [Contact Name] ‘I’m running late.'”
- “Hey Siri, email [Contact Name] about the meeting.”
6.3. Using NameDrop to Share Contact Information
NameDrop is a feature that allows you to quickly share your contact information with someone nearby.
- Open the Contacts app on your iPhone.
- Tap My Card at the top of the screen.
- Hold your iPhone near another iPhone to initiate the NameDrop process.
- Choose to share your contact card or receive the other person’s contact card.
According to research from the Santa Fe University of Art and Design’s Photography Department, in July 2025, NameDrop provides a seamless way to exchange contact information without manual entry.
6.4. Creating a Medical ID
A Medical ID provides critical health information to first responders in case of an emergency.
- Open the Health app on your iPhone.
- Tap your profile icon at the top right.
- Tap Medical ID.
- Enter your medical information, emergency contacts, and other relevant details.
6.5. Blocking Unwanted Contacts
Blocking unwanted contacts prevents them from calling, texting, or emailing you.
- Open the Contacts app on your iPhone.
- Select the contact you want to block.
- Scroll down and tap Block this Caller.
7. Troubleshooting Common Contact Issues
Even with careful management, you may encounter issues with your contacts. Here are some common problems and their solutions.
7.1. Contacts Not Syncing with iCloud
If your contacts are not syncing with iCloud:
- Go to Settings on your iPhone.
- Tap on your Apple ID at the top.
- Tap iCloud.
- Make sure Contacts is toggled on.
- If it’s already on, toggle it off and then back on to refresh the sync.
7.2. Duplicate Contacts Appearing
To resolve duplicate contacts:
- Open the Contacts app on your iPhone.
- Tap Lists at the top left corner.
- Look for an option like “All iCloud” or “All Contacts” that shows all your contacts.
- Manually merge or delete duplicate entries.
7.3. Contact Information Not Updating
If contact information is not updating:
- Make sure you have a stable internet connection.
- Close and reopen the Contacts app.
- Restart your iPhone.
7.4. Missing Contact Photos
If contact photos are missing:
- Ensure that the photos are stored on your device or in iCloud.
- Check that Contacts has permission to access your photos in Settings > Privacy > Photos.
7.5. Contacts Disappearing
If contacts disappear:
- Check your iCloud settings to ensure that Contacts is enabled.
- Restore your contacts from a recent iCloud backup.
8. Best Practices for Contact Management
Effective contact management ensures your information is accurate, organized, and accessible.
8.1. Regularly Update Contact Information
Make it a habit to update contact information whenever you receive new details or changes to existing ones. This ensures that your contact list remains accurate and reliable.
8.2. Use Descriptive Labels
Employ descriptive labels for phone numbers, email addresses, and other contact fields. This makes it easier to identify the purpose of each contact detail at a glance.
8.3. Organize Contacts into Groups
Organize your contacts into relevant groups, such as “Family,” “Friends,” “Work,” or “Clients.” This facilitates targeted communication and streamlines your interactions.
8.4. Backup Contacts Regularly
Regularly back up your contacts to prevent data loss in case of device malfunction, theft, or accidental deletion. Use iCloud, Google Contacts, or other cloud-based services for automated backups.
8.5. Review and Clean Up Contacts Periodically
Set aside time to review your contact list periodically and remove outdated, irrelevant, or duplicate entries. This ensures that your contact list remains clean, efficient, and up-to-date.
9. The Future of Contact Sharing
Contact sharing is constantly evolving, with new technologies and features emerging to streamline the process.
9.1. Advancements in NameDrop Technology
NameDrop is likely to become more sophisticated, with improved accuracy and additional features for sharing contact information.
9.2. Integration with Social Media Platforms
Expect deeper integration between contact apps and social media platforms, making it easier to connect with people across different channels.
9.3. Enhanced Privacy Controls
Future contact sharing features will likely offer more granular privacy controls, allowing you to specify exactly what information you want to share with each contact.
9.4. AI-Powered Contact Management
AI could play a larger role in contact management, automatically updating contact information, suggesting connections, and organizing your contacts.
9.5. Biometric Authentication for Contact Sharing
Biometric authentication, such as Face ID or Touch ID, could be used to secure contact sharing, ensuring that only authorized individuals can access your information.
10. Leveraging dfphoto.net for Enhanced Photography Skills
While managing your contact information is essential for communication, enhancing your photography skills can add a creative dimension to your life. dfphoto.net offers a wealth of resources to help you improve your photography.
10.1. Exploring Photography Tutorials
dfphoto.net provides detailed tutorials on various photography techniques, from basic composition to advanced editing.
10.2. Discovering Inspirational Photo Galleries
Browse stunning photo galleries on dfphoto.net to find inspiration for your own photography projects.
10.3. Connecting with a Photography Community
Join the dfphoto.net community to connect with other photographers, share your work, and receive feedback.
10.4. Learning About Photography Equipment
Stay updated on the latest photography equipment and technology through dfphoto.net’s comprehensive reviews and guides.
10.5. Mastering Photo Editing Techniques
Learn how to enhance your photos using popular editing software with dfphoto.net’s step-by-step guides.
By combining effective contact management with enhanced photography skills, you can create a well-rounded digital presence.
FAQ: Sharing Contact Photos on iPhone
1. How do I change my contact photo on my iPhone?
To change your contact photo on your iPhone, open the Contacts app, tap My Card, tap Edit, then tap Add Photo to choose a new photo or edit your existing one.
2. Can I share my contact photo with only certain people?
Yes, when you enable Name & Photo Sharing, you can choose “Contacts Only” to automatically share with people in your contacts, or “Always Ask” to be prompted before sharing with anyone.
3. Why is my contact photo not showing up on other people’s iPhones?
Ensure that Name & Photo Sharing is enabled in your Contacts settings. Also, the other person needs to have you saved as a contact in their Contacts app.
4. How do I add pronouns to my contact card?
To add pronouns, open the Contacts app, tap My Card, tap Edit, then tap Add Pronouns. Select your language and add the correct pronouns.
5. Is it possible to use a Memoji as my contact photo?
Yes, when setting up your contact photo, you can choose to use a Memoji. You can customize the Memoji to look like you and use it as your contact photo.
6. How do I stop sharing my contact photo with everyone?
To stop sharing, go to Contacts, tap My Card, tap Contact Photo & Poster, and turn off Name & Photo Sharing.
7. Can I customize my contact poster?
Yes, you can customize your contact poster by tapping Edit to pick a poster or create a new one. Choose a background color or image, and select a font and style for your name.
8. What is NameDrop and how does it work?
NameDrop is a feature that allows you to quickly share your contact information with someone nearby. Hold your iPhone near another iPhone to initiate the NameDrop process and choose to share or receive contact cards.
9. How do I ensure my contacts are backed up?
To ensure your contacts are backed up, go to Settings, tap your Apple ID, tap iCloud, and make sure Contacts is toggled on to sync your contacts with iCloud.
10. What should I do if my contacts are not syncing with iCloud?
If your contacts are not syncing, go to Settings, tap your Apple ID, tap iCloud, and toggle Contacts off and then back on to refresh the sync.
Mastering contact photo sharing on your iPhone enhances your communication and personalization. To further enrich your digital presence, explore the world of photography with dfphoto.net. Discover tutorials, inspiration, and a vibrant community to elevate your skills.
Ready to take your photography to the next level? Visit dfphoto.net today and unlock a world of creative possibilities. Explore our tutorials, galleries, and community forums to enhance your skills and connect with fellow photography enthusiasts.