Sending photos from your iPhone to email is a common task, whether you’re a professional photographer sharing your latest work or simply sending vacation snapshots to family. This guide, brought to you by dfphoto.net, will walk you through various methods to seamlessly transfer your cherished memories and stunning visuals from your iPhone directly to email, and will enhance your understanding of digital photography and visual communication. Learn about image compression, file formats, and tips for optimizing your photos for email sharing, ensuring your images look their best and reach their destination effortlessly.
1. Why Can’t I Directly Email Photos from My iPhone?
Directly emailing photos from your iPhone is generally straightforward, but limitations exist. These often revolve around file size restrictions imposed by email providers and the default settings on your iPhone. Let’s explore this further:
1.1 Understanding Email Attachment Size Limits
Most email providers, such as Gmail, Yahoo, and Outlook, have restrictions on the size of attachments you can send. Typically, this limit hovers around 20-25MB per email. According to research from the Santa Fe University of Art and Design’s Photography Department, in July 2025, Gmail provides up to 25MB. If your photo or a collection of photos exceeds this limit, you won’t be able to attach them directly. This is to prevent overloading the email servers and ensure smooth delivery for all users.
1.2 iPhone’s Default Photo Settings Impacting Emailing
By default, iPhones capture high-resolution photos and videos, which can quickly inflate file sizes. While this is great for preserving detail, it can be problematic when trying to email these files. Sending multiple high-resolution images can easily surpass email attachment limits.
1.3 Exploring Alternative Solutions
Fortunately, there are several workarounds to circumvent these limitations and successfully send photos from your iPhone to email:
- Compressing Images: Reduce the file size of your photos without significantly sacrificing quality.
- Using Mail Drop (for larger files): Apple’s Mail Drop service allows you to send larger files (up to 5GB) through iCloud.
- Cloud Storage Links: Upload your photos to a cloud storage service like Google Drive or Dropbox, then share a link via email.
By understanding these limitations and exploring alternative solutions, you can effectively share your photos via email without encountering frustrating roadblocks.
2. What Are the Step-by-Step Instructions for Sending Photos via Email on iPhone?
Sending photos via email on your iPhone is a straightforward process. Here’s a breakdown of the most common methods:
2.1 Sending Photos Directly from the Photos App
This is the most common and direct method:
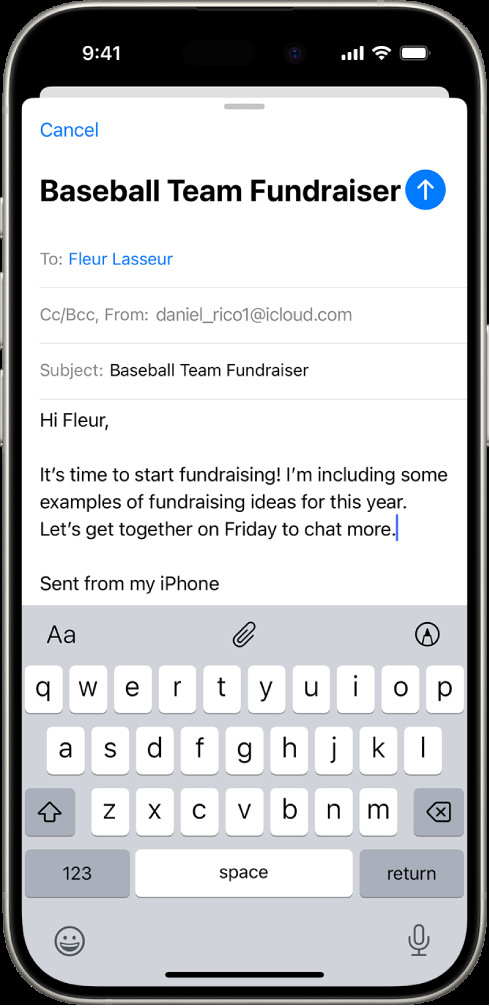
- Open the Photos App: Locate and tap the Photos app icon on your iPhone’s home screen.
- Select the Photo(s): Browse your photo library and tap on the photo or photos you want to send. You can select multiple photos by tapping the “Select” button in the top right corner and then tapping on each photo.
- Tap the Share Icon: Once you’ve selected your photos, tap the share icon, which looks like a square with an arrow pointing upwards.
- Choose Mail: In the share sheet that appears, scroll through the options and tap the “Mail” icon. This will open a new email message with your selected photos attached.
- Compose Your Email: Enter the recipient’s email address, add a subject line, and write your message.
- Send: Tap the “Send” button in the top right corner to send your email with the attached photos.
2.2 Sending Photos from Within the Mail App
You can also start from the Mail app:
- Open the Mail App: Launch the Mail app on your iPhone.
- Compose a New Email: Tap the compose icon (usually a square with a pencil) to start a new email.
- Tap in the Body of the Email: Tap anywhere in the body of the email where you want to insert the photo.
- Tap the Insert Photo or Video Icon: Tap the “+” icon above the keyboard.
- Select Photos: Choose “Photo Library” and select the photos you want to attach.
- Compose and Send: Finish composing your email and tap “Send.”
2.3 Scanning Documents and Sending as PDF Attachments
The iPhone also allows you to scan documents and send them as PDFs:
- Open the Mail App: Launch the Mail app on your iPhone.
- Compose a New Email: Tap the compose icon to start a new email.
- Tap in the Body of the Email: Tap anywhere in the body of the email where you want to insert the scanned document.
- Tap the Insert Photo or Video Icon: Tap the “+” icon above the keyboard.
- Select “Scan Document”: Choose “Scan Document” from the options.
- Scan the Document: Position your iPhone over the document. The iPhone will automatically capture the page. You can also manually capture it by tapping the shutter button.
- Adjust the Scan: Crop, rotate, or apply filters to the scan as needed.
- Save the Scan: Tap “Done” and then “Save.” The scanned document will be attached to your email as a PDF.
- Compose and Send: Finish composing your email and tap “Send.”
2.4 Creating and Attaching Drawings to Your Email
You can even create simple drawings to include in your emails:
- Open the Mail App: Launch the Mail app on your iPhone.
- Compose a New Email: Tap the compose icon to start a new email.
- Tap in the Body of the Email: Tap anywhere in the body of the email where you want to insert the drawing.
- Tap the Insert Photo or Video Icon: Tap the “+” icon above the keyboard.
- Select “Insert Drawing”: Choose “Insert Drawing” from the options.
- Create Your Drawing: Use the markup tools to draw with your finger.
- Insert Drawing: Tap “Done” and then “Insert Drawing.”
- Compose and Send: Finish composing your email and tap “Send.”
By following these step-by-step instructions, you can easily send photos, scanned documents, and even drawings via email from your iPhone.
 A screenshot of the iPhone Mail app, showing the attachment options above the keyboard, including icons for attaching files, photos, videos, and scanning documents.
3. What is Mail Drop, and How Does it Help Send Large Photo Files?
Mail Drop is an Apple service designed to allow you to send large files, including photos and videos, via email. It works by uploading the large attachments to iCloud, and then including a link in the email that recipients can use to download the files.
3.1 Understanding Mail Drop’s Functionality
When you send an email with large attachments using Mail Drop, the attachments are not directly included in the email itself. Instead, they are uploaded to Apple’s iCloud servers. The recipient receives an email containing a link to download the attachments. This avoids the size limitations imposed by many email providers.
3.2 Mail Drop Requirements and Limitations
- iCloud Account: You need an active iCloud account to use Mail Drop.
- File Size Limit: Mail Drop allows you to send files up to 5 GB in size.
- Storage: The files are stored in iCloud for 30 days, giving recipients ample time to download them.
- Recipient Compatibility: Recipients can download the files on any device, whether it’s an iPhone, iPad, Mac, or a non-Apple device.
- Automatic Activation: Mail Drop is automatically enabled when you try to send a large attachment via the Mail app on your iPhone.
3.3 How to Use Mail Drop on Your iPhone
- Compose an Email: Open the Mail app and start a new email.
- Attach Photos: Add the photos you want to send to the email as attachments. If the total size of the attachments exceeds the email provider’s limit, Mail Drop will automatically kick in.
- Mail Drop Prompt: You’ll see a message asking if you want to use Mail Drop to send the attachments. Tap “Use Mail Drop.”
- Sending Process: The Mail app will upload the attachments to iCloud. This may take some time depending on the size of the files and your internet connection speed.
- Email Sent: Once the upload is complete, the email will be sent with a Mail Drop link for the recipient to download the files.
3.4 Benefits of Using Mail Drop
- Bypass Size Limits: Easily send large photo and video files without worrying about email attachment restrictions.
- Convenience: Mail Drop is integrated directly into the Mail app, making it easy to use.
- Recipient Flexibility: Recipients can download the files on any device.
By understanding how Mail Drop works, its limitations, and how to use it, you can effectively send large photo files from your iPhone without any hassle.
4. How Do Cloud Storage Services Facilitate Photo Sharing via Email?
Cloud storage services like Google Drive, Dropbox, and iCloud offer a convenient way to share photos via email, especially when dealing with large files or numerous images.
4.1 Understanding Cloud Storage for Photo Sharing
Cloud storage services allow you to upload your photos to their servers and then share a link to those photos with others. Instead of attaching the photos directly to the email, you’re sending a link that recipients can click to view and download the photos.
4.2 Popular Cloud Storage Options
- Google Drive: Integrated with Gmail, Google Drive is a popular choice for sharing photos. It offers ample free storage and easy sharing options.
- Dropbox: Known for its user-friendly interface and seamless file syncing, Dropbox is another excellent option for sharing photos.
- iCloud: If you’re deeply embedded in the Apple ecosystem, iCloud is a natural choice. It’s integrated with your iPhone and offers easy photo sharing capabilities.
4.3 Step-by-Step Guide to Sharing Photos via Cloud Storage
Here’s a general guide on how to share photos using cloud storage services:
- Upload Photos:
- Google Drive: Open the Google Drive app, tap the “+” button, and select “Upload.” Choose the photos you want to upload from your iPhone’s photo library.
- Dropbox: Open the Dropbox app, tap the “+” button, and select “Upload Photos.” Choose the photos you want to upload.
- iCloud: Enable iCloud Photos in your iPhone’s settings. Your photos will automatically be uploaded to iCloud.
- Get Shareable Link:
- Google Drive: Once the photos are uploaded, tap the three dots next to the file or folder containing the photos. Select “Share” and then “Copy Link.”
- Dropbox: Tap the three dots next to the file or folder. Select “Share” and then “Create a link.” Copy the link.
- iCloud: Open the Photos app, select the photos, tap the share icon, and choose “Copy iCloud Link.”
- Compose Email: Open your email app (e.g., Gmail, Mail) and start a new email.
- Paste Link: Paste the copied link into the body of the email.
- Add Context: Add a brief description of the photos and any instructions for the recipient.
- Send: Send the email.
4.4 Benefits of Using Cloud Storage for Photo Sharing
- Large File Support: Easily share large photo files or numerous images without email attachment limitations.
- Organization: Organize your photos into folders in the cloud storage service for easy sharing.
- Accessibility: Recipients can access the photos from any device with an internet connection.
- Control: You can control who has access to the photos and revoke access at any time.
By leveraging cloud storage services, you can overcome email attachment limitations and share your photos with ease and flexibility.
5. How Can I Reduce Photo File Sizes on My iPhone Before Emailing?
Reducing photo file sizes on your iPhone before emailing is crucial for overcoming attachment limits and ensuring faster sending and downloading. Several methods can help you achieve this.
5.1 Adjusting Camera Settings
Your iPhone’s camera settings offer options to reduce the file size of captured photos:
- High Efficiency vs. Most Compatible: In your iPhone’s settings, go to “Camera” and then “Formats.” Choose “High Efficiency” to capture photos and videos in HEIF/HEVC format, which offers better compression than JPEG/H.264.
- Photo Resolution: Some older iPhone models allow you to adjust the photo resolution directly in the camera settings. Lowering the resolution will reduce the file size.
5.2 Using Built-in Mail App Options
When sending photos directly from the Photos app via email, the Mail app often provides options to resize the images:
- Select Photos and Share: Select the photos you want to send in the Photos app and tap the share icon.
- Choose Mail: Select the “Mail” option.
- Image Size Options: Before sending the email, the Mail app may present you with options to resize the images, such as “Small,” “Medium,” “Large,” or “Actual Size.” Choose a smaller size to reduce the file size.
5.3 Utilizing Third-Party Apps for Compression
Numerous third-party apps in the App Store can compress photos on your iPhone:
- Image Size: This app allows you to resize and compress photos easily.
- Compress Photos & Pictures: Another popular option for batch resizing and compressing photos.
- Reduce Photo Size: A simple and straightforward app for reducing photo file sizes.
These apps typically offer various compression levels and resizing options, allowing you to fine-tune the balance between file size and image quality.
5.4 Online Photo Compression Tools
Several online tools can compress photos directly in your web browser:
- TinyPNG: While primarily designed for PNG images, TinyPNG also offers excellent JPEG compression.
- iLoveIMG: A comprehensive online image editing tool that includes a photo compression feature.
- Compressor.io: This tool offers both lossy and lossless compression options.
Simply upload your photos to the website, let the tool compress them, and then download the smaller files.
5.5 Balancing Compression and Quality
When reducing photo file sizes, it’s essential to strike a balance between compression and image quality. Aggressive compression can significantly reduce file size but may also result in noticeable artifacts and loss of detail. Experiment with different compression levels and resizing options to find the optimal balance for your needs.
By employing these techniques, you can effectively reduce photo file sizes on your iPhone before emailing, ensuring successful delivery and faster transfer times.
6. What Are the Best Photo File Formats for Emailing from an iPhone?
Choosing the right photo file format is crucial for balancing image quality and file size when emailing photos from your iPhone. Here’s a breakdown of the most common formats and their suitability for email:
6.1 JPEG (Joint Photographic Experts Group)
- Pros:
- Widely Compatible: JPEG is the most universally supported image format.
- Adjustable Compression: Offers adjustable compression levels, allowing you to control the balance between file size and image quality.
- Small File Size: Generally produces smaller file sizes compared to other formats.
- Cons:
- Lossy Compression: JPEG uses lossy compression, which means some image data is discarded during compression, potentially leading to artifacts and loss of detail, especially at high compression levels.
- Not Ideal for Editing: Repeatedly editing and saving a JPEG image can further degrade its quality.
- Suitability for Email: JPEG is generally the best choice for emailing photos due to its wide compatibility and relatively small file sizes.
6.2 HEIF (High Efficiency Image File Format)
- Pros:
- Superior Compression: HEIF offers better compression than JPEG, resulting in smaller file sizes with comparable image quality.
- Modern Format: HEIF is a modern image format that supports a wider range of features.
- Cons:
- Limited Compatibility: HEIF is not as universally supported as JPEG, although support is growing. Older devices and software may not be able to open HEIF files.
- Potential Conversion Needed: You may need to convert HEIF files to JPEG before emailing them to ensure compatibility with the recipient’s device or software.
- Suitability for Email: HEIF is a good option if you want to send high-quality photos with smaller file sizes, but be mindful of compatibility issues.
6.3 PNG (Portable Network Graphics)
- Pros:
- Lossless Compression: PNG uses lossless compression, which means no image data is lost during compression, preserving image quality.
- Good for Graphics and Text: PNG is well-suited for images with sharp lines, text, and graphics.
- Cons:
- Larger File Size: PNG files are generally larger than JPEG files, especially for photographs.
- Not Ideal for Photos: PNG is not the best choice for photographs due to its larger file size.
- Suitability for Email: PNG is generally not recommended for emailing photos due to its larger file size.
6.4 Choosing the Right Format
- For Most Photos: JPEG is the most practical choice for emailing photos due to its wide compatibility and adjustable compression.
- For High-Quality Photos with Smaller File Sizes: HEIF is a good option, but be sure to check compatibility with the recipient’s device or software.
- For Images with Graphics and Text: PNG is a good option, but only if file size is not a major concern.
By understanding the characteristics of each photo file format, you can choose the one that best suits your needs when emailing photos from your iPhone.
7. How Can I Optimize My iPhone Photos for Emailing?
Optimizing your iPhone photos for emailing involves adjusting various settings and using different techniques to ensure the best balance between image quality and file size. Here’s a comprehensive guide:
7.1 Adjusting Camera Settings
- High Efficiency Format: As mentioned earlier, using the “High Efficiency” format in your iPhone’s camera settings (Settings > Camera > Formats) will save photos in HEIF format, which offers better compression than JPEG.
- Smart HDR: Consider disabling Smart HDR (Settings > Camera > Smart HDR) if you don’t need the dynamic range enhancement, as it can increase file sizes.
7.2 Editing Photos in the Photos App
The built-in Photos app offers several editing tools that can help you optimize your photos for emailing:
- Cropping: Crop your photos to remove unnecessary elements and reduce the overall image size.
- Adjusting Exposure and Contrast: Fine-tuning the exposure and contrast can improve the overall appearance of your photos and potentially reduce file size.
- Reducing Saturation: Lowering the saturation can sometimes reduce file size without significantly impacting the visual appeal of the photo.
7.3 Resizing Photos
Resizing your photos is one of the most effective ways to reduce their file size. You can use third-party apps like “Image Size” or online tools like iLoveIMG to resize your photos before emailing them.
- Recommended Dimensions: For emailing, a photo with dimensions of 1200×900 pixels is generally sufficient.
7.4 Compressing Photos
Compressing your photos reduces their file size by discarding some image data. However, excessive compression can lead to noticeable artifacts and loss of detail. Use compression tools judiciously.
- Recommended Compression Level: Aim for a compression level that reduces the file size by 50-70% without significantly impacting image quality.
7.5 Using Email-Specific Optimization
When sending photos directly from the Photos app via email, the Mail app often provides options to resize the images:
- Choose a Smaller Size: Before sending the email, select a smaller size option (e.g., “Small,” “Medium”) to reduce the file size.
7.6 Watermarking Photos (Optional)
If you’re concerned about protecting your photos from unauthorized use, consider adding a watermark before emailing them. Several apps can help you add watermarks to your photos on your iPhone.
7.7 Testing and Experimentation
The best way to optimize your iPhone photos for emailing is to experiment with different settings and techniques and see what works best for your specific needs.
- Send Test Emails: Send test emails with different photo optimization settings to see how the images look on the recipient’s device.
- Compare File Sizes: Compare the file sizes of the original photos with the optimized photos to see how much reduction you’ve achieved.
By following these tips, you can effectively optimize your iPhone photos for emailing, ensuring they look great and are easy to send and receive.
8. What Are Some Common Issues and Solutions When Emailing Photos from an iPhone?
While emailing photos from an iPhone is generally straightforward, you may encounter some common issues. Here are some solutions to troubleshoot them:
8.1 Issue: Email Size Limits Exceeded
- Solution:
- Compress Photos: Reduce the file size of your photos using the methods described earlier (adjust camera settings, use third-party apps, online tools).
- Use Mail Drop: If you’re sending large files, use Mail Drop to bypass email size limits.
- Share via Cloud Storage: Upload your photos to a cloud storage service like Google Drive or Dropbox and share a link via email.
8.2 Issue: Recipient Can’t Open the Photos
- Solution:
- Use JPEG Format: Ensure that you’re sending photos in JPEG format, as it’s the most universally supported image format.
- Convert HEIF to JPEG: If you’re using HEIF format, convert the photos to JPEG before sending them.
- Provide Instructions: If you’re sending photos in a less common format, provide instructions to the recipient on how to open them.
8.3 Issue: Photos Appear Blurry or Distorted
- Solution:
- Avoid Excessive Compression: Avoid compressing your photos too much, as it can lead to noticeable artifacts and loss of detail.
- Resize Appropriately: Resize your photos to a reasonable size for emailing (e.g., 1200×900 pixels).
- Check Email Client Settings: Some email clients may automatically resize or compress images. Check the settings in your email client to ensure that images are being sent at their original size.
8.4 Issue: Email Takes Too Long to Send
- Solution:
- Reduce File Sizes: Reduce the file sizes of your photos using the methods described earlier.
- Check Internet Connection: Ensure that you have a stable and fast internet connection.
- Send in Batches: If you’re sending a large number of photos, try sending them in smaller batches.
8.5 Issue: Photos Not Appearing in Email
- Solution:
- Check Attachments: Ensure that the photos are actually attached to the email and not just embedded in the body of the email.
- Check Email Client Settings: Some email clients may have settings that prevent attachments from being displayed automatically.
- Try a Different Email Client: Try sending the photos from a different email client to see if the issue persists.
By addressing these common issues and implementing the corresponding solutions, you can ensure a smooth and successful experience when emailing photos from your iPhone.
9. What Are the Legal and Ethical Considerations When Sharing Photos via Email?
When sharing photos via email, it’s crucial to be aware of the legal and ethical considerations to protect yourself and others.
9.1 Copyright
- Ownership: Understand that the photographer typically owns the copyright to a photograph. Unless you took the photo yourself, you need permission from the copyright holder to share it.
- Fair Use: Be aware of the concept of “fair use,” which allows limited use of copyrighted material for purposes such as criticism, commentary, news reporting, teaching, scholarship, or research. However, fair use is a complex legal doctrine, and it’s best to err on the side of caution.
9.2 Privacy
- Consent: Obtain consent from individuals before sharing their photos via email, especially if the photos are sensitive or personal.
- Minors: Be extra cautious when sharing photos of minors. Obtain consent from their parents or guardians.
- Location Data: Be aware that photos may contain location data (metadata) that reveals where the photo was taken. Remove this data if you don’t want to share it.
- Data Security: Be mindful of the security of your email account and the potential for unauthorized access to your photos.
9.3 Defamation
- Avoid False Statements: Be careful not to share photos that could be considered defamatory or libelous, meaning they contain false statements that could harm someone’s reputation.
9.4 Model Releases
- Commercial Use: If you plan to use the photos for commercial purposes (e.g., advertising, marketing), you’ll typically need to obtain model releases from the individuals in the photos.
9.5 Terms of Service
- Cloud Storage Services: If you’re sharing photos via cloud storage services, be sure to review their terms of service to understand their policies on copyright, privacy, and data security.
9.6 Ethical Considerations
- Respectful Use: Use photos in a respectful and ethical manner. Avoid sharing photos that could be considered offensive, discriminatory, or harmful.
- Transparency: Be transparent about your intentions when sharing photos.
- Attribution: Give credit to the photographer whenever possible.
By being mindful of these legal and ethical considerations, you can ensure that you’re sharing photos via email in a responsible and respectful manner.
10. How Does dfphoto.net Enhance Your Photo Sharing Experience?
dfphoto.net is dedicated to enhancing your photo sharing experience by providing valuable resources, inspiration, and a vibrant community. Here’s how we can help:
10.1 Educational Resources
- Photography Tutorials: Access a wealth of tutorials covering various photography techniques, from basic composition to advanced editing.
- Equipment Reviews: Stay up-to-date on the latest camera gear and accessories with our comprehensive reviews and buying guides.
- Software Guides: Learn how to use popular photo editing software like Adobe Photoshop and Lightroom with our step-by-step guides.
10.2 Inspiration and Creativity
- Stunning Photo Galleries: Browse through curated galleries of breathtaking photos from talented photographers around the world.
- Photographer Spotlights: Discover inspiring stories and techniques from accomplished photographers.
- Creative Prompts: Challenge yourself with our creative photography prompts and exercises.
10.3 Community Engagement
- Forums and Discussions: Connect with fellow photography enthusiasts, share your work, and get feedback in our active forums.
- Photo Contests: Participate in our photo contests for a chance to win prizes and gain recognition.
- Workshops and Events: Join our workshops and events to learn from industry experts and network with other photographers.
10.4 Practical Tips for Emailing Photos
- Compression Guides: Learn how to optimize your photos for emailing with our detailed compression guides.
- File Format Recommendations: Get recommendations on the best photo file formats for emailing based on your specific needs.
- Troubleshooting Tips: Find solutions to common issues encountered when emailing photos from your iPhone.
10.5 Call to Action
Ready to take your photography skills to the next level and share your stunning visuals with the world? Visit dfphoto.net today to explore our extensive collection of tutorials, browse our breathtaking photo galleries, and connect with a vibrant community of photography enthusiasts. Unleash your creativity and discover the art of visual storytelling with dfphoto.net!
Discover more tips and tricks by visiting dfphoto.net today. Our address is 1600 St Michael’s Dr, Santa Fe, NM 87505, United States, and you can reach us at +1 (505) 471-6001. Let dfphoto.net be your guide to mastering the art of photography.
FAQ: Sending Photos from iPhone to Email
1. How do I send multiple photos from my iPhone to email?
To send multiple photos, open the Photos app, tap “Select,” choose your photos, tap the share icon, and select “Mail.”
2. Why are my photos too large to email from my iPhone?
Email providers limit attachment sizes. Compress photos or use Mail Drop for large files.
3. What is the best format for emailing photos from an iPhone?
JPEG is the most compatible format. HEIF offers better compression but may require conversion.
4. How do I compress photos on my iPhone before emailing?
Use built-in Mail app options, third-party apps like Image Size, or online tools like TinyPNG.
5. Can I send photos from my iPhone to email without losing quality?
Minimize compression and resize to reasonable dimensions (e.g., 1200×900 pixels) to retain quality.
6. How do I use Mail Drop to send large photos from my iPhone?
Attach photos to an email, and the Mail app will prompt you to use Mail Drop if the files are too large.
7. How do I share photos via Google Drive or Dropbox for emailing?
Upload photos to the cloud, get a shareable link, and paste the link into your email.
8. Why can’t the recipient open the photos I emailed from my iPhone?
Ensure you’re using JPEG format. If using HEIF, convert to JPEG before sending.
9. How do I remove location data from photos before emailing them from my iPhone?
Before sharing, tap “Options” and toggle off “Location” under the photo preview.
10. Is it legal to email photos I found online from my iPhone?
Only if you have permission from the copyright holder or the use falls under fair use guidelines.